DU ART COLLECTION
X
Printing: Teaching Resource

Durham University's Art Collection
Durham is home to a significant collection of 20th and 21st century art.
The 'Western Art Collection' is utilised throughout Durham University and features prints, drawings, paintings and sculpture. Collection themes include Pop Art, British Modernism, the St Ives Group and mining art. Print-based artworks are one of the collection’s core strengths, offering insights into the key printing techniques used by artists, including woodcuts, lithographs, screenprints and digital prints. See some of our collection highlights here.
This resource has been designed for teachers of primary-aged children as a lesson plan for teaching about types of printmaking.
An Introduction to Printing
printmaking /ˈprɪntmeɪkɪŋ/ Learn to pronounce
noun
The activity or occupation of making pictures or designs by printing them from specially prepared plates or blocks.
Example: "traditional Japanese woodblock printmaking"
-Oxford Language Dictionary 2021
Printing, or printmaking, is an artistic technique. Prints can be produced by drawing or carving an image onto a hard surface (such as a wood block, metal plate, or stone), using stencils (such as silkscreen printing) or adding material to a surface to make a raised stamp to print from.
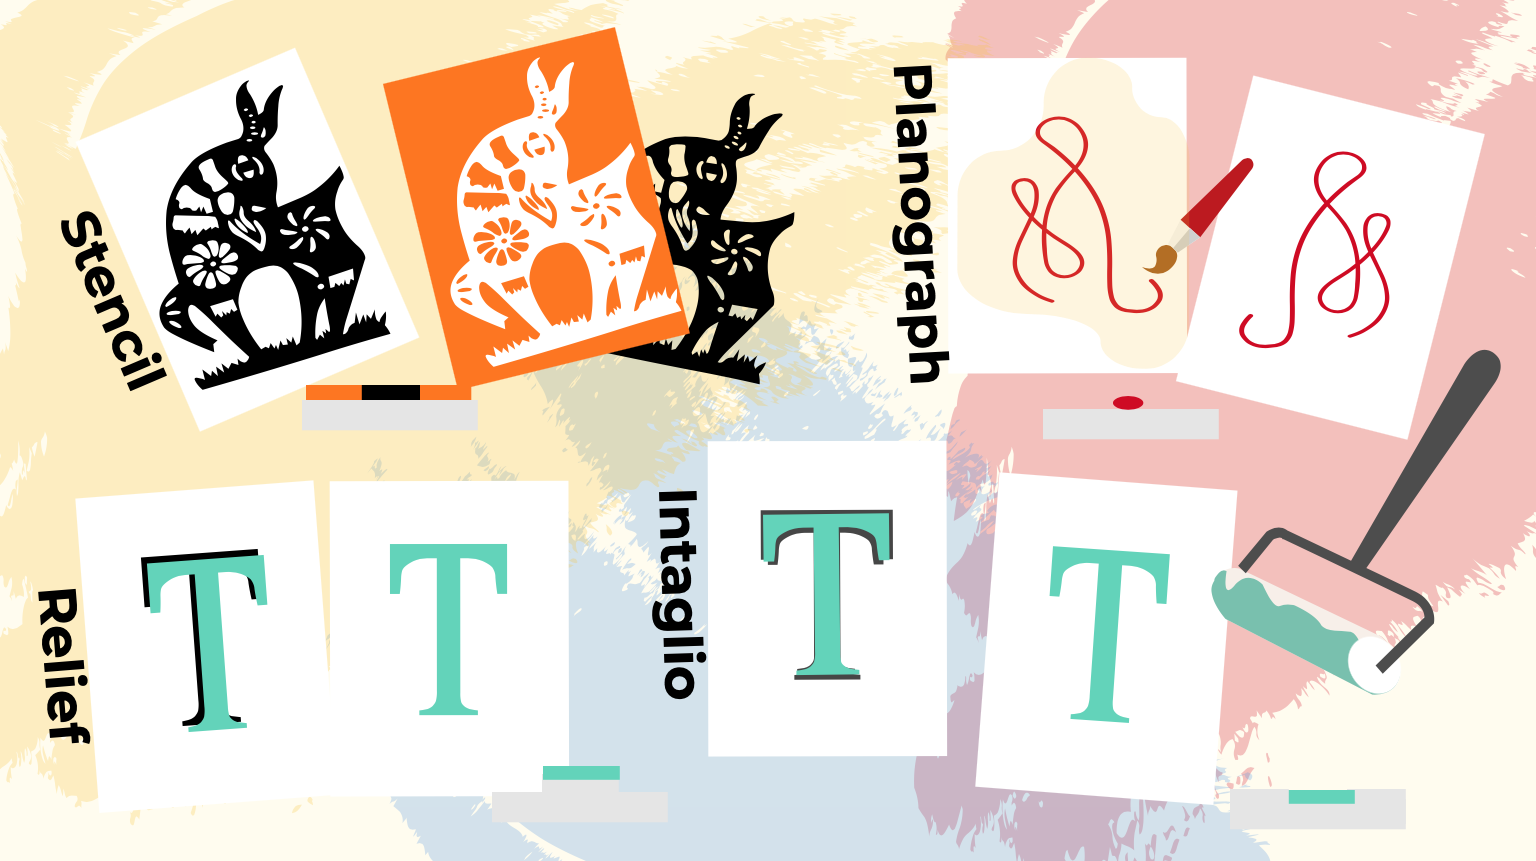
The four main types of printmaking are: Relief, Intaglio, Planography and Stencil. This resource will explore these types of printmaking by:
- Learning how each printing technique is defined.
- Looking at an artist from Durham University's Art Collection who has each technique.
- Introducing an example activity to put learning into practice.


Types of Printing resource image
Types of Printing resource image
Lesson Plan: Types of Printing
Objectives:
- Learn about the four main printing techniques.
- Learn how printing techniques differ and look at examples.
- Learn about artists who use these techniques.
- Learn new printing skills.
Skills developed:
- Ability to identify different types of printmaking.
- Increased creative confidence and new artistic skills.
- Art knowledge, conversation and language.
Below are links to further fantastic online resources all about printing:
Art Class Curator: Block Printing
Royal Academy of Art: How to Relief Print
Warm up challenges:
Warm up challenges are a great way to get your class thinking outside the box!
- To start a conversation, try a simple word game to describe an artwork. For example, show this artwork by Damien Hirst to the class, alongside a selection of descriptive words. Ask the class to pick and explain which words they think fit with this work.

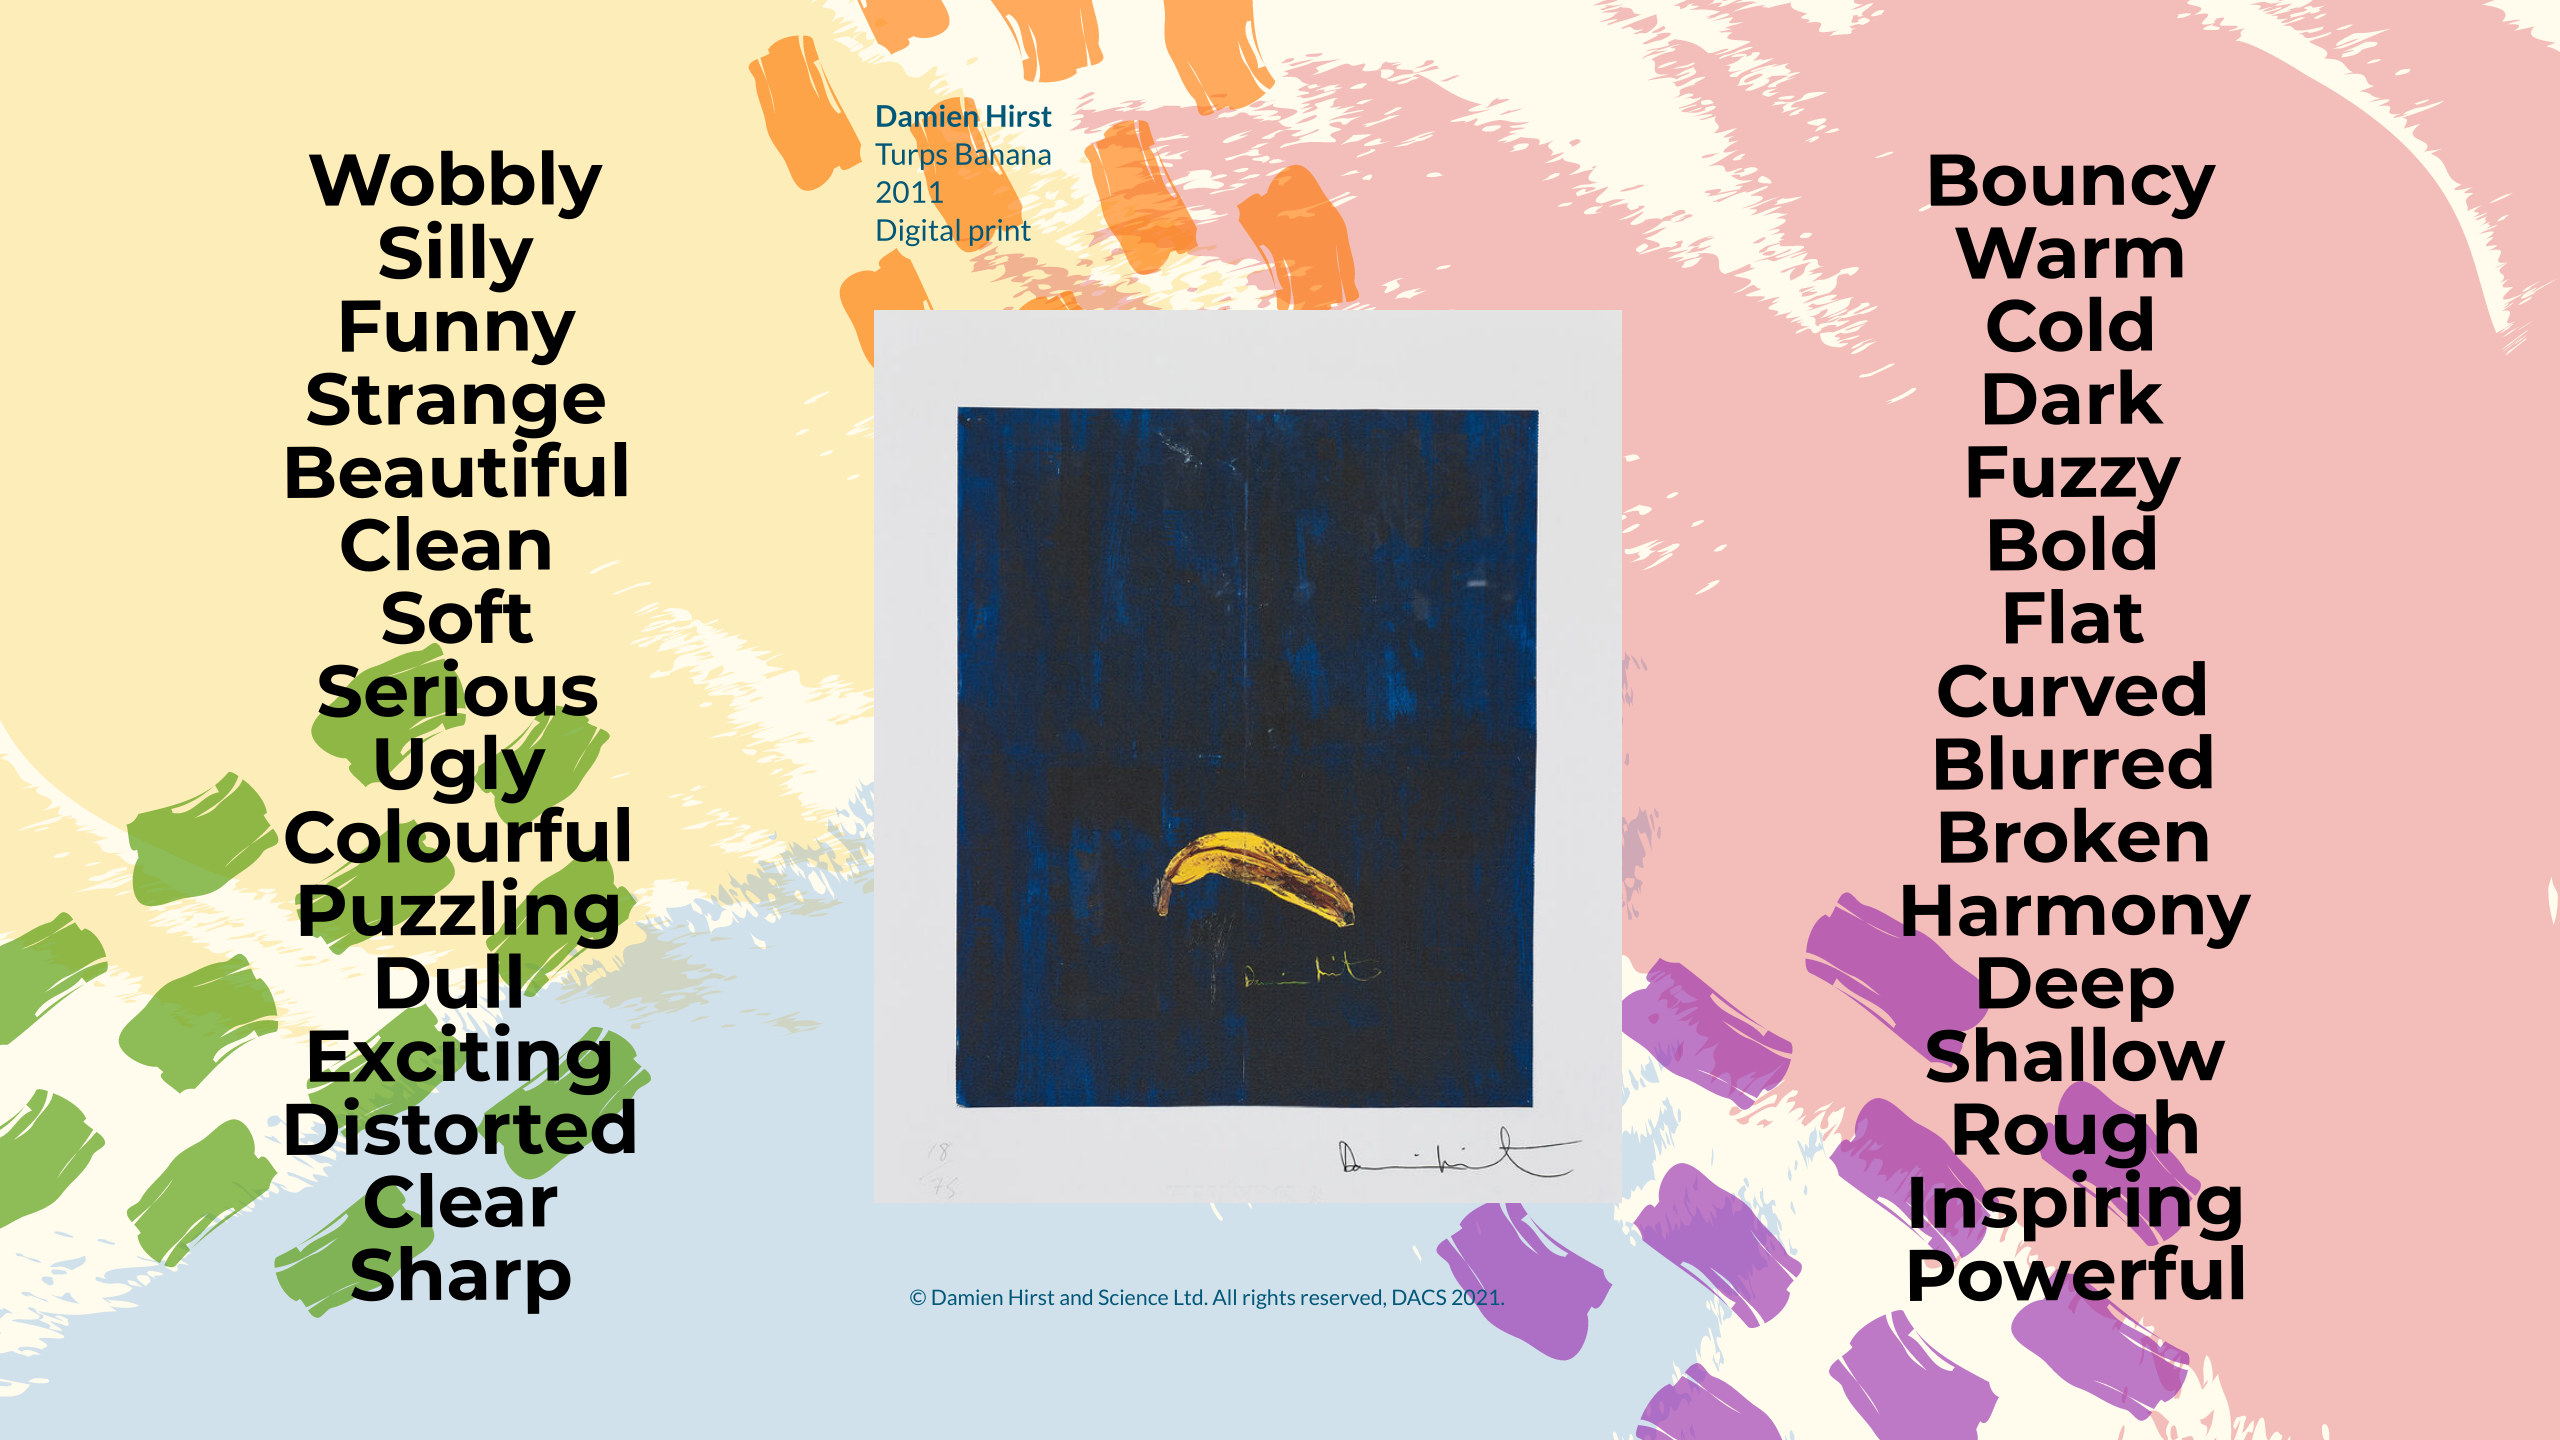
Descriptive words resource
Descriptive words resource
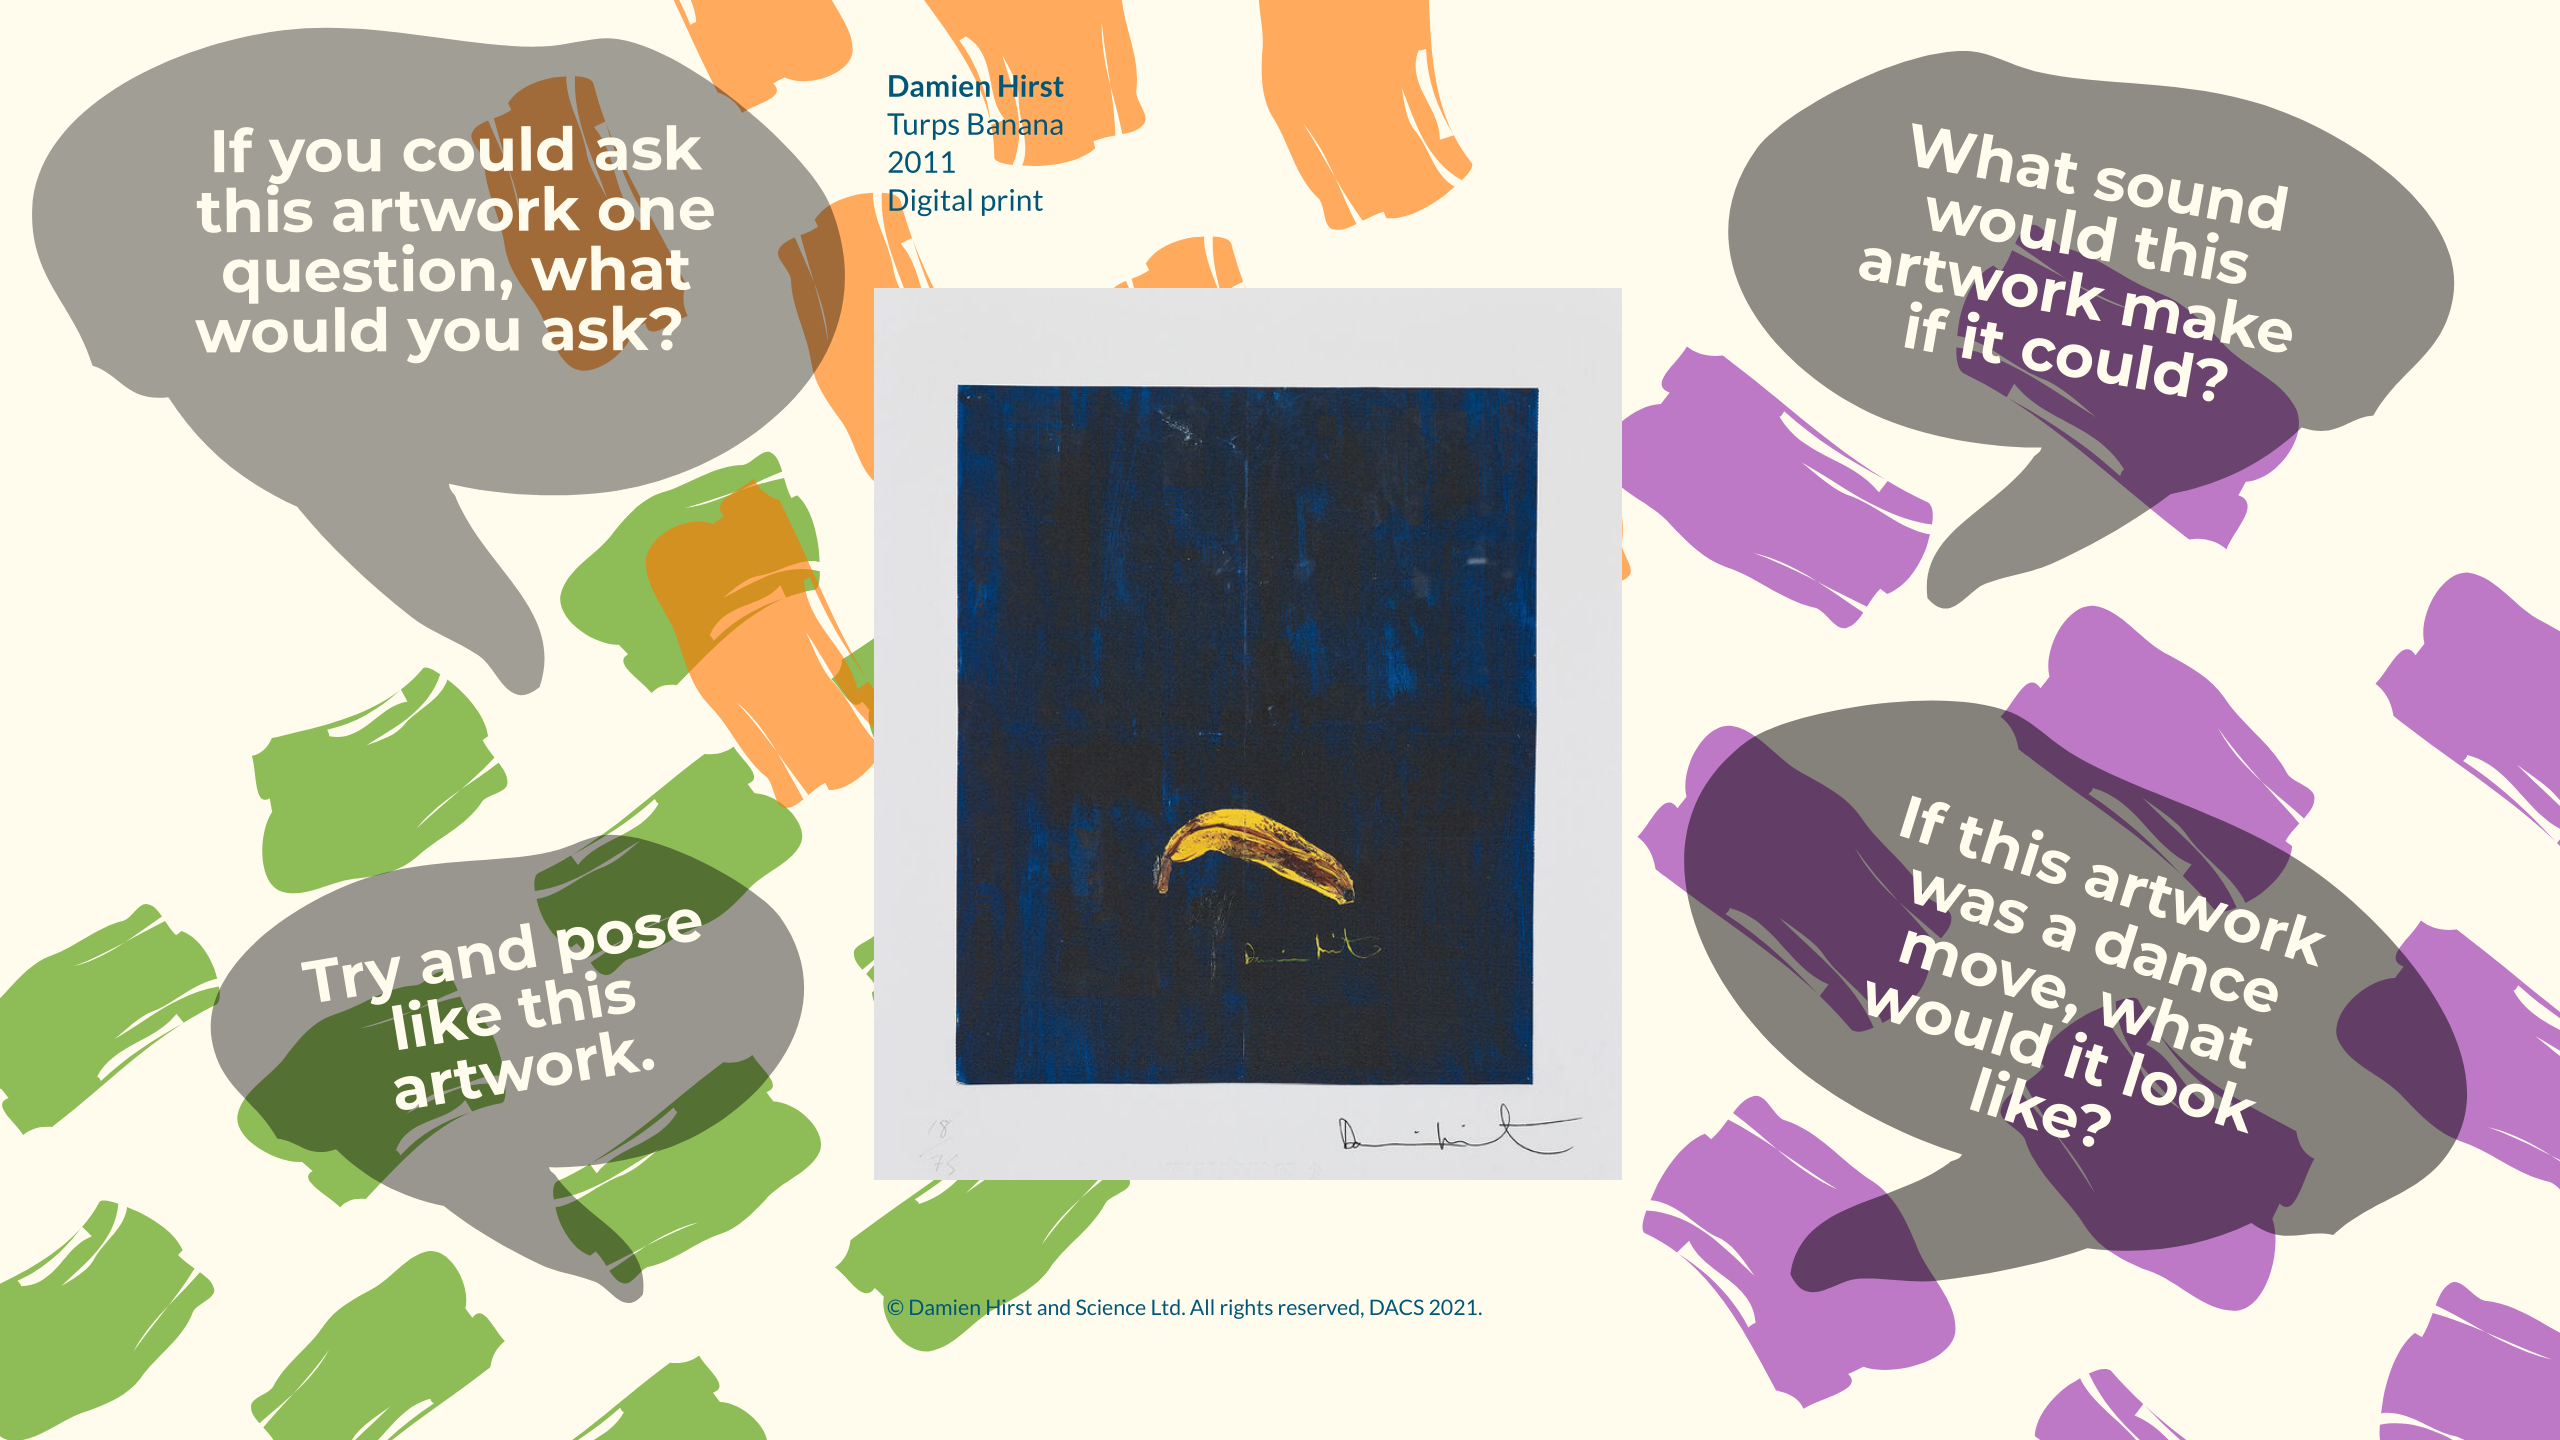
Funny Questions resource
Funny Questions resource
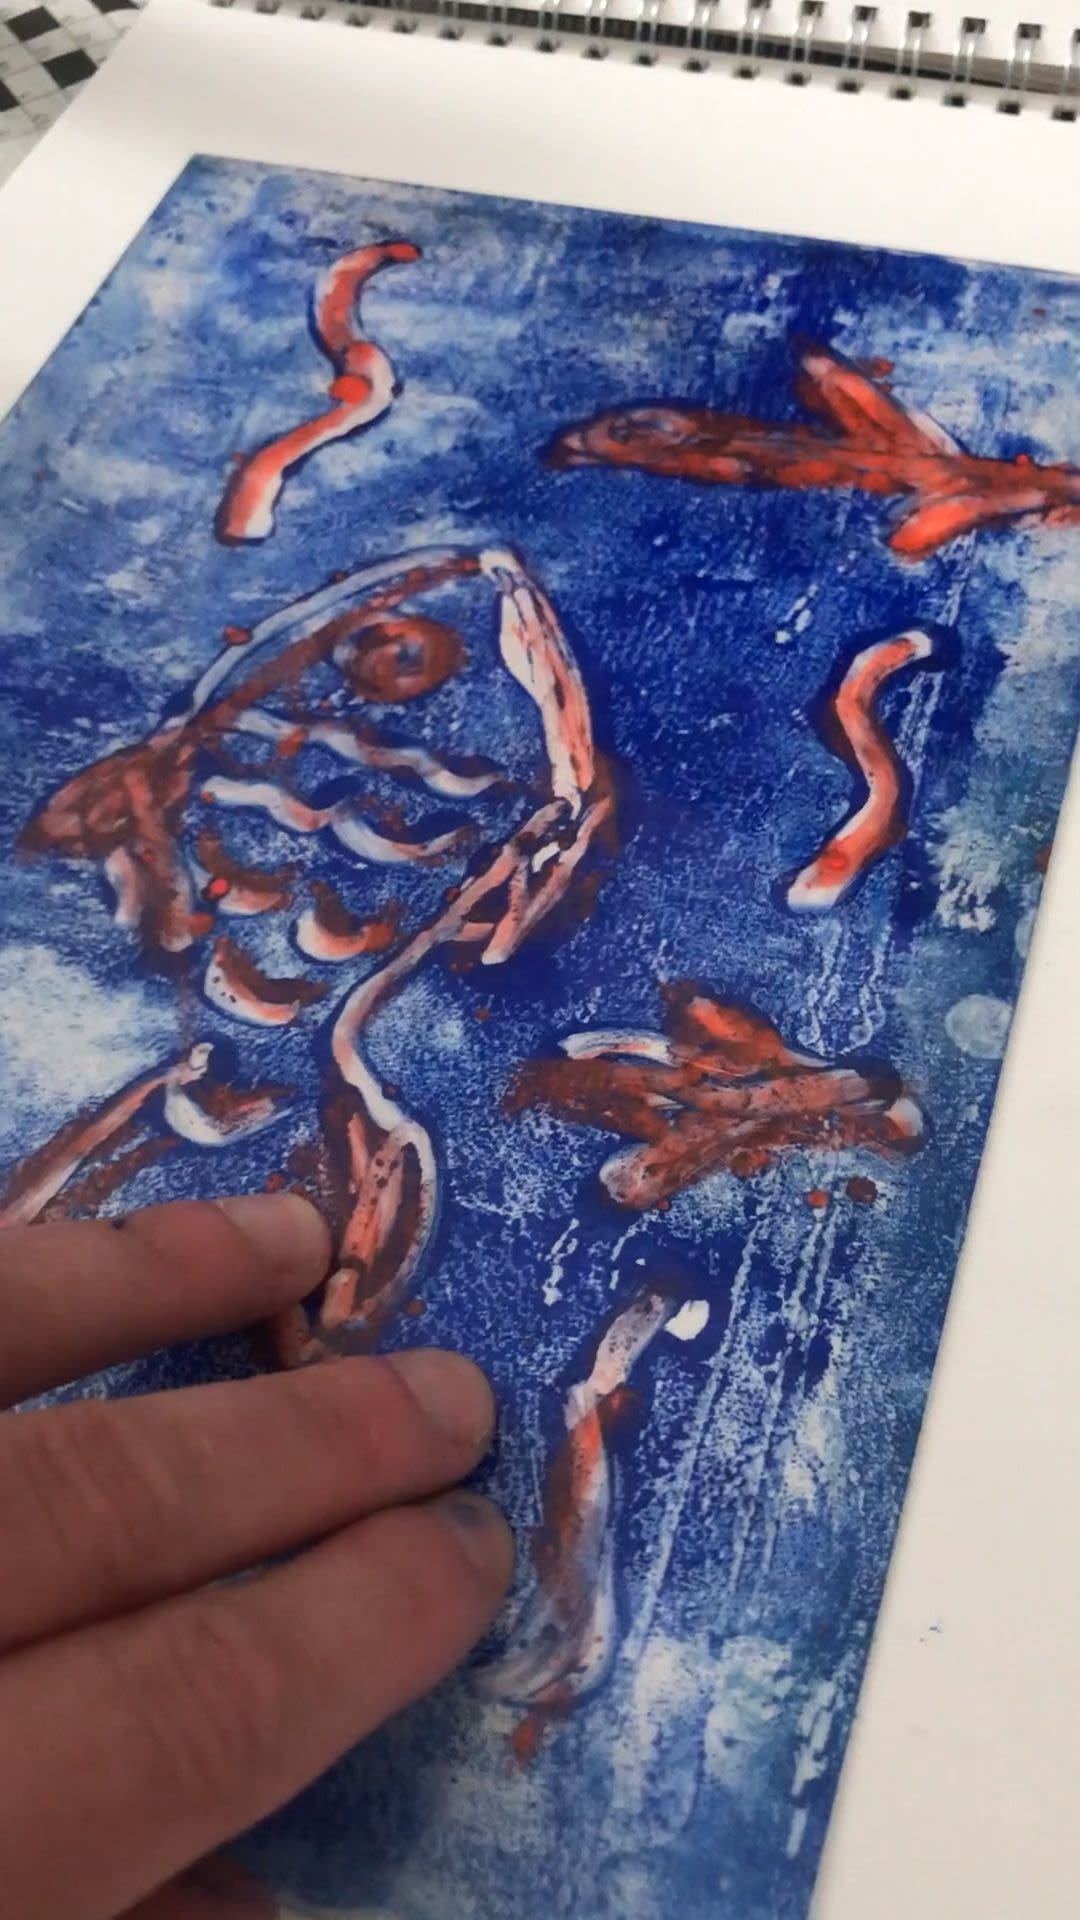
Session one: Relief Printing
Possibly the easiest way to make a print. Relief printing, in its simplest form, is like making a stamp. You are making a raised surface to print from, printing what is left on the surface. Think about a typewriter for example, the letter is raised/ left over from the surface block.
In this session, you will explore how to make a collagraphic print with your class. You will need:
- Cardboard - this will be your printing plate
- PVA glue
- A paint roller
- Printing ink or water based paint
- Different textured materials (corrugated card, string, bubble wrap, newspaper)
- Paper to print onto
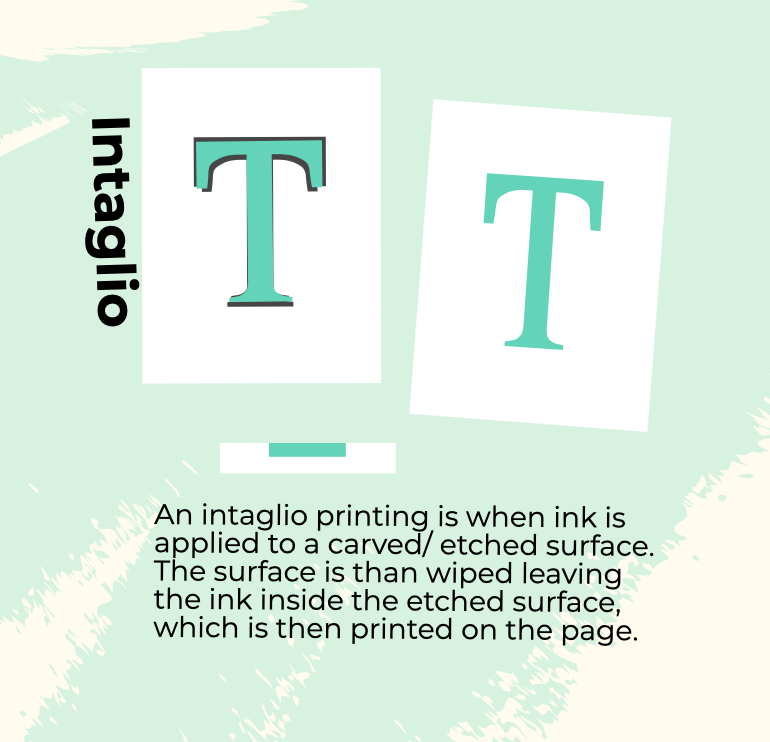
Session two: Intaglio Printing
Intaglio printing is the opposite of Relief printing. The surface is carved, etched or indented - the image is taken from the ink or paint left in the indented surface.
In this session, you will explore how to make an intaglio print using Styrofoam. You will need:
- Plastic sheet (from an old plastic wallet)
- A biro or embossing tool
- Printing ink
- A paint roller
- A cloth
- Paper to print onto
Session three: Planographic Printing
Unlike Relief and Intaglio printing, Planographic printing is a surface print from a flat surface. This means the surface is not raised or engraved. Oil and water based materials are used to make positive and negative prints.
In this session you will use oily crayons and water based paint to make a lithograph print. You will need:
- A piece of perspex or a plain ceramic tile
- A dark coloured crayon
- Water based ink or paint
- Paper to print onto
Session four: Stencil Printing
In this final session, your class will learn about printing using stencils. Stencils are a great way to create quick layers of prints, cutting out shapes from card, paper or plastic, laying on a surface and rolling paint over the top.
In this session you will need:
- Paper or thin card
- A pencil
- Scissors
- A paint roller
- Paint or ink
- Paper to print onto
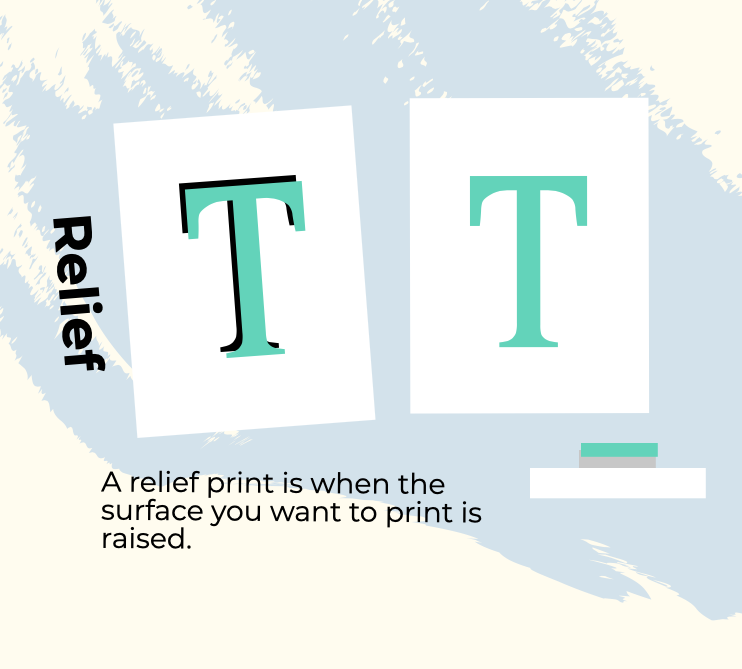
Relief
Relief printing is when the surface you want to print is raised. The raised surface is inked and printed while the un-raised area will show as the paper's original colour.
Eg: woodcut, typewriters, collagraph, linocut

What is a Relief Print?

Activity idea!
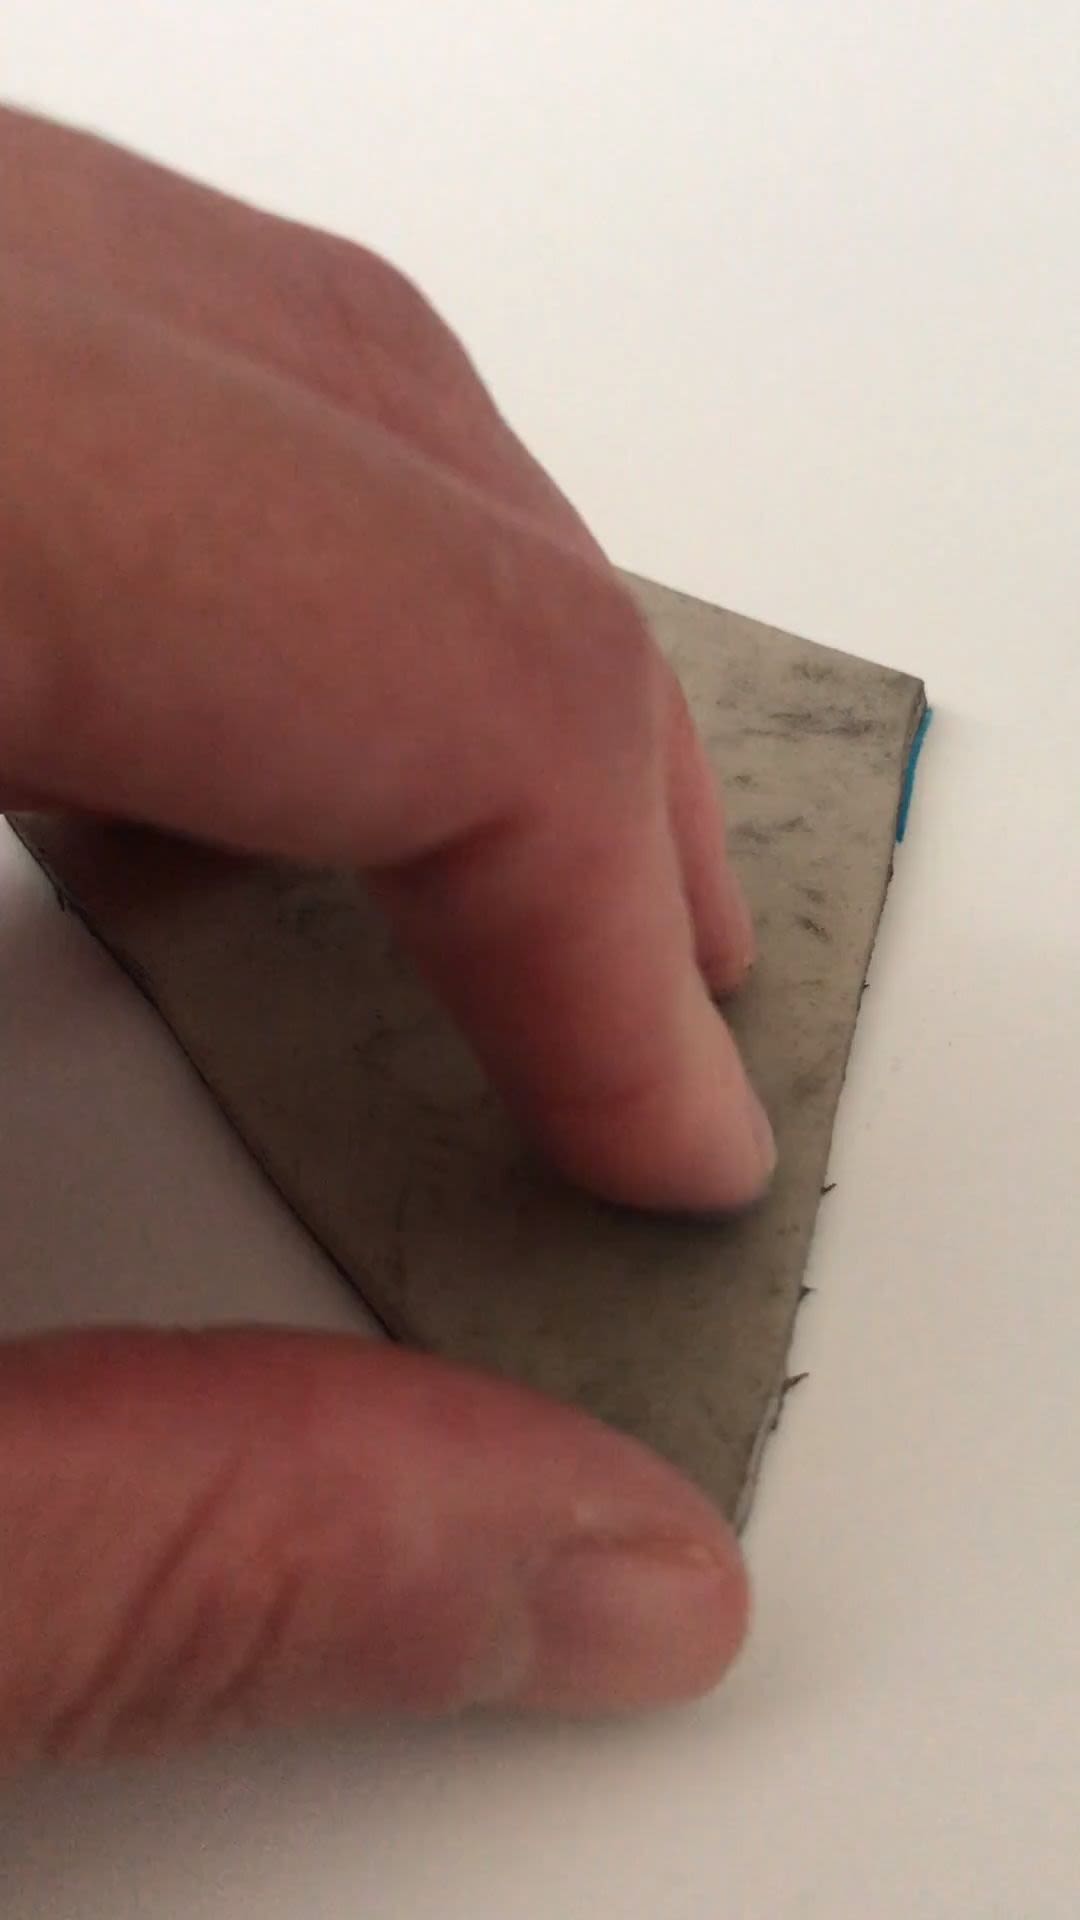
Making a collagraphic print is super easy! To keep costs down you can use recycled materials from home. All you need are some different textured materials (corrugated card, string, bubble wrap, newspaper), PVA glue, cardboard, paper and paint!
- Start by layering your different textured materials on to a small piece of cardboard - A5 or smaller.
- Once you are happy with the way they are laid out, glue them down with PVA and wait for them to dry.
- Once dry, either dab or roller with paint.
- Lay on your paper and peel off to reveal your print!

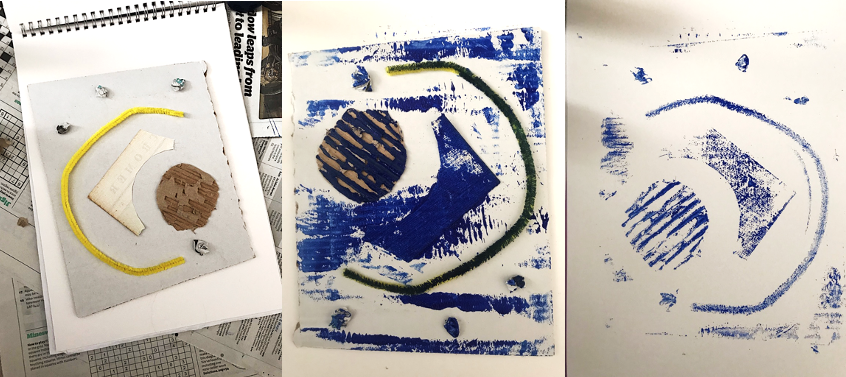
Example of a collagraphic print
Example of a collagraphic print
Example of a relief print:
This print by Pablo Picasso has been made using a relief method with linocut. Imagine each colour as a separate stamp, like a jigsaw puzzle, that has been put together to make this print of a black bull standing next to three people dancing.
Pablo Picasso
Bacchanal with a Black Bull, 1962
Linocut on paper

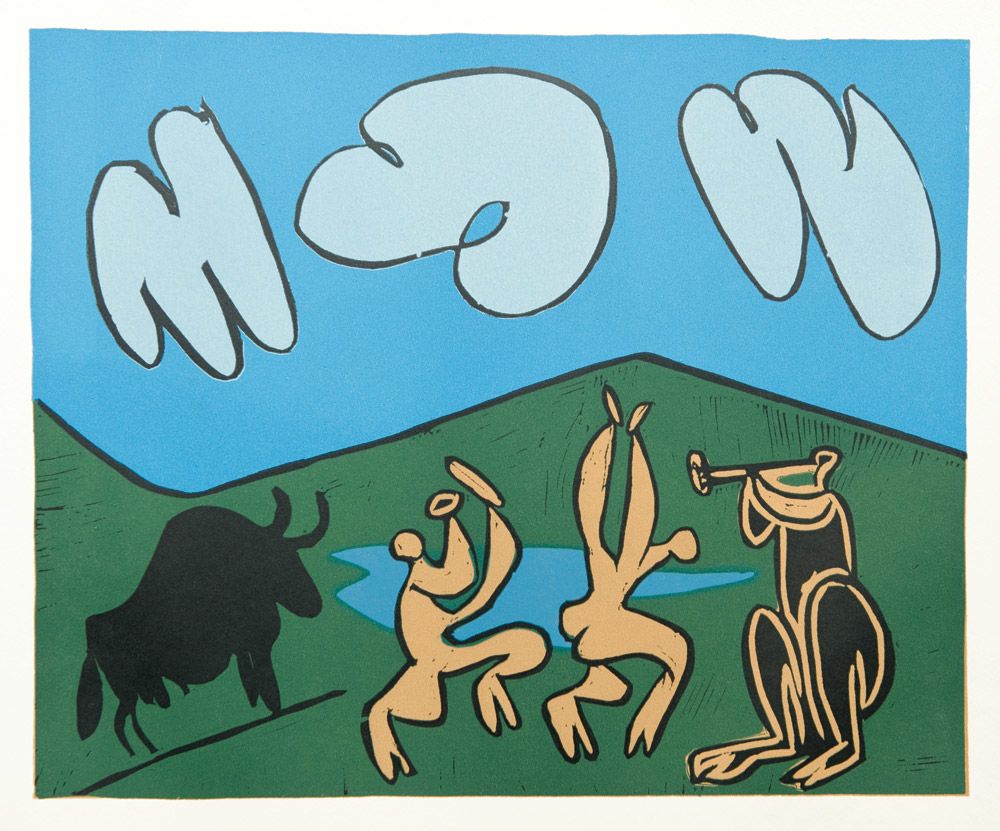
© Succession Picasso/DACS, London 2021.
© Succession Picasso/DACS, London 2021.
Ask your class: What musical instruments do you think the people are playing?
Other artists to explore:
- Kara Walker, Boo Hoo (2000), linocut on paper.
- Sol LeWitt, Tondo 1 (2002), linocut on paper.
- Enid Marx, Watermelon, pumpkin and cucumber (c.1950), linocut on paper.
Linocut was developed from carving an image into linoleum flooring, inking the raised area and printing onto paper. The linocut printing technique was used first by the artists of Die Brücke in Germany between 1905 and 1913.
Intaglio
Printing what is below the surface. The cut surface's grooves hold the ink, while the uncut surface is wiped clean.
Eg: etching, mezzotint, engraving, drypoint, aquatint

What is an Intaglio Print?

- Depressions are engraved or etched into a flat printing surface such as wood, copper or plastic.
- The surface is covered in ink.
- The ink is wiped off the surface, but remains in the indentations.
- Paper is placed on the surface and pressure is applied.
- The paper is removed, the inked image has been transferred from the plate onto the paper.
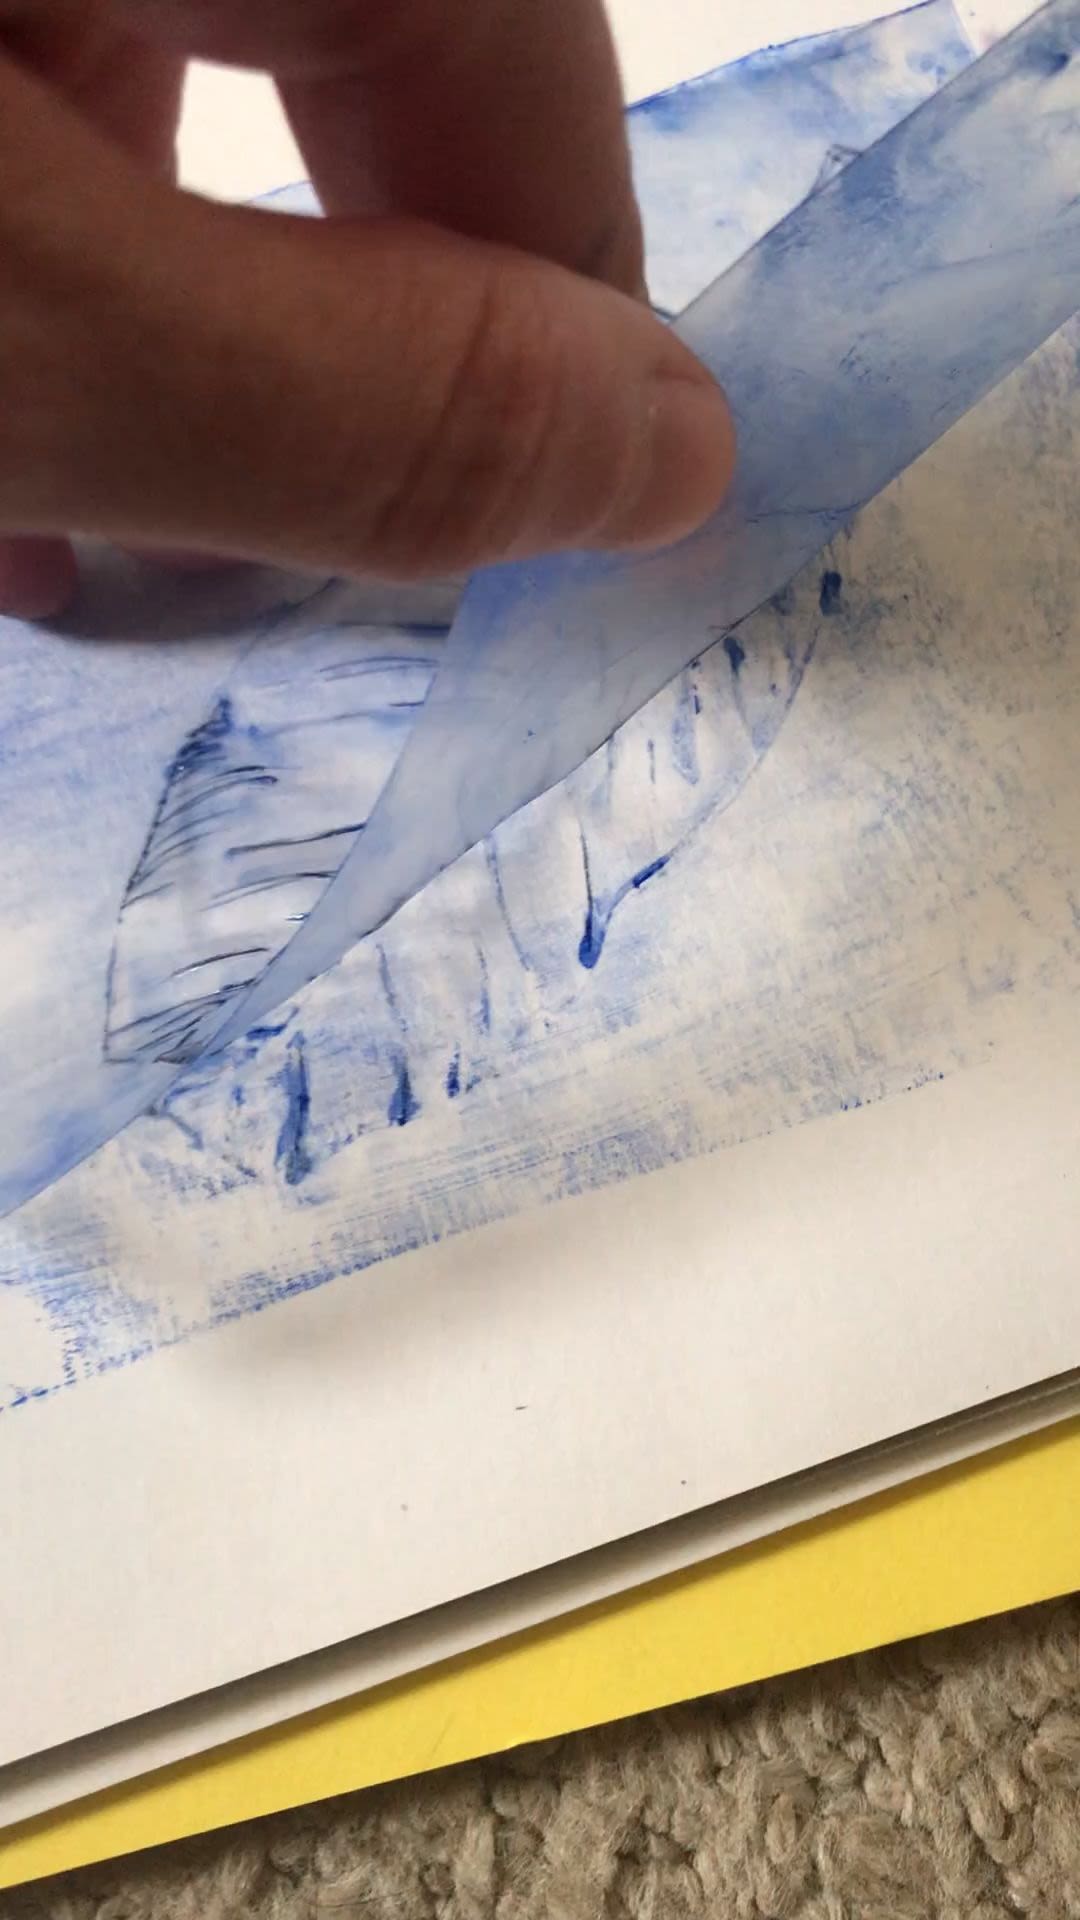
Activity idea!
Making an Intaglio print can be quite difficult as you need to compress the surface print against the paper using a heavy weight. A great tip is to pile books onto your print to help compress it. To make your own Intaglio print you will need a thin plastic sheet (from an old plastic wallet), a biro or embossing tool, printing ink, a cloth and paper.
- Draw your design on to the plastic sheet using a biro. Push hard to make an indentation into the plastic sheet
- Cover with ink, making sure to fill all of the lines
- Wipe off ink with a cloth - the ink will stay in the indentations that you have made
- Place on paper, ink side down. Use your fingernail or a card to push the indentations into the paper
- Remove the plastic sheet to reveal your print!

Example of an intaglio print
Example of an intaglio print
Example of an Intaglio Print:
This woodcut engraving by Peter Blake is an example of an Intaglio print. Made by carving into a complete wooden block, imagine the black spaces on the page are the carved surfaces of the wood, they would have been filled with ink, while the uncarved surfaces would have been carefully cleaned of ink.
Peter Blake
Bearded Lady, 1974
Wood engraving on paper

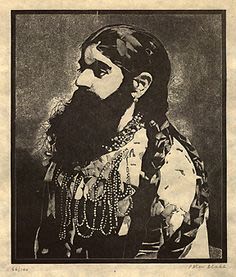
© Peter Blake. All rights reserved, DACS 2021.
© Peter Blake. All rights reserved, DACS 2021.
Ask your class: To draw a portrait of their partner only using one colour. Think about the features of the face that stand out, these would be the areas that would be carved in an Intaglio print. Think about the shadows in your ears, the pupils in your eyes, your lips and nostrils.
Other artists to explore:
- Victor Pasmore, The Dance of Modern Times (1972), aquatint on paper.
- Eduardo Paolozzi, Illustration for Les Chants de Maldoror (1992), etching on paper.
When Intaglio printing was first invented, artists learned how to create patterns such as cross hatching and using dots and parallel lines to make the different kinds of shading we see in etchings today!
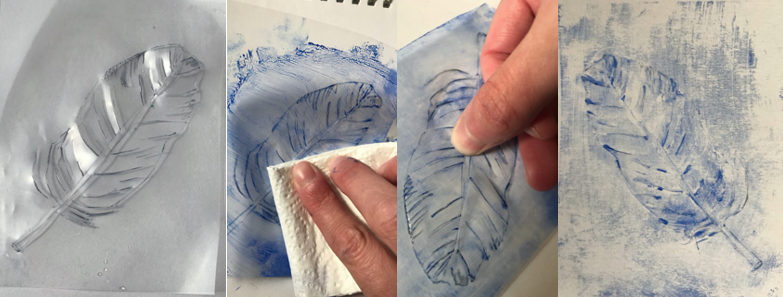
Planography
Prints that involve drawing on a surface
Eg: lithograph

What is a Planographic Print?


Imagine a flat stone surface. A greasy, oil-like substance is applied to the areas that you do not want printed (negative space) and water-based paint is applied to areas you do want to be printed (positive space). The oil and paint will not mix together, meaning you can print over and over again.
Activity Idea!
A really simple way to make a planography print is by using wax crayons or oil pastels and a water-based paint. You'll also need a surface to draw on (a tile, Perspex or card) and paper to print onto.
- Use crayons to fill in your negative space. This is the area that you want to remain clear.
- Roll a water based paint like acrylic or poster paint over the top of your crayon or oil pastel drawing.
- Go over your drawing with your crayon or oil pastel.
- Place paper over the top and rub lightly.
- Peel away paper to reveal your print.

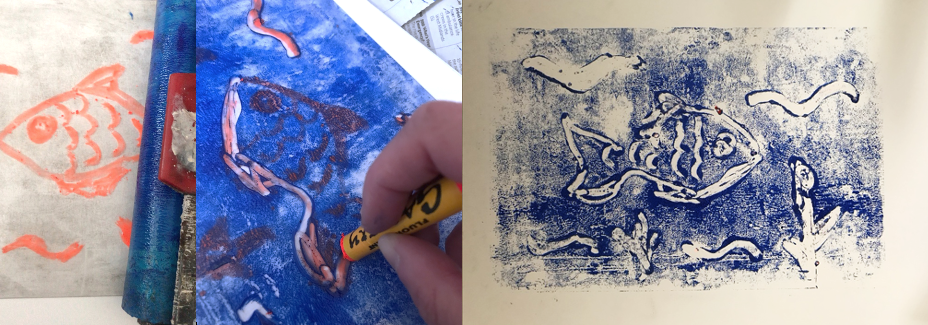
Image of oil pastel and ink used to make a planographic print
Image of oil pastel and ink used to make a planographic print
Example of a Planographic Print:
This lithograph print by René Magritte shows a bird in flight made from outlines of falling leaves, filled with images of more leaves! Magritte was a Belgium surrealist who was known for making funny, clever, and strange artworks that often played tricks on the viewer's perceptions.
René Magritte
Salon de mai, 1965
Lithograph on paper


© ADAGP, Paris and DACS, London 2021.
© ADAGP, Paris and DACS, London 2021.
Ask your class: To be inspired by Magritte and use everyday objects, such as leaves, to create a new image. They could use string to make a face, counters to make a flower or pencils to make a house.
Other artists to explore:
- Elizabeth Frink, Calypso (1973-4), lithograph on paper.
- Henry Moore, Five Ideas for Sculpture (1981), lithograph on paper.
- Agnes Martin, Praise (1976), lithograph on paper.
A planographic print works on the scientific principle that oil and water do not mix together.
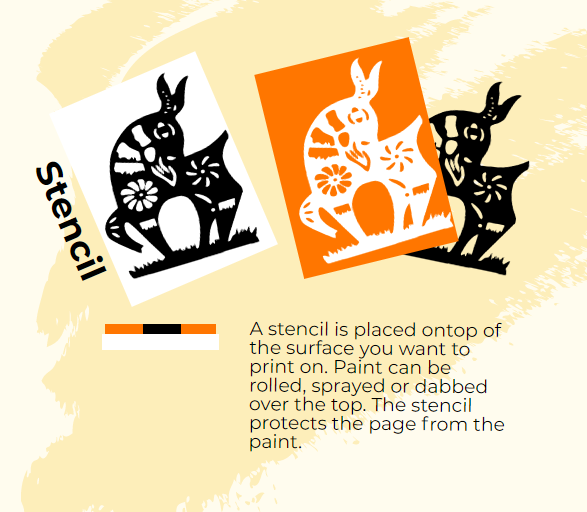
Stencil
Printed through an open area or shape
eg: Silkscreen print, stencil graffiti
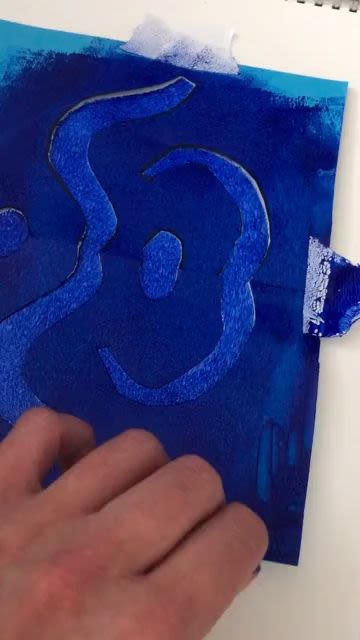

What is a stencil print?

Activity Idea!
A safe way to make a stencil, without a sharp knife, is to make something similar to a Christmas snowflake cut out! You will need thin card for your stencil, a pen or pencil, scissors, masking tape, a paint roller, printing ink and paper.
- Fold your paper in half.
- Draw out your design.
- Safely use scissors to cut out your design.
- Unfold and place over your paper.
- Use masking tape to secure your stencil.
- Roll paint over the stencil (a soft sponge roller works best).
- Carefully remove the stencil to reveal your print.

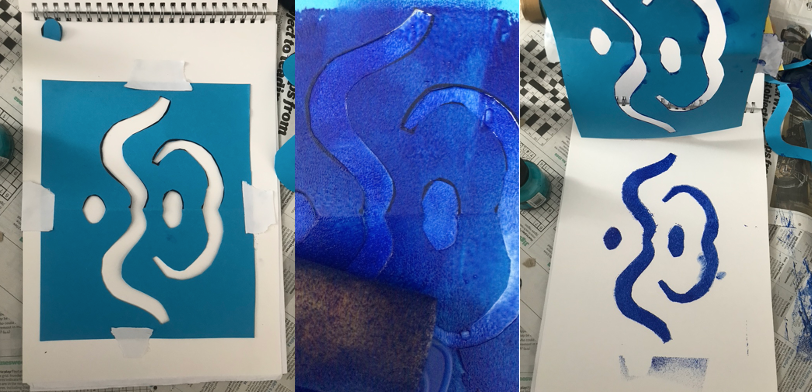
Image of stencil print
Image of stencil print
Example of a stencil print:
This screen print by Terry Frost is an example of what can be achieved when printing with stencils. Made by placing a stencil over a screen made from a tightly stretched fabric on a frame, this creates a more detailed, crisper image.
Terry Frost
Lemon Glow, 1991
Screen print

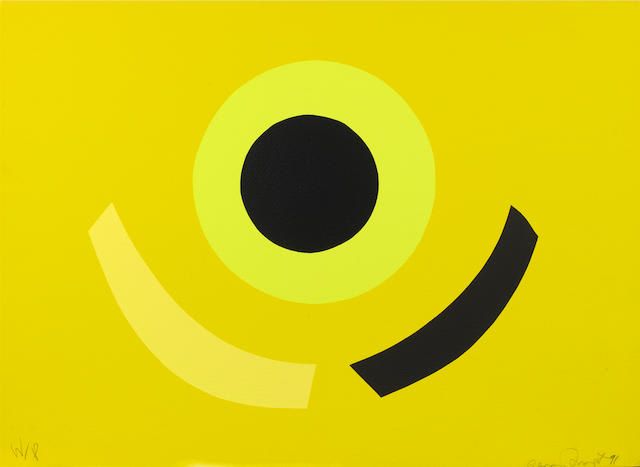
© Estate of Terry Frost. All Rights Reserved, DACS 2021.
© Estate of Terry Frost. All Rights Reserved, DACS 2021.
Ask your class: How many stencils or layers were used to make this print? Hint - think about how many different colours there are.
Other artist works to explore:
- Yayoi Kusama, Toadstools (1990), screenprint on paper.
- Dame Barbara Hepworth, Moonplay (1972), screenprint on paper.
- Bridget Riley, Fete (1989), screenprint on paper.
- Niki Saint de Phalle, Vive Jean (1993), screenprint on paper.
The most common type of stencil printing is silkscreen printing. Silkscreen printing was invented in China during the Song Dynasty (960-1279 AD).
Thank you!
If you would like more information about Durham University's Art Collection, or would like to book a school visit, outreach or virtual visit please contact Emily Dowler at 4schools@durham.ac.uk