100 Years Since Marshall
The Marshall Collection provides invaluable insights into both the condition of monuments when they were first discovered and how they were then preserved and presented to the public. It also makes it possible to identify how these monuments, and their settings, have changed in the century since Marshall worked at Taxila.
Working through the images in the Marshall Collection, Dr Abdul Azeem, now Director-General of the Department of Archaeology and Museums (Government of Pakistan), identified 100 key images of Taxila for in-depth study. Mapping the exact locations from where the images in the Marshall Collection were captured, new photographs were taken from similar viewpoints. This study sought to evaluate how individual sites had changed in the intervening 100 years and review the success of earlier conservation. The work also aimed to establish how less successful conservation and restoration work might be remedied.


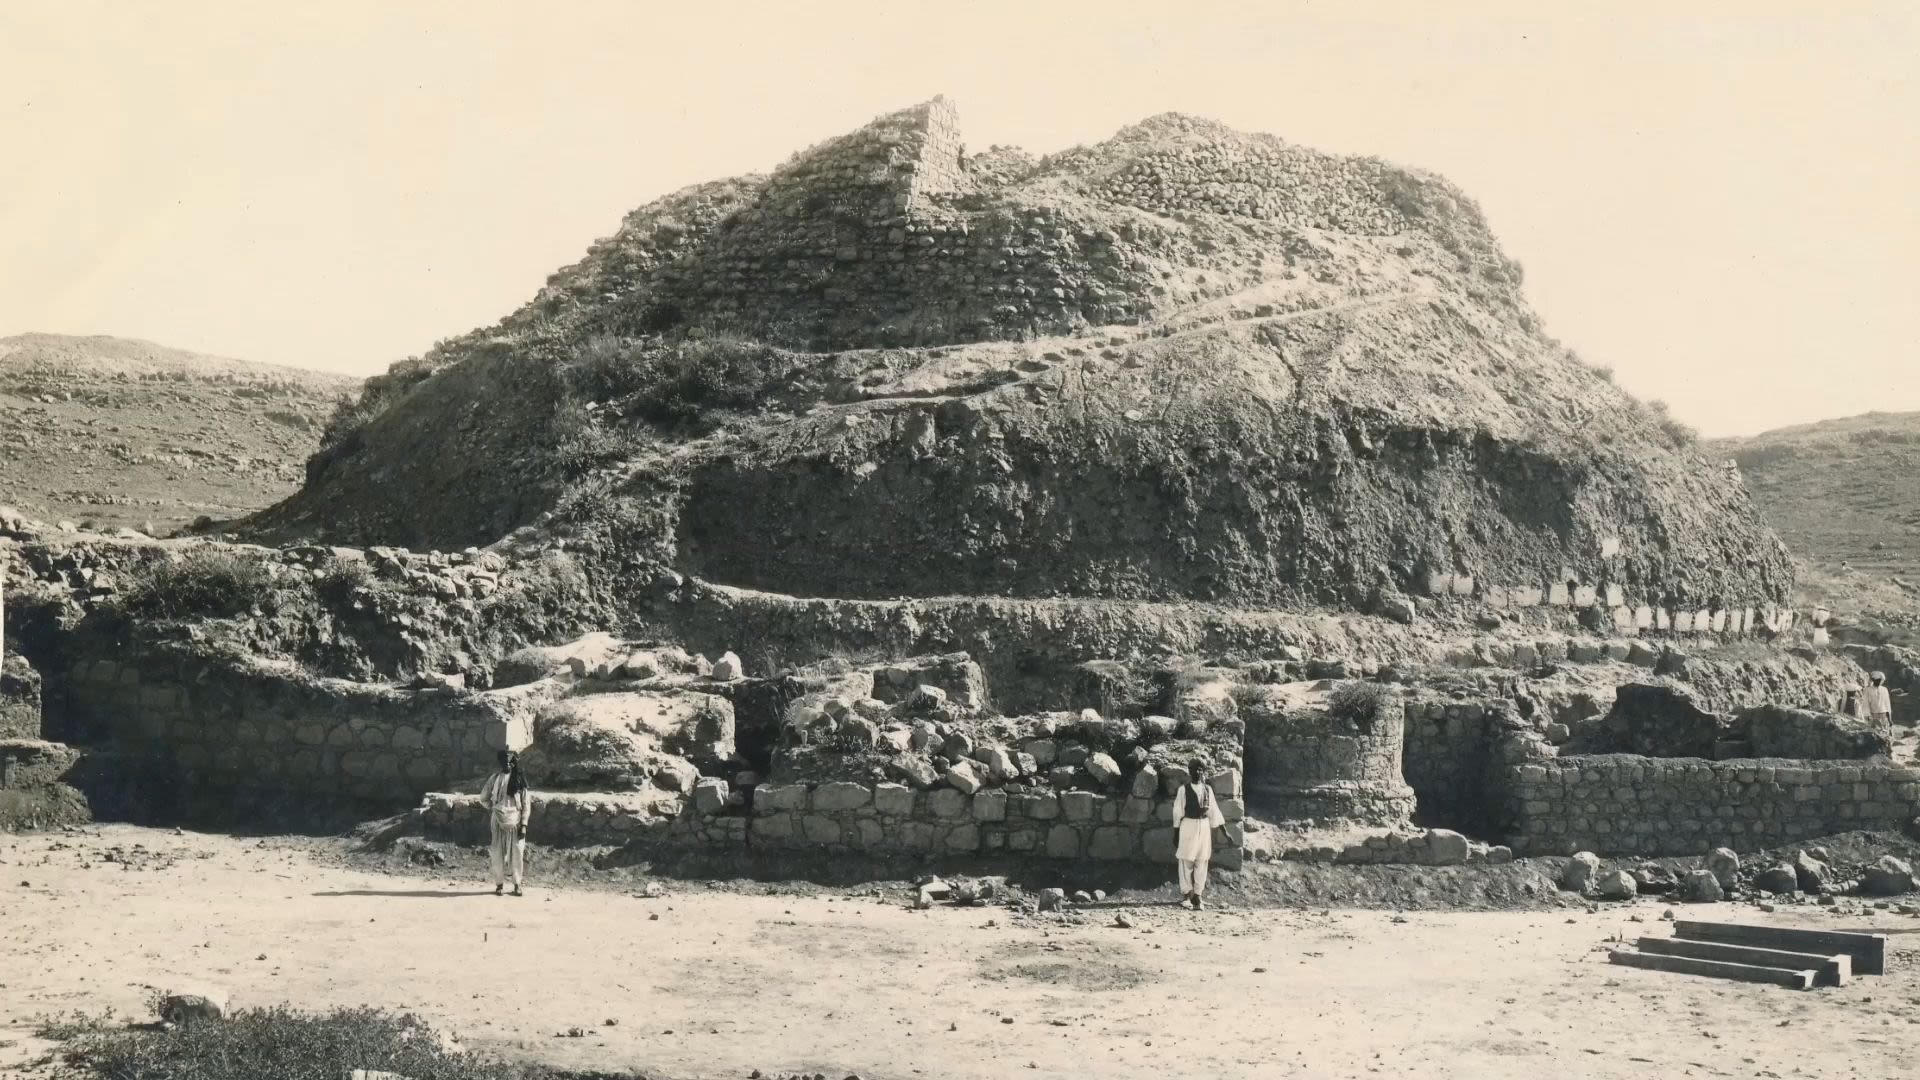
View of the Great Stupa at Dharmarajika, Taxila, taken in 1913/1914, from the southwest, compared with view taken in 2019 by Dr Abdul Azeem. Sir John Marshall Collection, given by Dr and Mrs Spalding. DUROM.1957.1.1377
View of the Great Stupa at Dharmarajika, Taxila, taken in 1913/1914, from the southwest, compared with view taken in 2019 by Dr Abdul Azeem. Sir John Marshall Collection, given by Dr and Mrs Spalding. DUROM.1957.1.1377

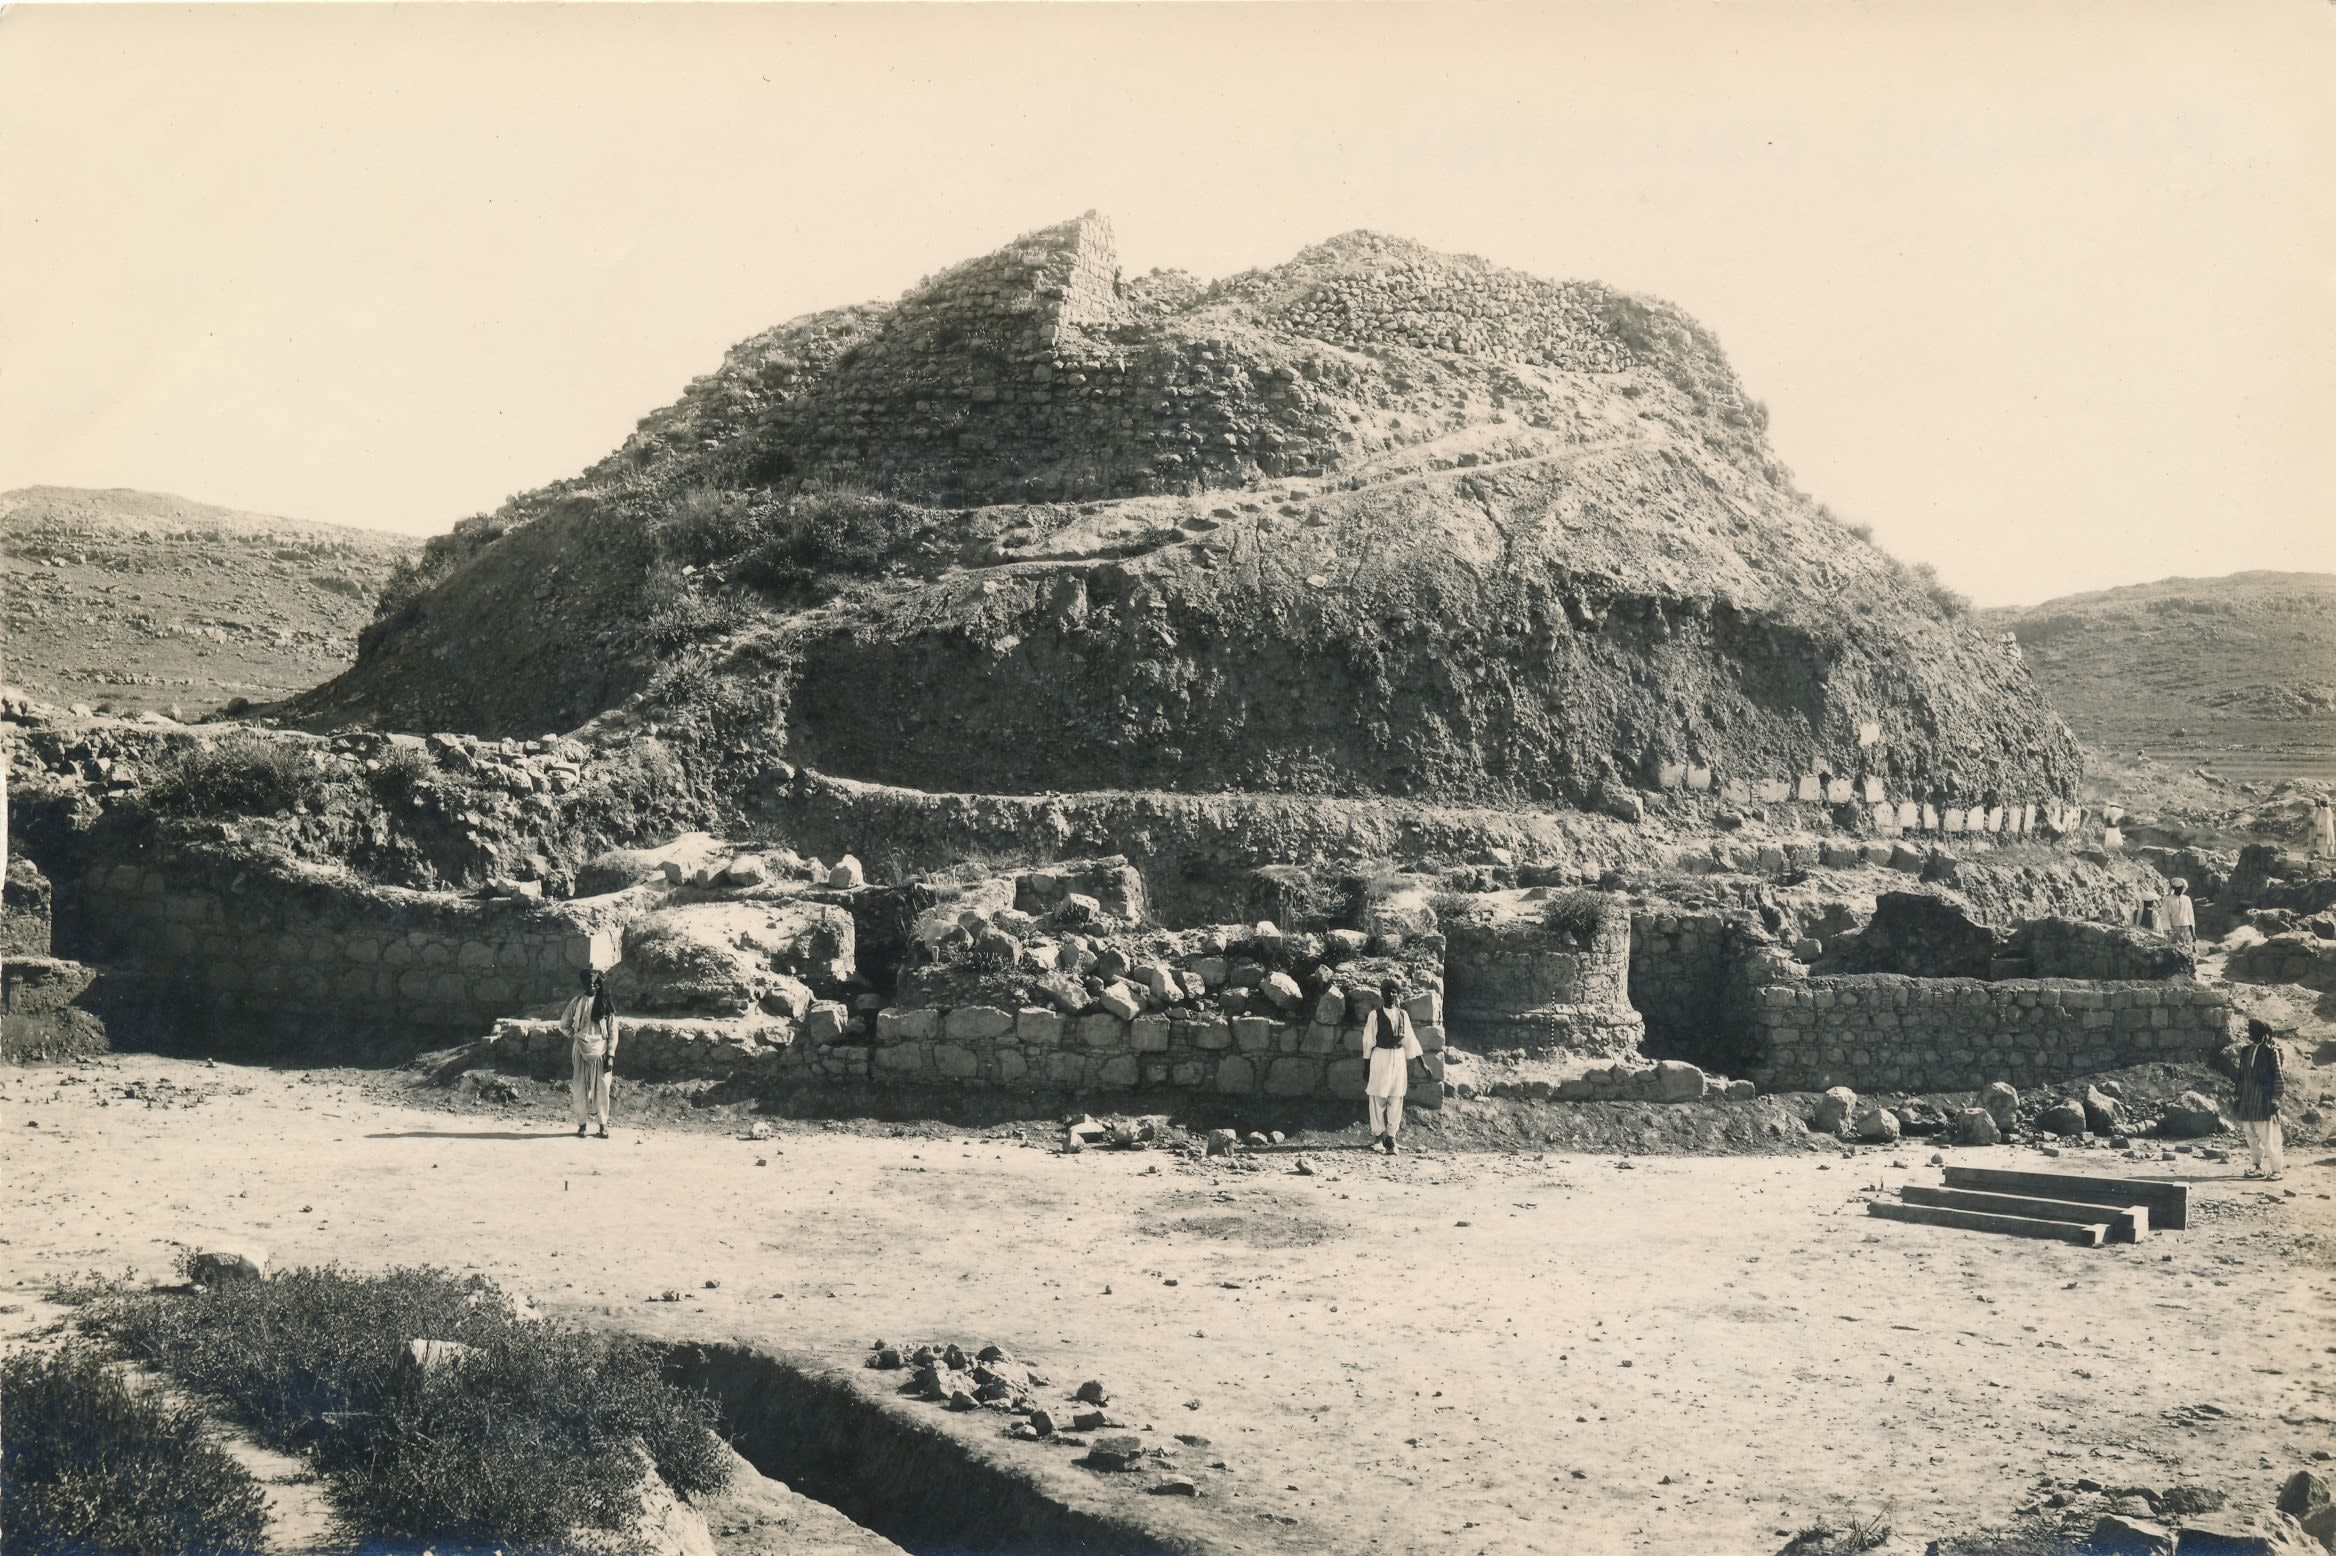
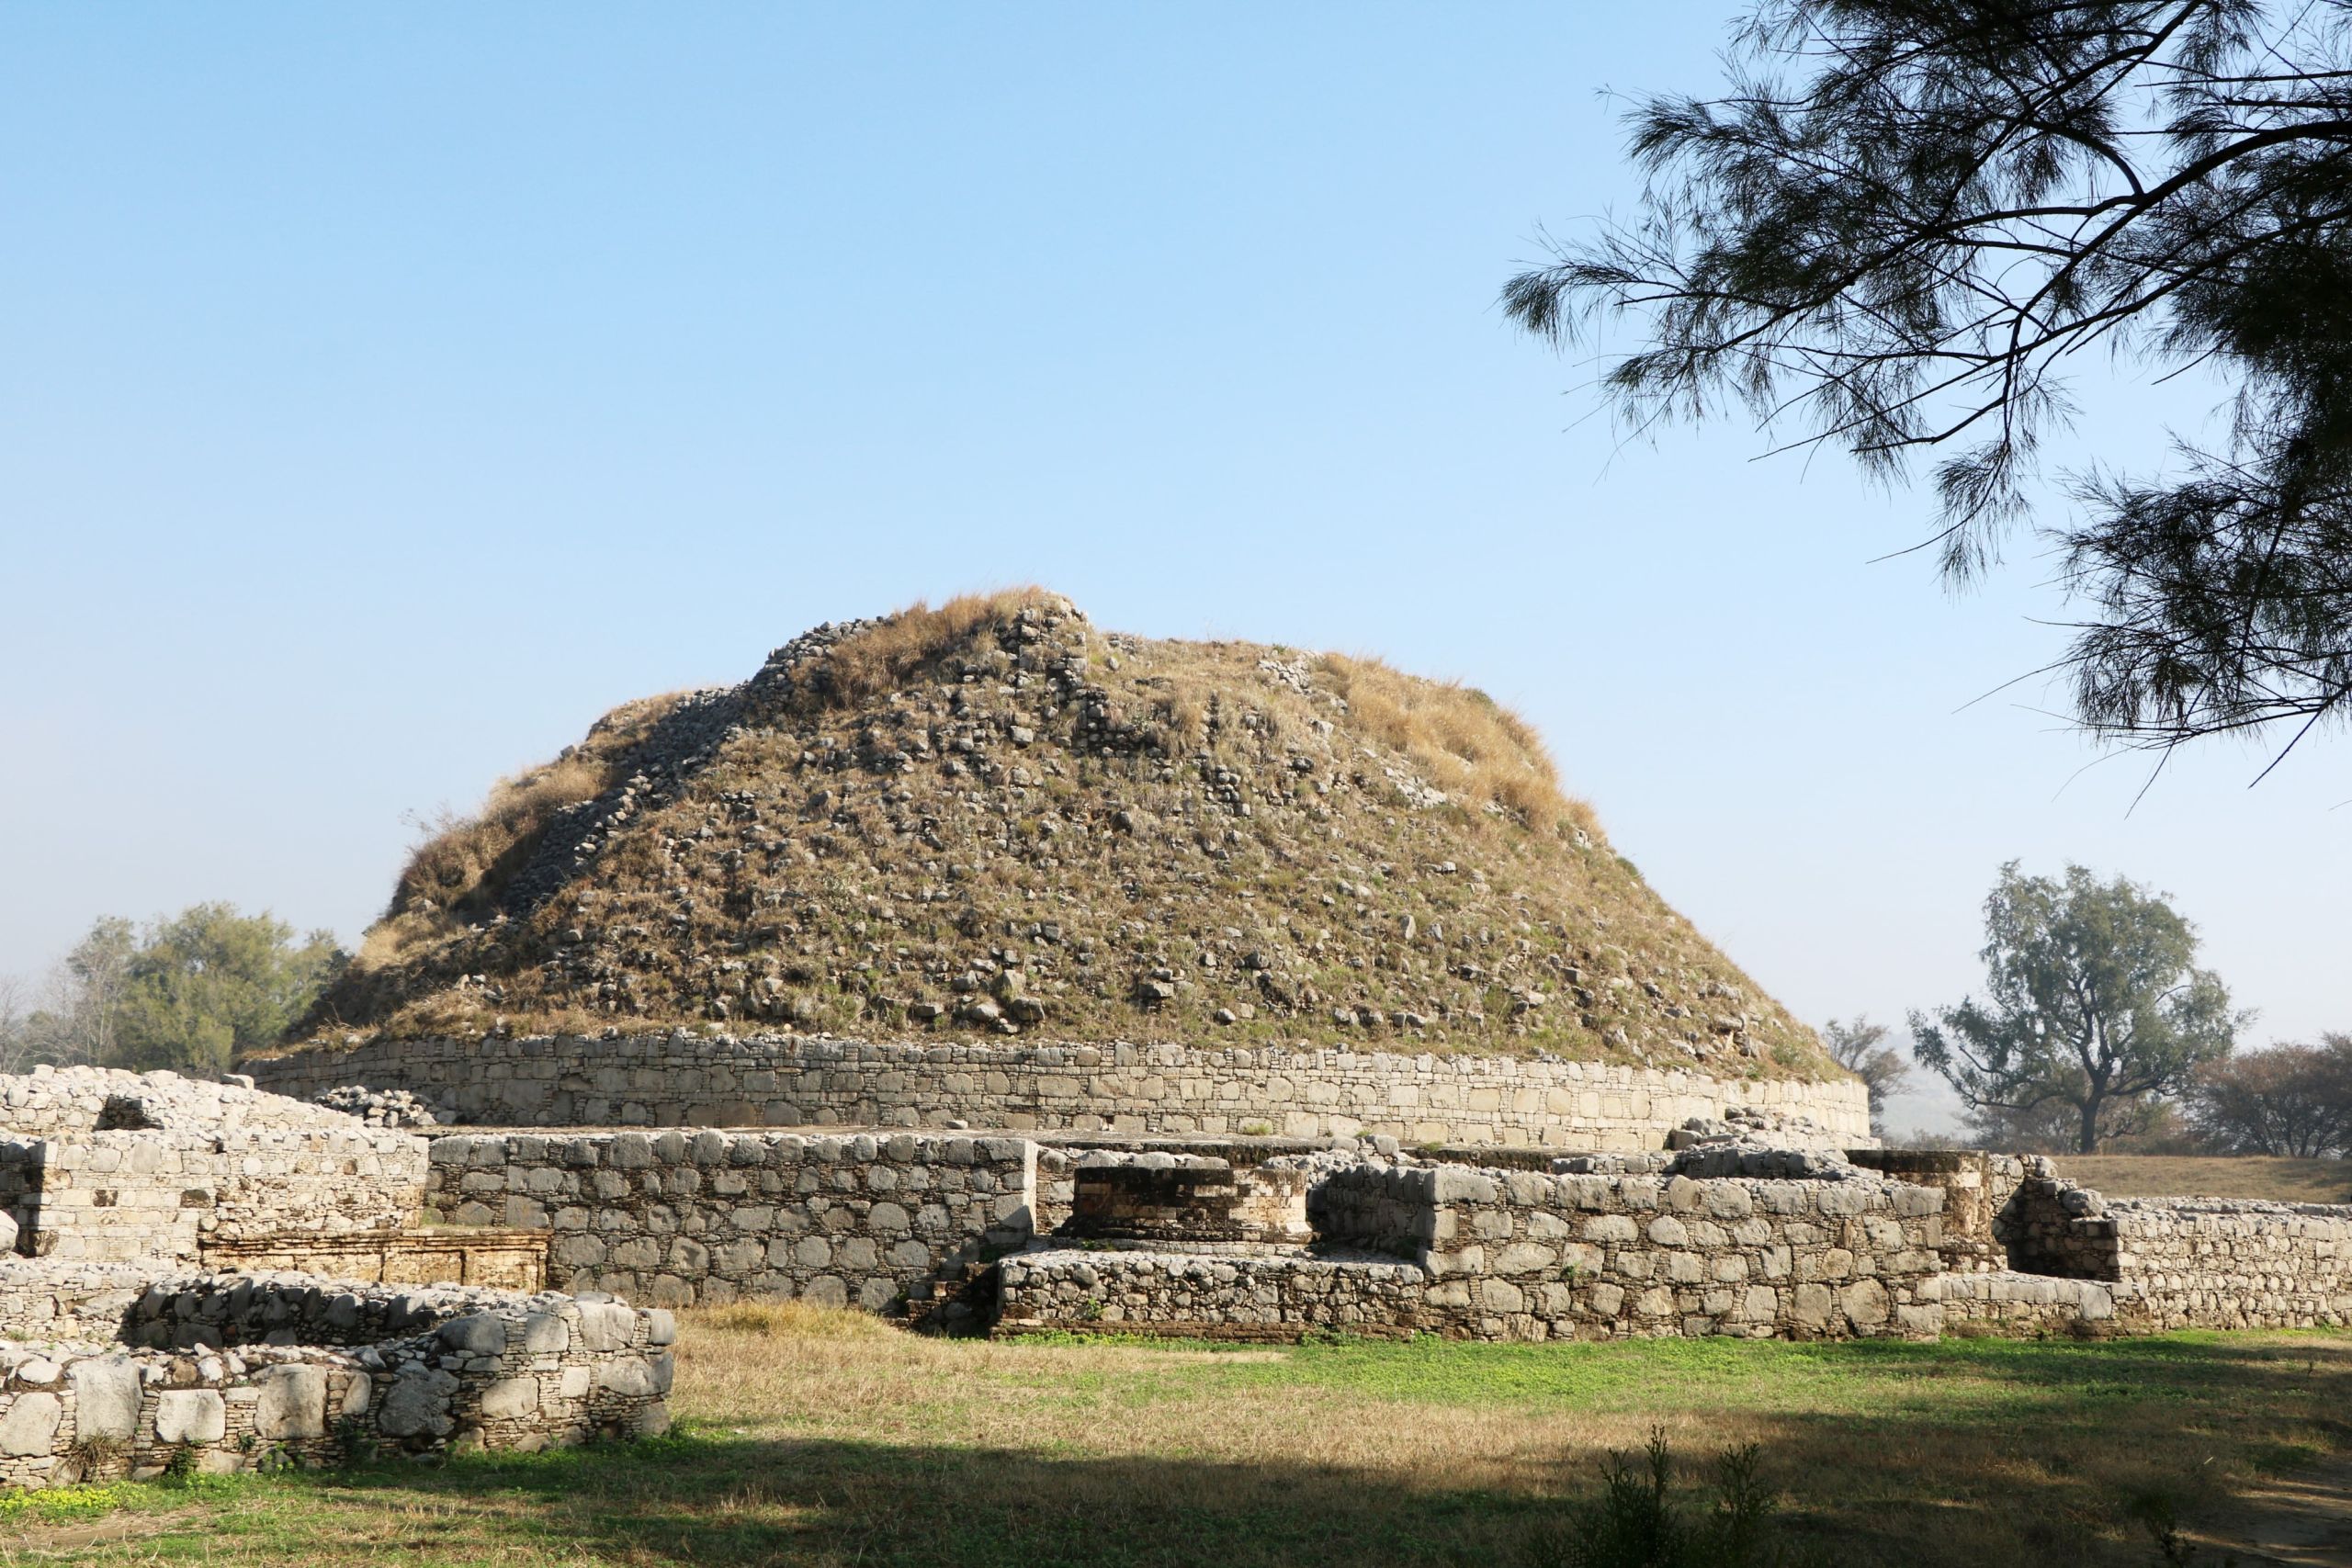
View of the Great Stupa at Dharmarajika, Taxila, 2019, from the southwest, taken by Dr Abdul Azeem.
View of the Great Stupa at Dharmarajika, Taxila, 2019, from the southwest, taken by Dr Abdul Azeem.

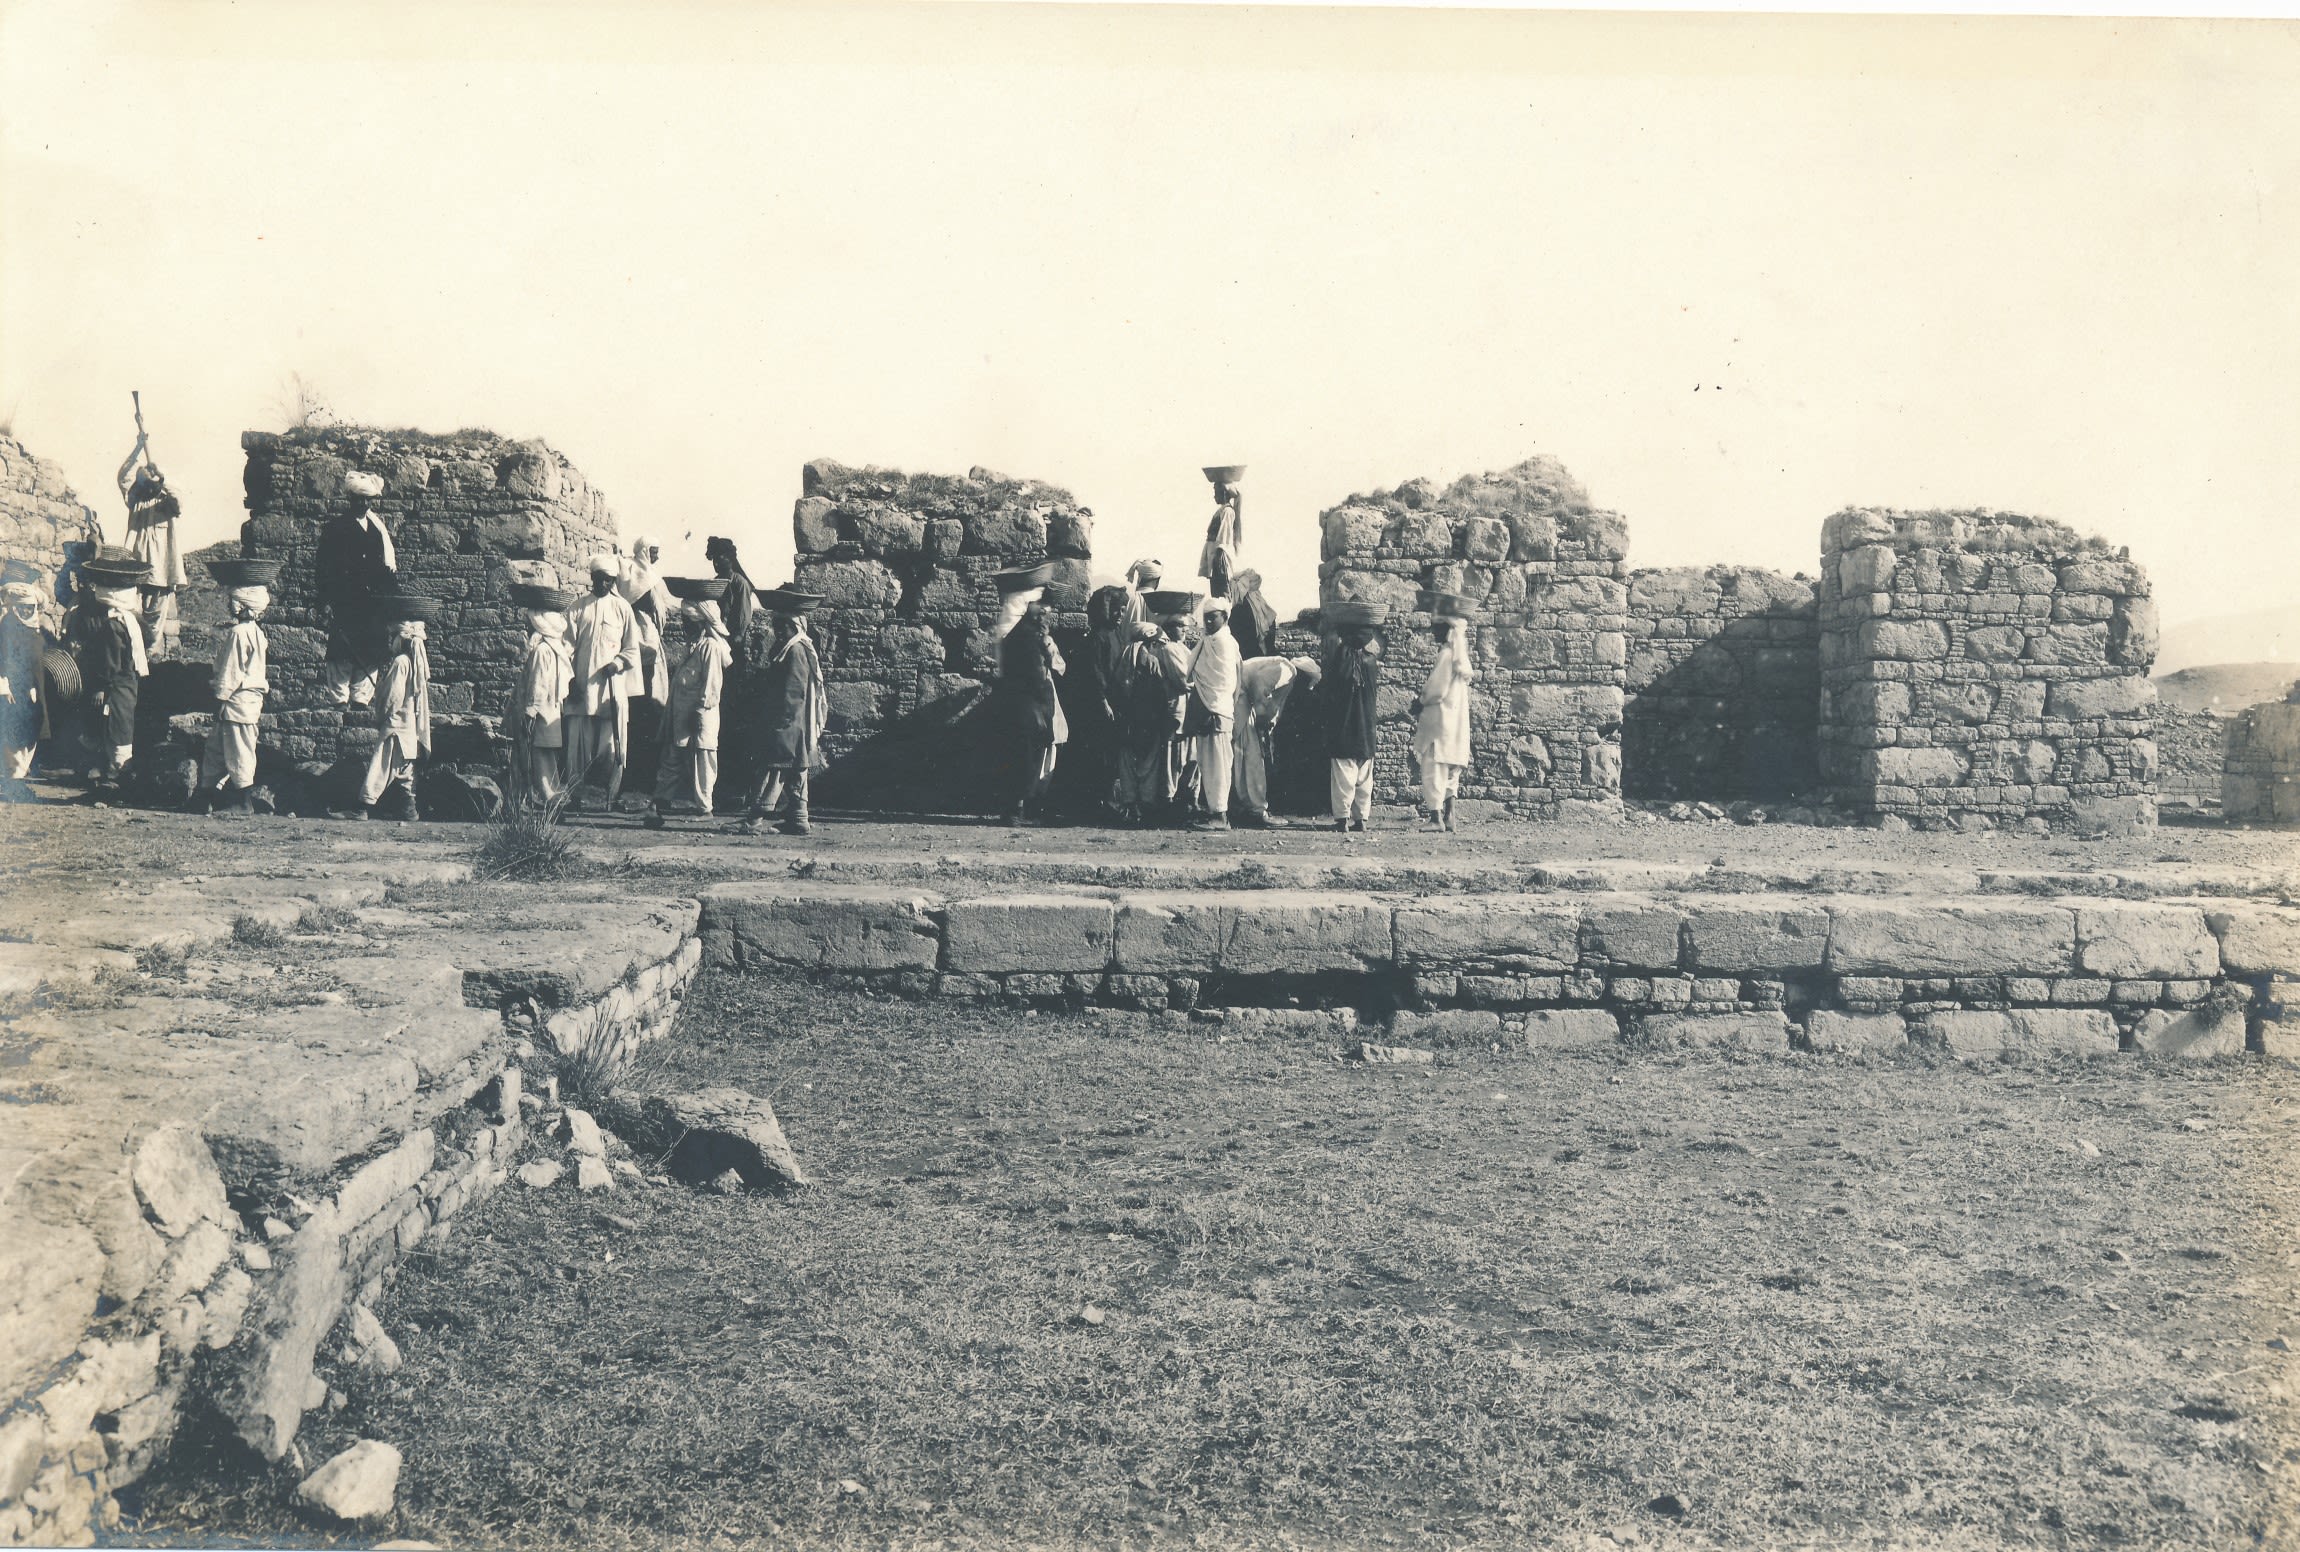
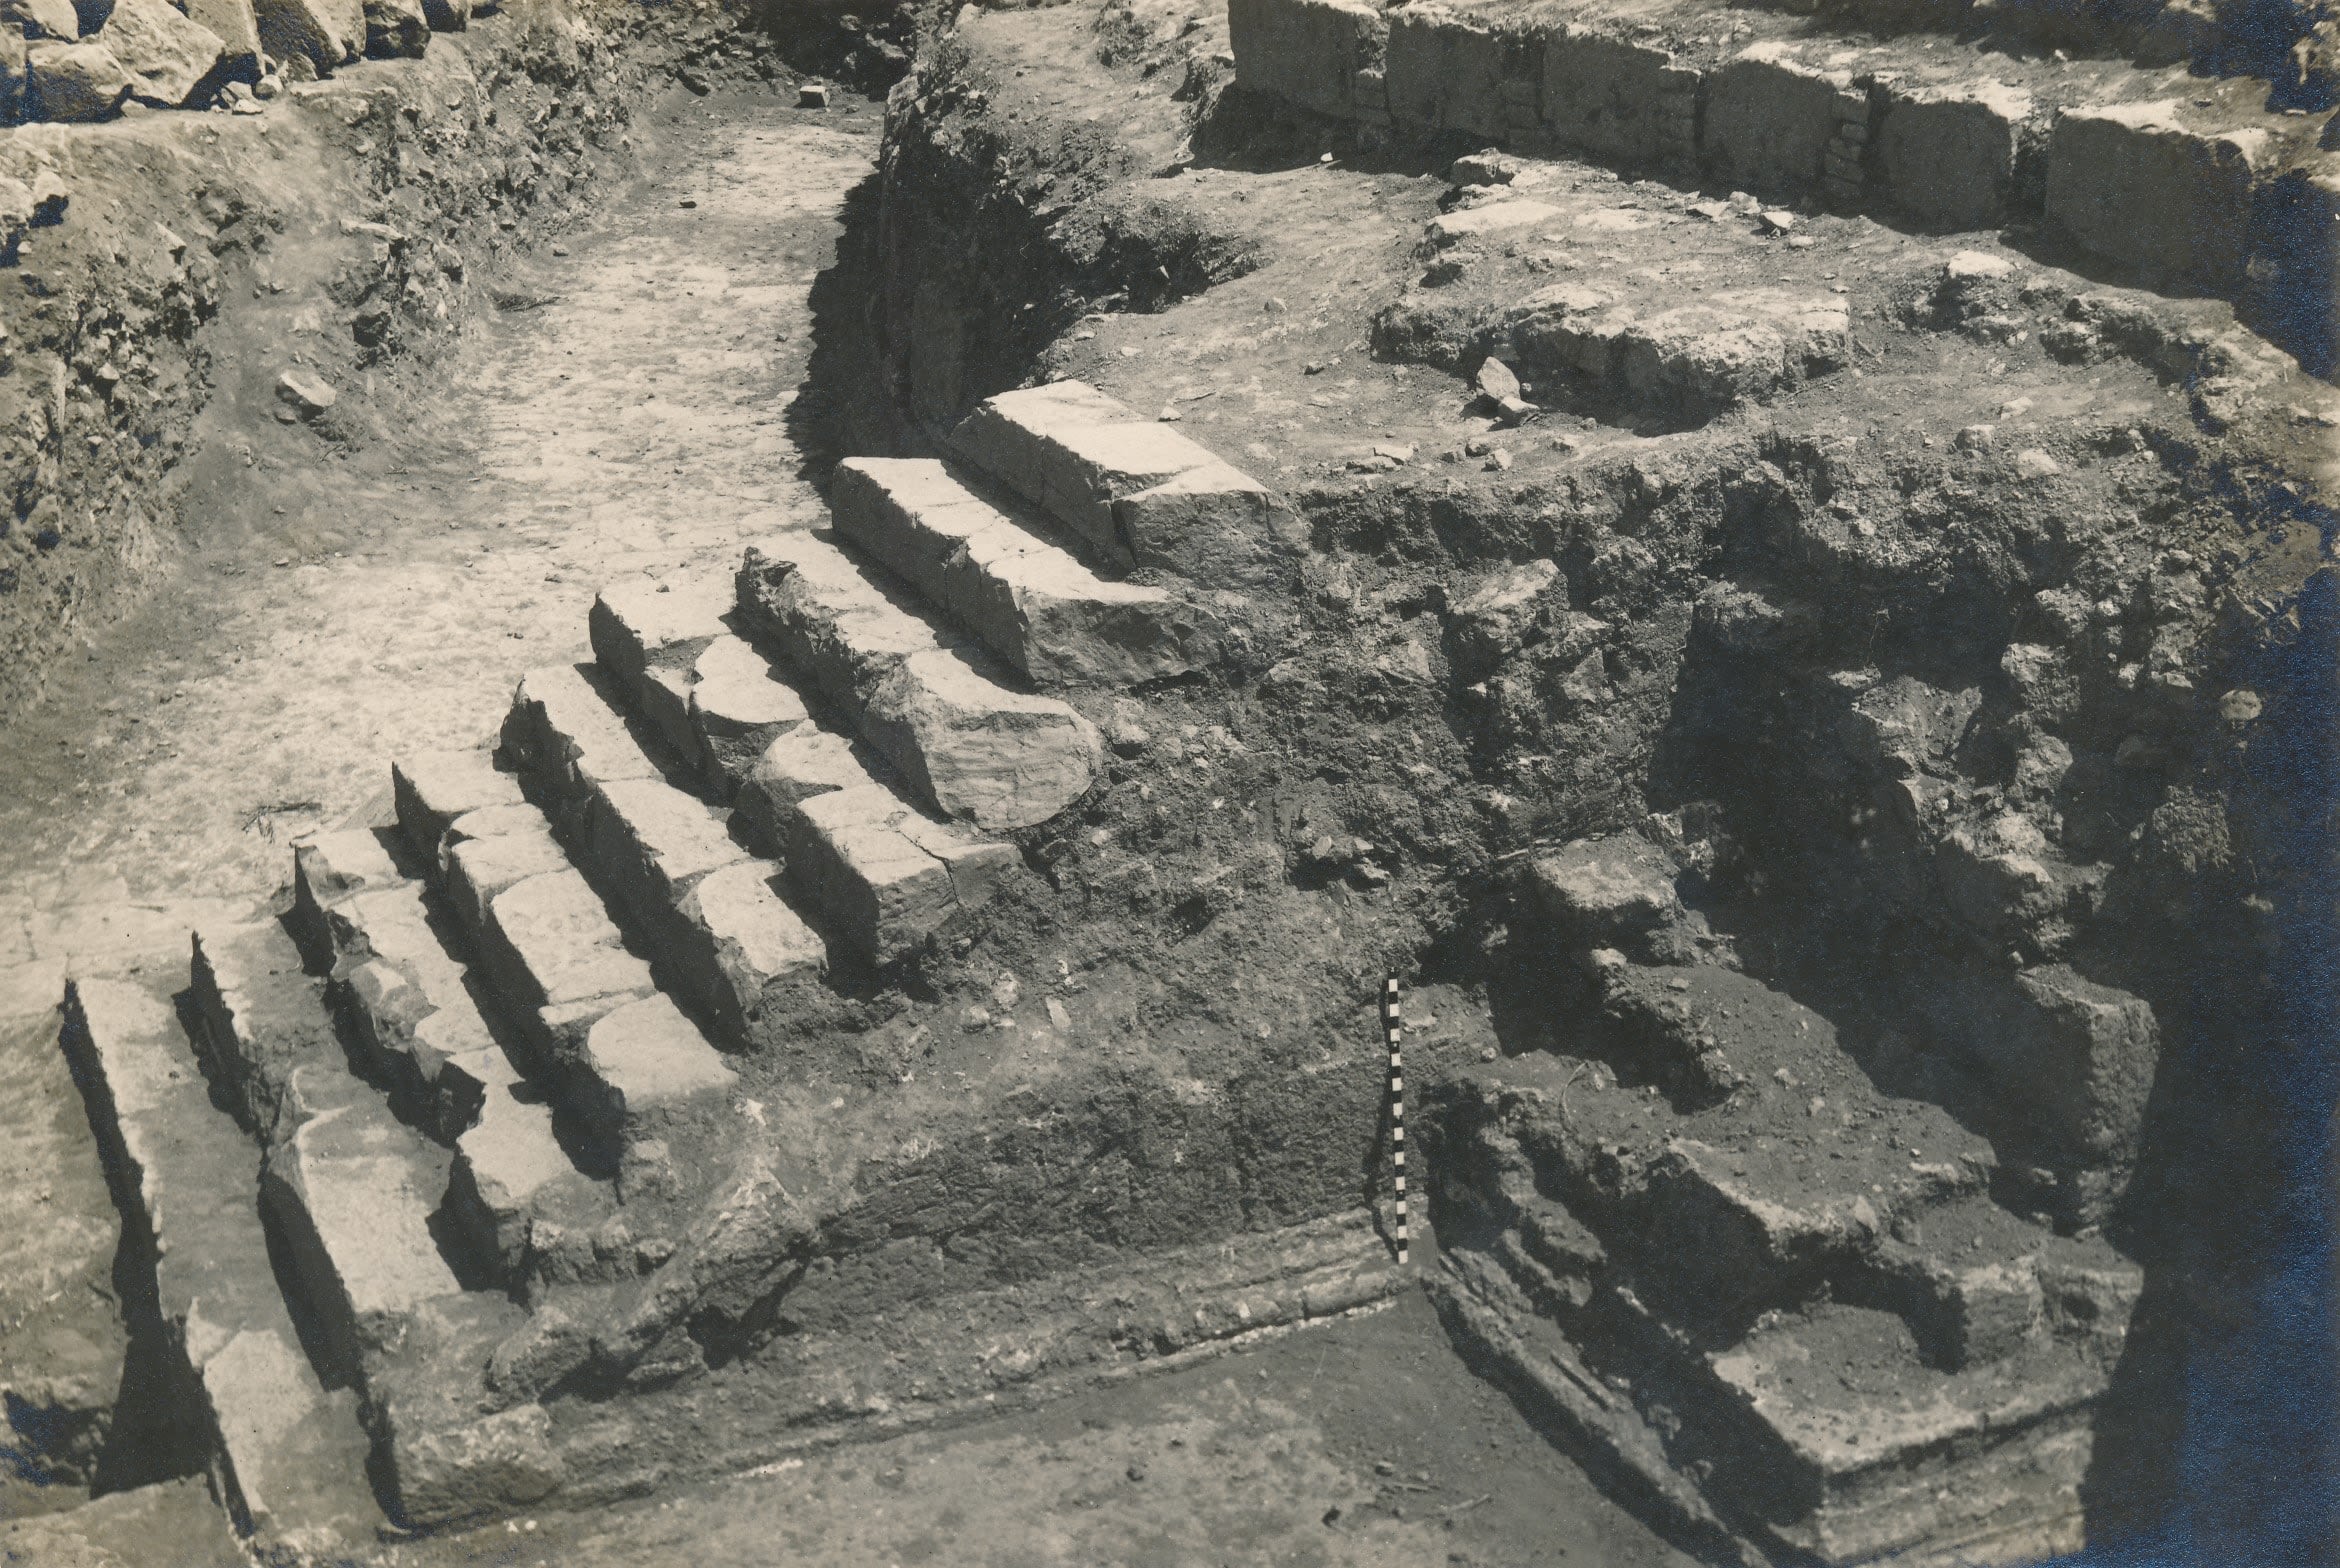
View of the north steps of the Great Stupa at Dharmarajika, Taxila, from the northwest, taken in 1912/1913, compared with view taken in 2019 by Dr Abdul Azeem. Sir John Marshall Collection, given by Dr and Mrs Spalding. DUROM.1957.1.1381
View of the north steps of the Great Stupa at Dharmarajika, Taxila, from the northwest, taken in 1912/1913, compared with view taken in 2019 by Dr Abdul Azeem. Sir John Marshall Collection, given by Dr and Mrs Spalding. DUROM.1957.1.1381
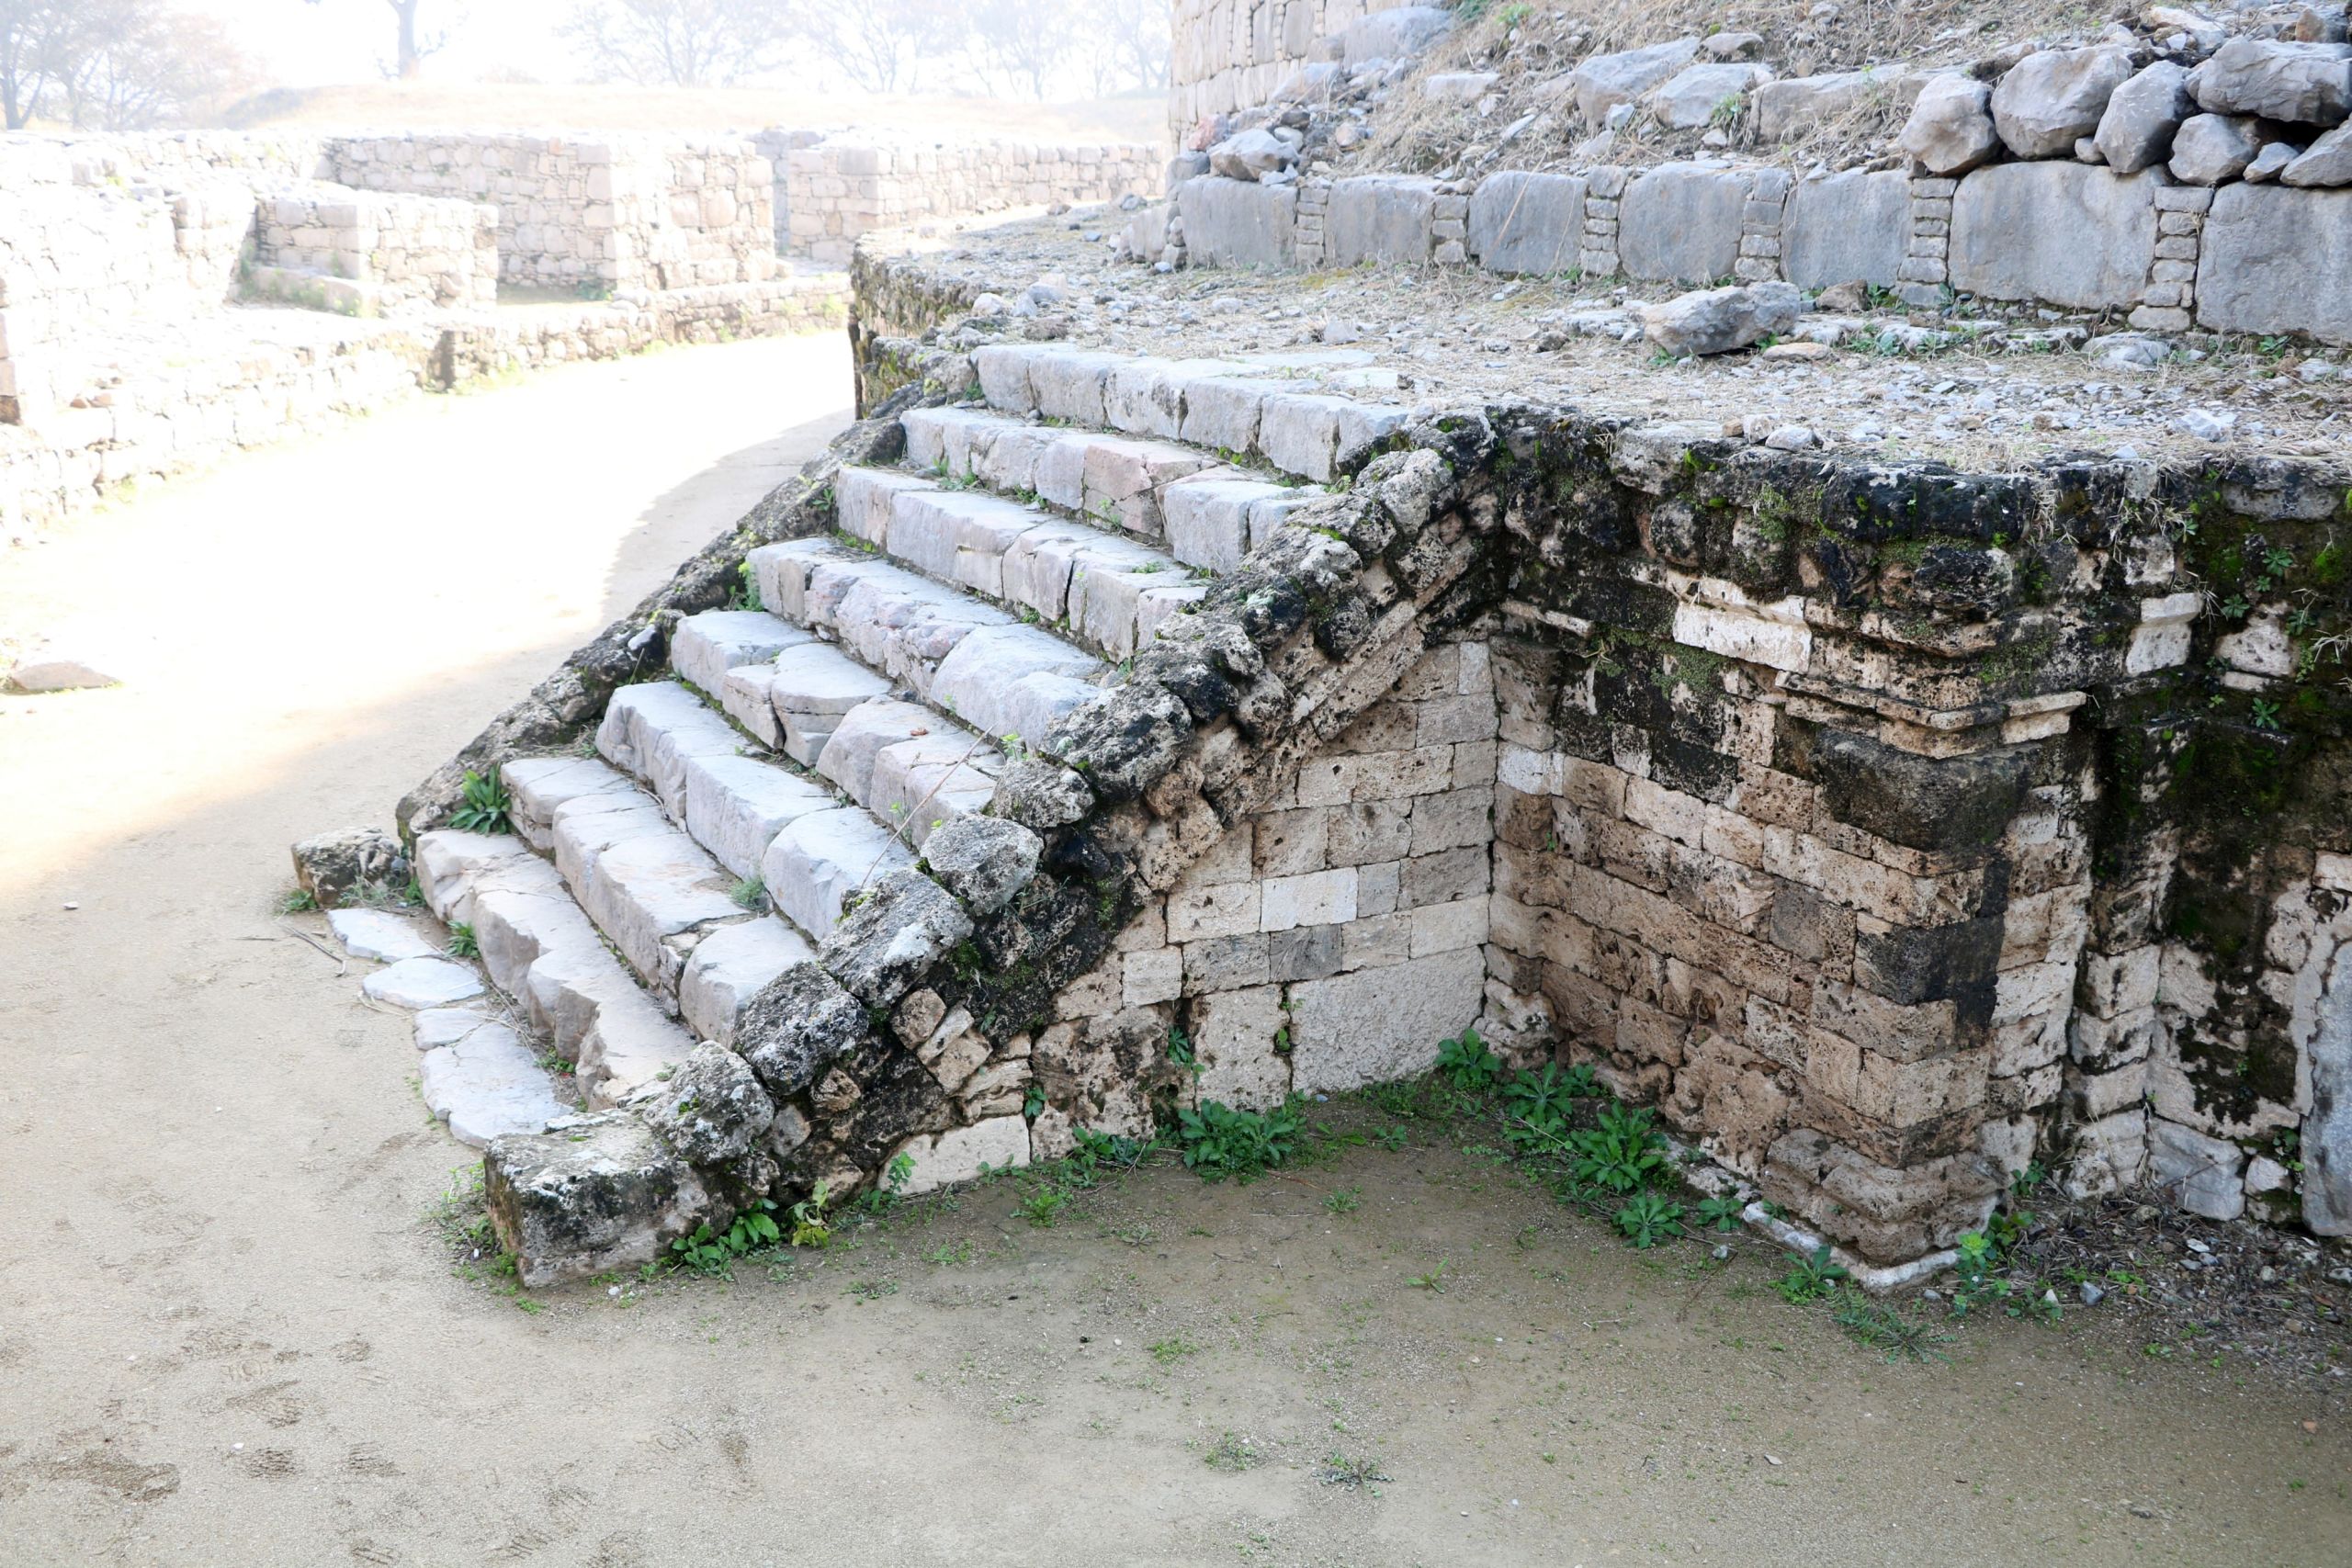
View of the north steps of the Great Stupa at Dharmarajika, Taxila, taken in 2019 by Dr Abdul Azeem.
View of the north steps of the Great Stupa at Dharmarajika, Taxila, taken in 2019 by Dr Abdul Azeem.

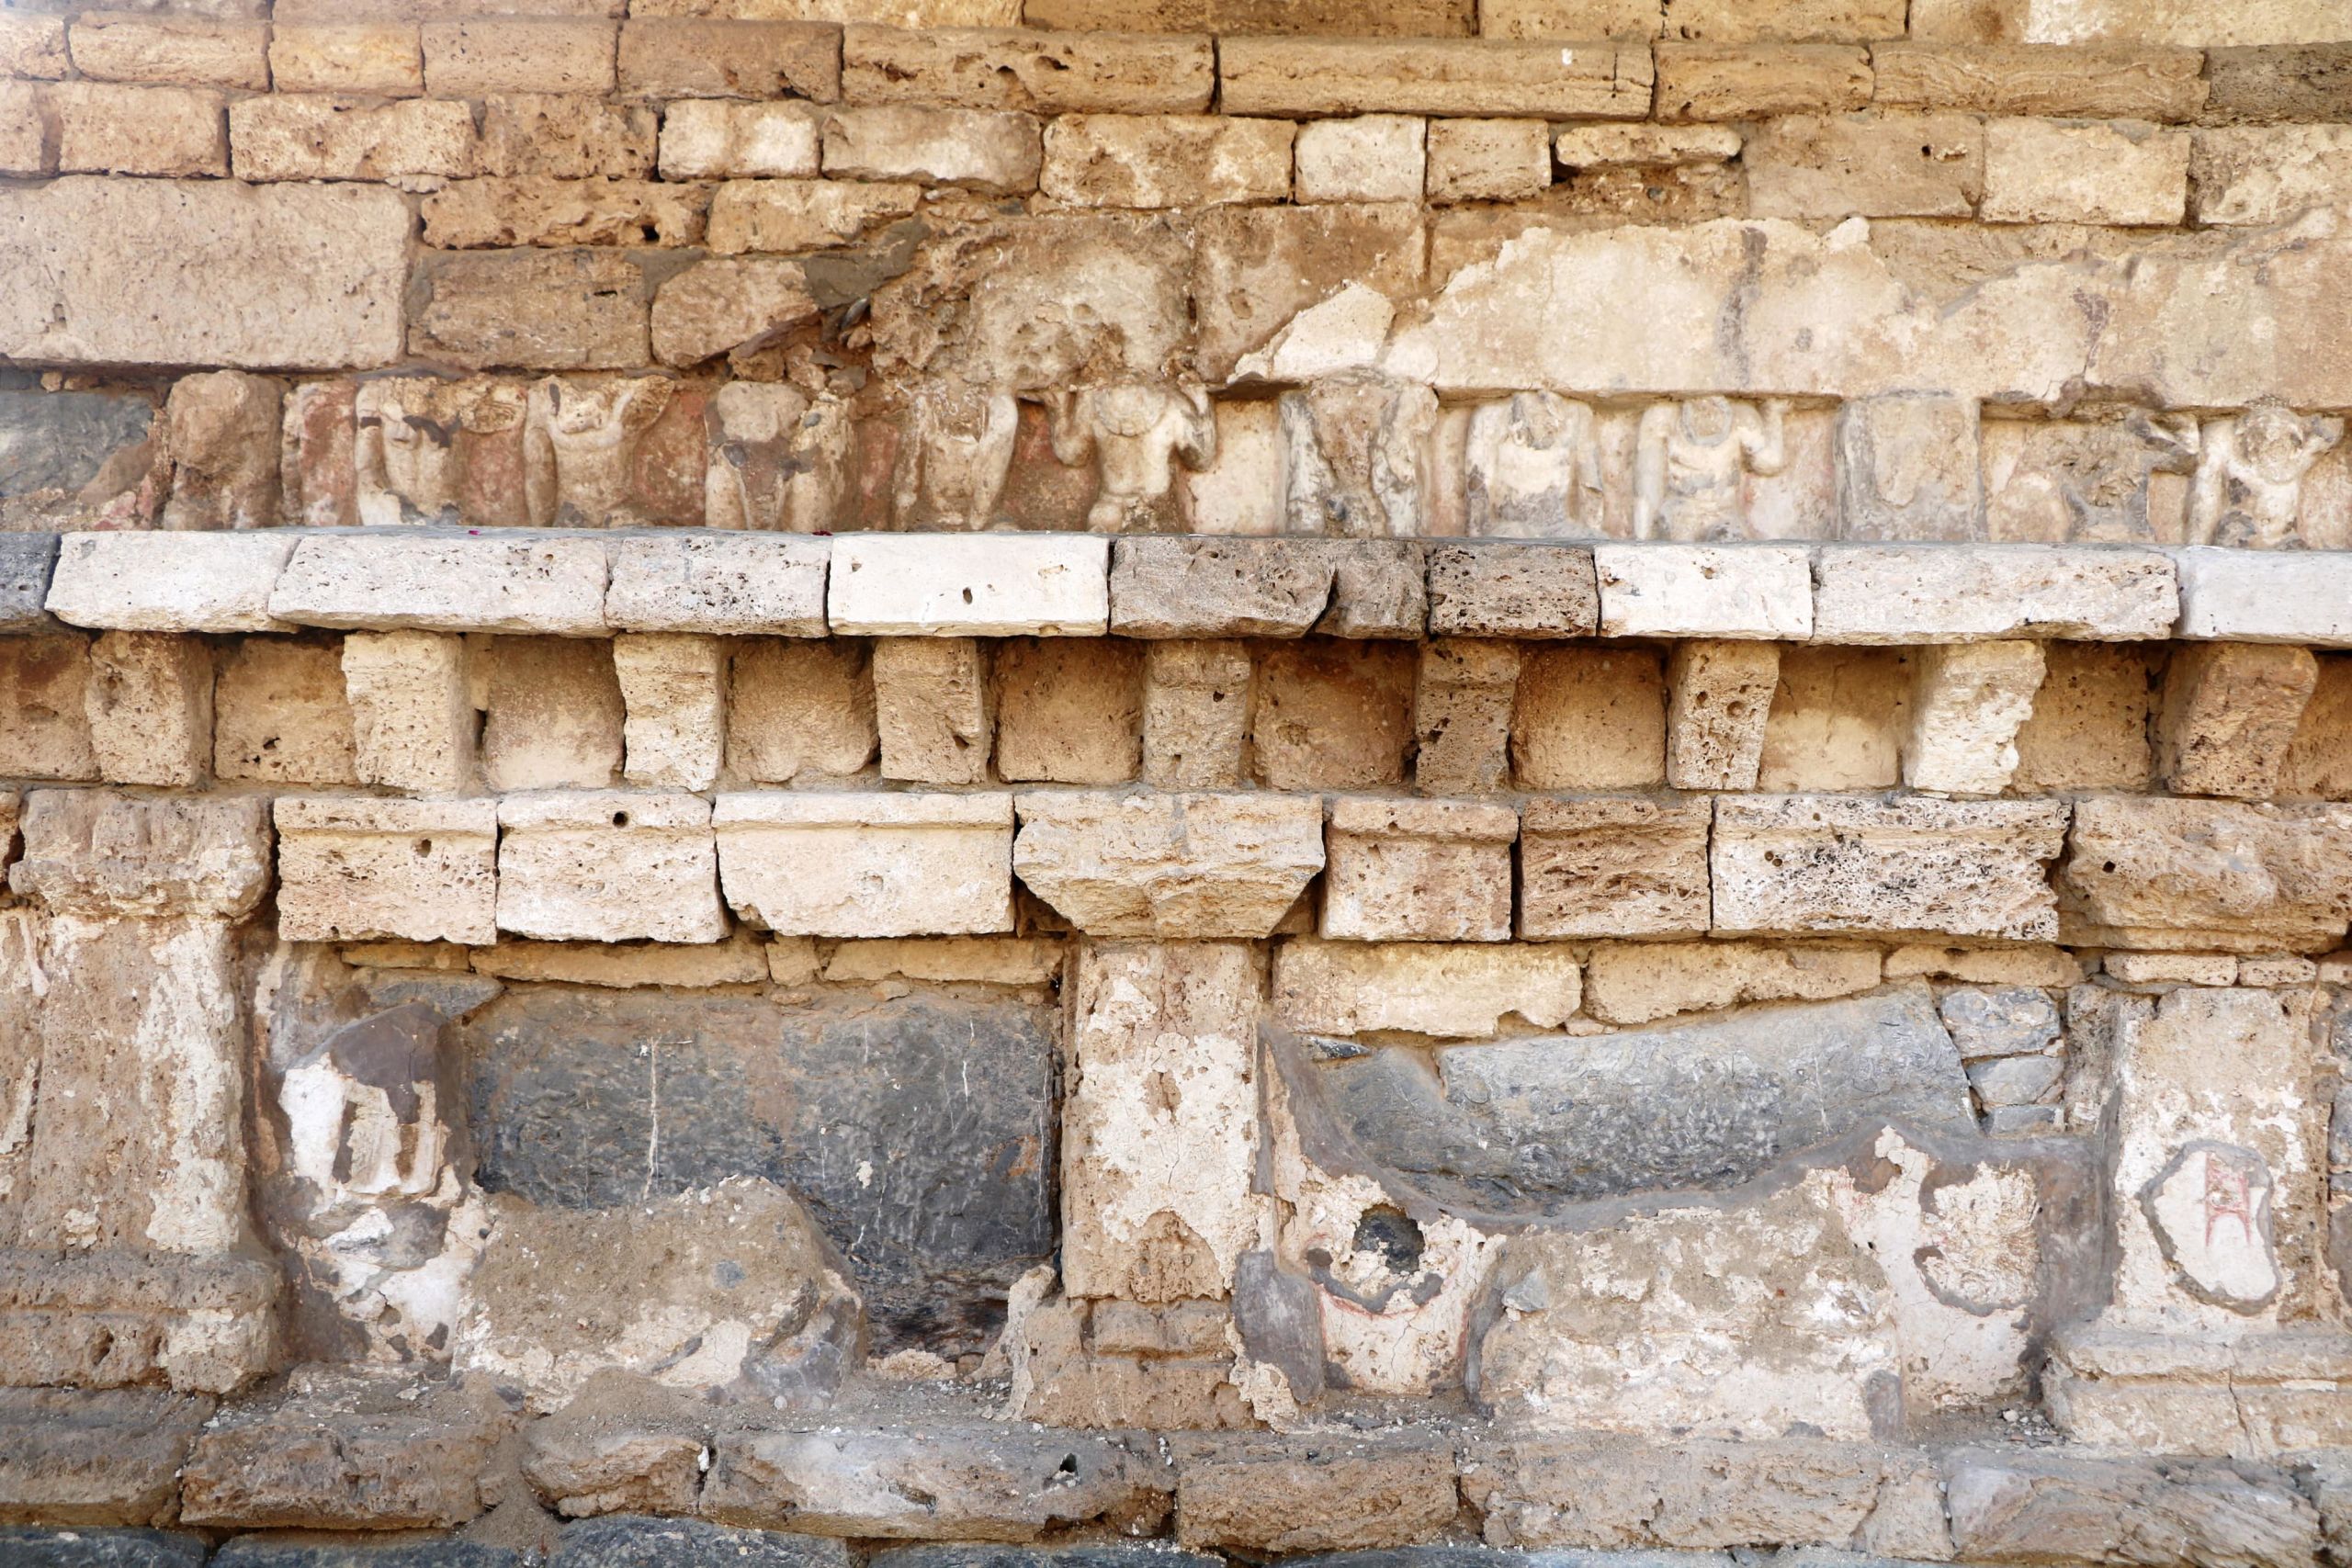
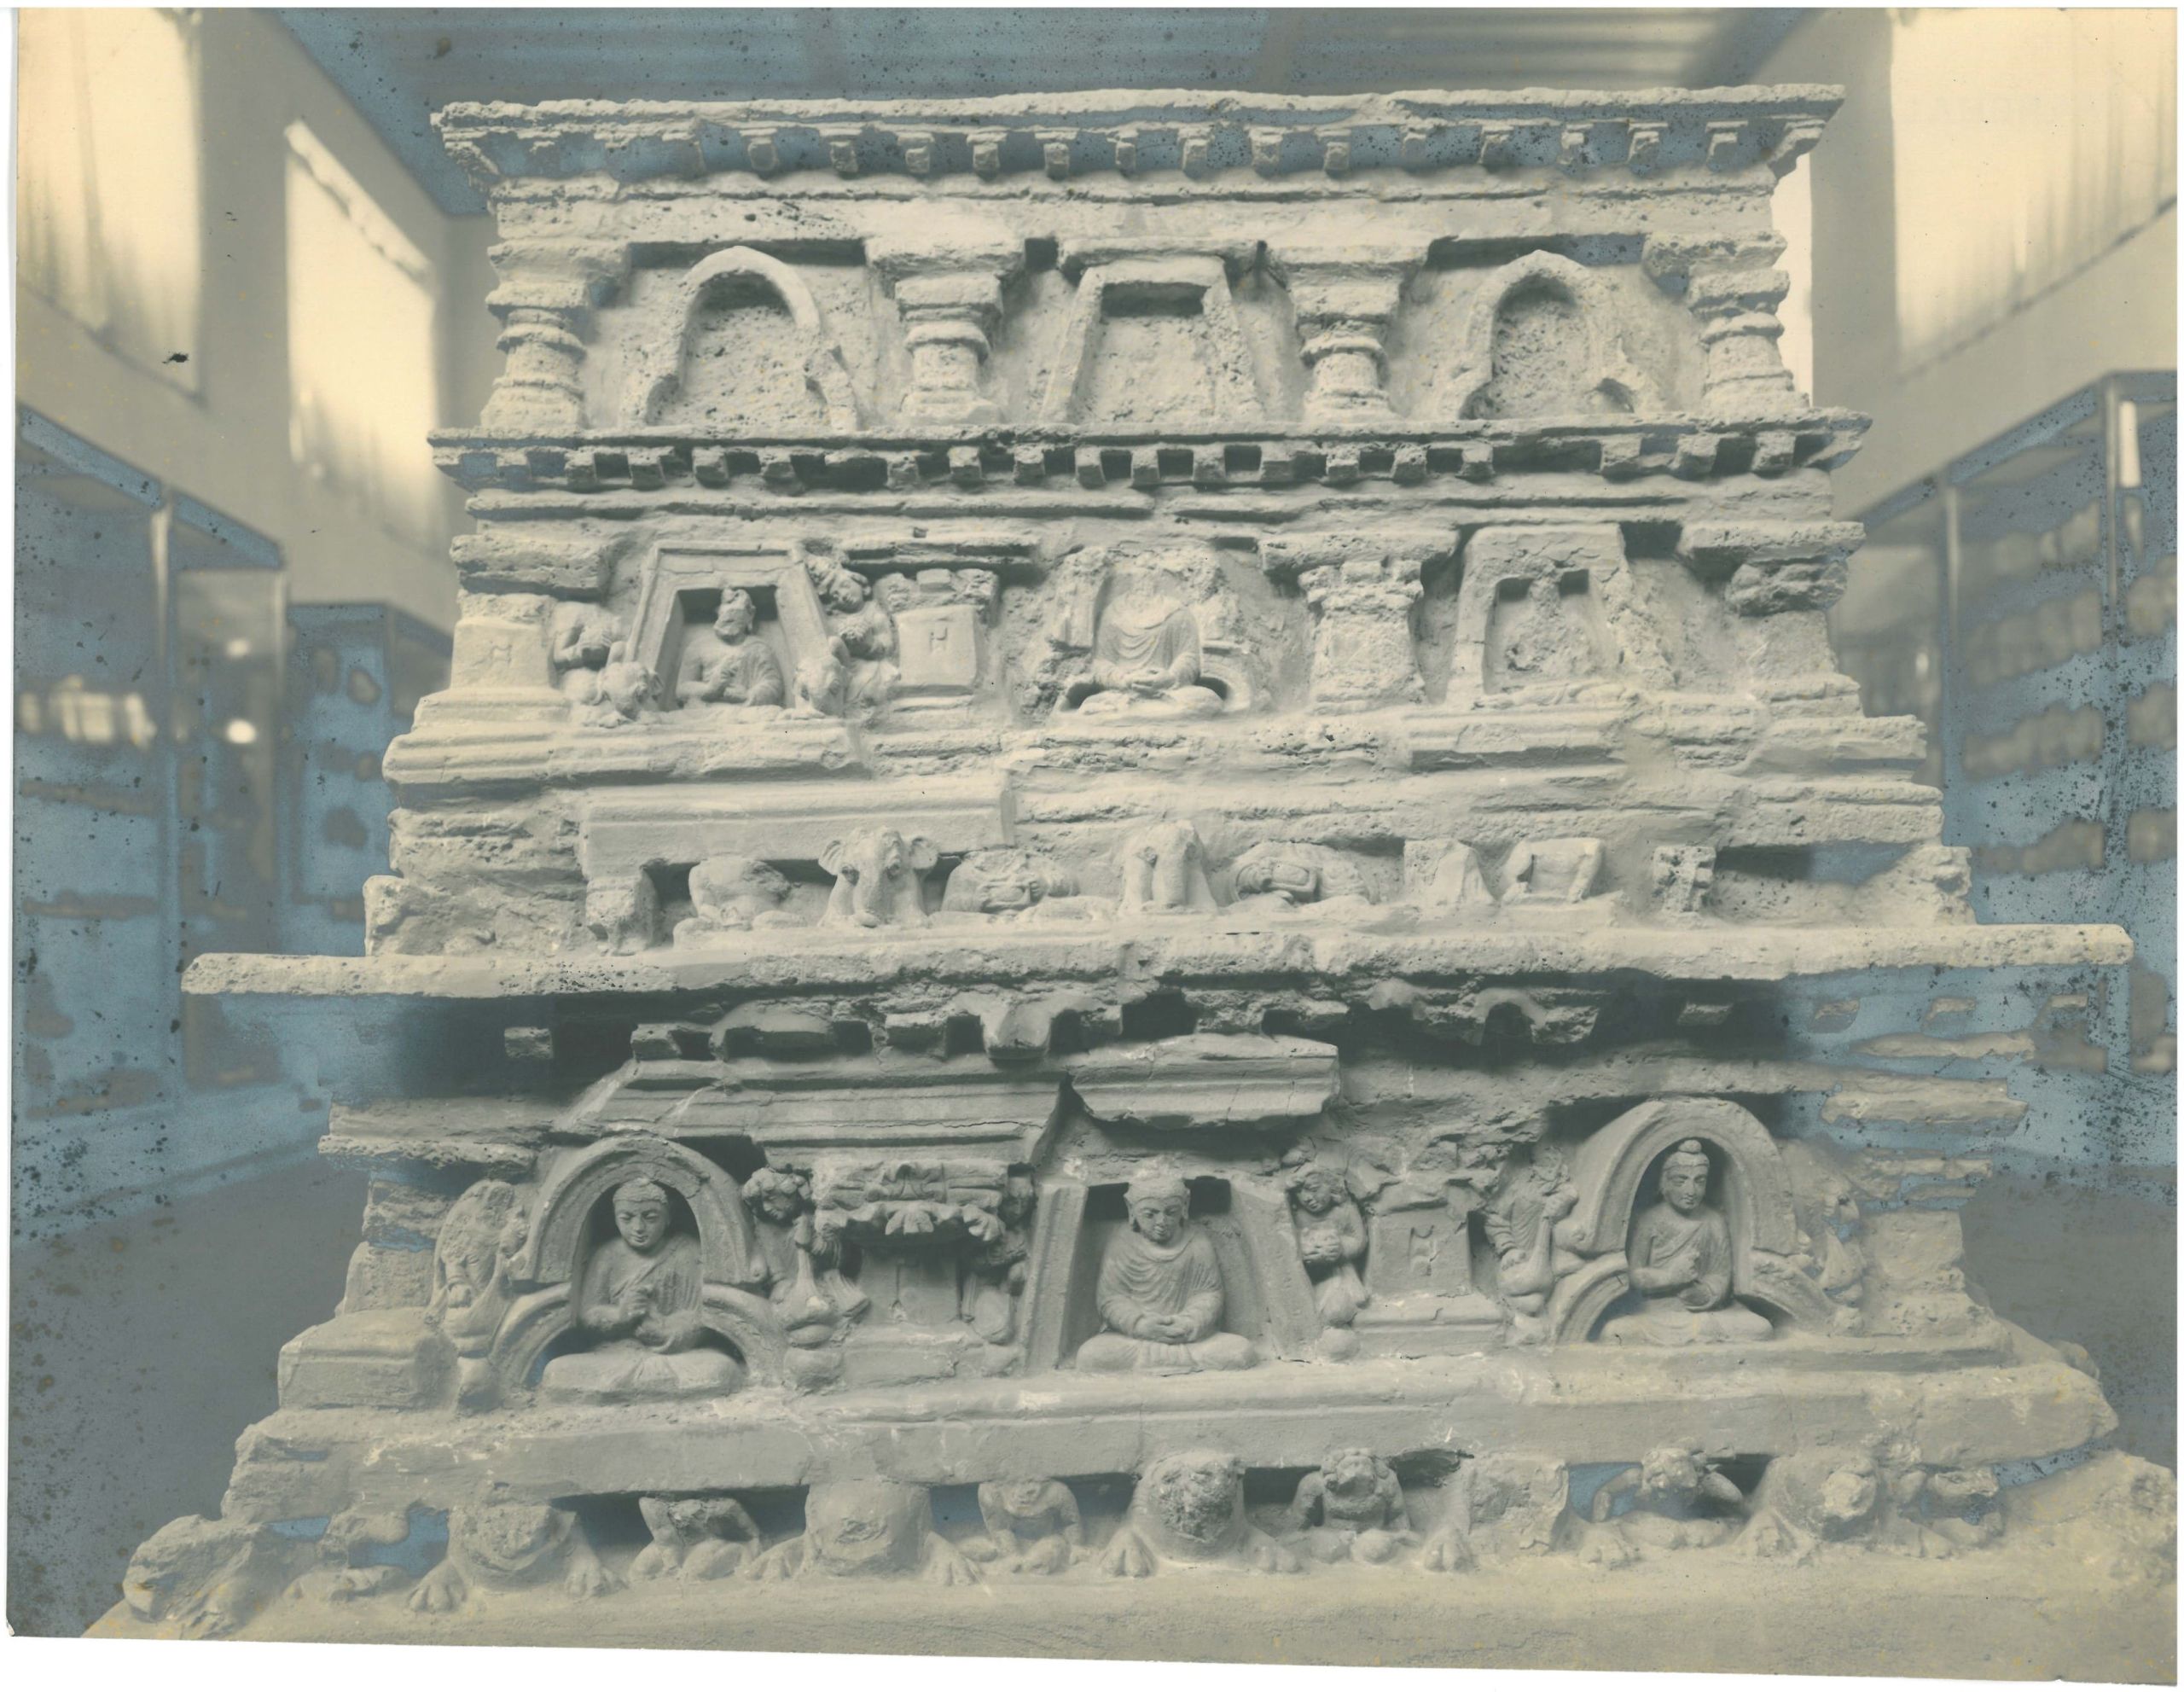
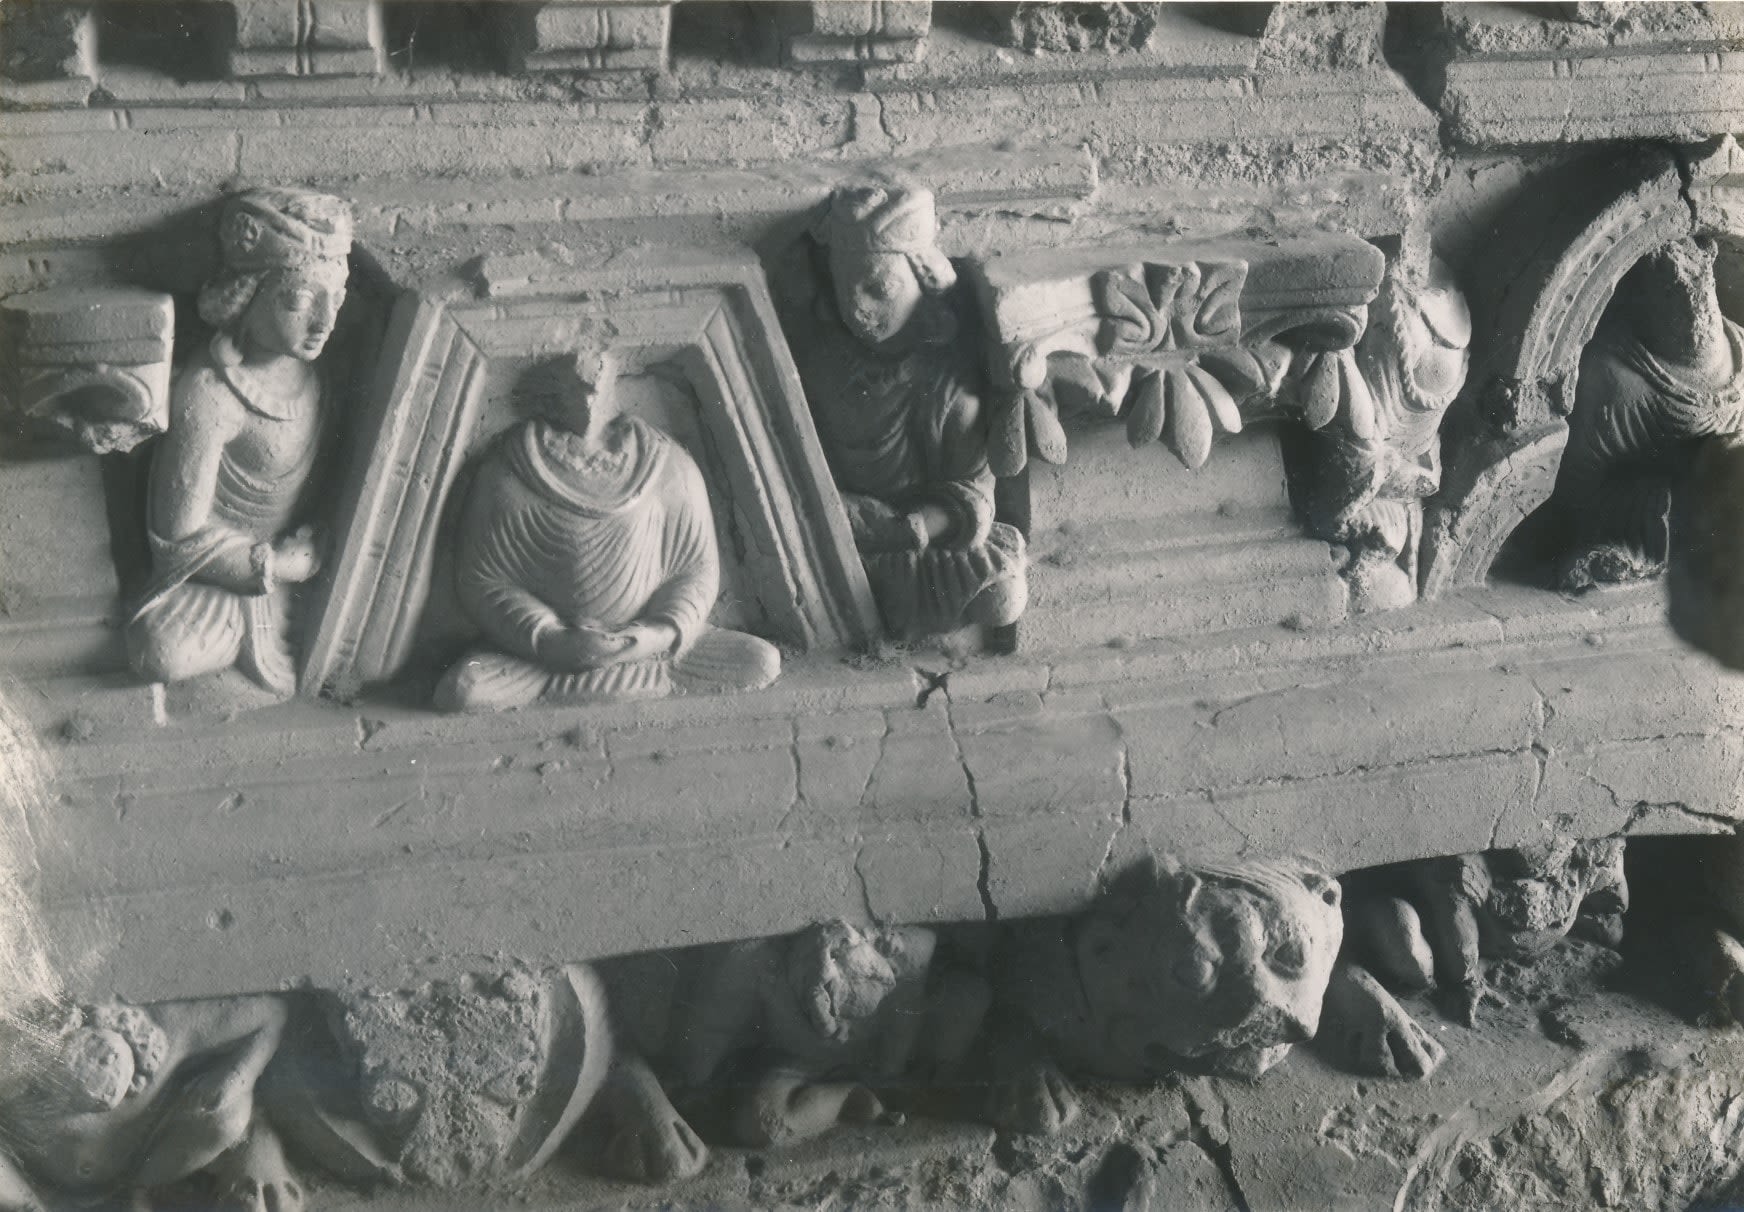
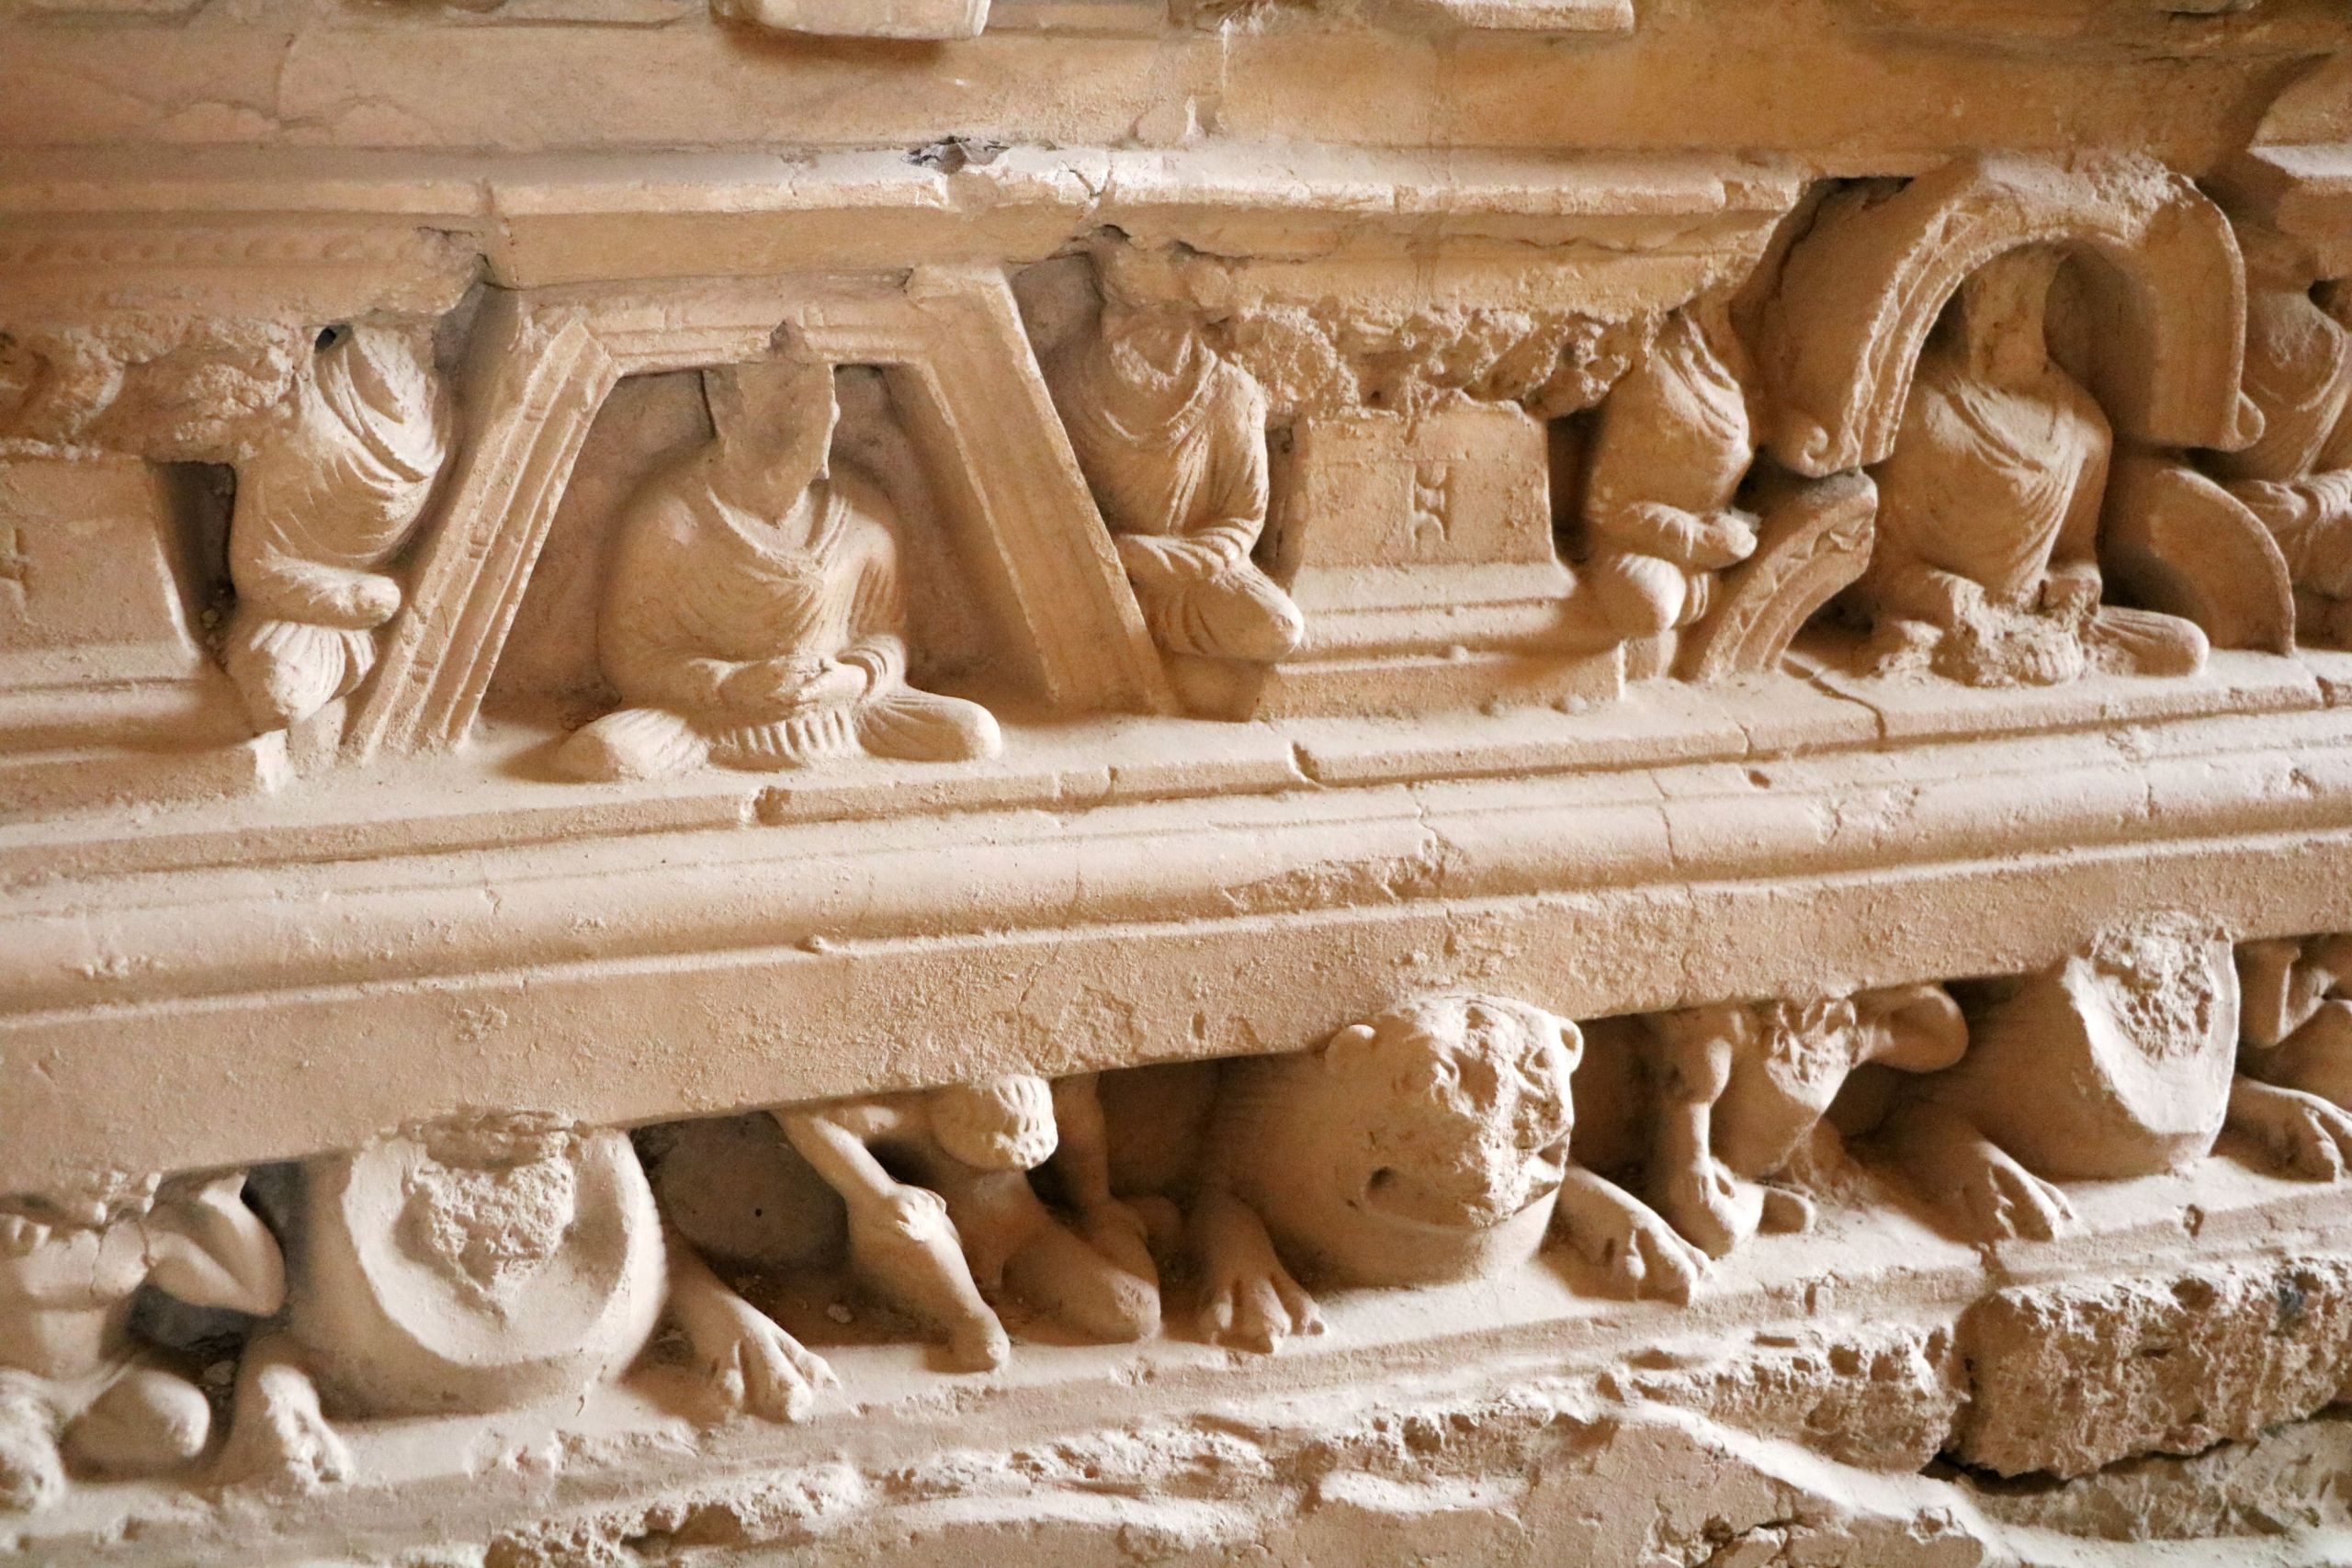
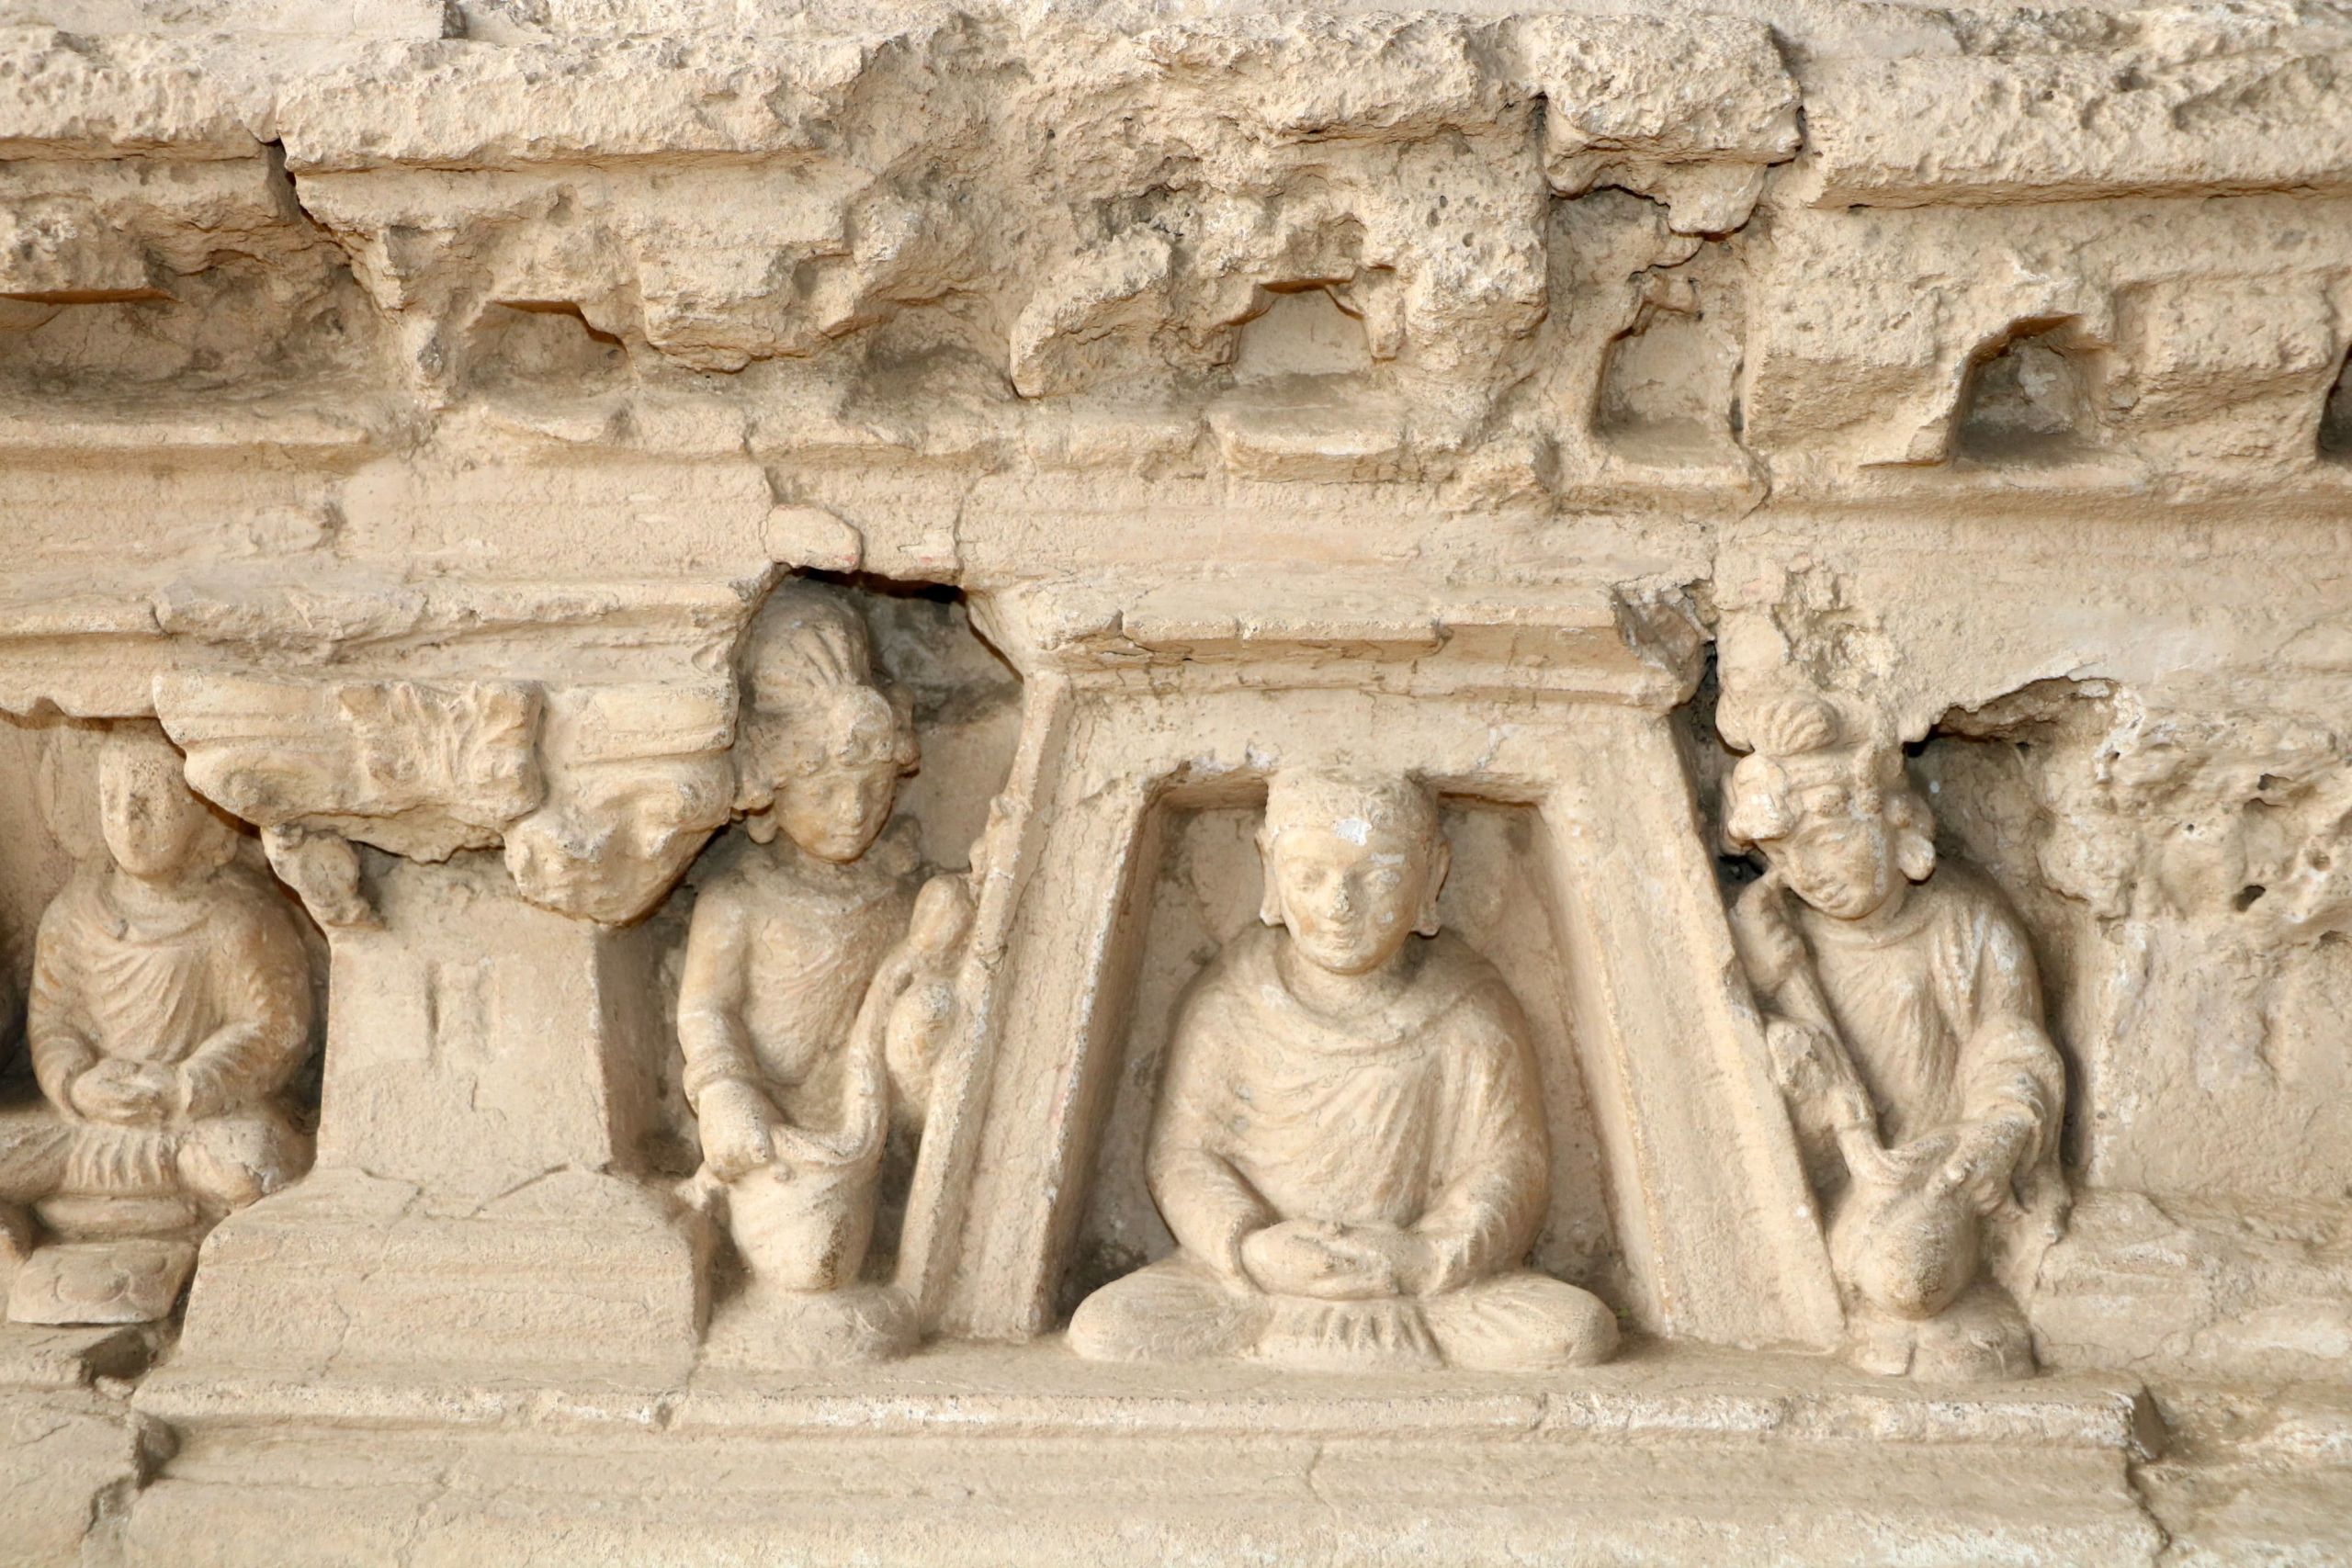
Detail of upper frieze of Stupa J at Dharmarajika, Taxila, from the northwest, taken in 1912/1913, compared with view taken in 2019 by Dr Abdul Azeem. Sir John Marshall Collection, given by Dr and Mrs Spalding. DUROM.1957.1.1414
Detail of upper frieze of Stupa J at Dharmarajika, Taxila, from the northwest, taken in 1912/1913, compared with view taken in 2019 by Dr Abdul Azeem. Sir John Marshall Collection, given by Dr and Mrs Spalding. DUROM.1957.1.1414
Detail of upper frieze of Stupa J at Dharmarajika, Taxila, from the northwest, taken in 2019 by Dr Abdul Azeem.
Detail of upper frieze of Stupa J at Dharmarajika, Taxila, from the northwest, taken in 2019 by Dr Abdul Azeem.

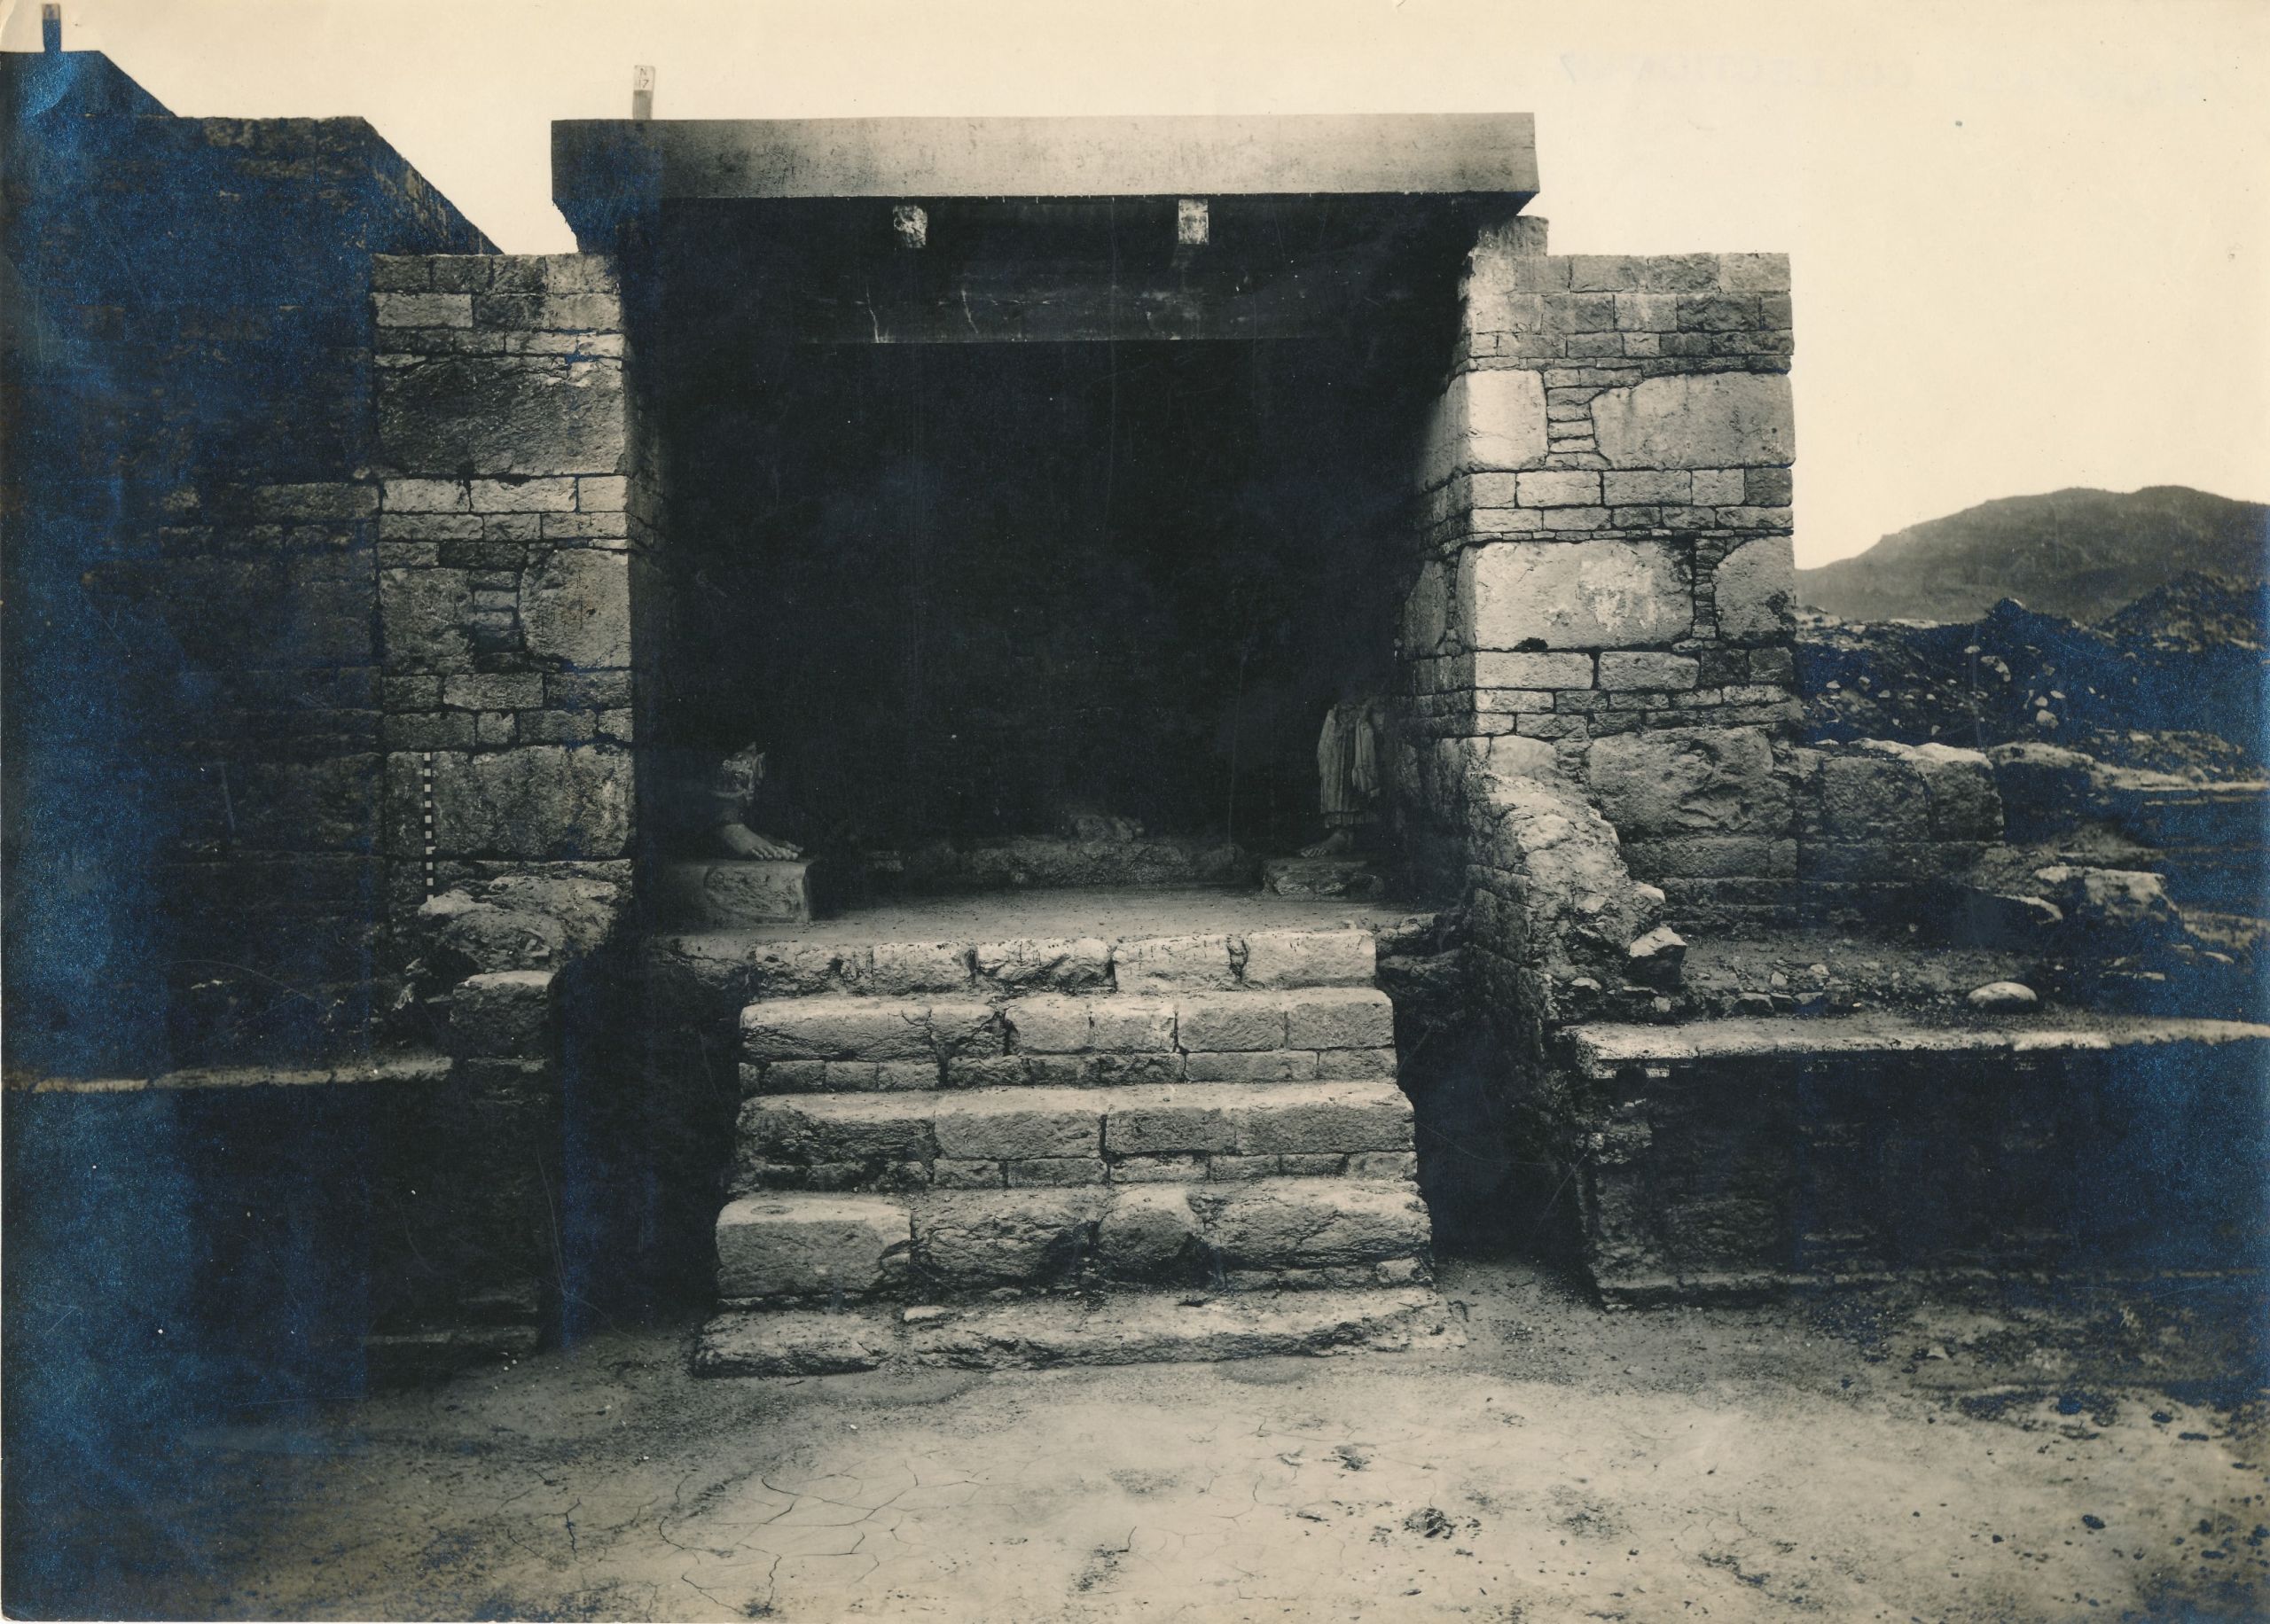
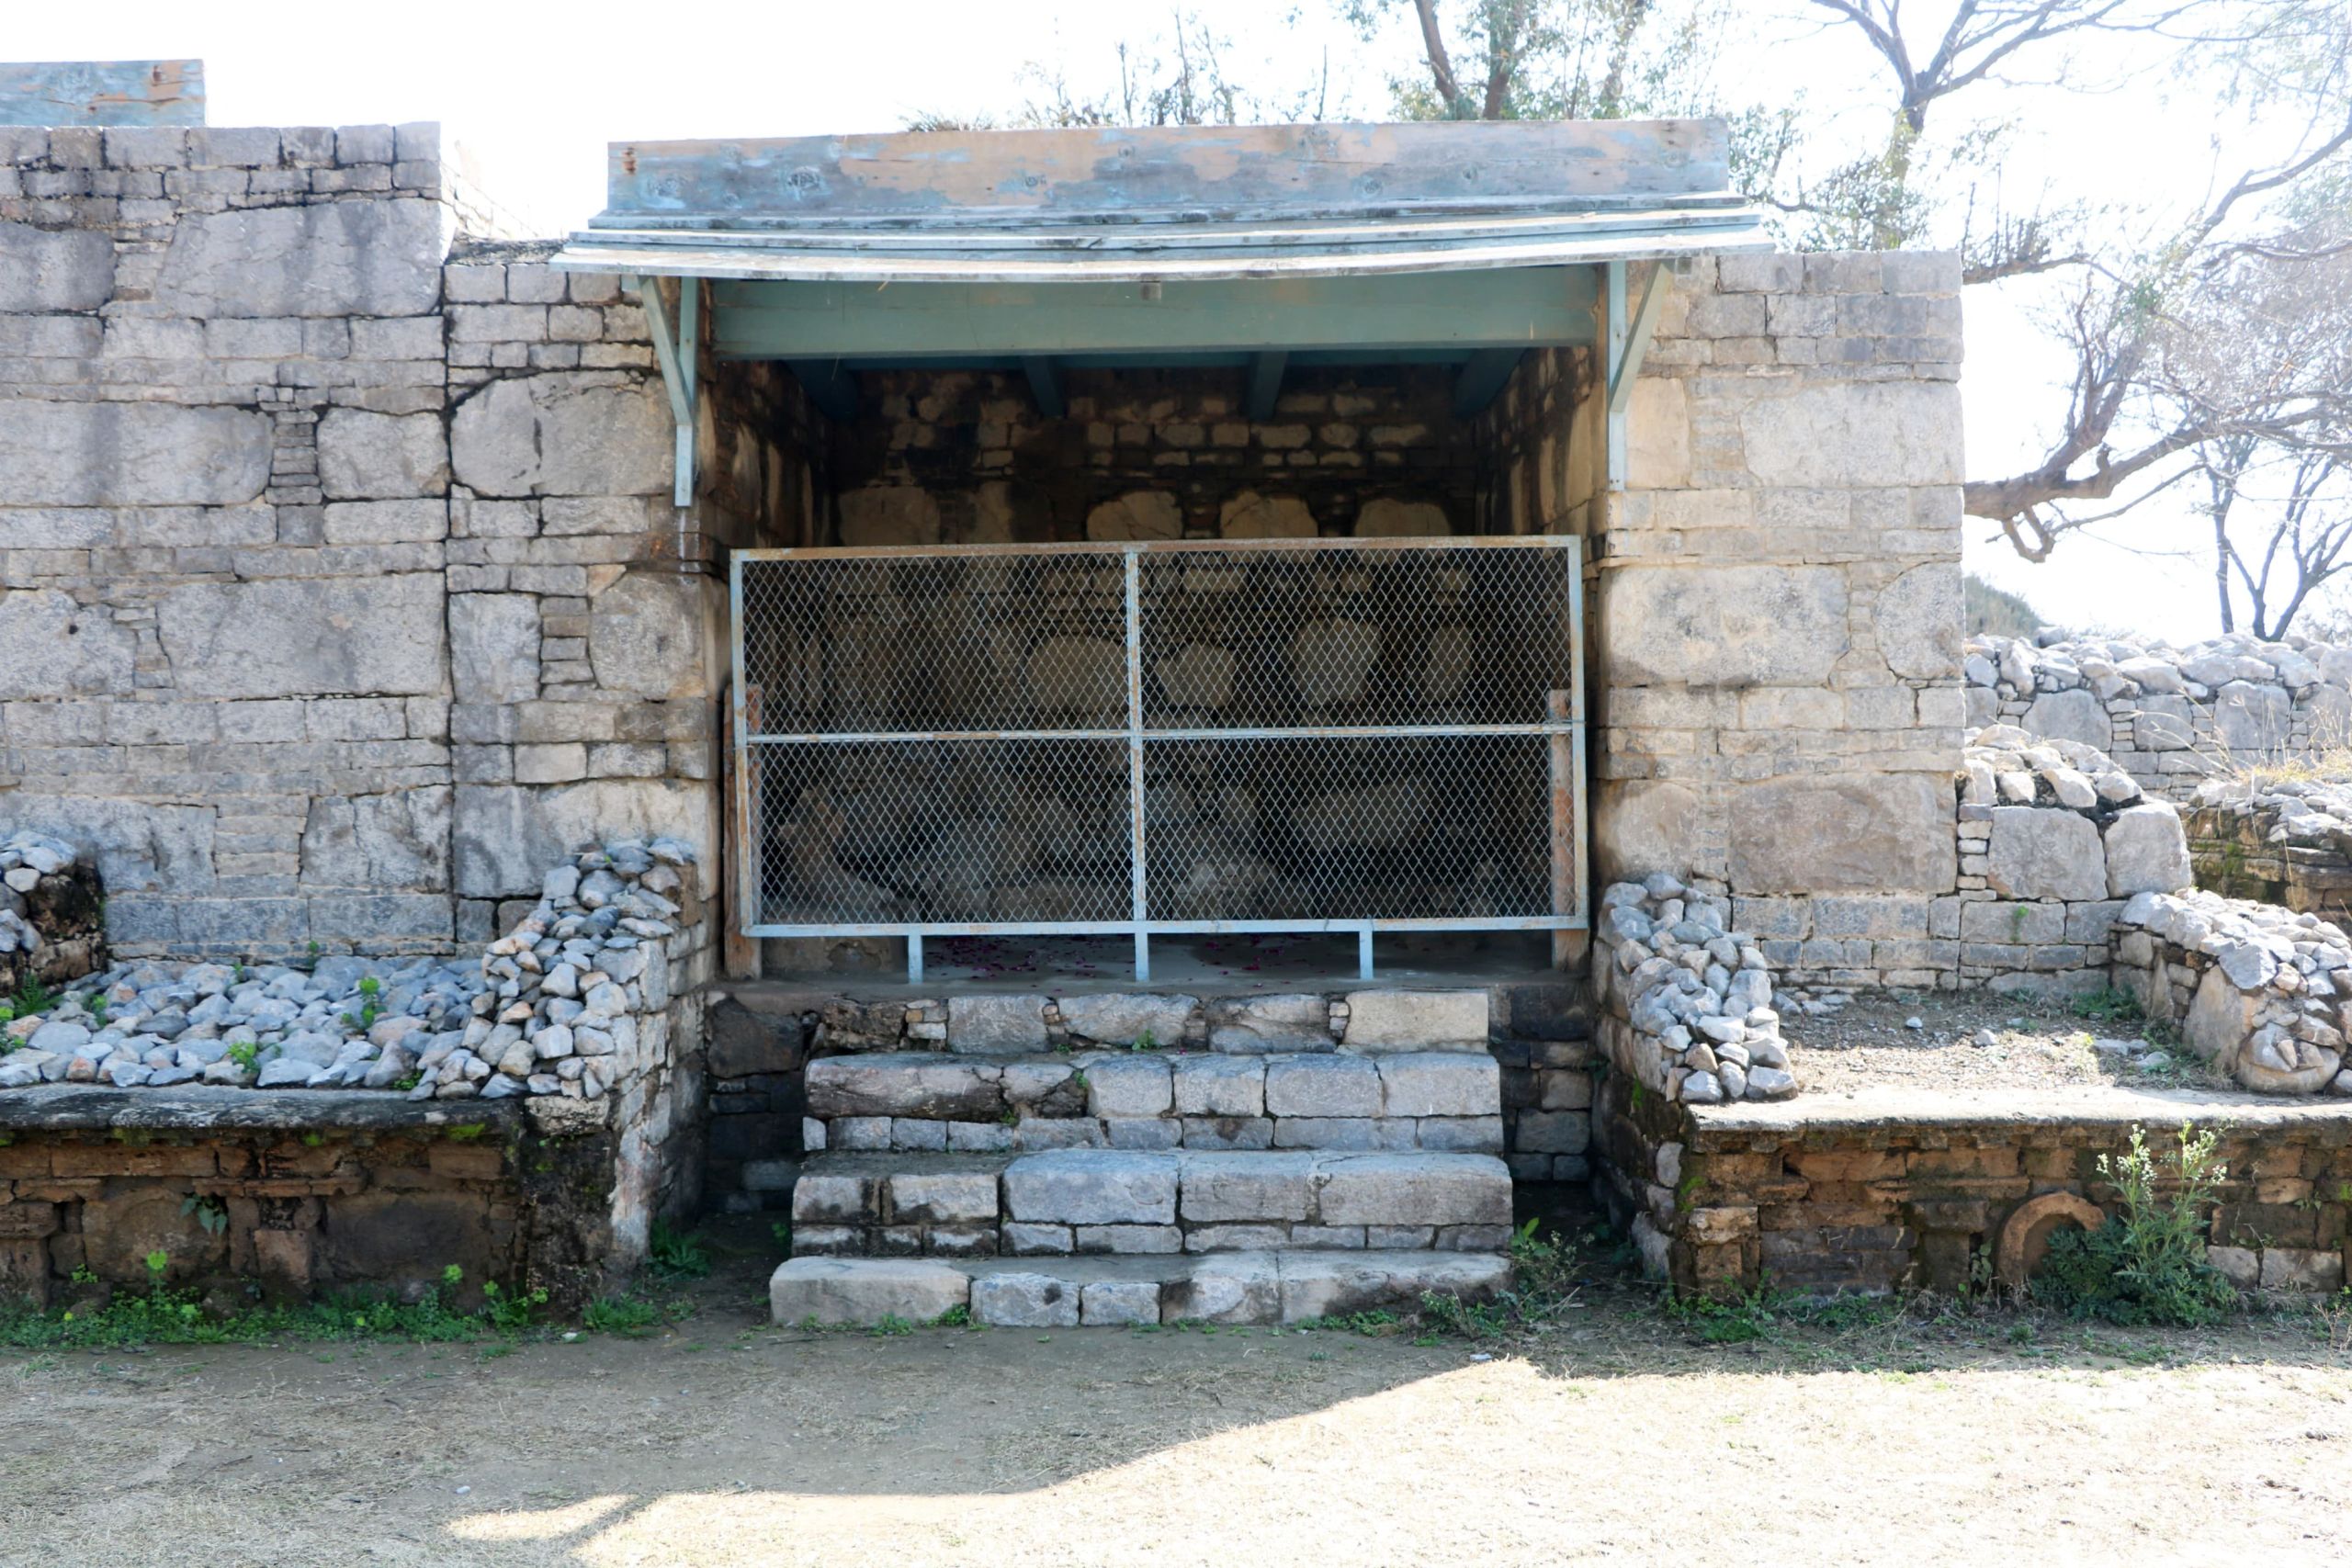
Chapel N17 at Dharmarajika, Taxila, after repairs, taken in 1915/1916, compared with view taken in 2019 by Dr Abdul Azeem. Sir John Marshall Collection, given by Dr and Mrs Spalding. DUROM.1957.1.1427
Chapel N17 at Dharmarajika, Taxila, after repairs, taken in 1915/1916, compared with view taken in 2019 by Dr Abdul Azeem. Sir John Marshall Collection, given by Dr and Mrs Spalding. DUROM.1957.1.1427
Chapel N17 at Dharmarajika, Taxila, after repairs, taken in 2019 by Dr Abdul Azeem.
Chapel N17 at Dharmarajika, Taxila, after repairs, taken in 2019 by Dr Abdul Azeem.
Although it was impossible to recreate all of Marshall’s images, it was possible to identify that many of the monuments conserved by Marshall at Taxila were still intact, and that his original programmes of conservation had been successful.
Unfortunately, the research also revealed that a lack of regular maintenance had led to the deterioration of some of the exposed plaster sculptures and reliefs across the site.
In many instances, more recent conservation work had also significantly altered the condition and appearance of the monuments.
Durham University’s Marshall Collection therefore has the potential to provide critical information to help enhance the future protection, conservation and management of key monuments across Taxila.

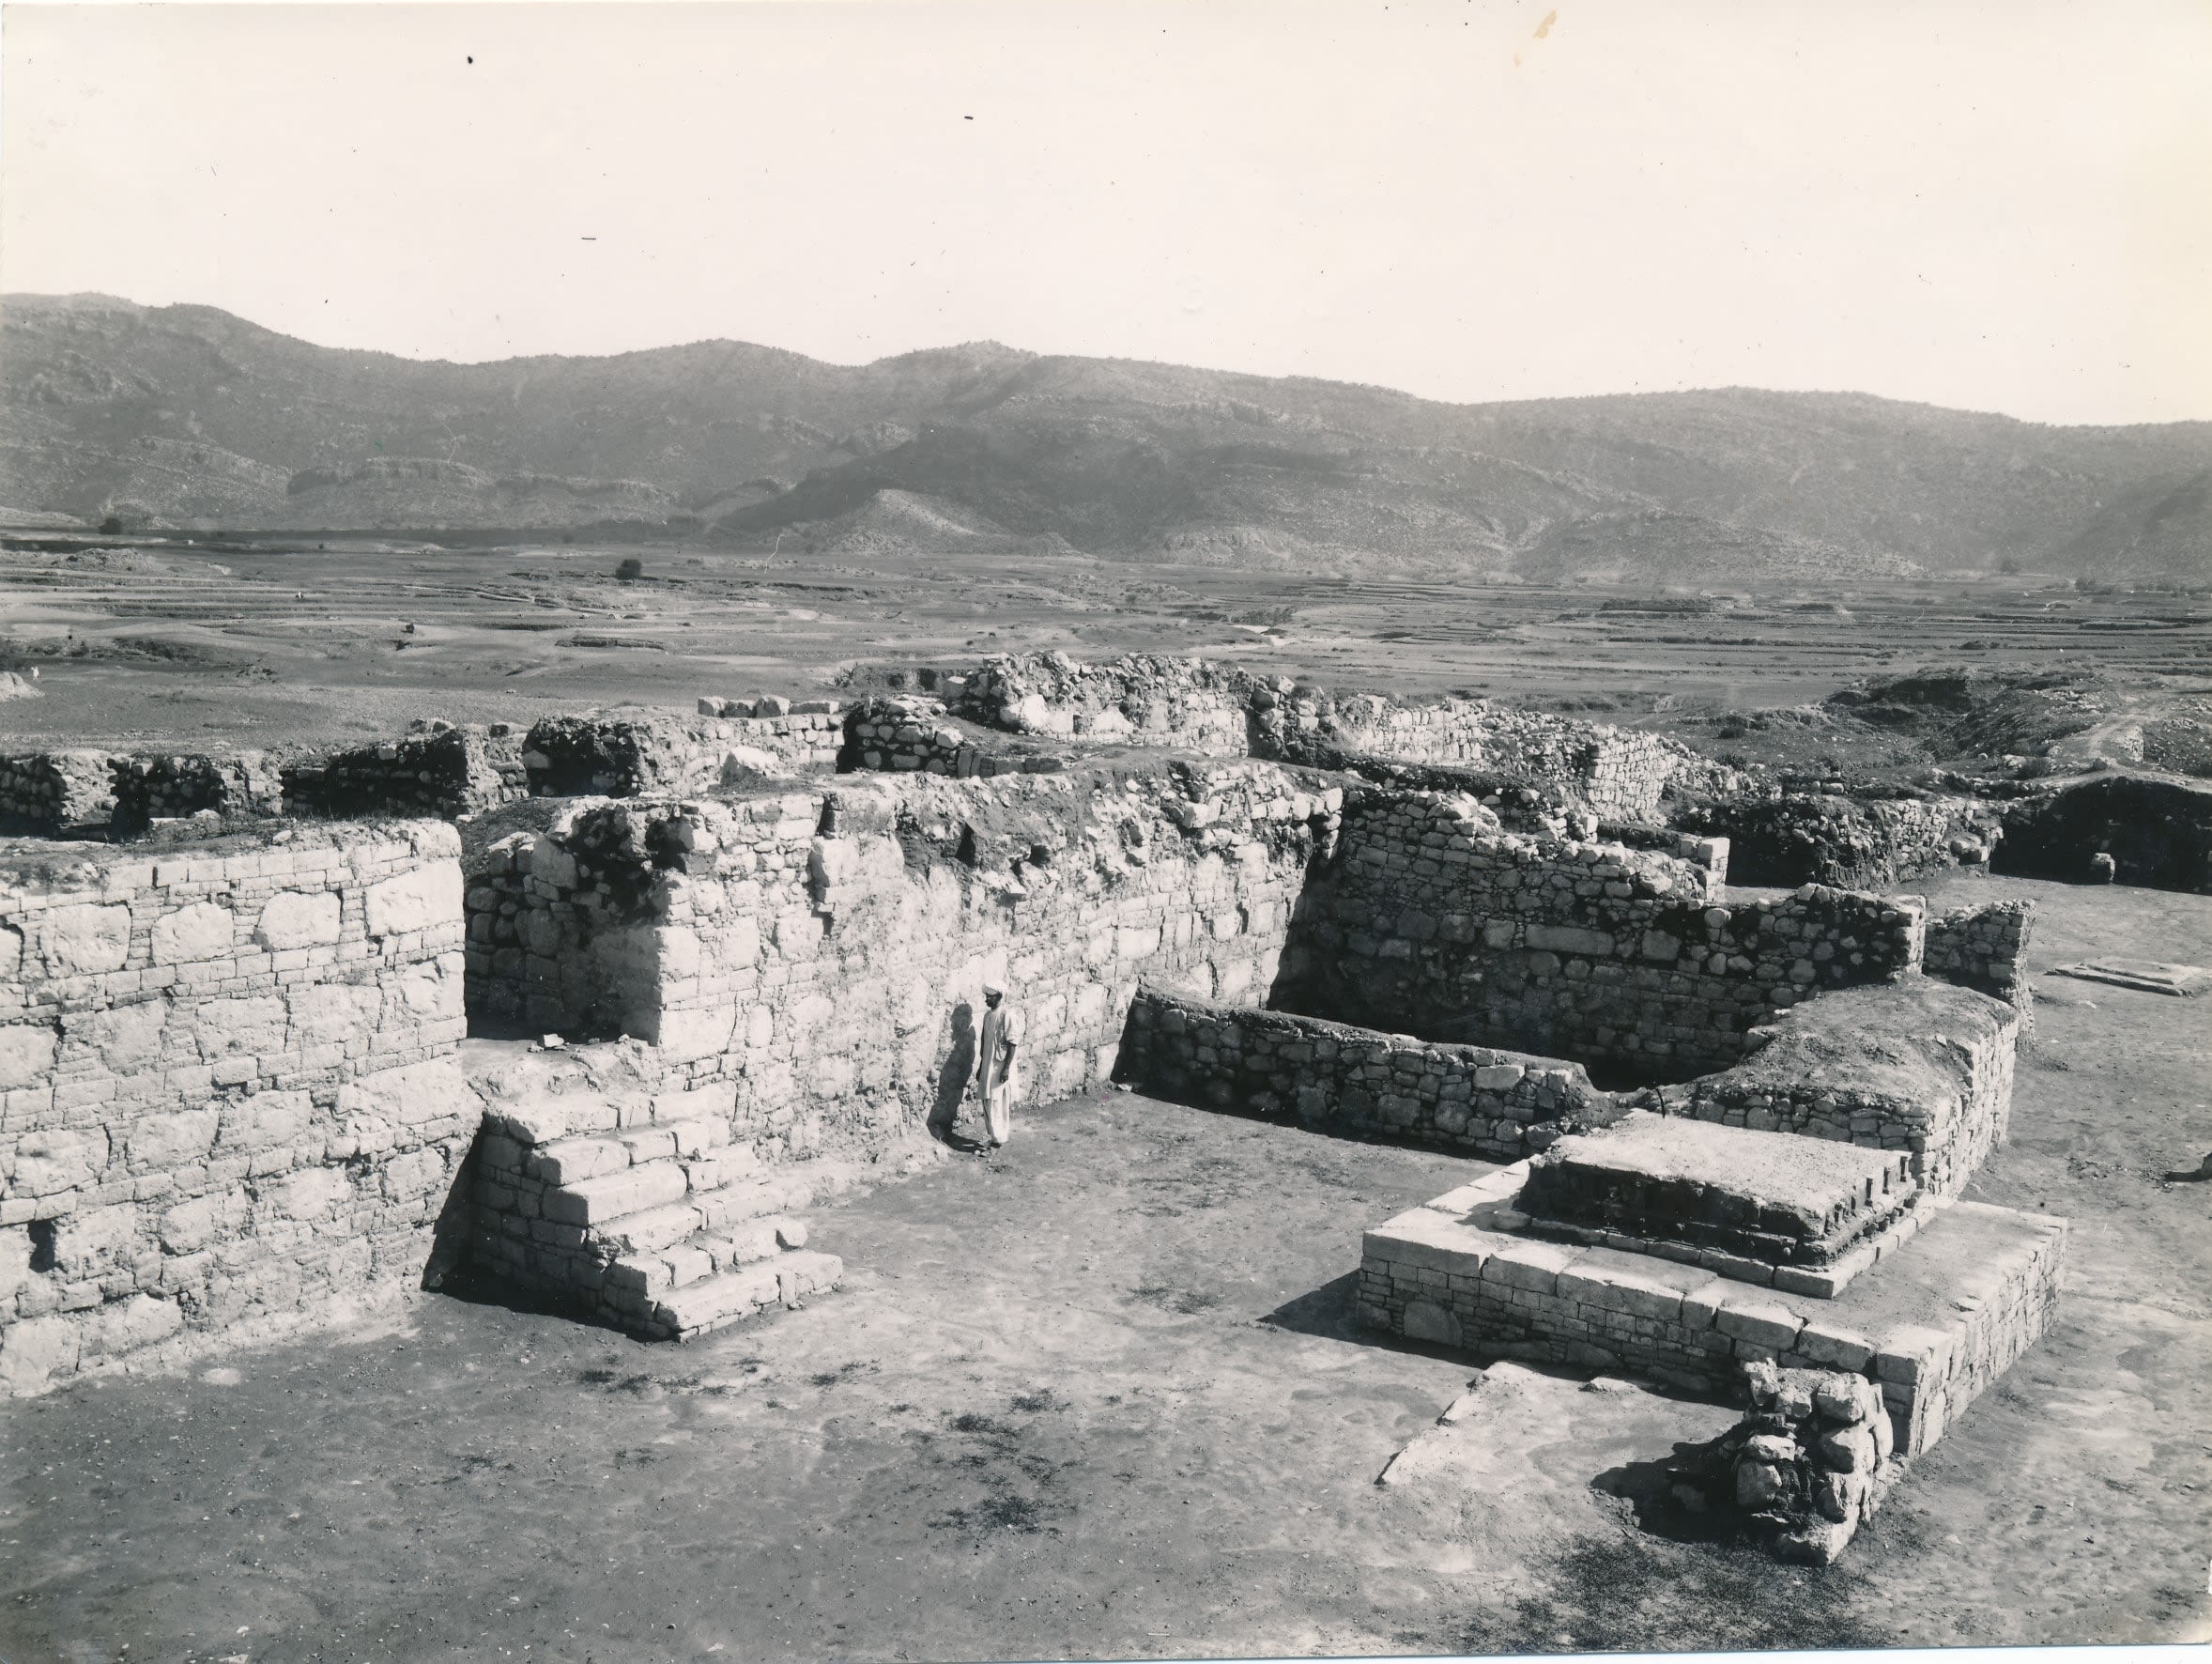

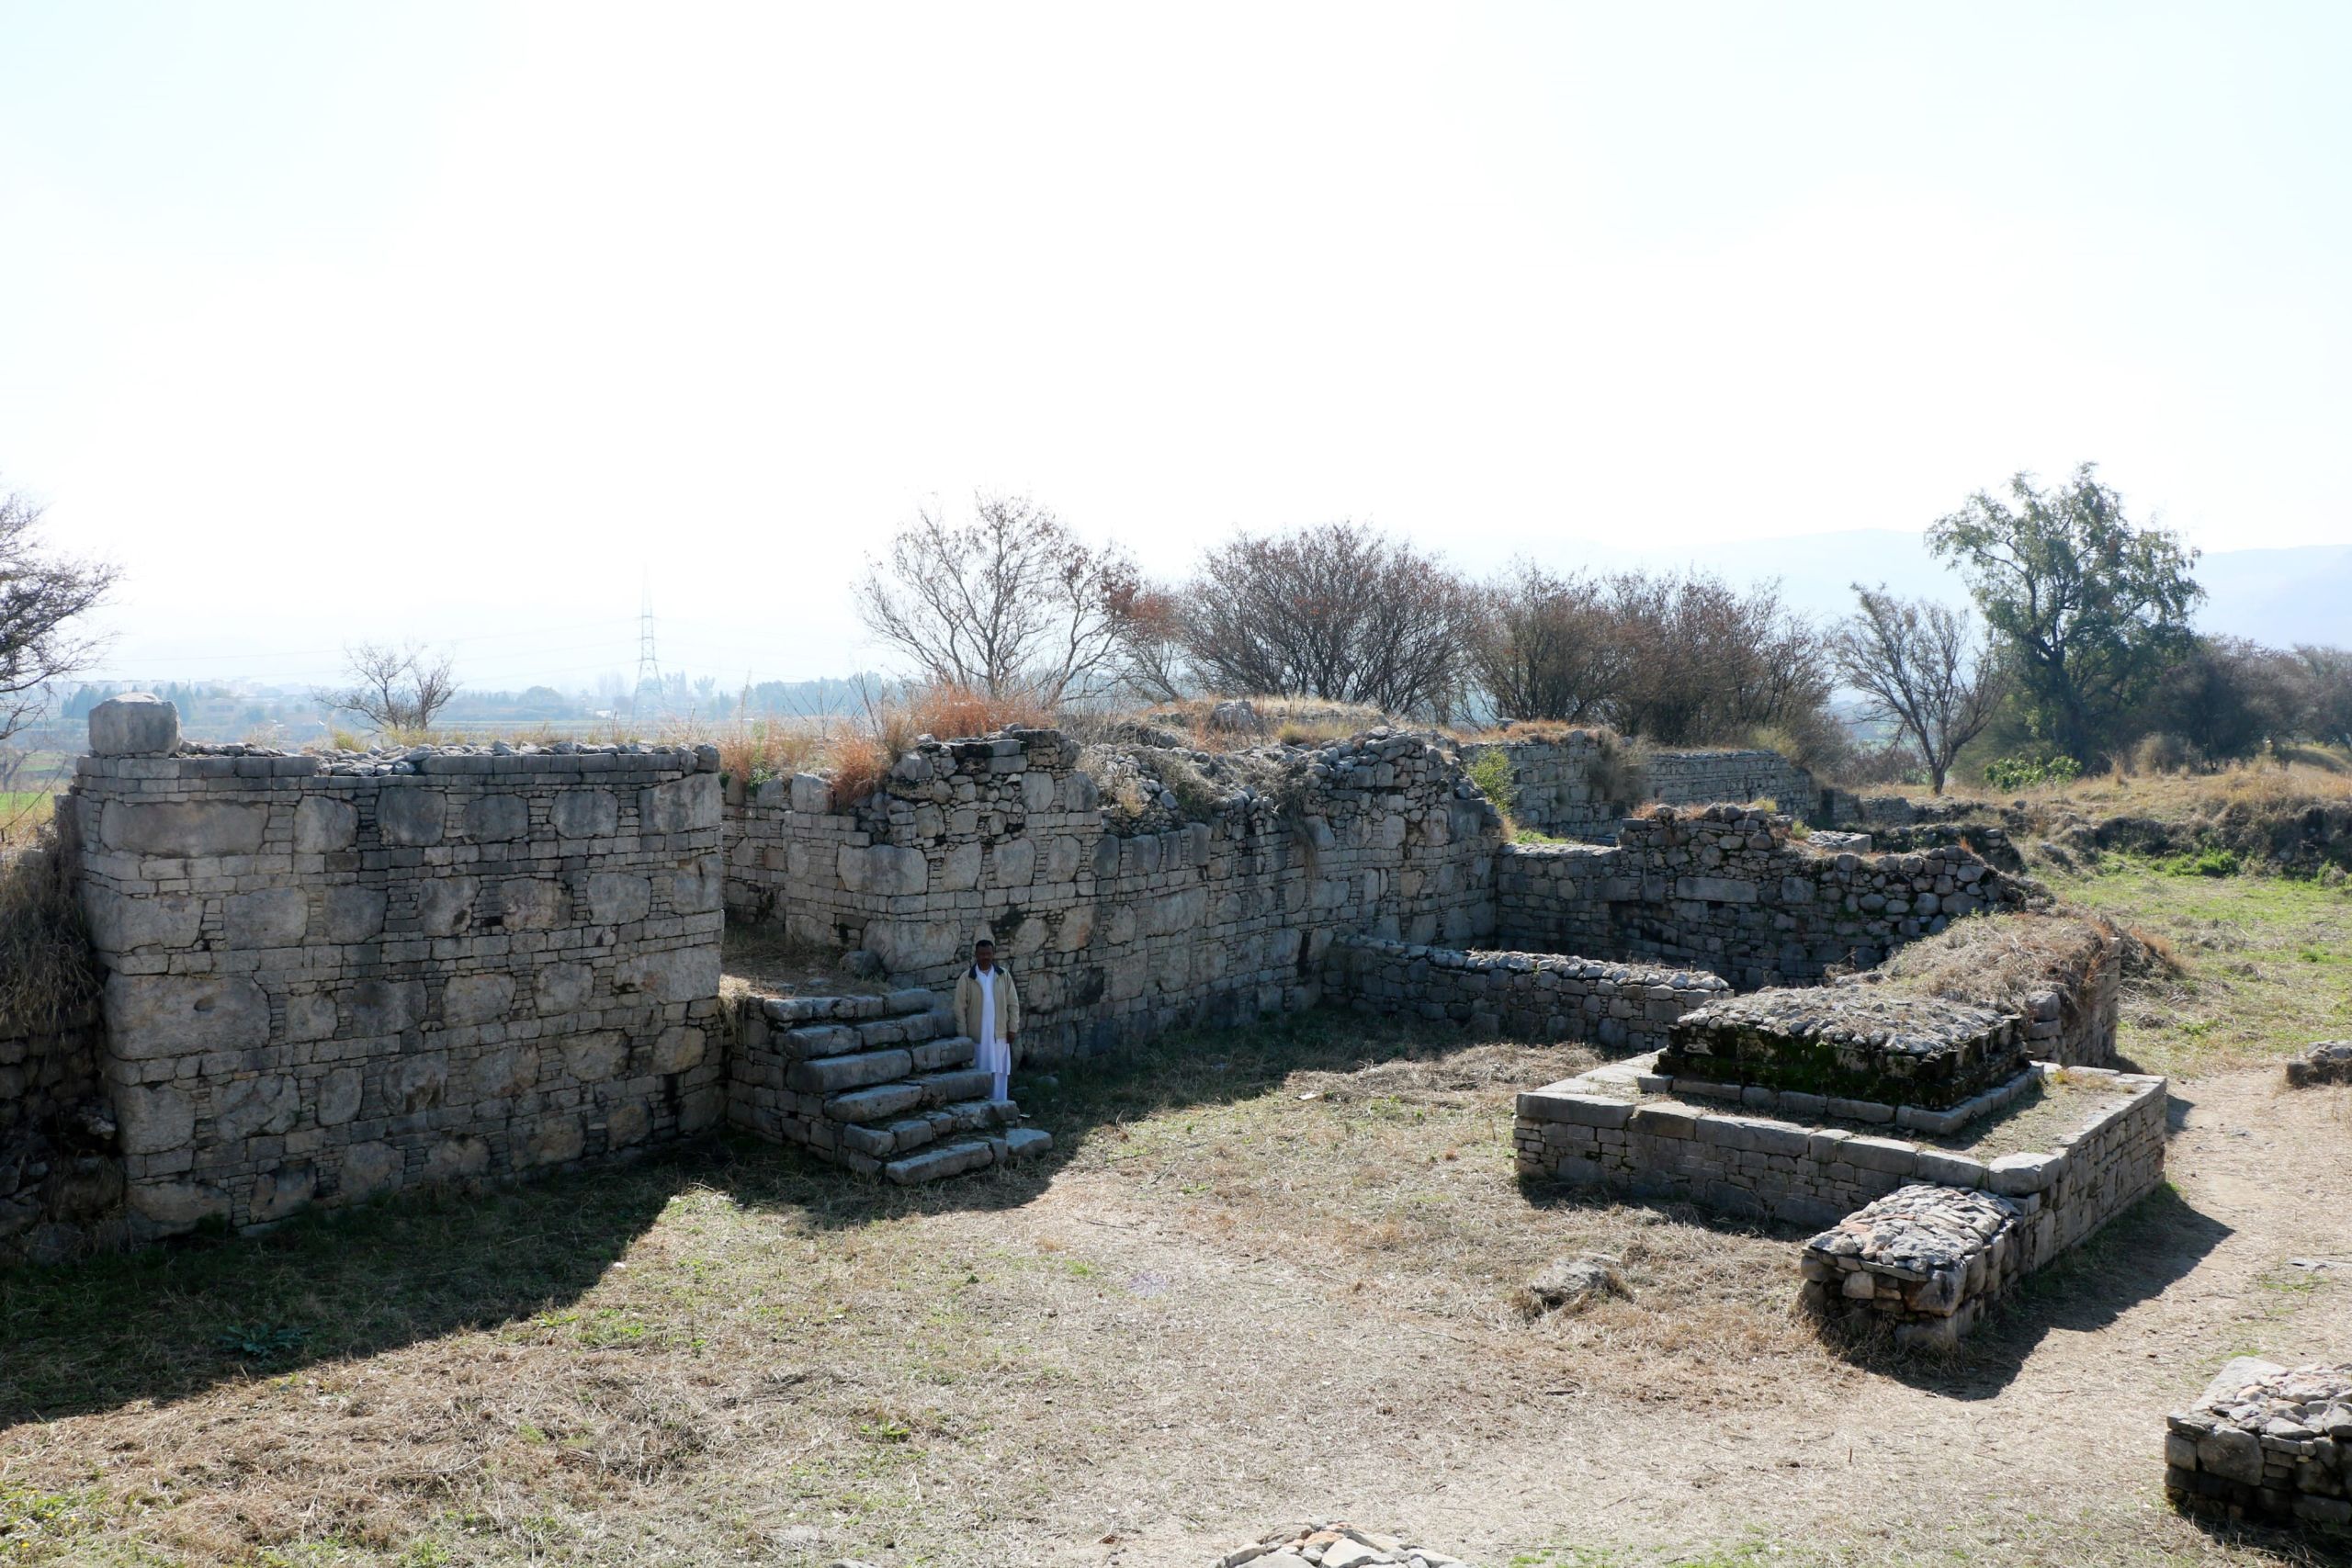


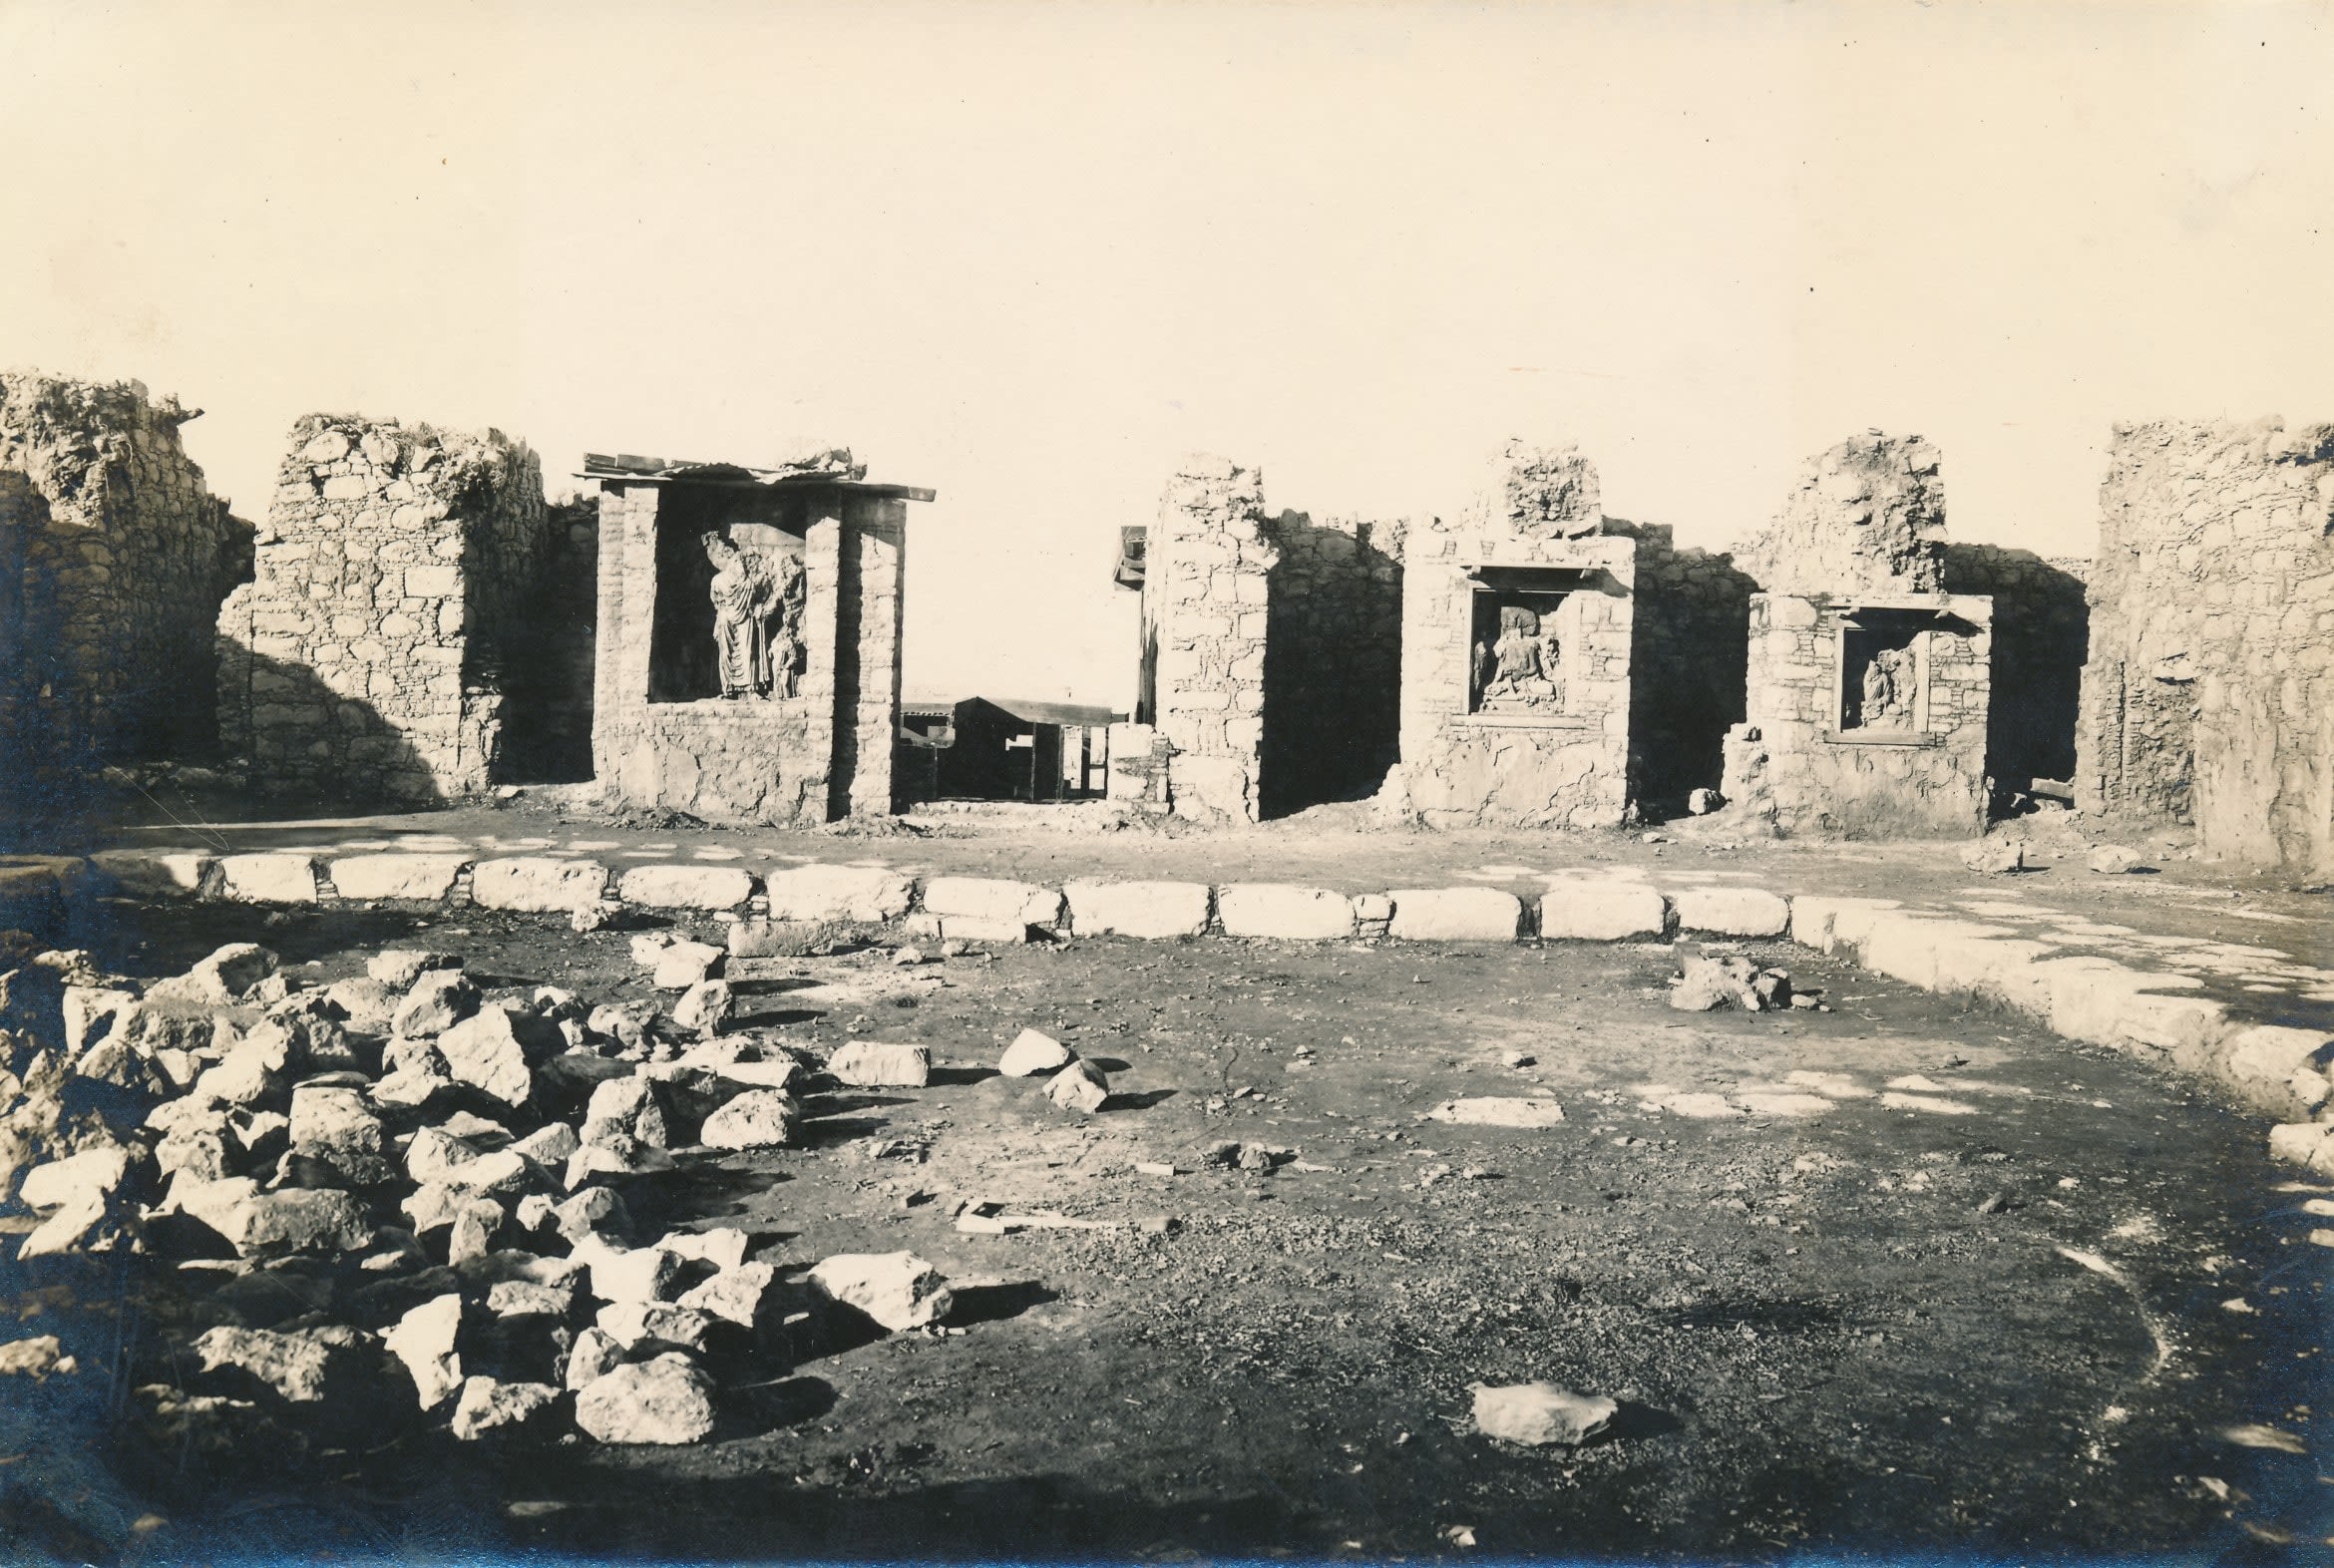
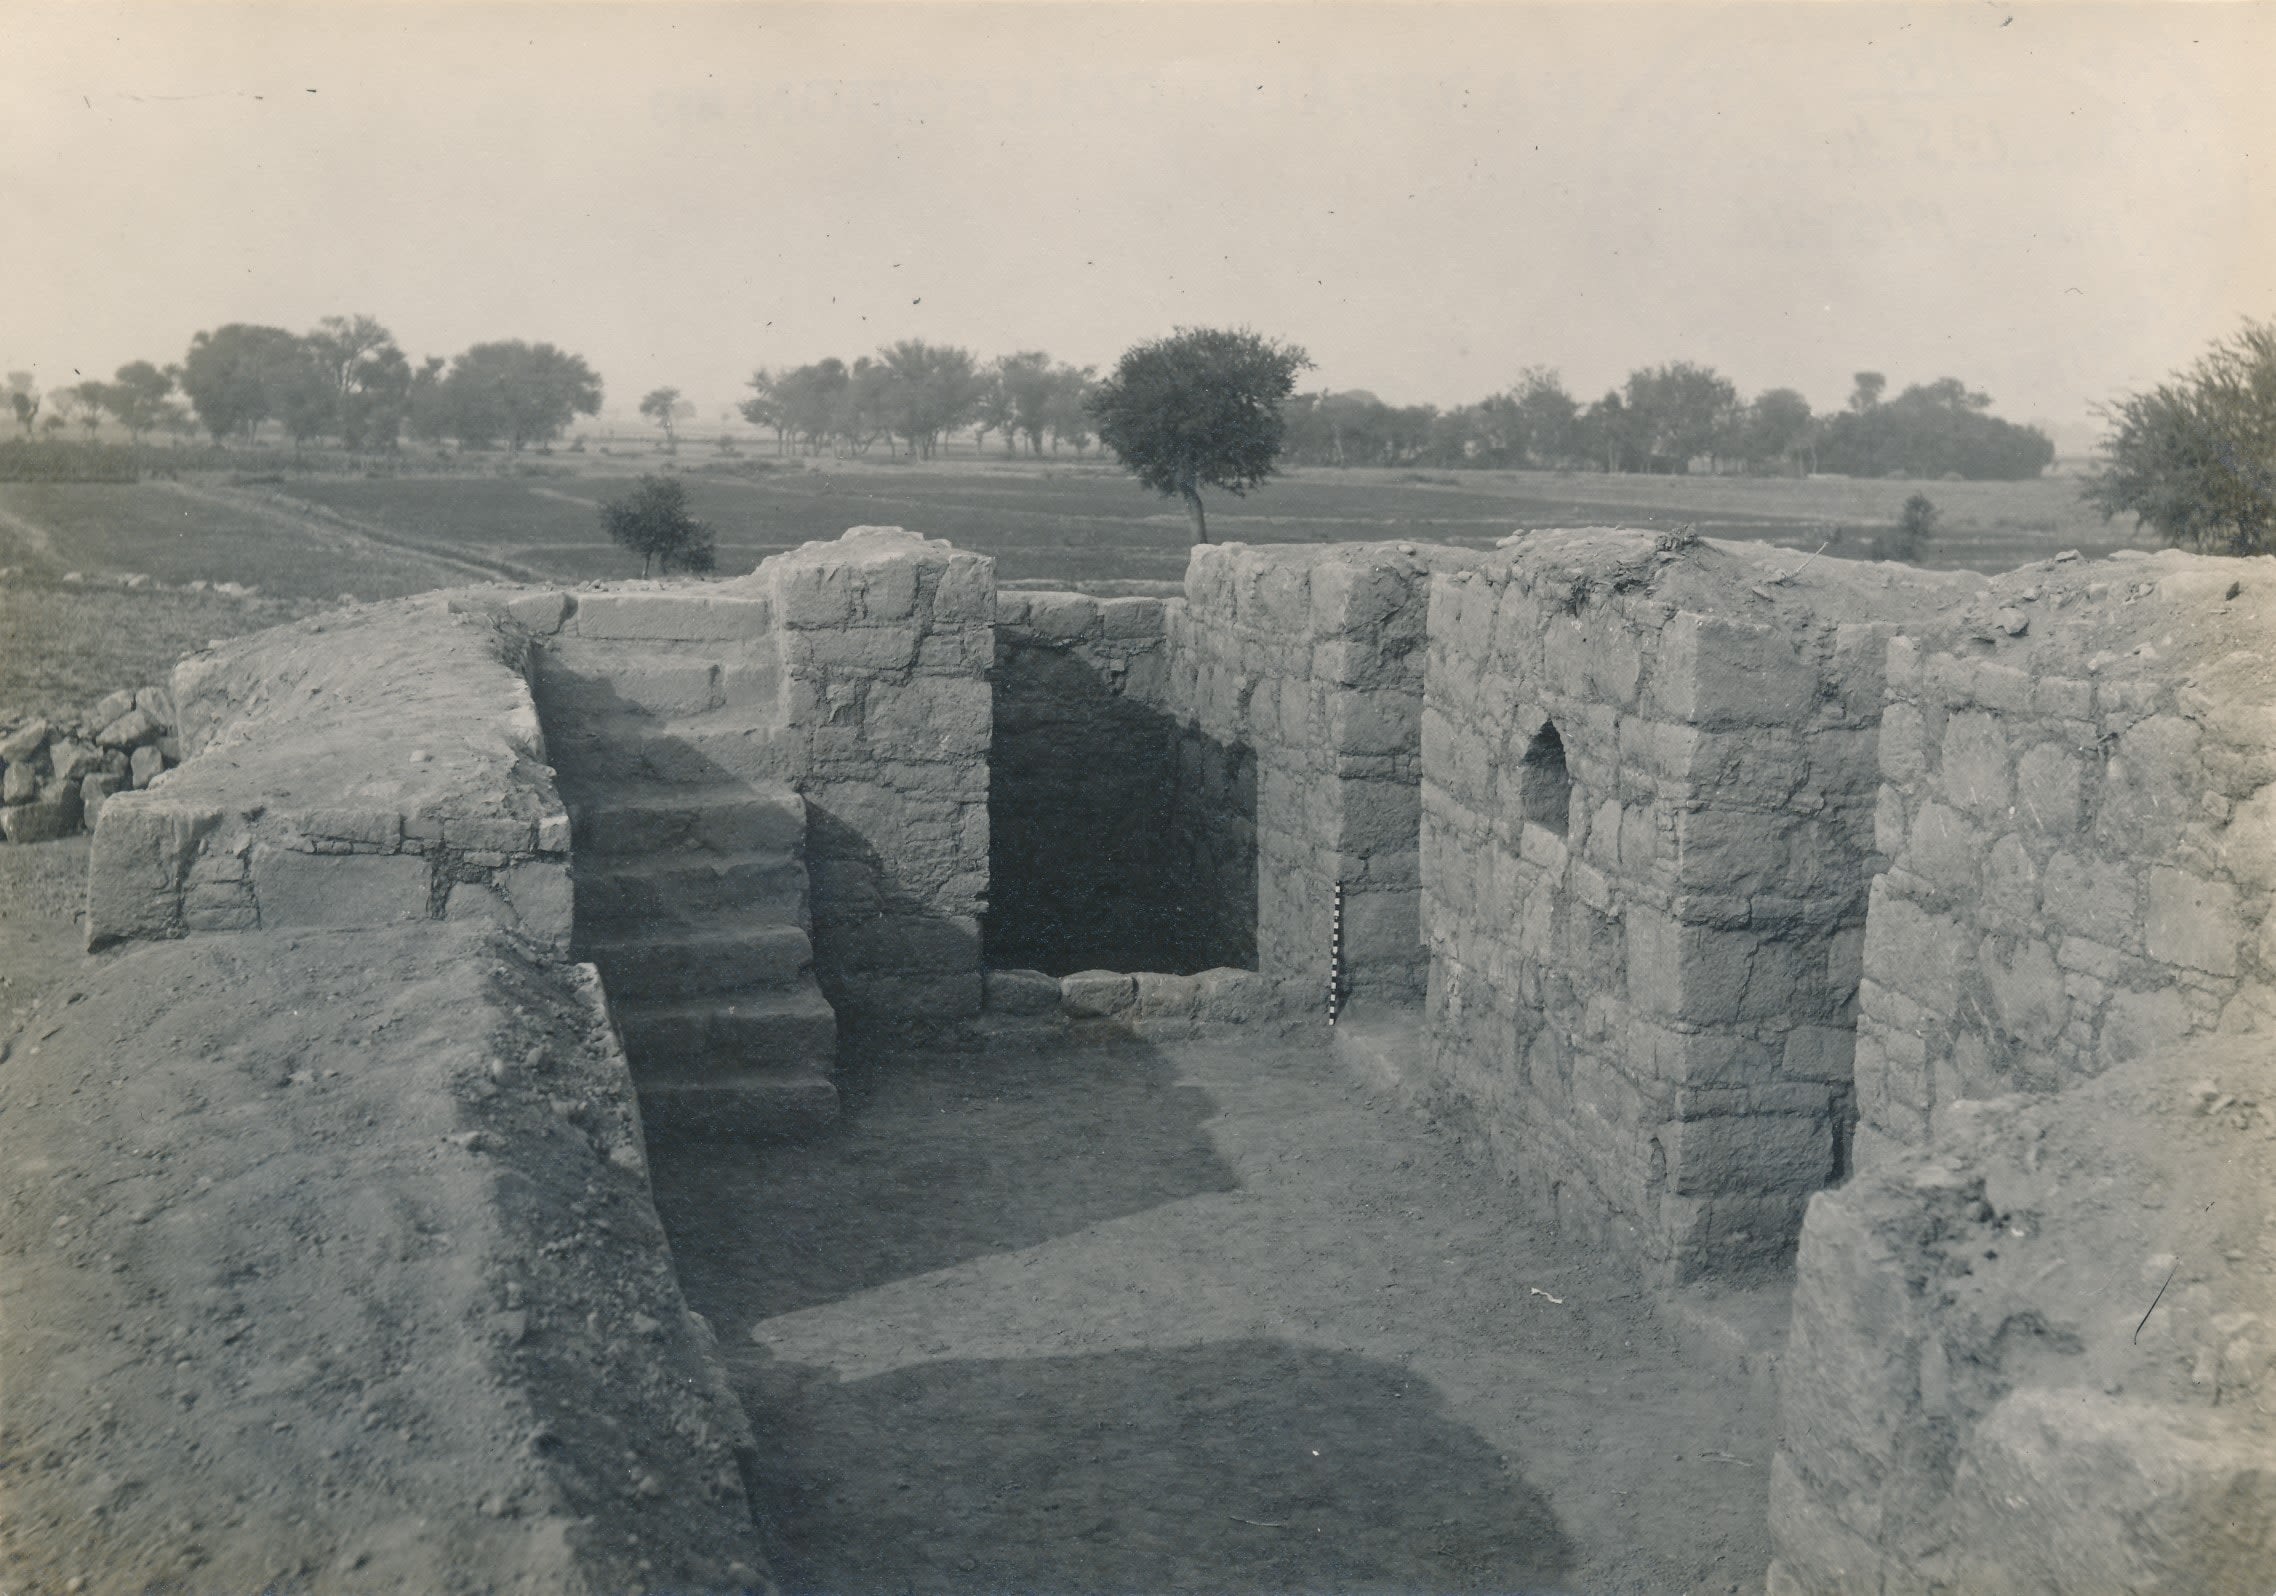
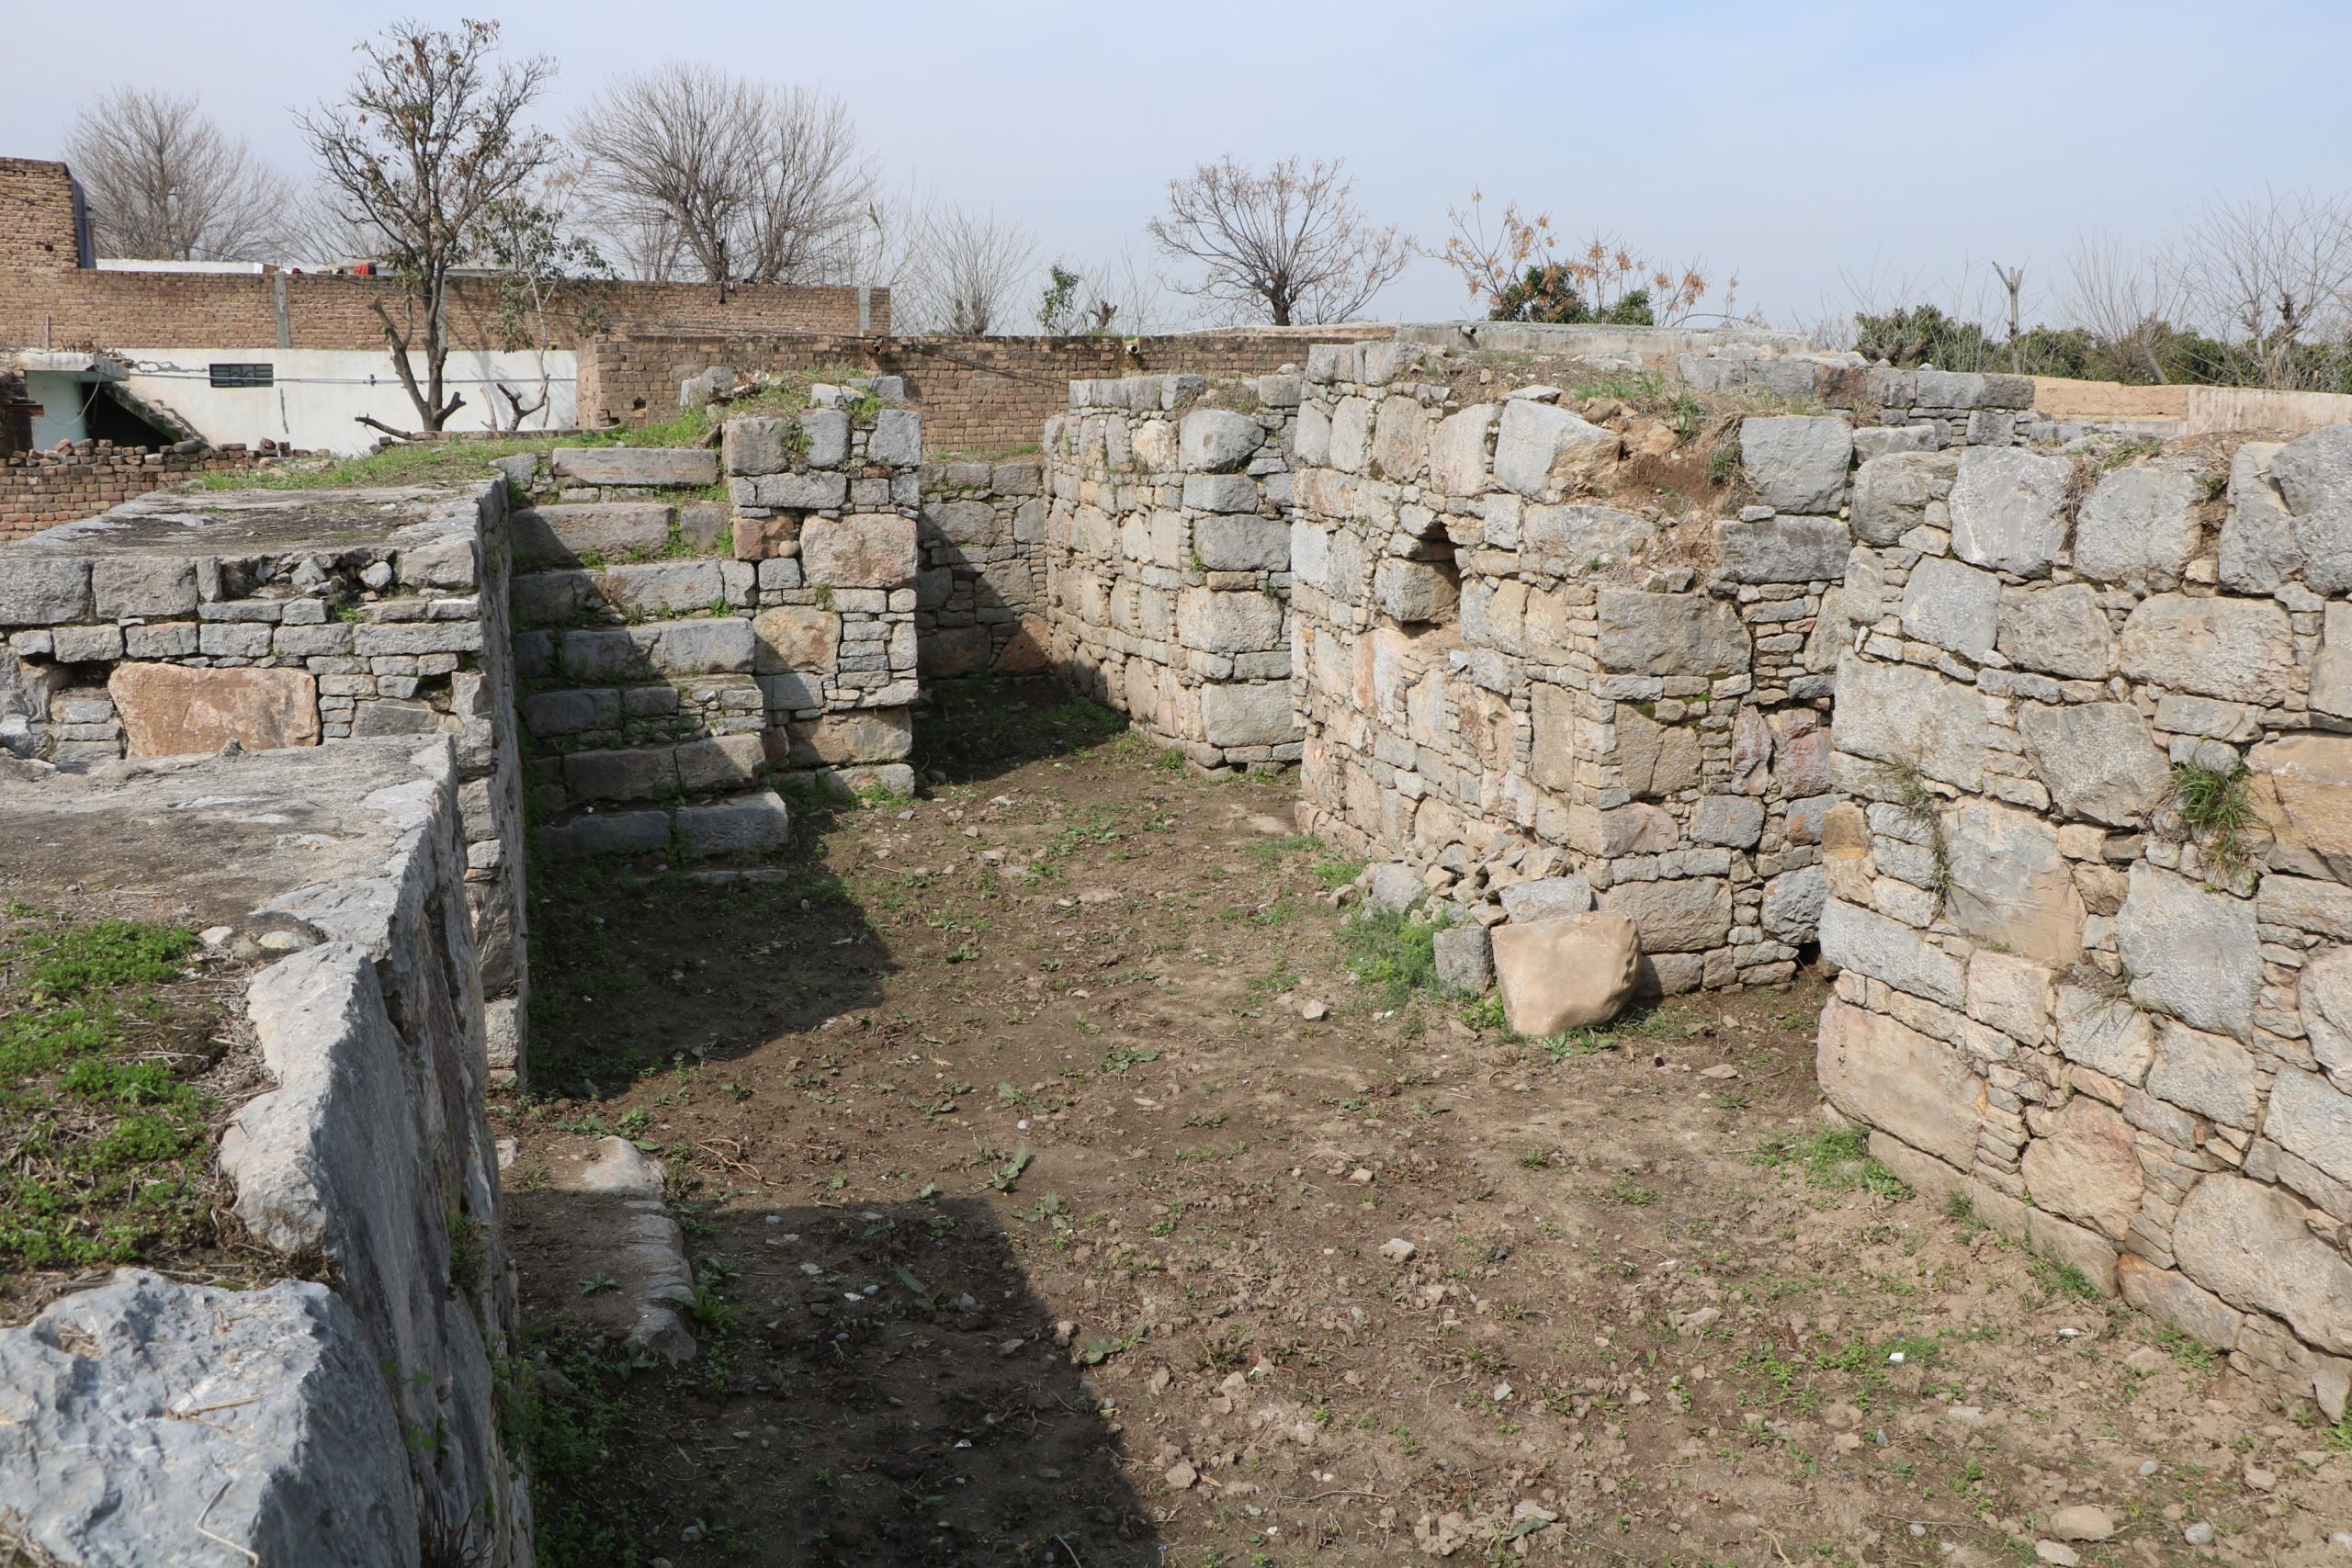
View of entrance to Monastic Court J, east of Stupa 1, at Dharmarajika, Taxila, taken in 1934/1935, compared with view taken in 2019 by Dr Abdul Azeem. Sir John Marshall Collection, given by Dr and Mrs Spalding. DUROM.1957.1.1463
View of entrance to Monastic Court J, east of Stupa 1, at Dharmarajika, Taxila, taken in 1934/1935, compared with view taken in 2019 by Dr Abdul Azeem. Sir John Marshall Collection, given by Dr and Mrs Spalding. DUROM.1957.1.1463
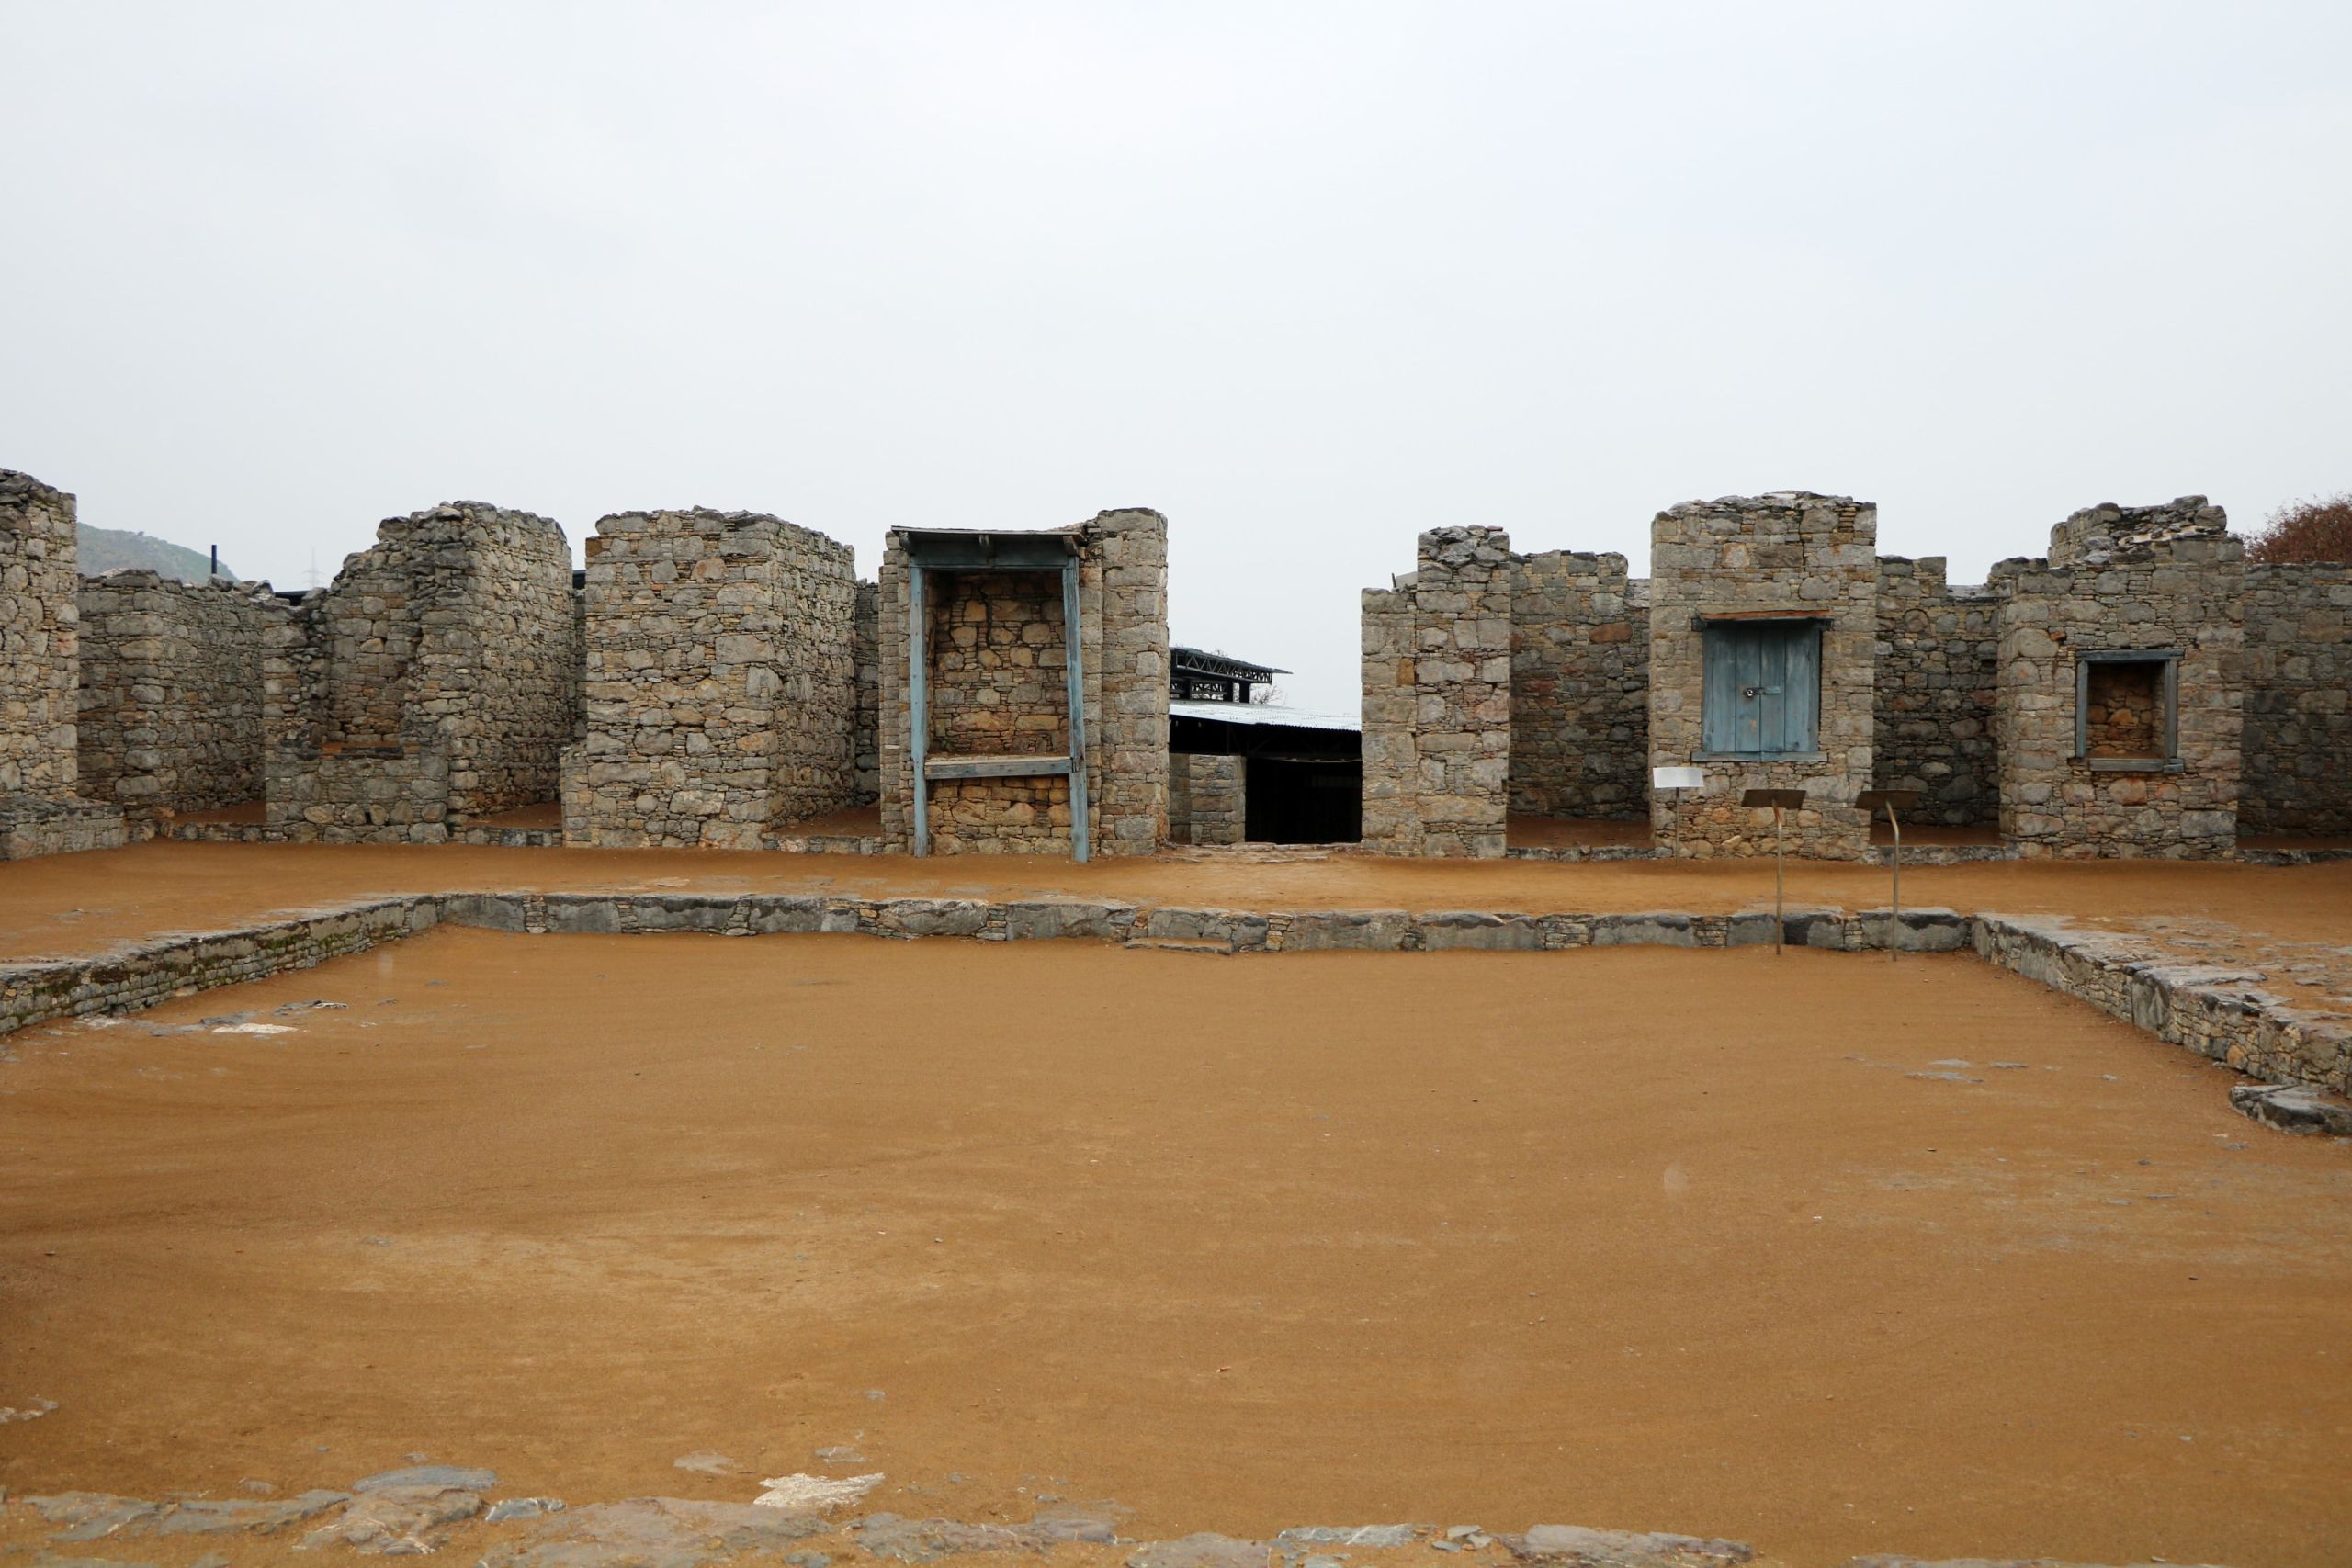
View of entrance to Monastic Court J, east of Stupa 1, at Dharmarajika, Taxila, taken in 2019 by Dr Abdul Azeem.
View of entrance to Monastic Court J, east of Stupa 1, at Dharmarajika, Taxila, taken in 2019 by Dr Abdul Azeem.

West face of Stupa 16 from Jaulian, Taxila, conserved and presented in Taxila Museum, taken in 1932/1933, compared with an image taken in 2019 by Dr Abdul Azeem. Sir John Marshall Collection, given by Dr and Mrs Spalding. DUROM.1957.1.1547
West face of Stupa 16 from Jaulian, Taxila, conserved and presented in Taxila Museum, taken in 1932/1933, compared with an image taken in 2019 by Dr Abdul Azeem. Sir John Marshall Collection, given by Dr and Mrs Spalding. DUROM.1957.1.1547
West face of Stupa 16 from Jaulian, Taxila, conserved and presented in Taxila Museum, taken in 2019 by Dr Abdul Azeem.
West face of Stupa 16 from Jaulian, Taxila, conserved and presented in Taxila Museum, taken in 2019 by Dr Abdul Azeem.

View of Stupas A14 and A15 at Jaulian, Taxila, from the northwest, taken in 1916/1917, compared with view taken in 2019 by Dr Abdul Azeem. Sir John Marshall Collection, given by Dr and Mrs Spalding. DUROM.1957.1.1548
View of Stupas A14 and A15 at Jaulian, Taxila, from the northwest, taken in 1916/1917, compared with view taken in 2019 by Dr Abdul Azeem. Sir John Marshall Collection, given by Dr and Mrs Spalding. DUROM.1957.1.1548
View of Stupas A14 and A15 at Jaulian, Taxila, from the northwest, taken in 2019 by Dr Abdul Azeem.
View of Stupas A14 and A15 at Jaulian, Taxila, from the northwest, taken in 2019 by Dr Abdul Azeem.

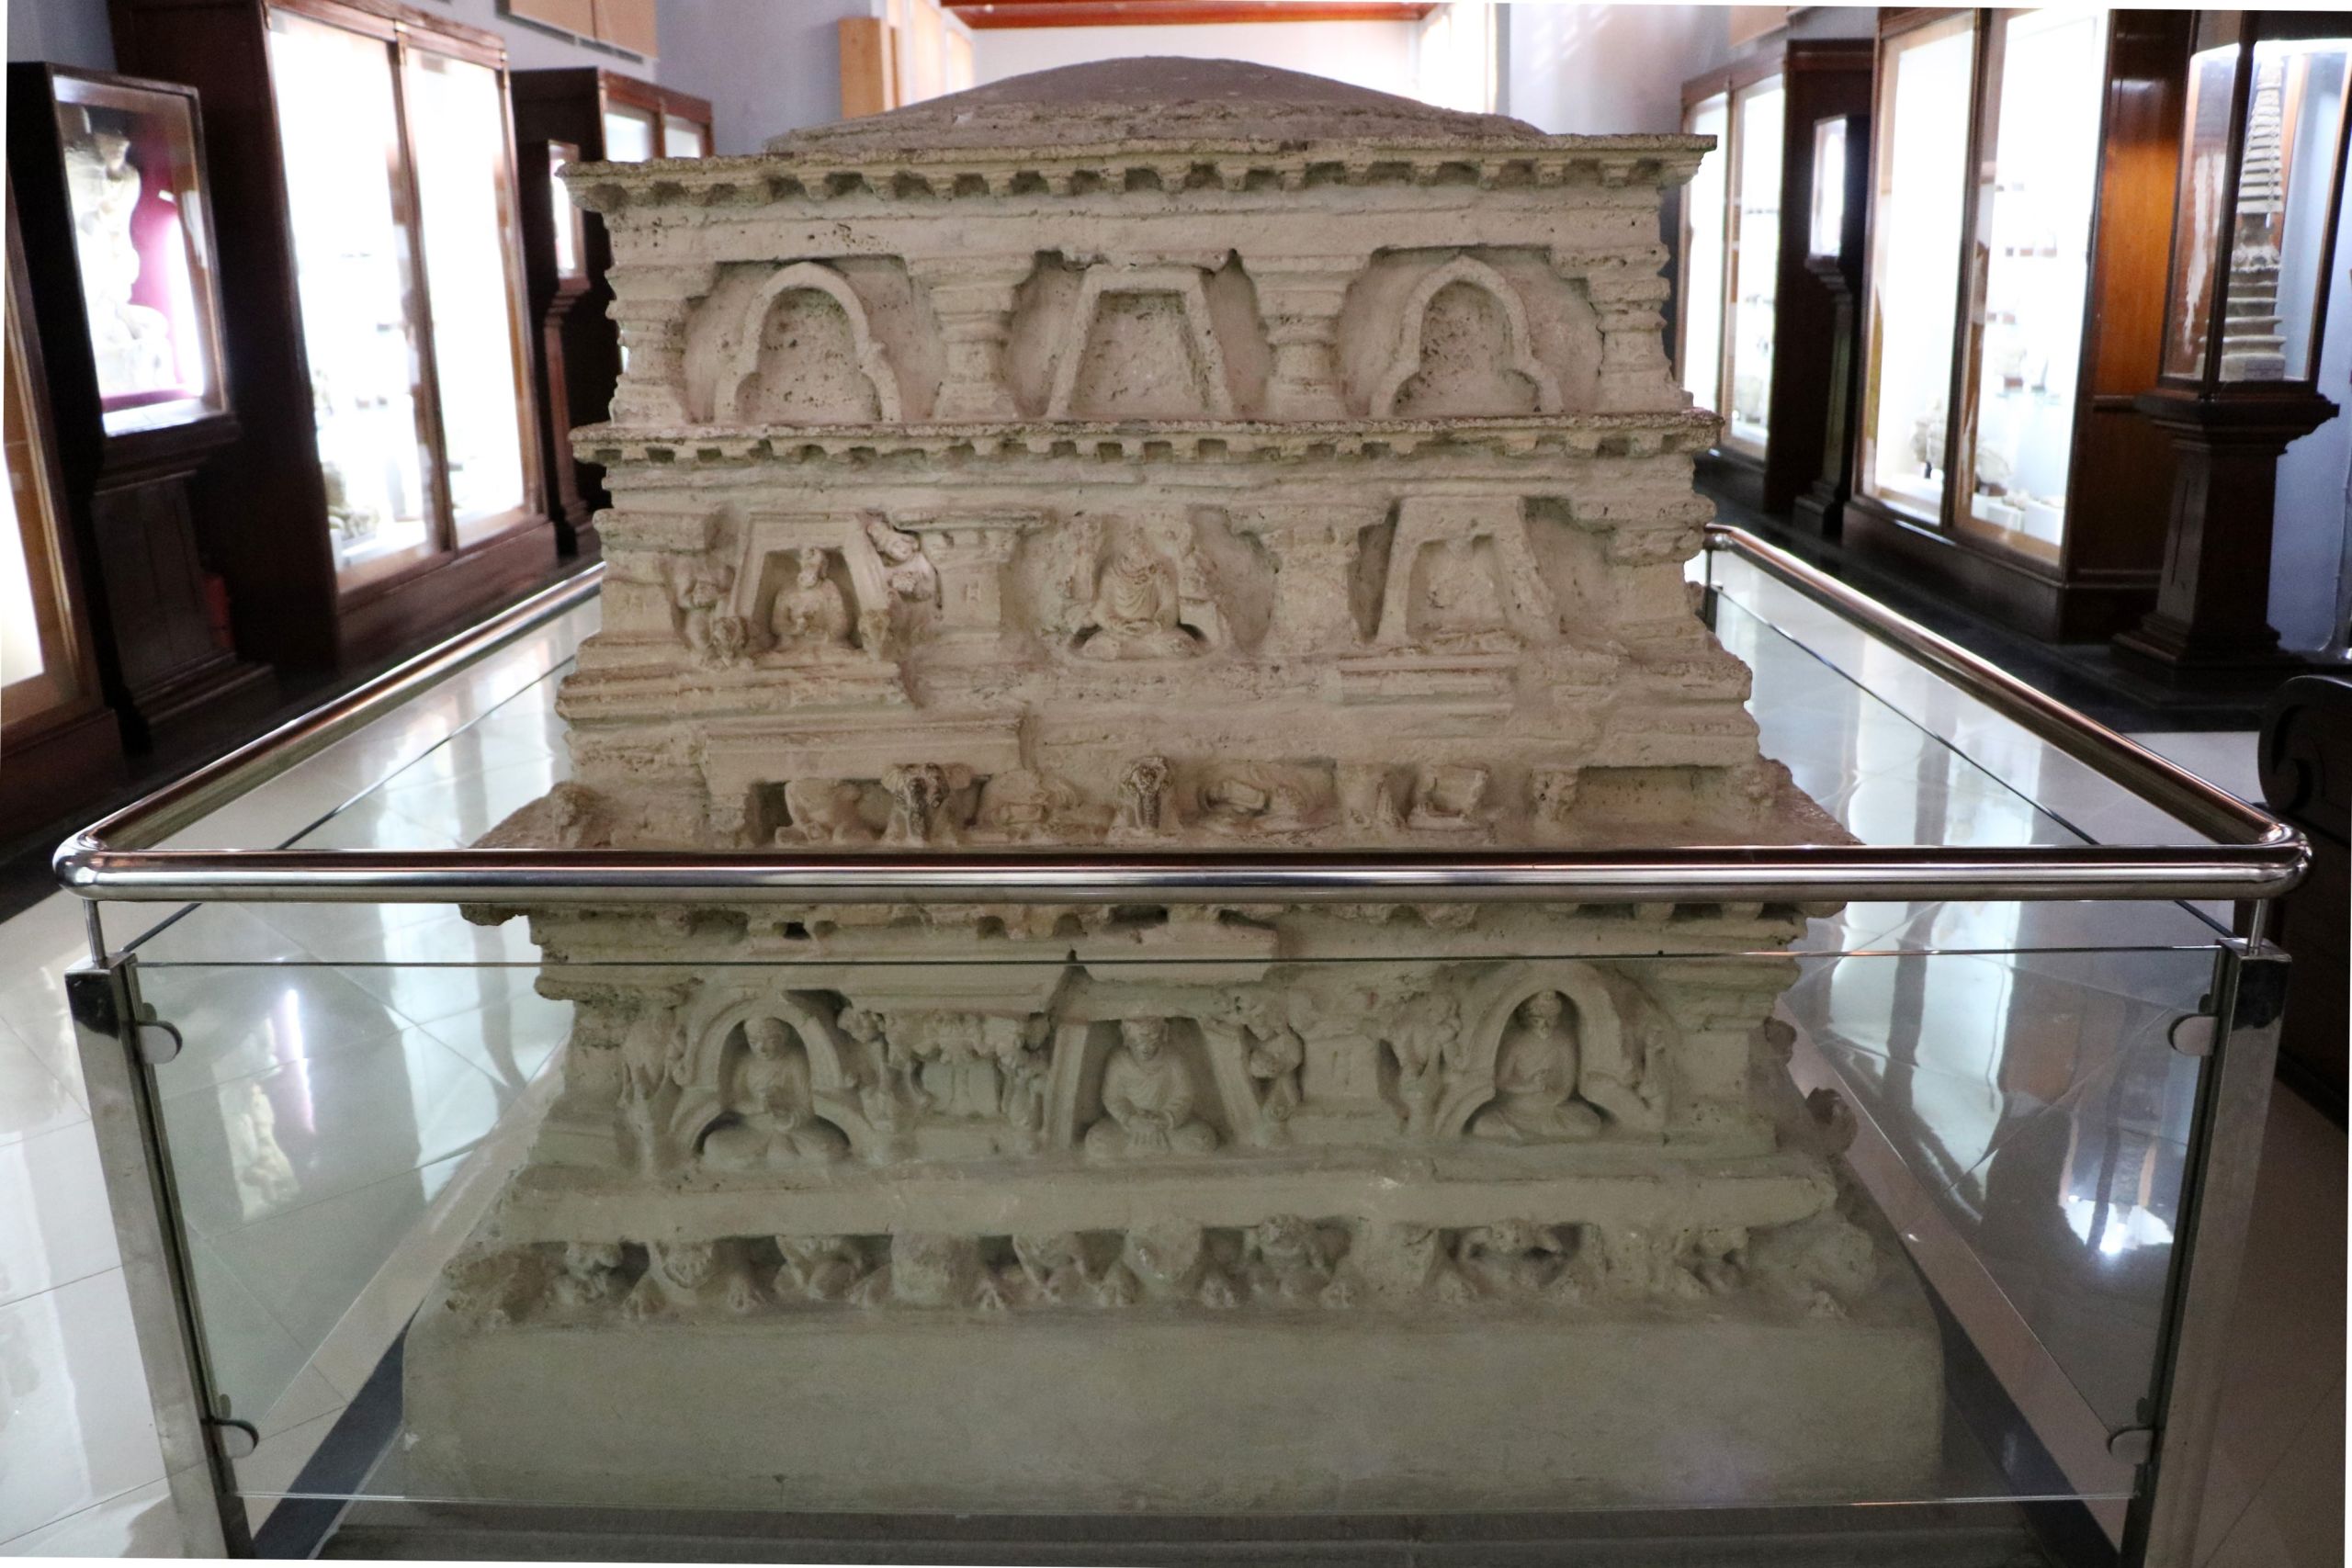
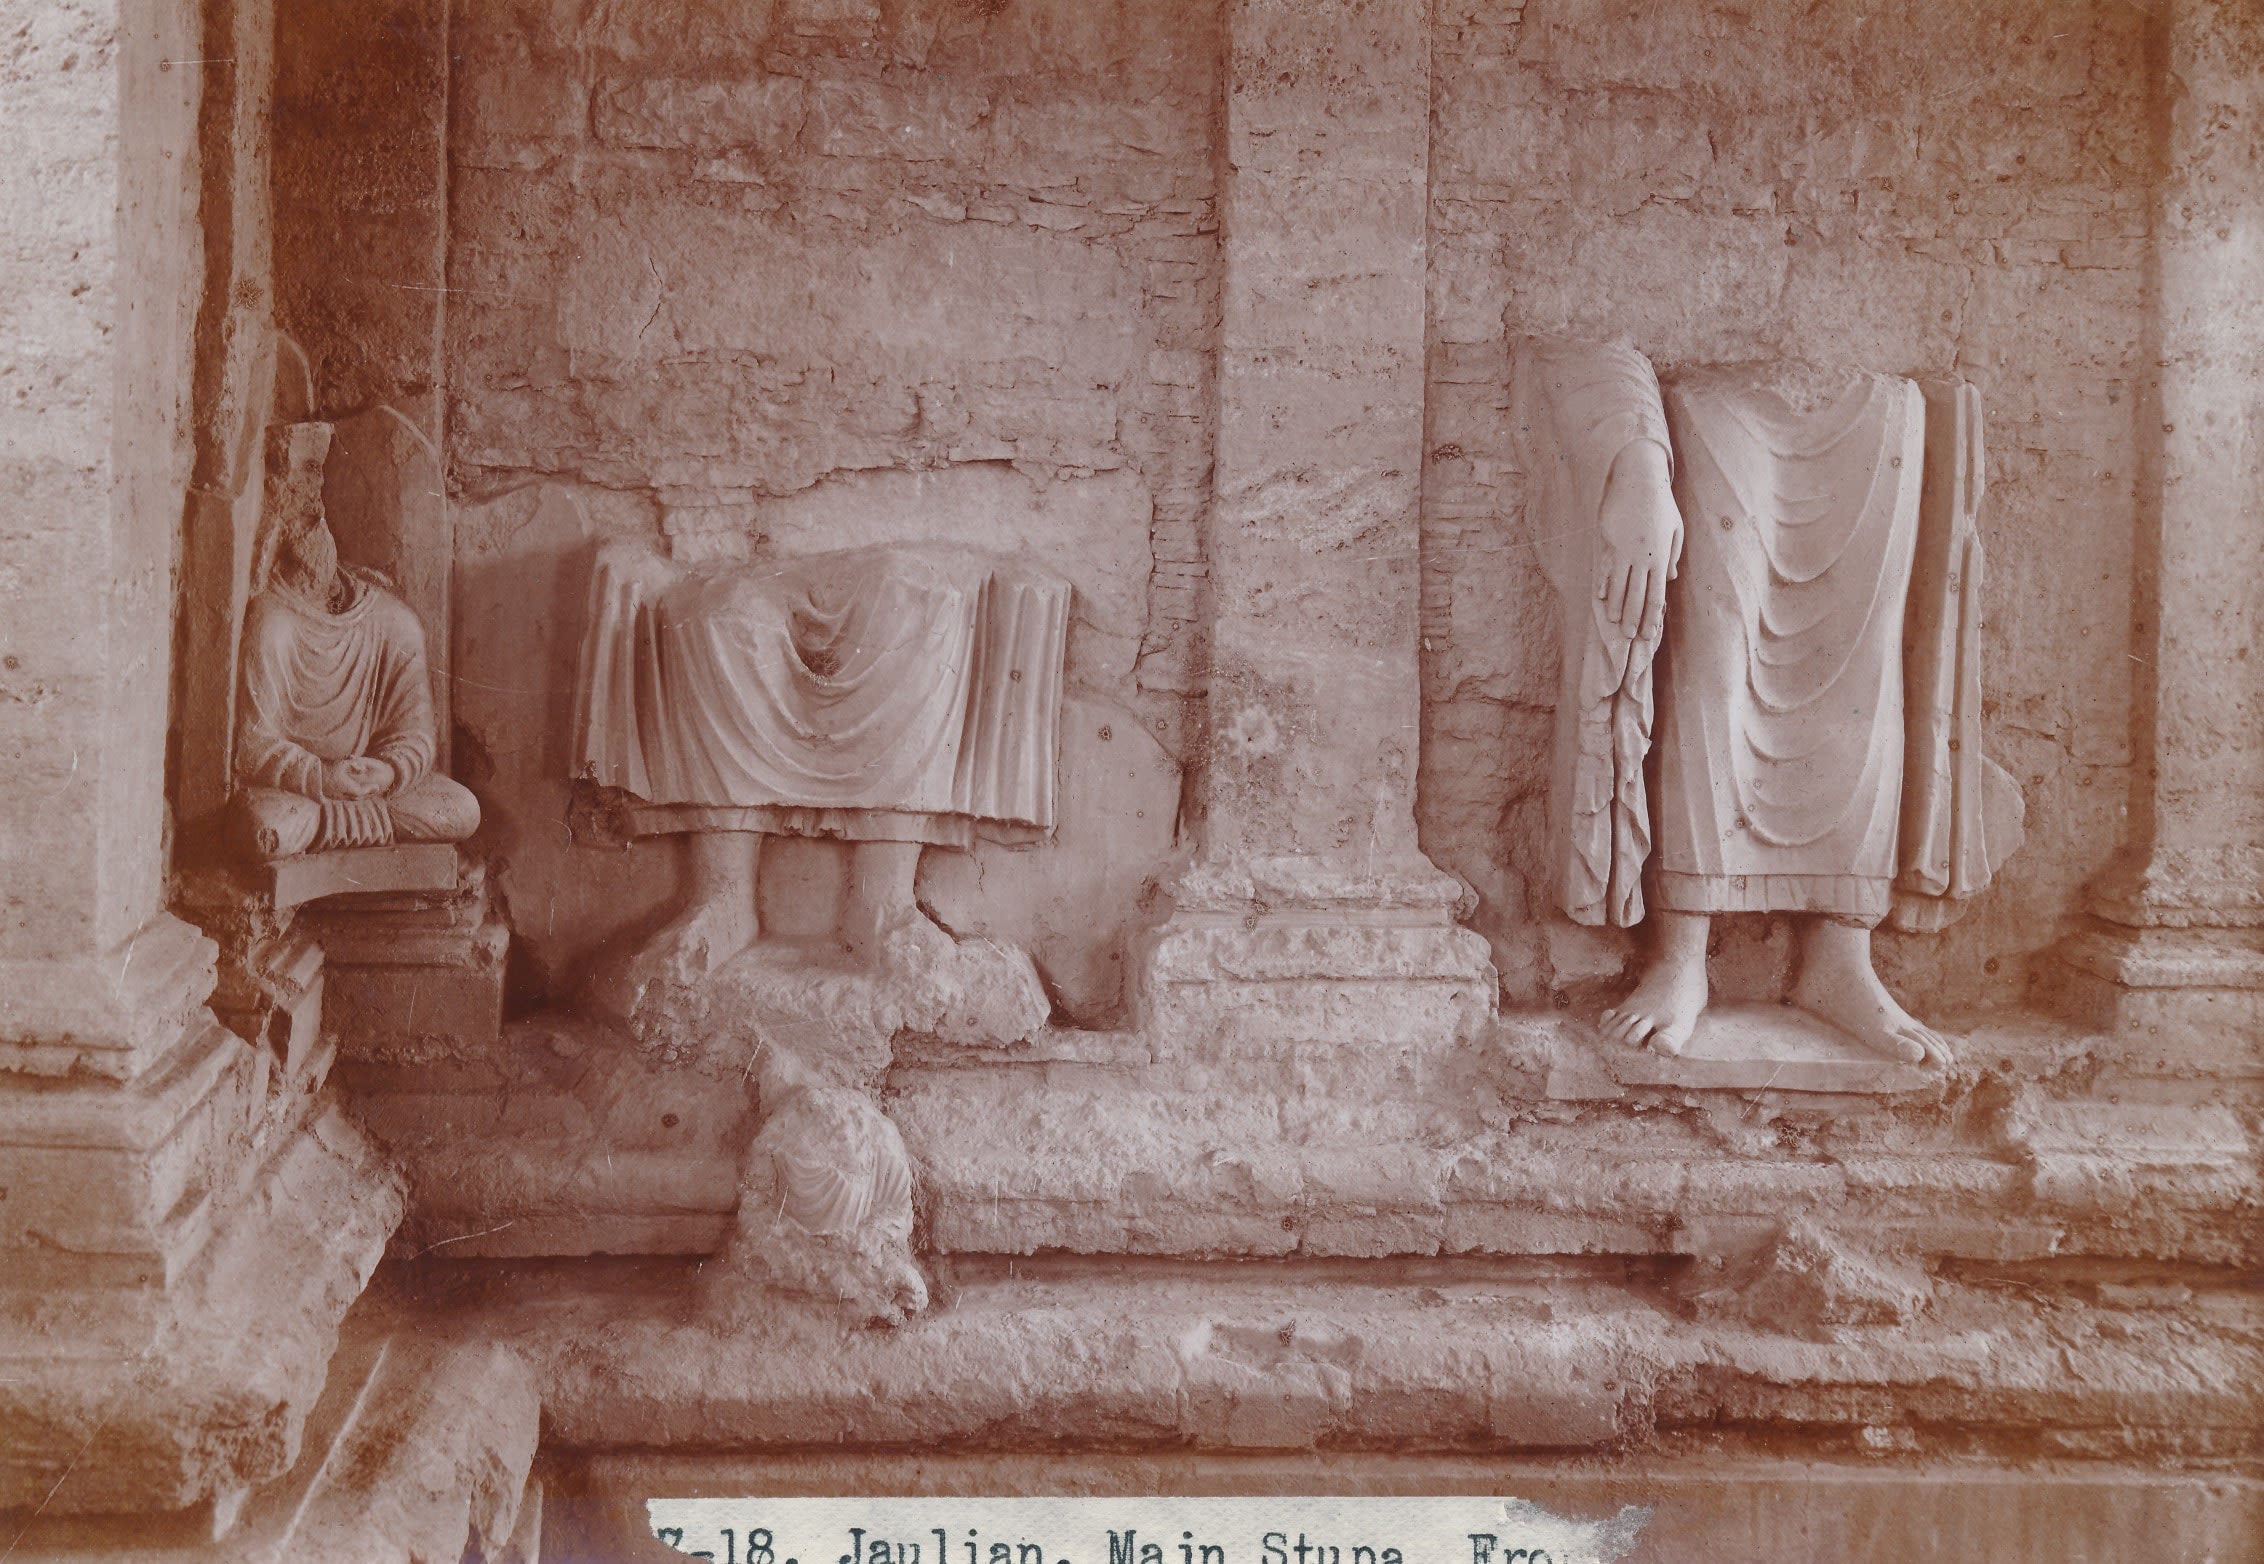
Standing Buddha/Bodhisattva figures on the western side of the front face of the Main Stupa at Jaulian, Taxila, compared with view taken in 2019 by Dr Abdul Azeem. Sir John Marshall Collection, given by Dr and Mrs Spalding. DUROM.1957.1.1550
Standing Buddha/Bodhisattva figures on the western side of the front face of the Main Stupa at Jaulian, Taxila, compared with view taken in 2019 by Dr Abdul Azeem. Sir John Marshall Collection, given by Dr and Mrs Spalding. DUROM.1957.1.1550
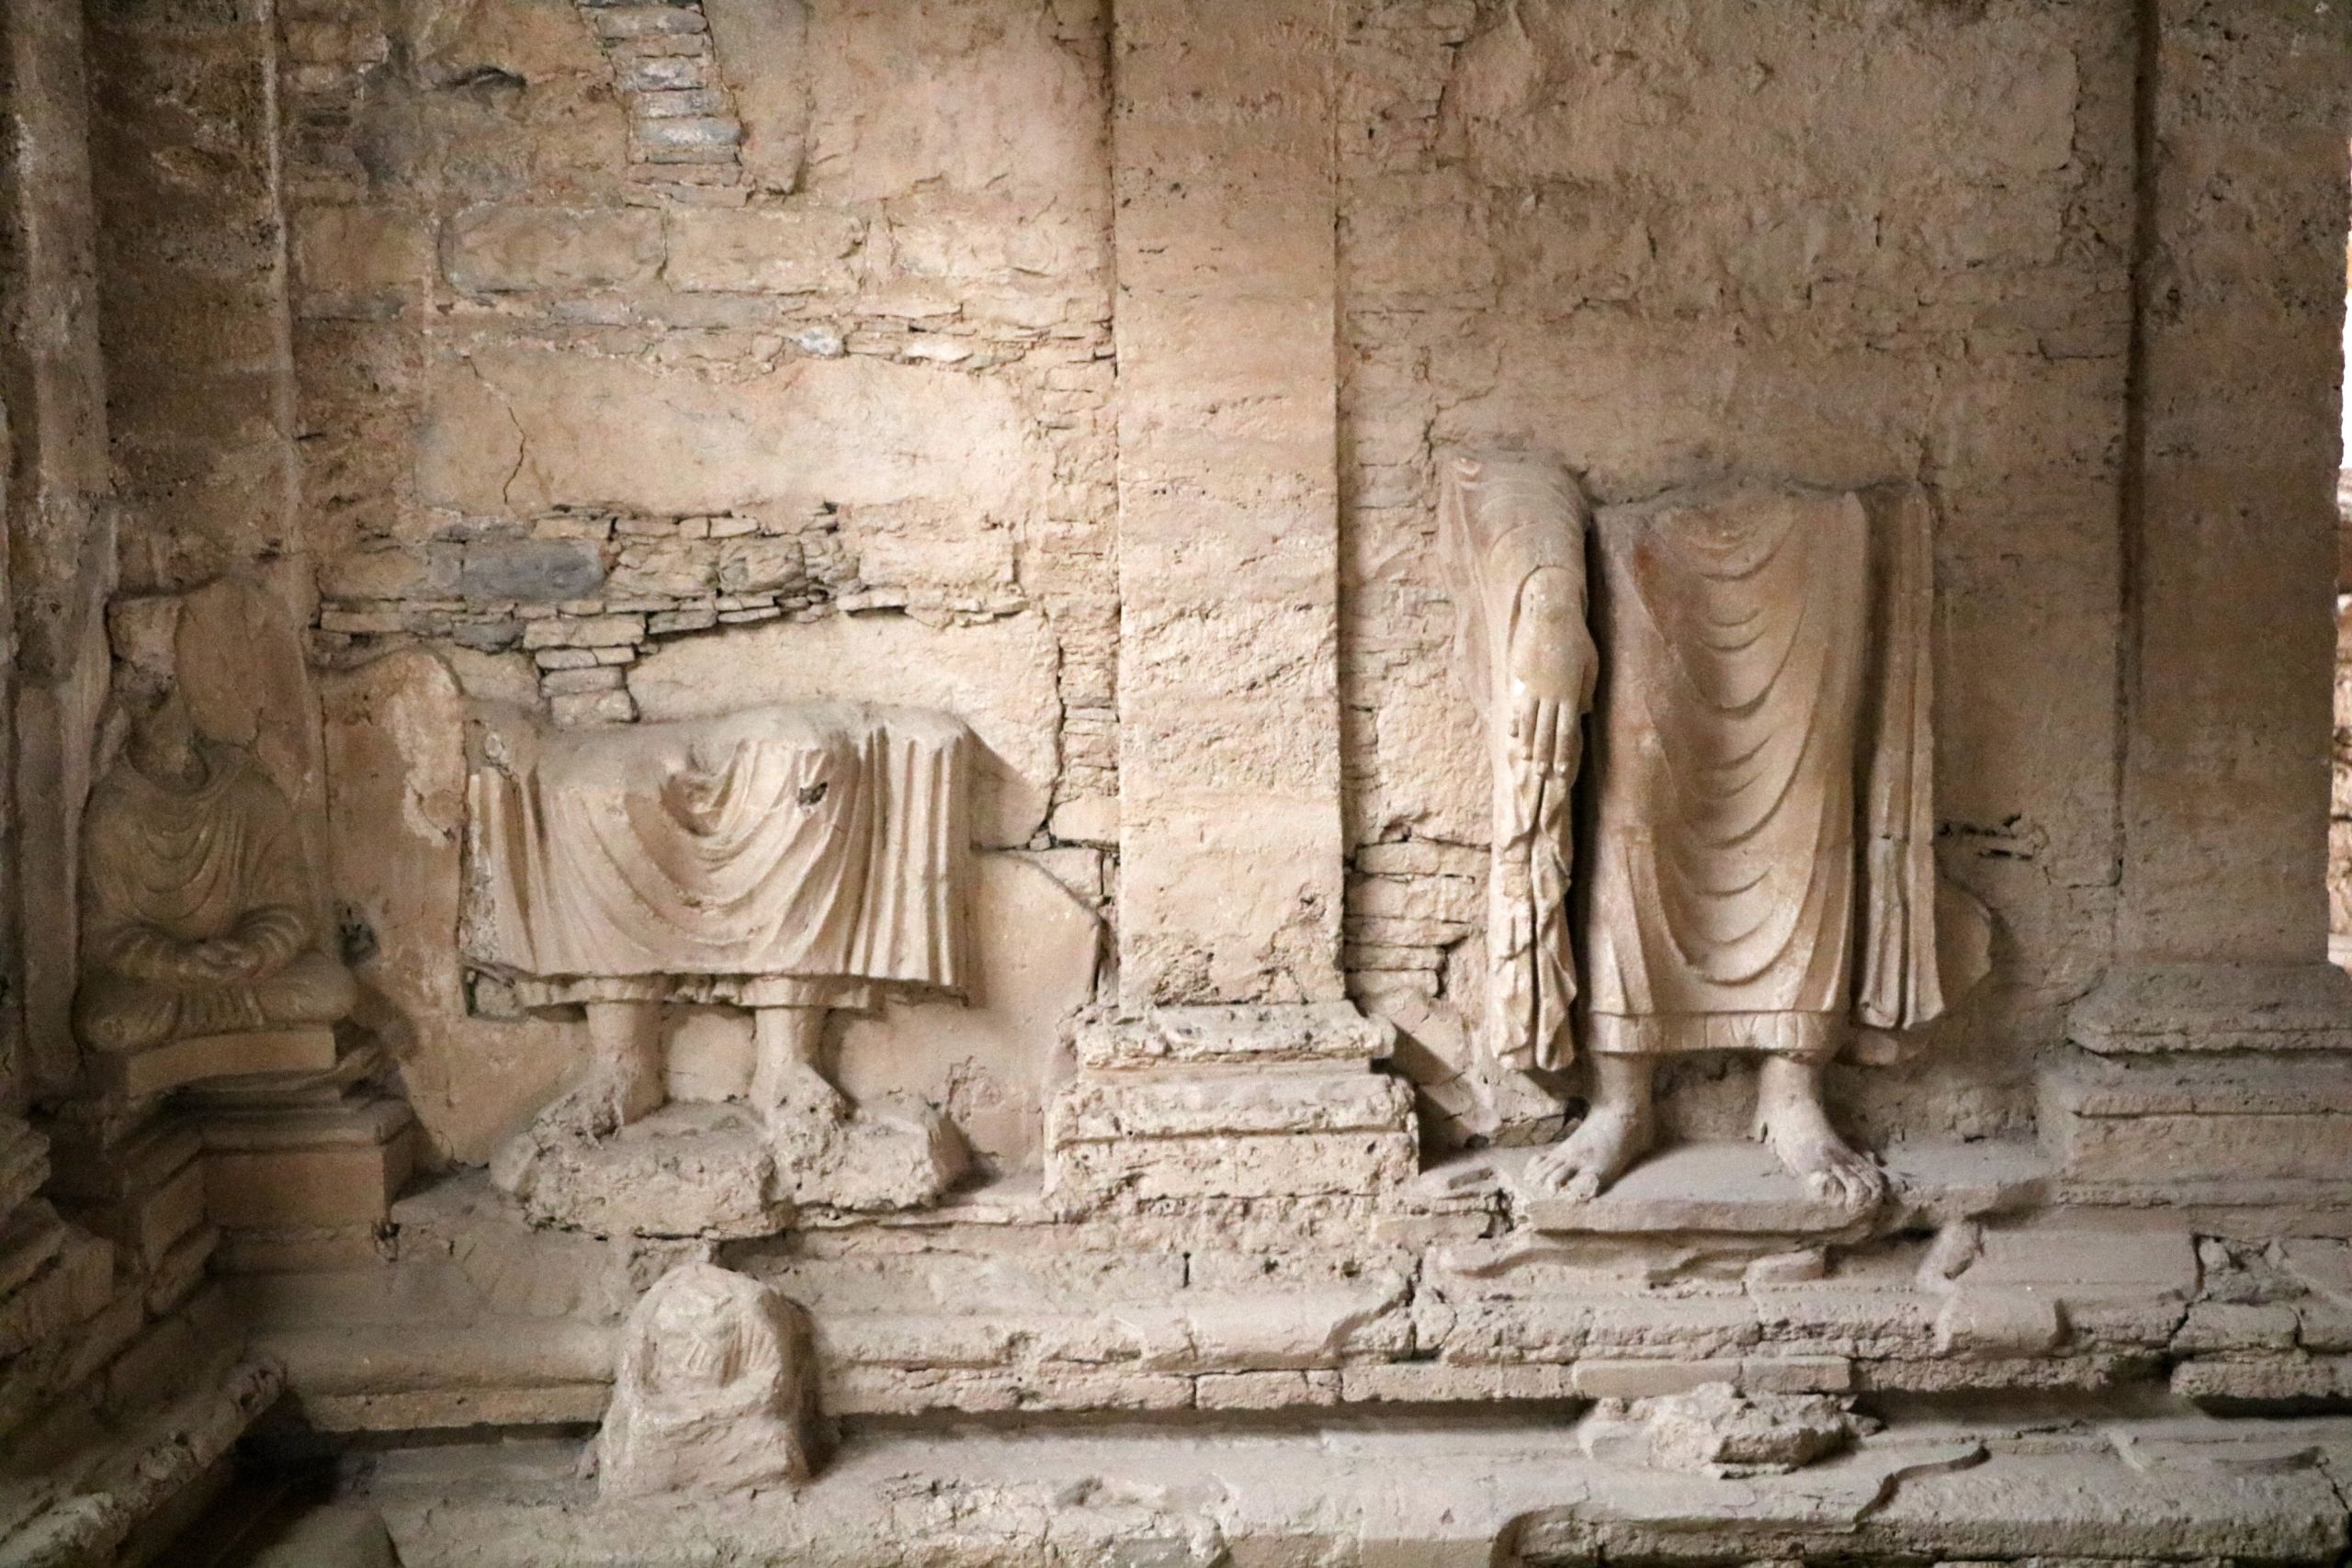
Standing Buddha/Bodhisattva figures on the western side of the front face of the Main Stupa at Jaulian, Taxila, taken in 2019 by Dr Abdul Azeem.
Standing Buddha/Bodhisattva figures on the western side of the front face of the Main Stupa at Jaulian, Taxila, taken in 2019 by Dr Abdul Azeem.

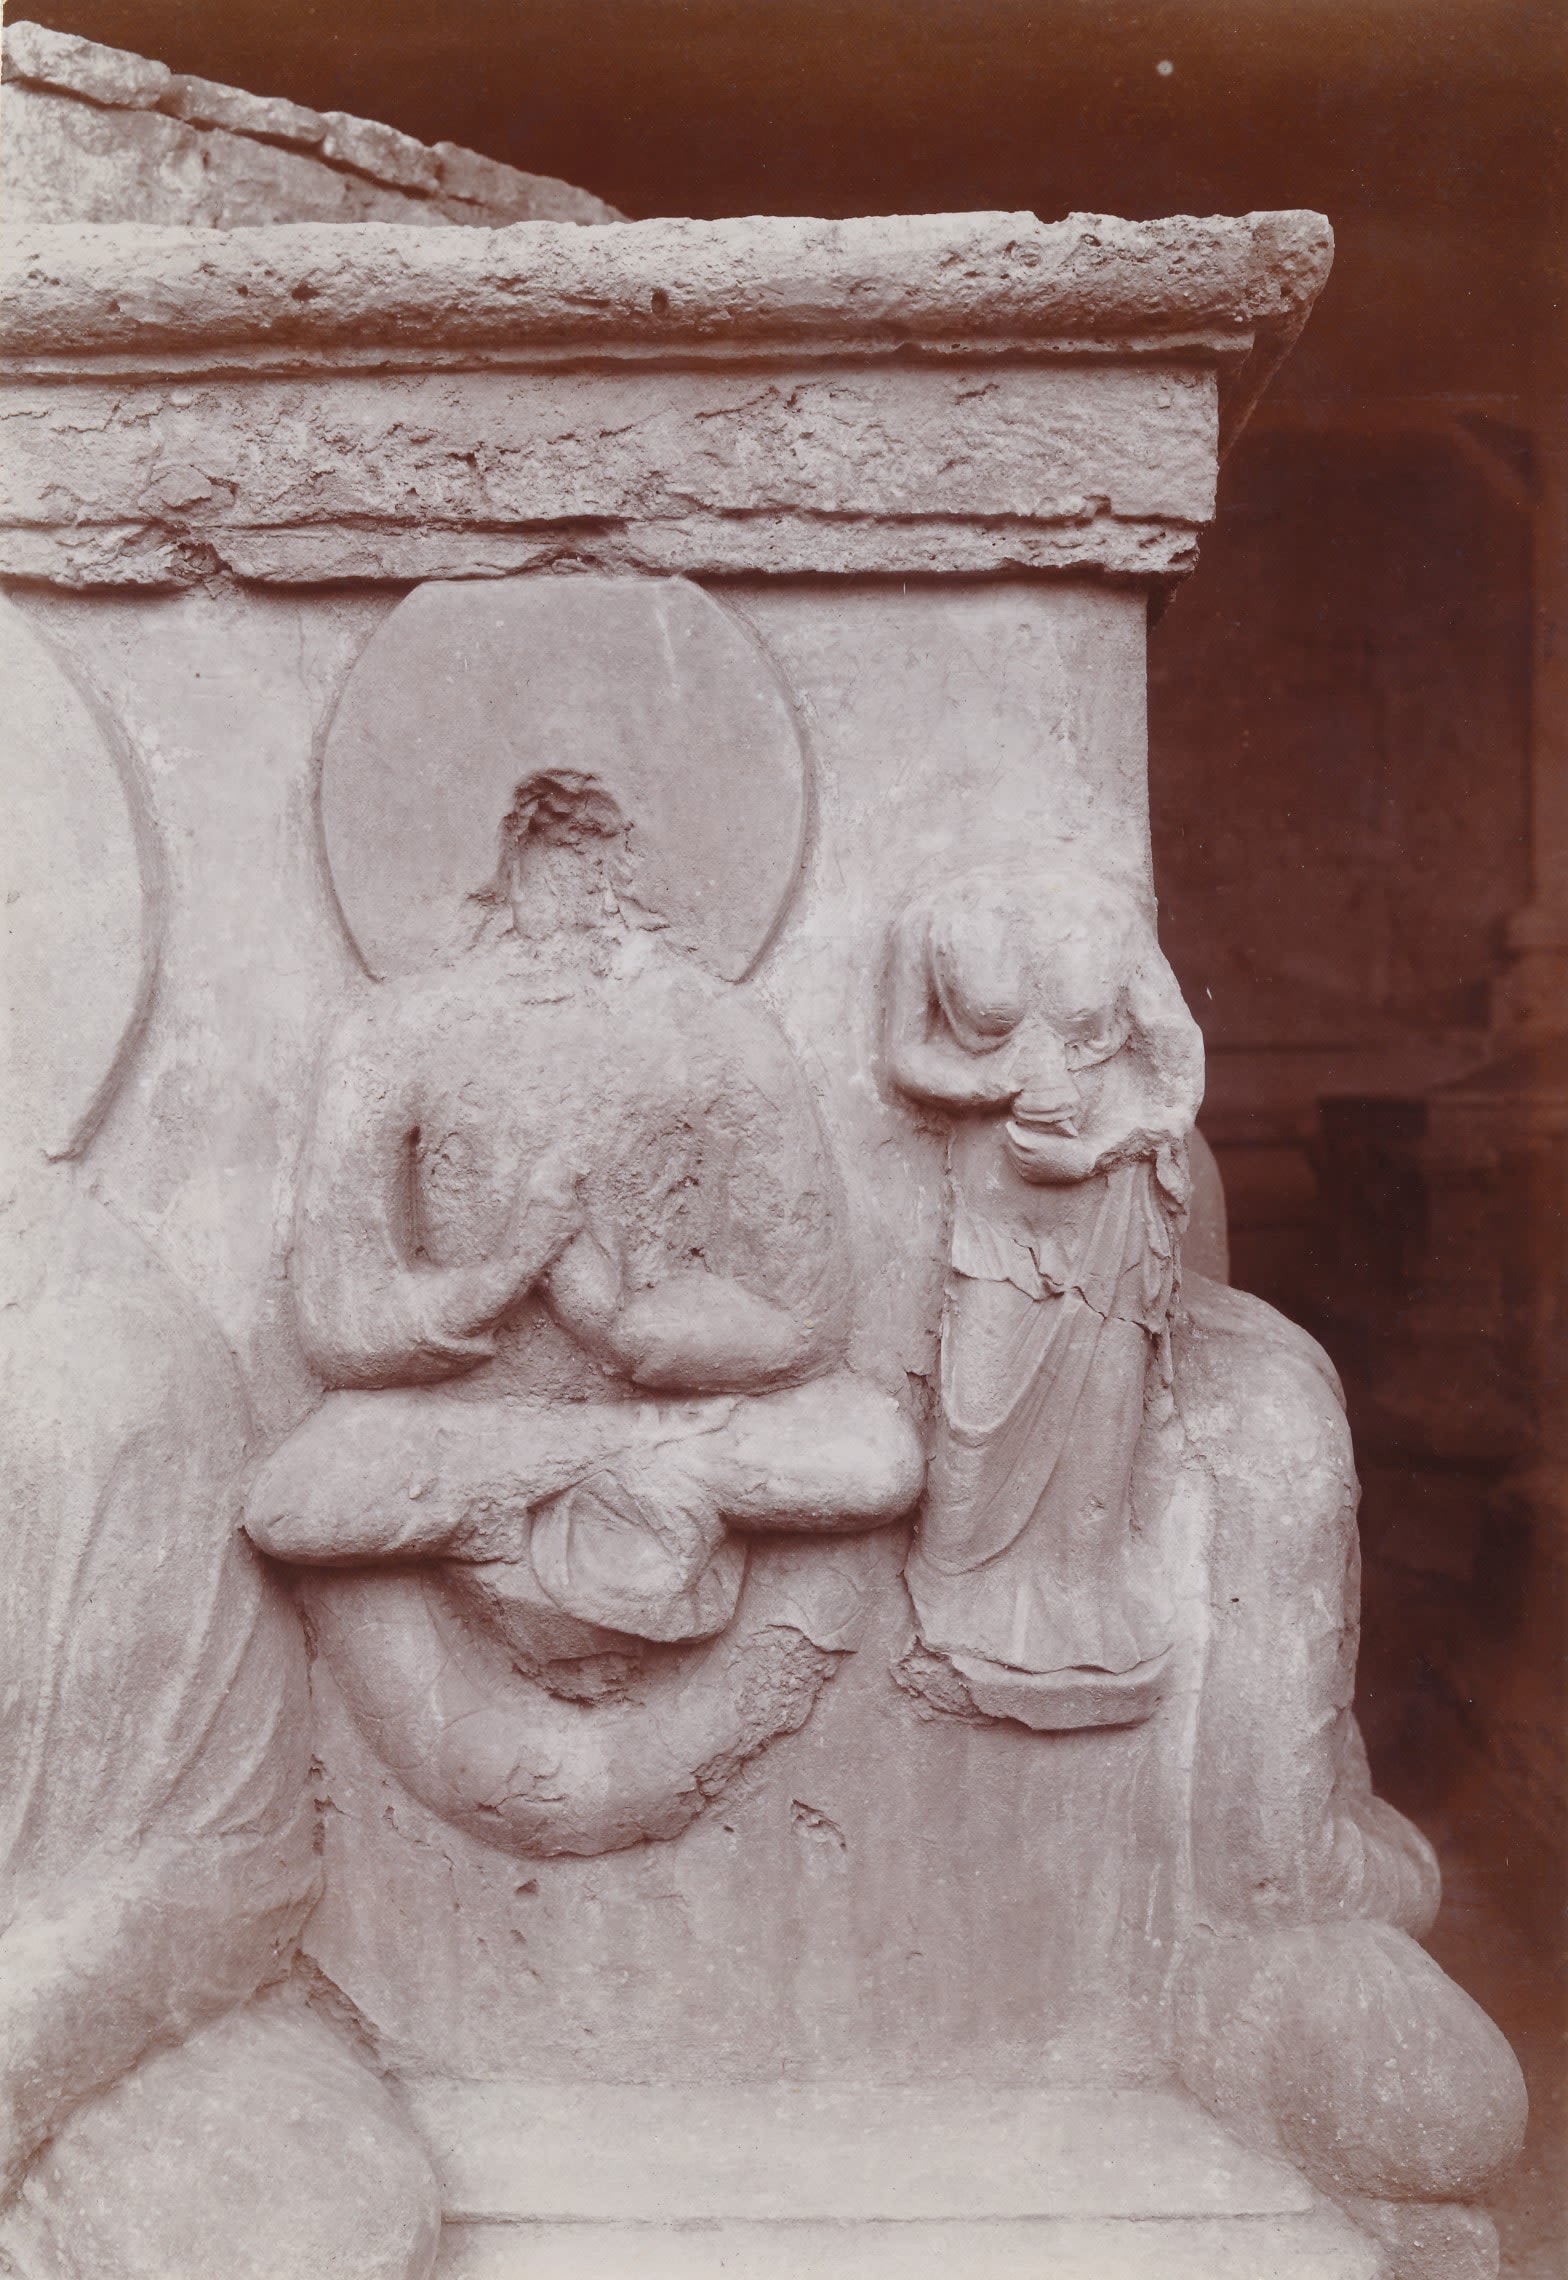
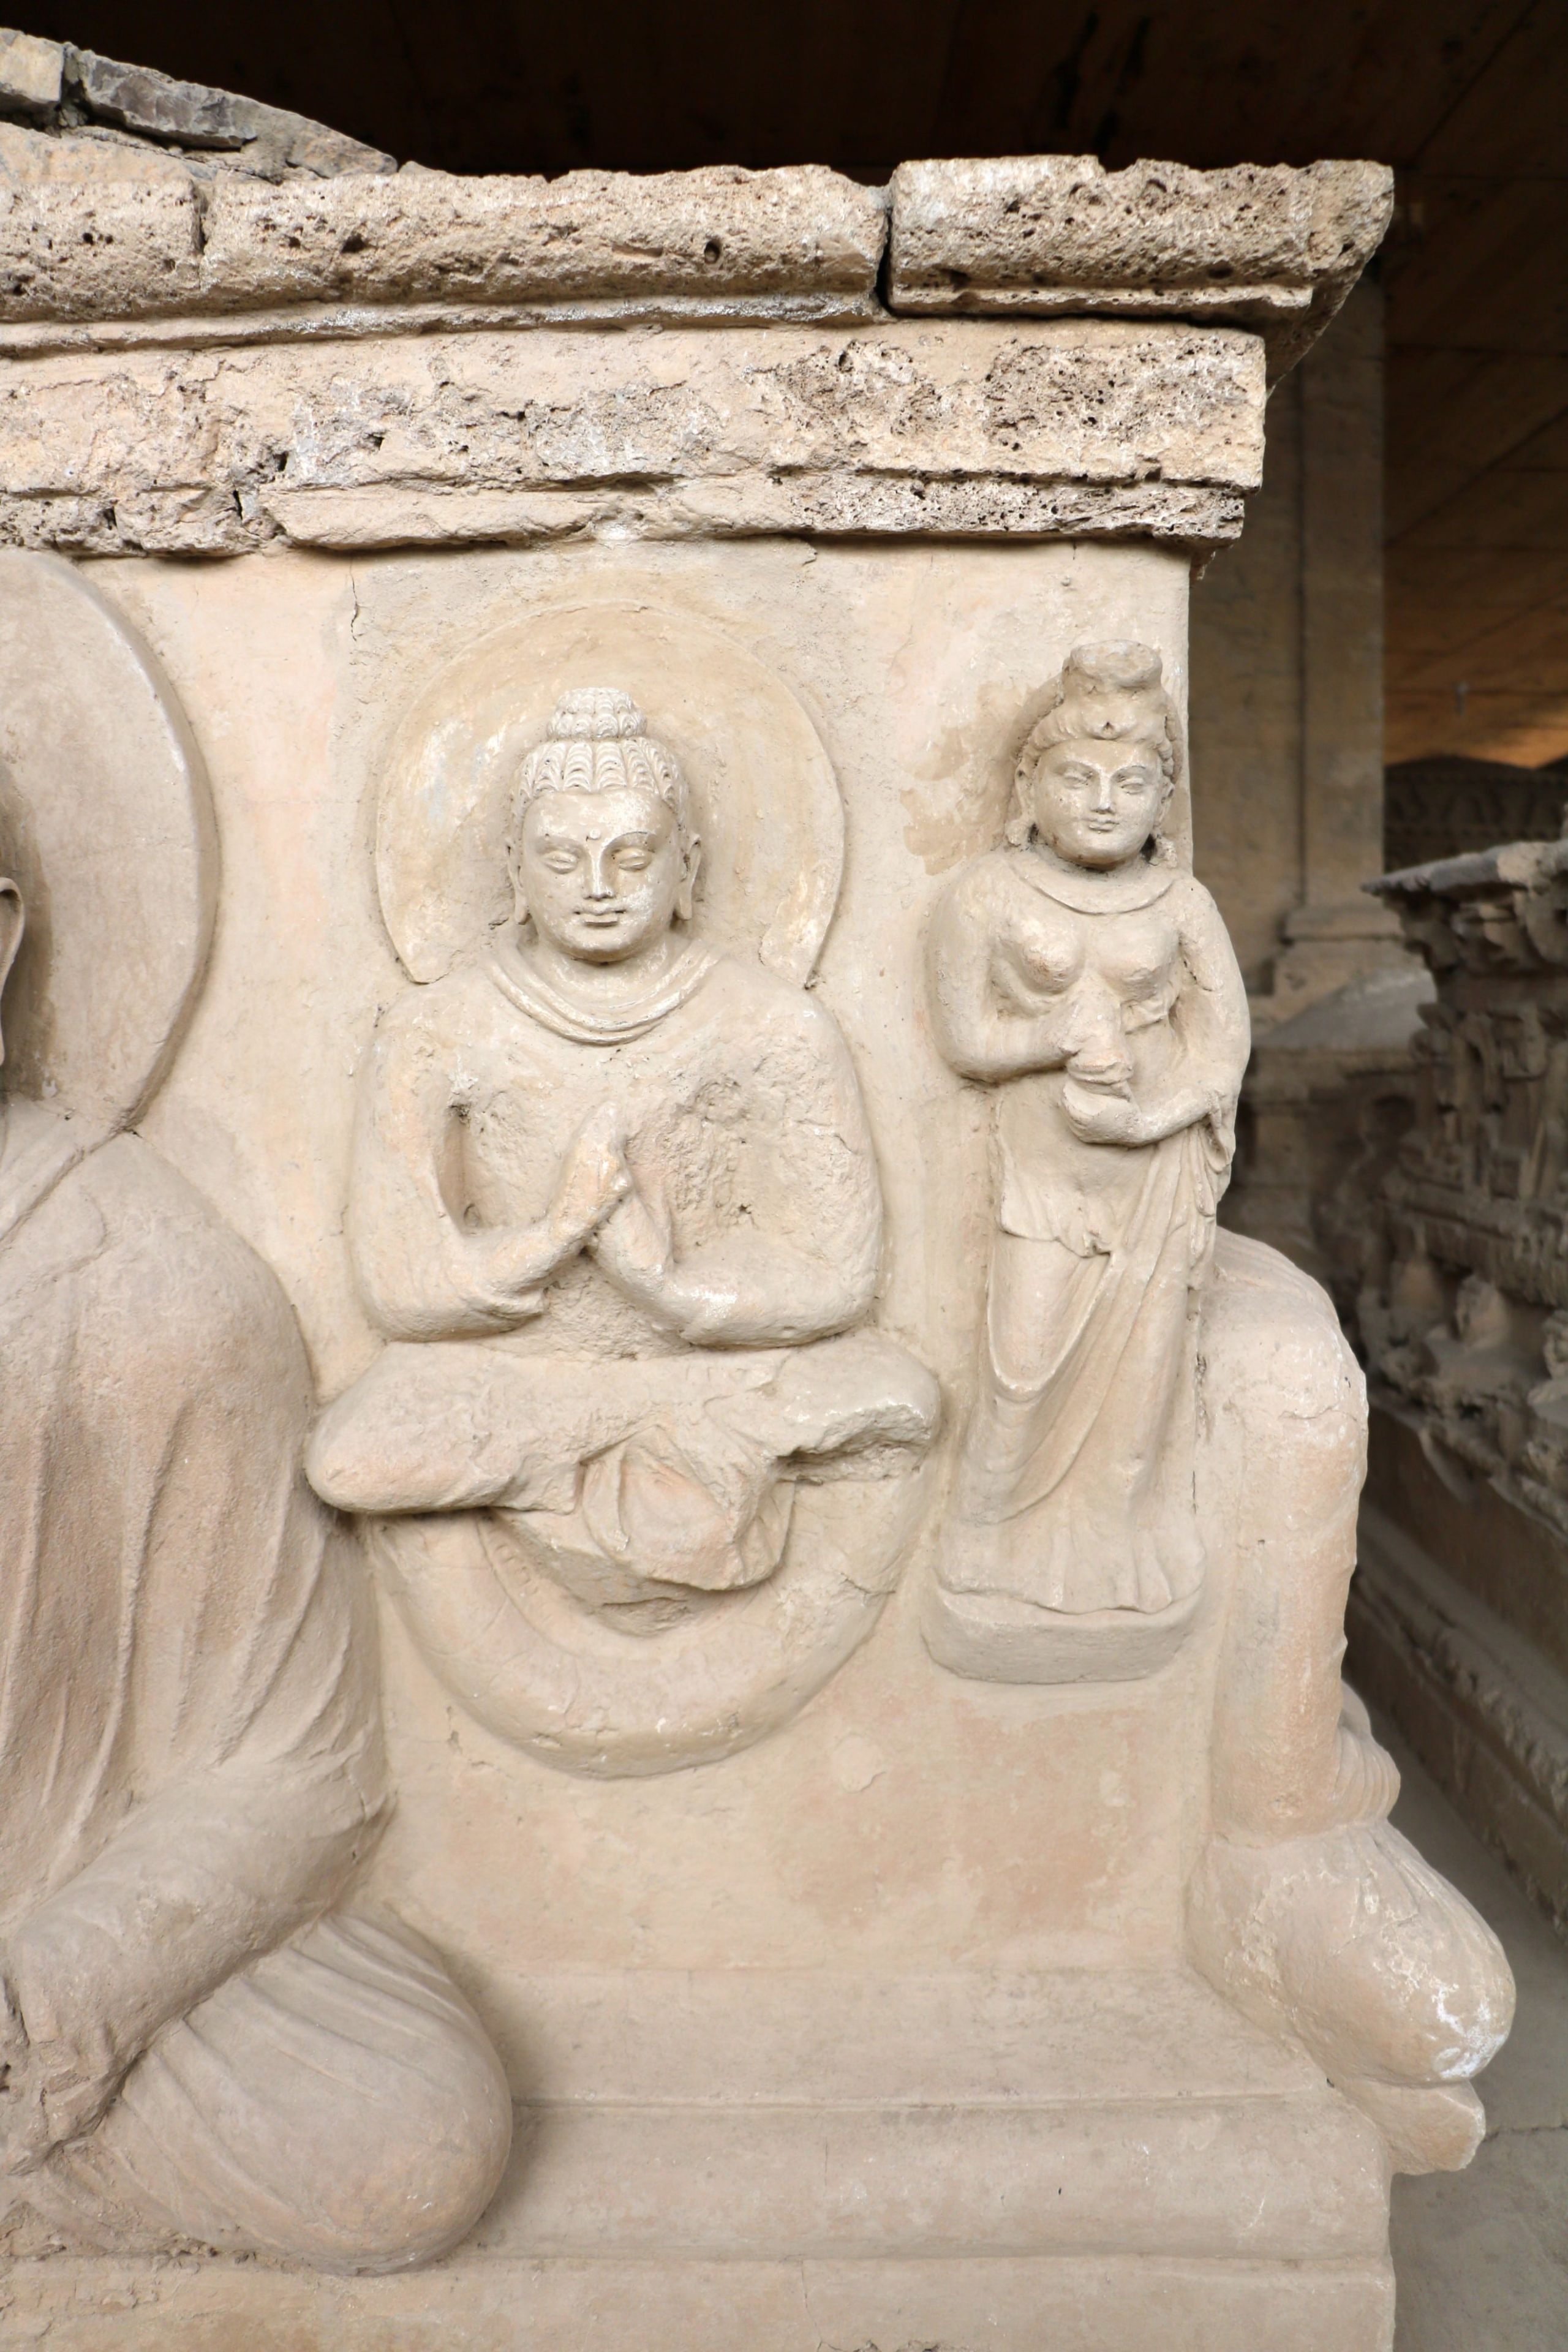
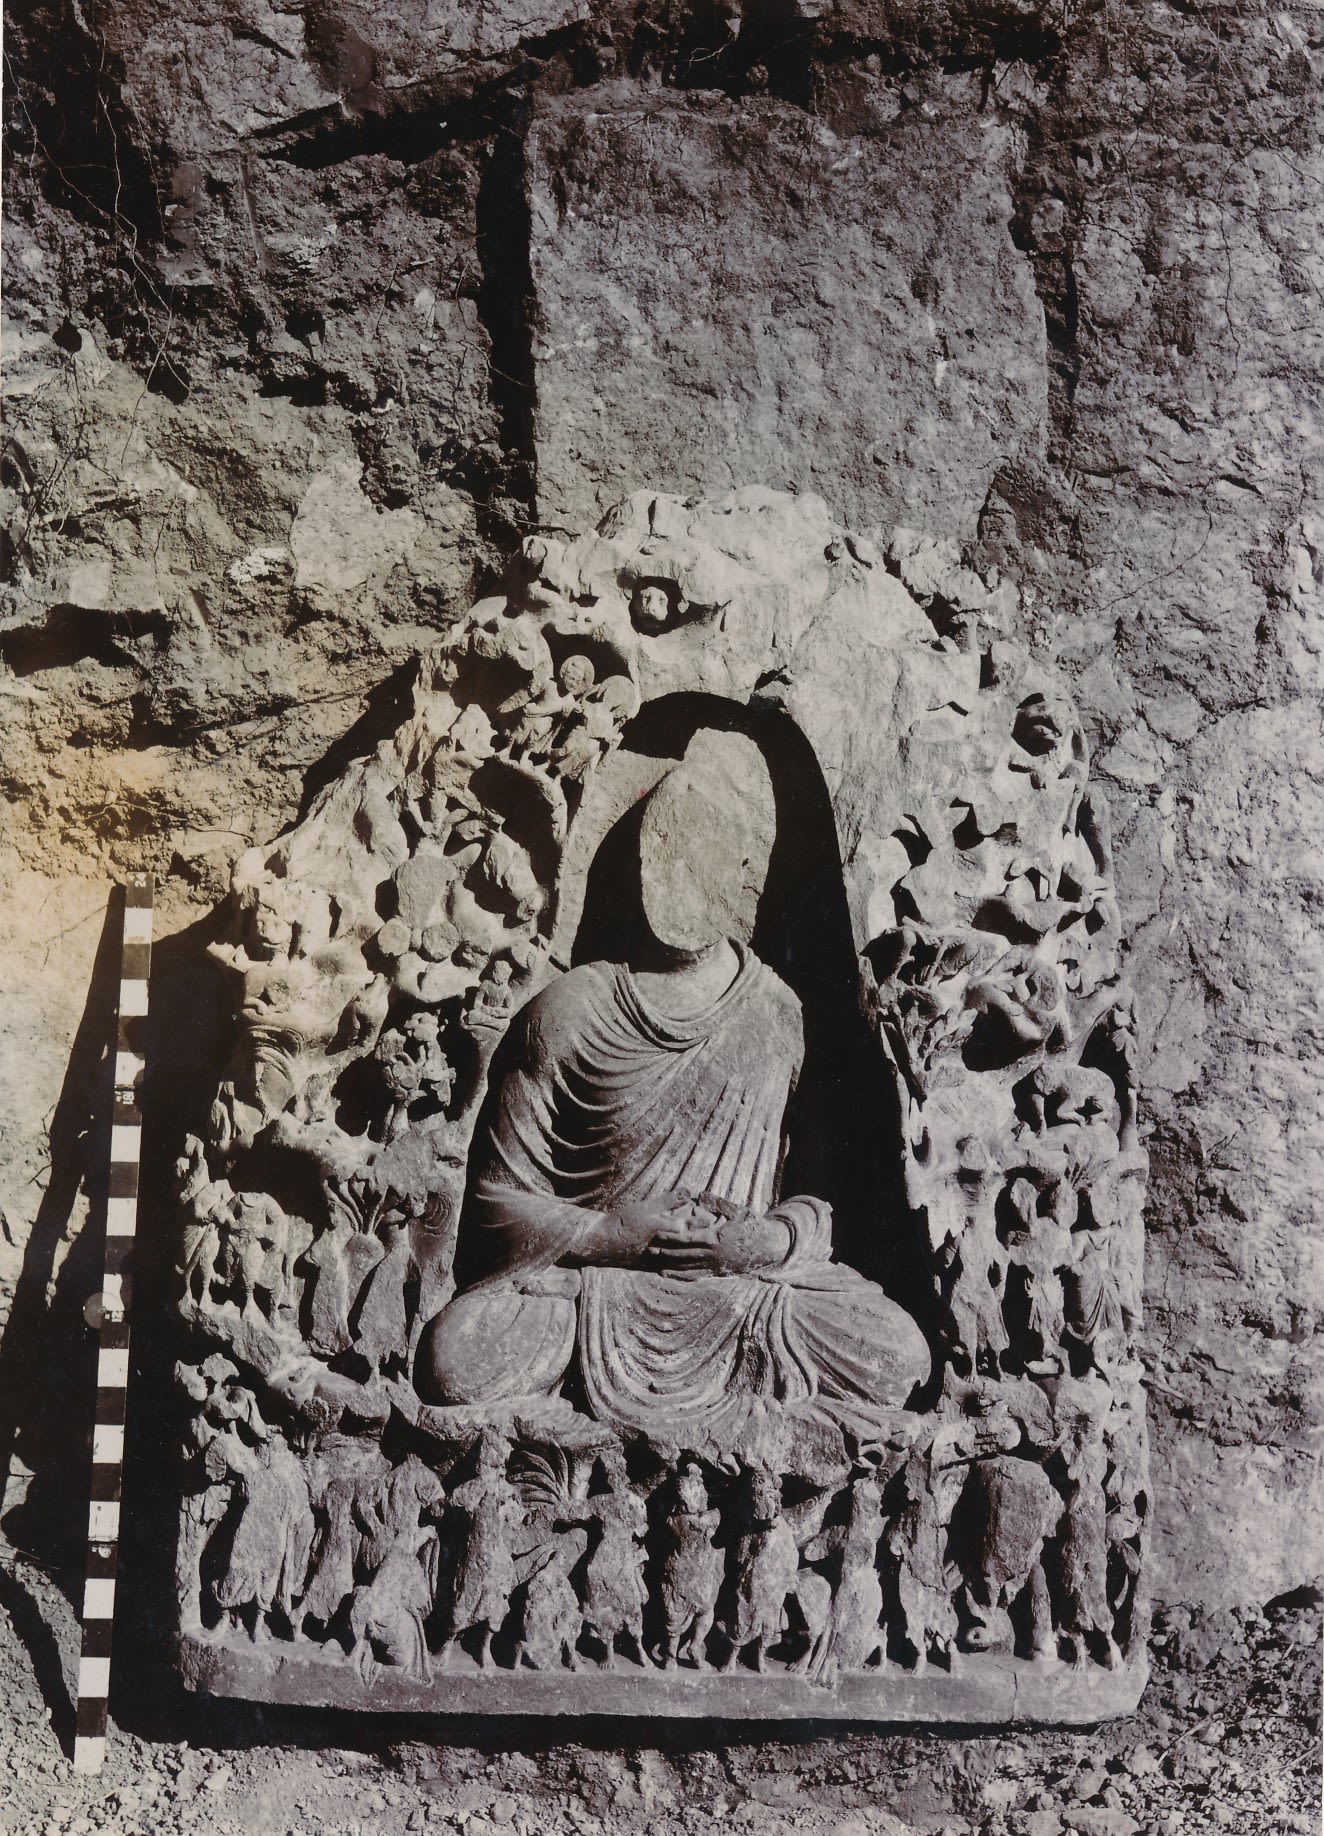
Detail of stucco sculpture of a seated Buddha with attendant figures on west face of Stupa 17 at Jaulian, Taxila, taken in 1932/1933, compared with view taken in 2019 by Dr Abdul Azeem. Sir John Marshall Collection, given by Dr and Mrs Spalding. DUROM.1957.1.1557
Detail of stucco sculpture of a seated Buddha with attendant figures on west face of Stupa 17 at Jaulian, Taxila, taken in 1932/1933, compared with view taken in 2019 by Dr Abdul Azeem. Sir John Marshall Collection, given by Dr and Mrs Spalding. DUROM.1957.1.1557
Detail of stucco sculpture of a seated Buddha with attendant figures on west face of Stupa 17 at Jaulian, Taxila, taken in 2019 by Dr Abdul Azeem.
Detail of stucco sculpture of a seated Buddha with attendant figures on west face of Stupa 17 at Jaulian, Taxila, taken in 2019 by Dr Abdul Azeem.
Current Challenges for Protecting Taxila’s Heritage
Taxila’s heritage is regularly threatened by natural disasters and human activities. Archaeological remains at Taxila are vulnerable to heavy rainfall, flash floods and raised water levels from the annual monsoon.
Many structures have suffered water and vegetation damage, leading to cracks within masonry and the collapse of walls. The site is also located within seismically active region, and some aspects of Taxila’s heritage were damaged by a major earthquake in October 2005.
Human activity is also a serious threat. Despite legal protection, many archaeological sites continue to be damaged by treasure hunting and looting. Sites in, and around, Taxila have been particularly targeted due to the presence of Gandharan sculptures, which command high prices on the international art market.


Detail of stucco sculpture of a Buddha with attendant figures on the west face of Stupa 1 at Jaulian, Taxila, taken in 1932/1933, compared with view taken in 2019 by Dr Abdul Azeem. Sir John Marshall Collection, given by Dr and Mrs Spalding. DUROM.1957.1.1560
Detail of stucco sculpture of a Buddha with attendant figures on the west face of Stupa 1 at Jaulian, Taxila, taken in 1932/1933, compared with view taken in 2019 by Dr Abdul Azeem. Sir John Marshall Collection, given by Dr and Mrs Spalding. DUROM.1957.1.1560
Detail of stucco sculpture of a Buddha with attendant figures on the west face of Stupa 1 at Jaulian, Taxila, taken in 2019 by Dr Abdul Azeem.
Detail of stucco sculpture of a Buddha with attendant figures on the west face of Stupa 1 at Jaulian, Taxila, taken in 2019 by Dr Abdul Azeem.

Detail of stucco sculpture of a seated Buddha with female attendant on southeast corner of Stupa A15 at Jaulian, Taxila, taken in 1917/1918, compared with view taken in 2019 by Dr Abdul Azeem. Sir John Marshall Collection, given by Dr and Mrs Spalding. DUROM.1957.1.1567
Detail of stucco sculpture of a seated Buddha with female attendant on southeast corner of Stupa A15 at Jaulian, Taxila, taken in 1917/1918, compared with view taken in 2019 by Dr Abdul Azeem. Sir John Marshall Collection, given by Dr and Mrs Spalding. DUROM.1957.1.1567

Detail of stucco sculpture of a seated Buddha with female attendant on southeast corner of Stupa A15 at Jaulian, Taxila, taken in 2019 by Dr Abdul Azeem.
Detail of stucco sculpture of a seated Buddha with female attendant on southeast corner of Stupa A15 at Jaulian, Taxila, taken in 2019 by Dr Abdul Azeem.

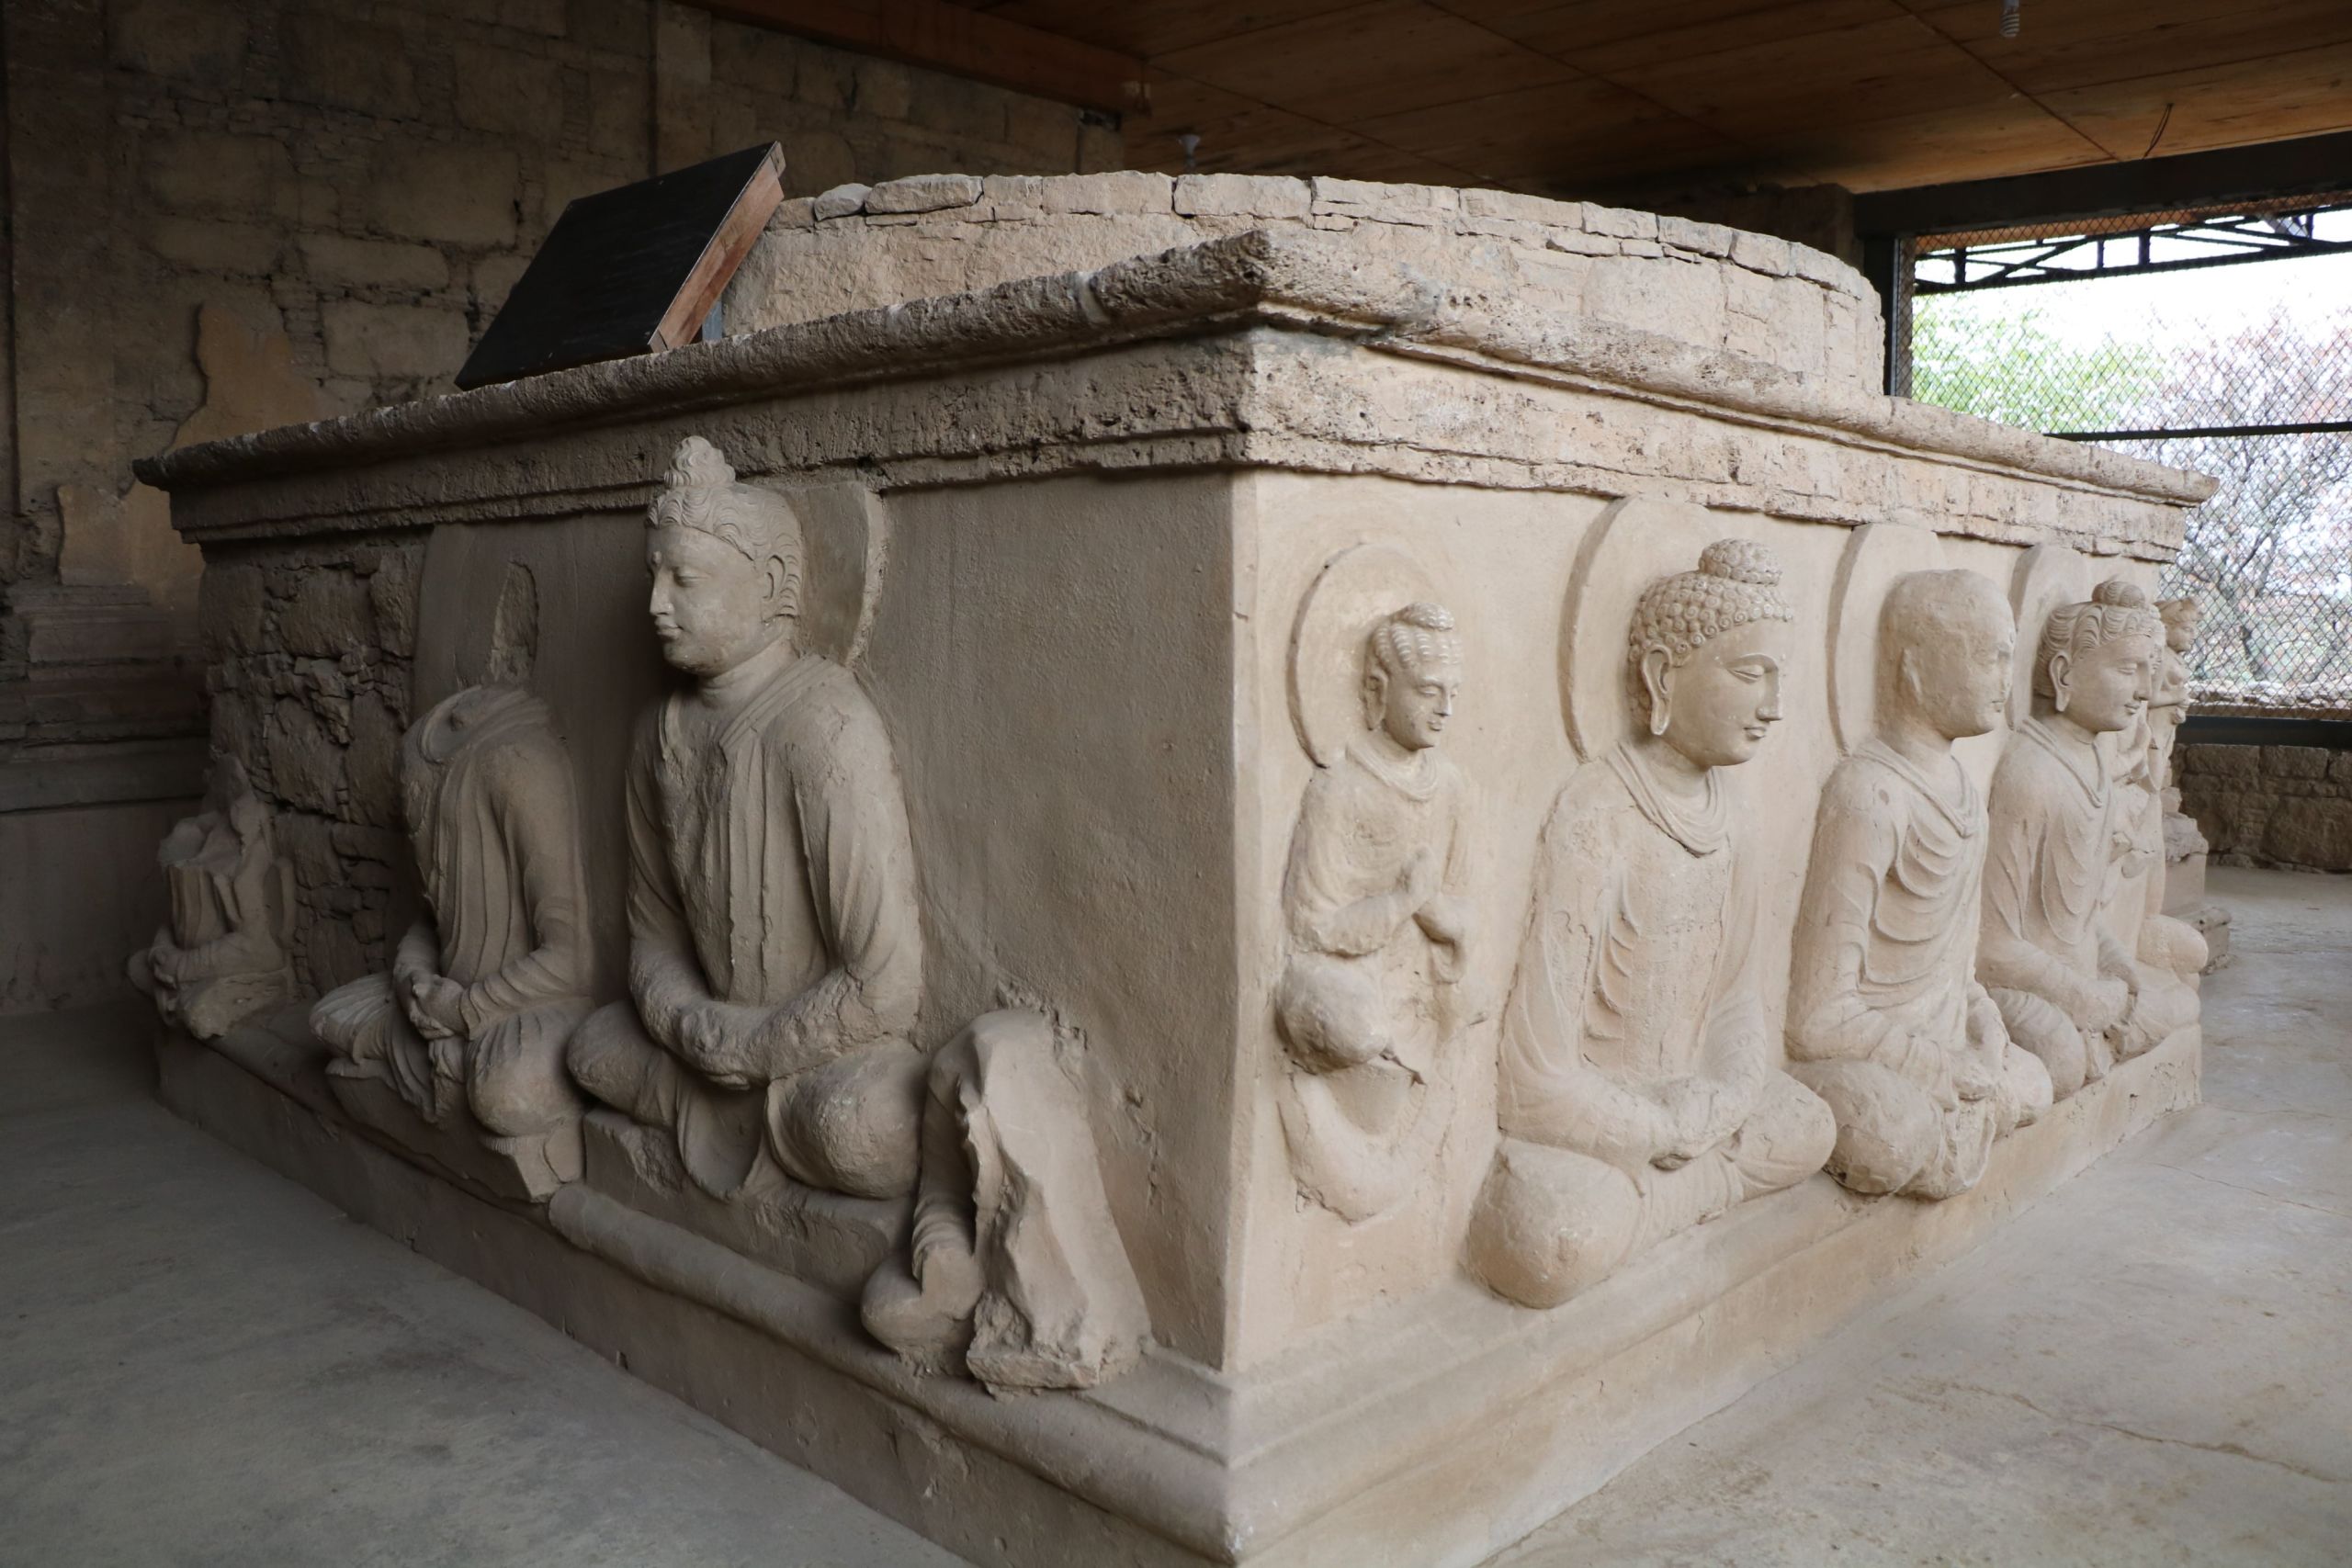
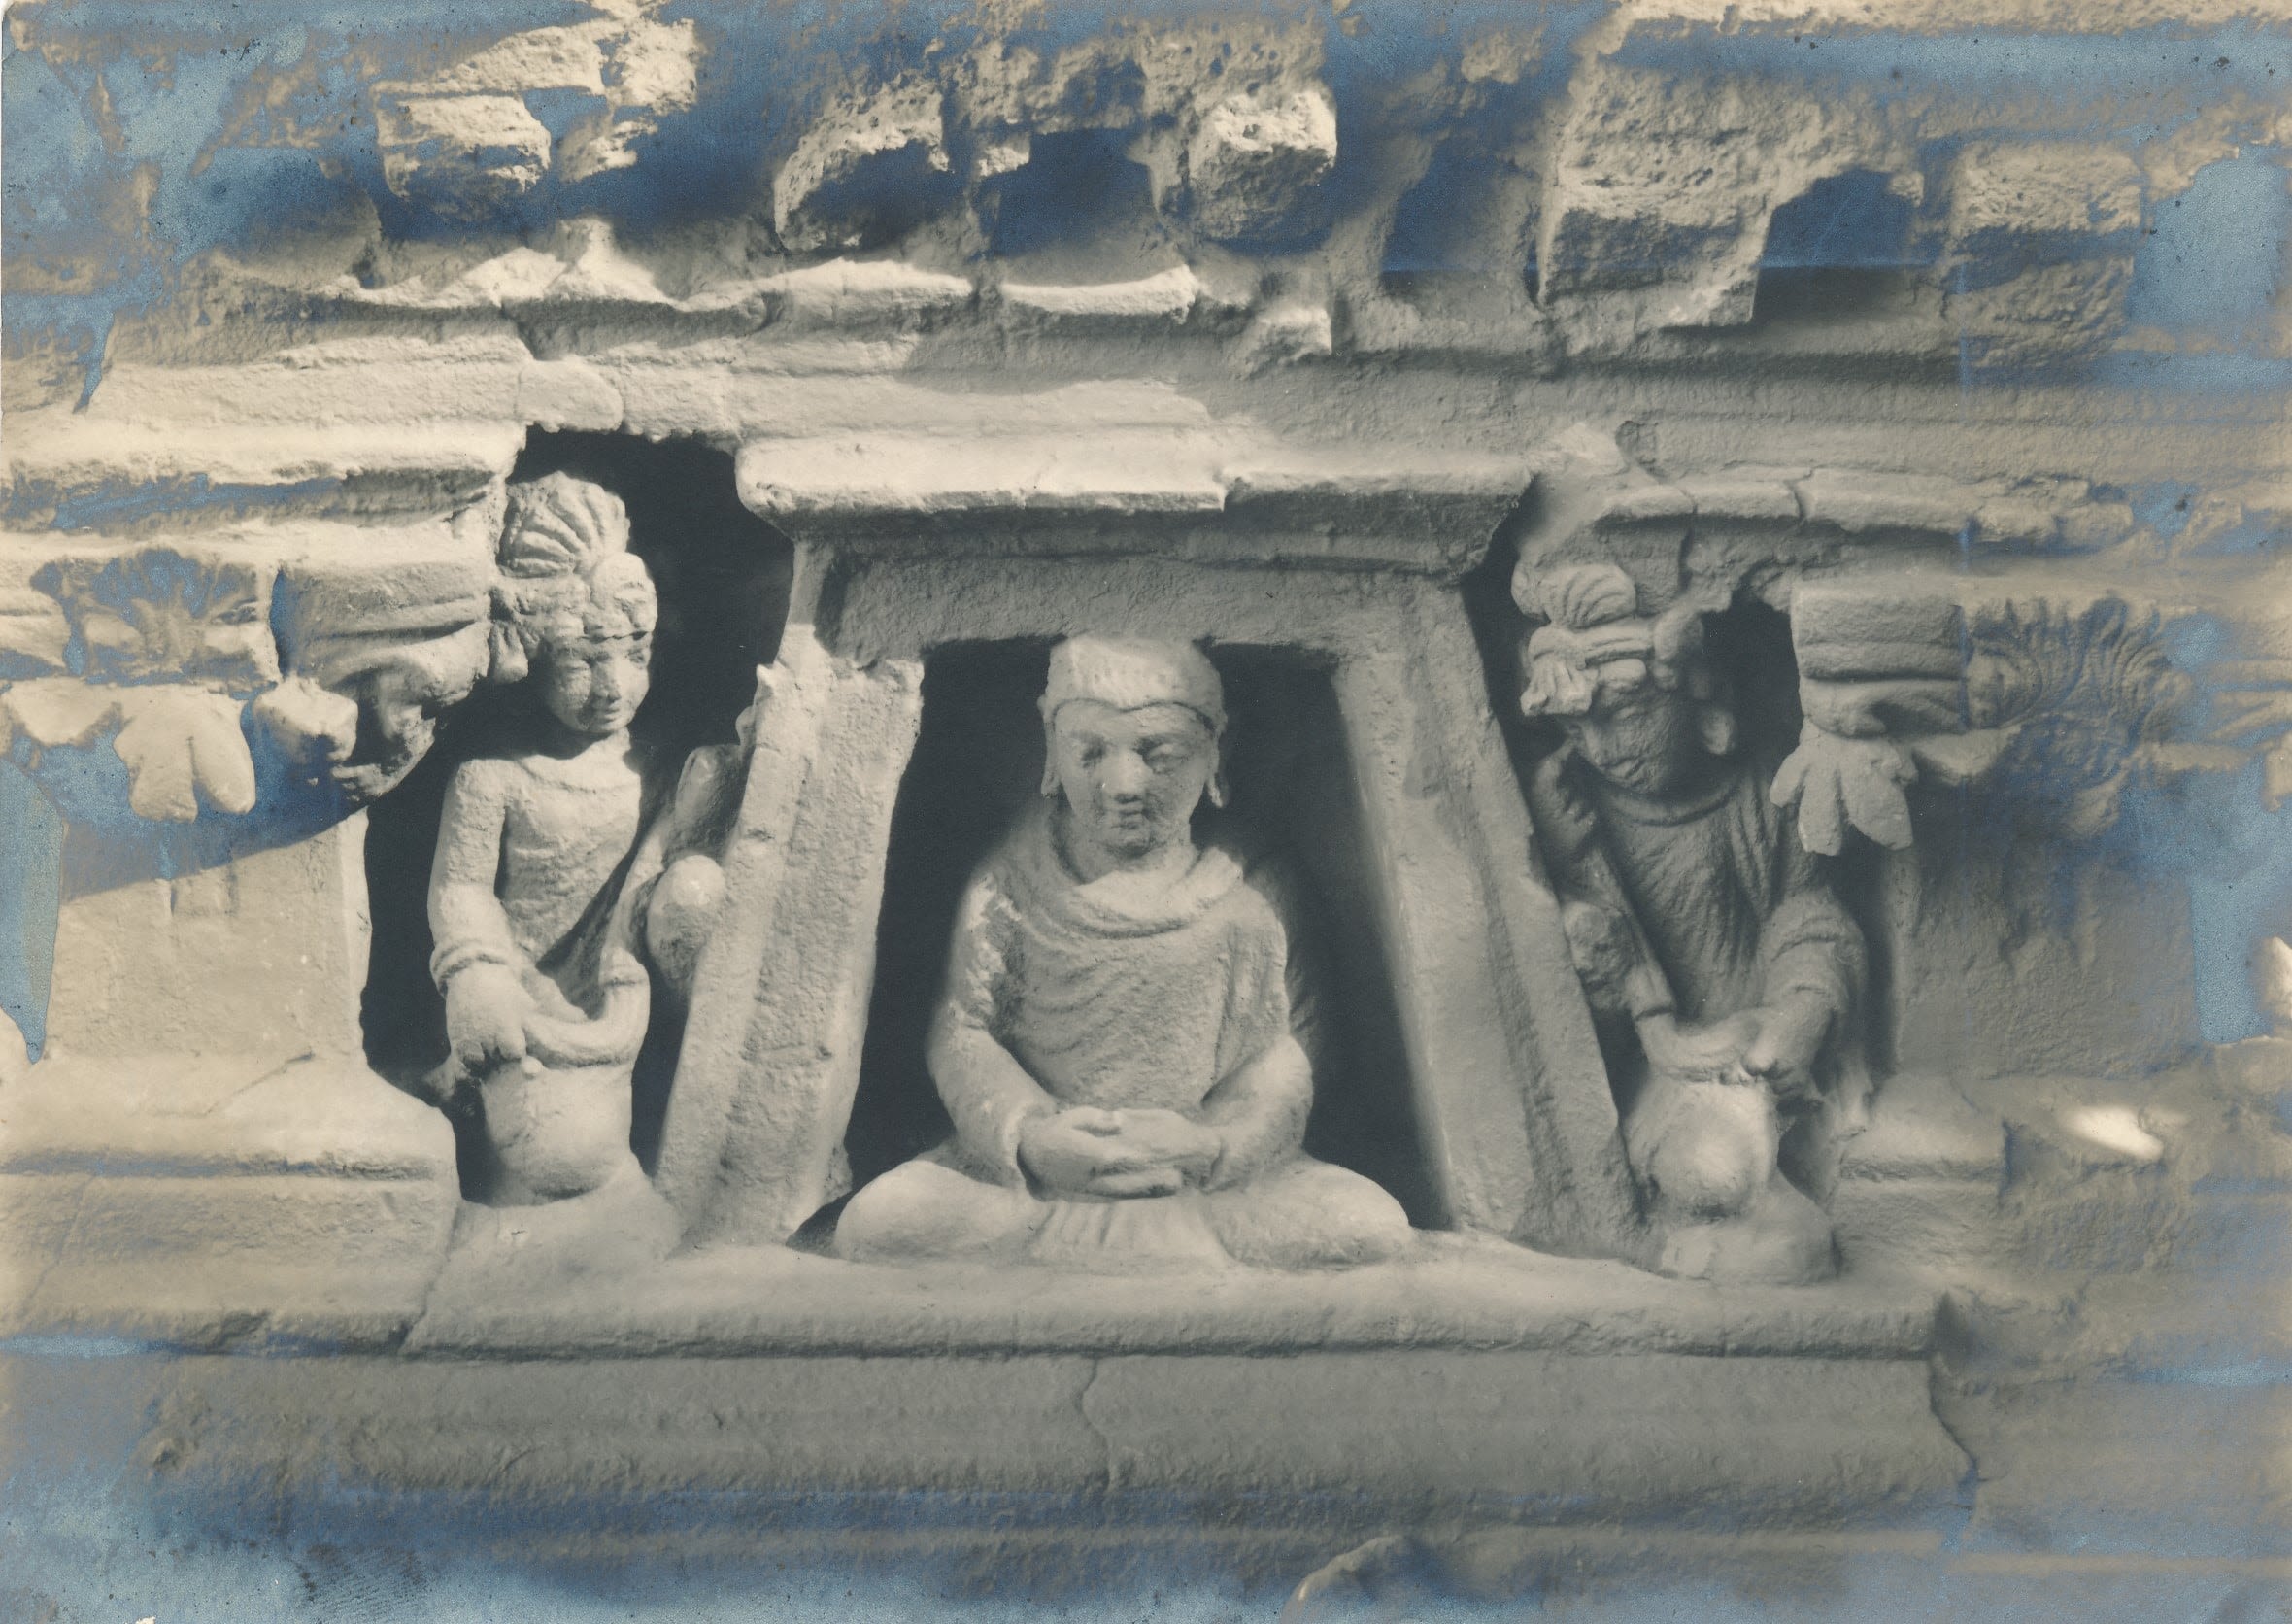
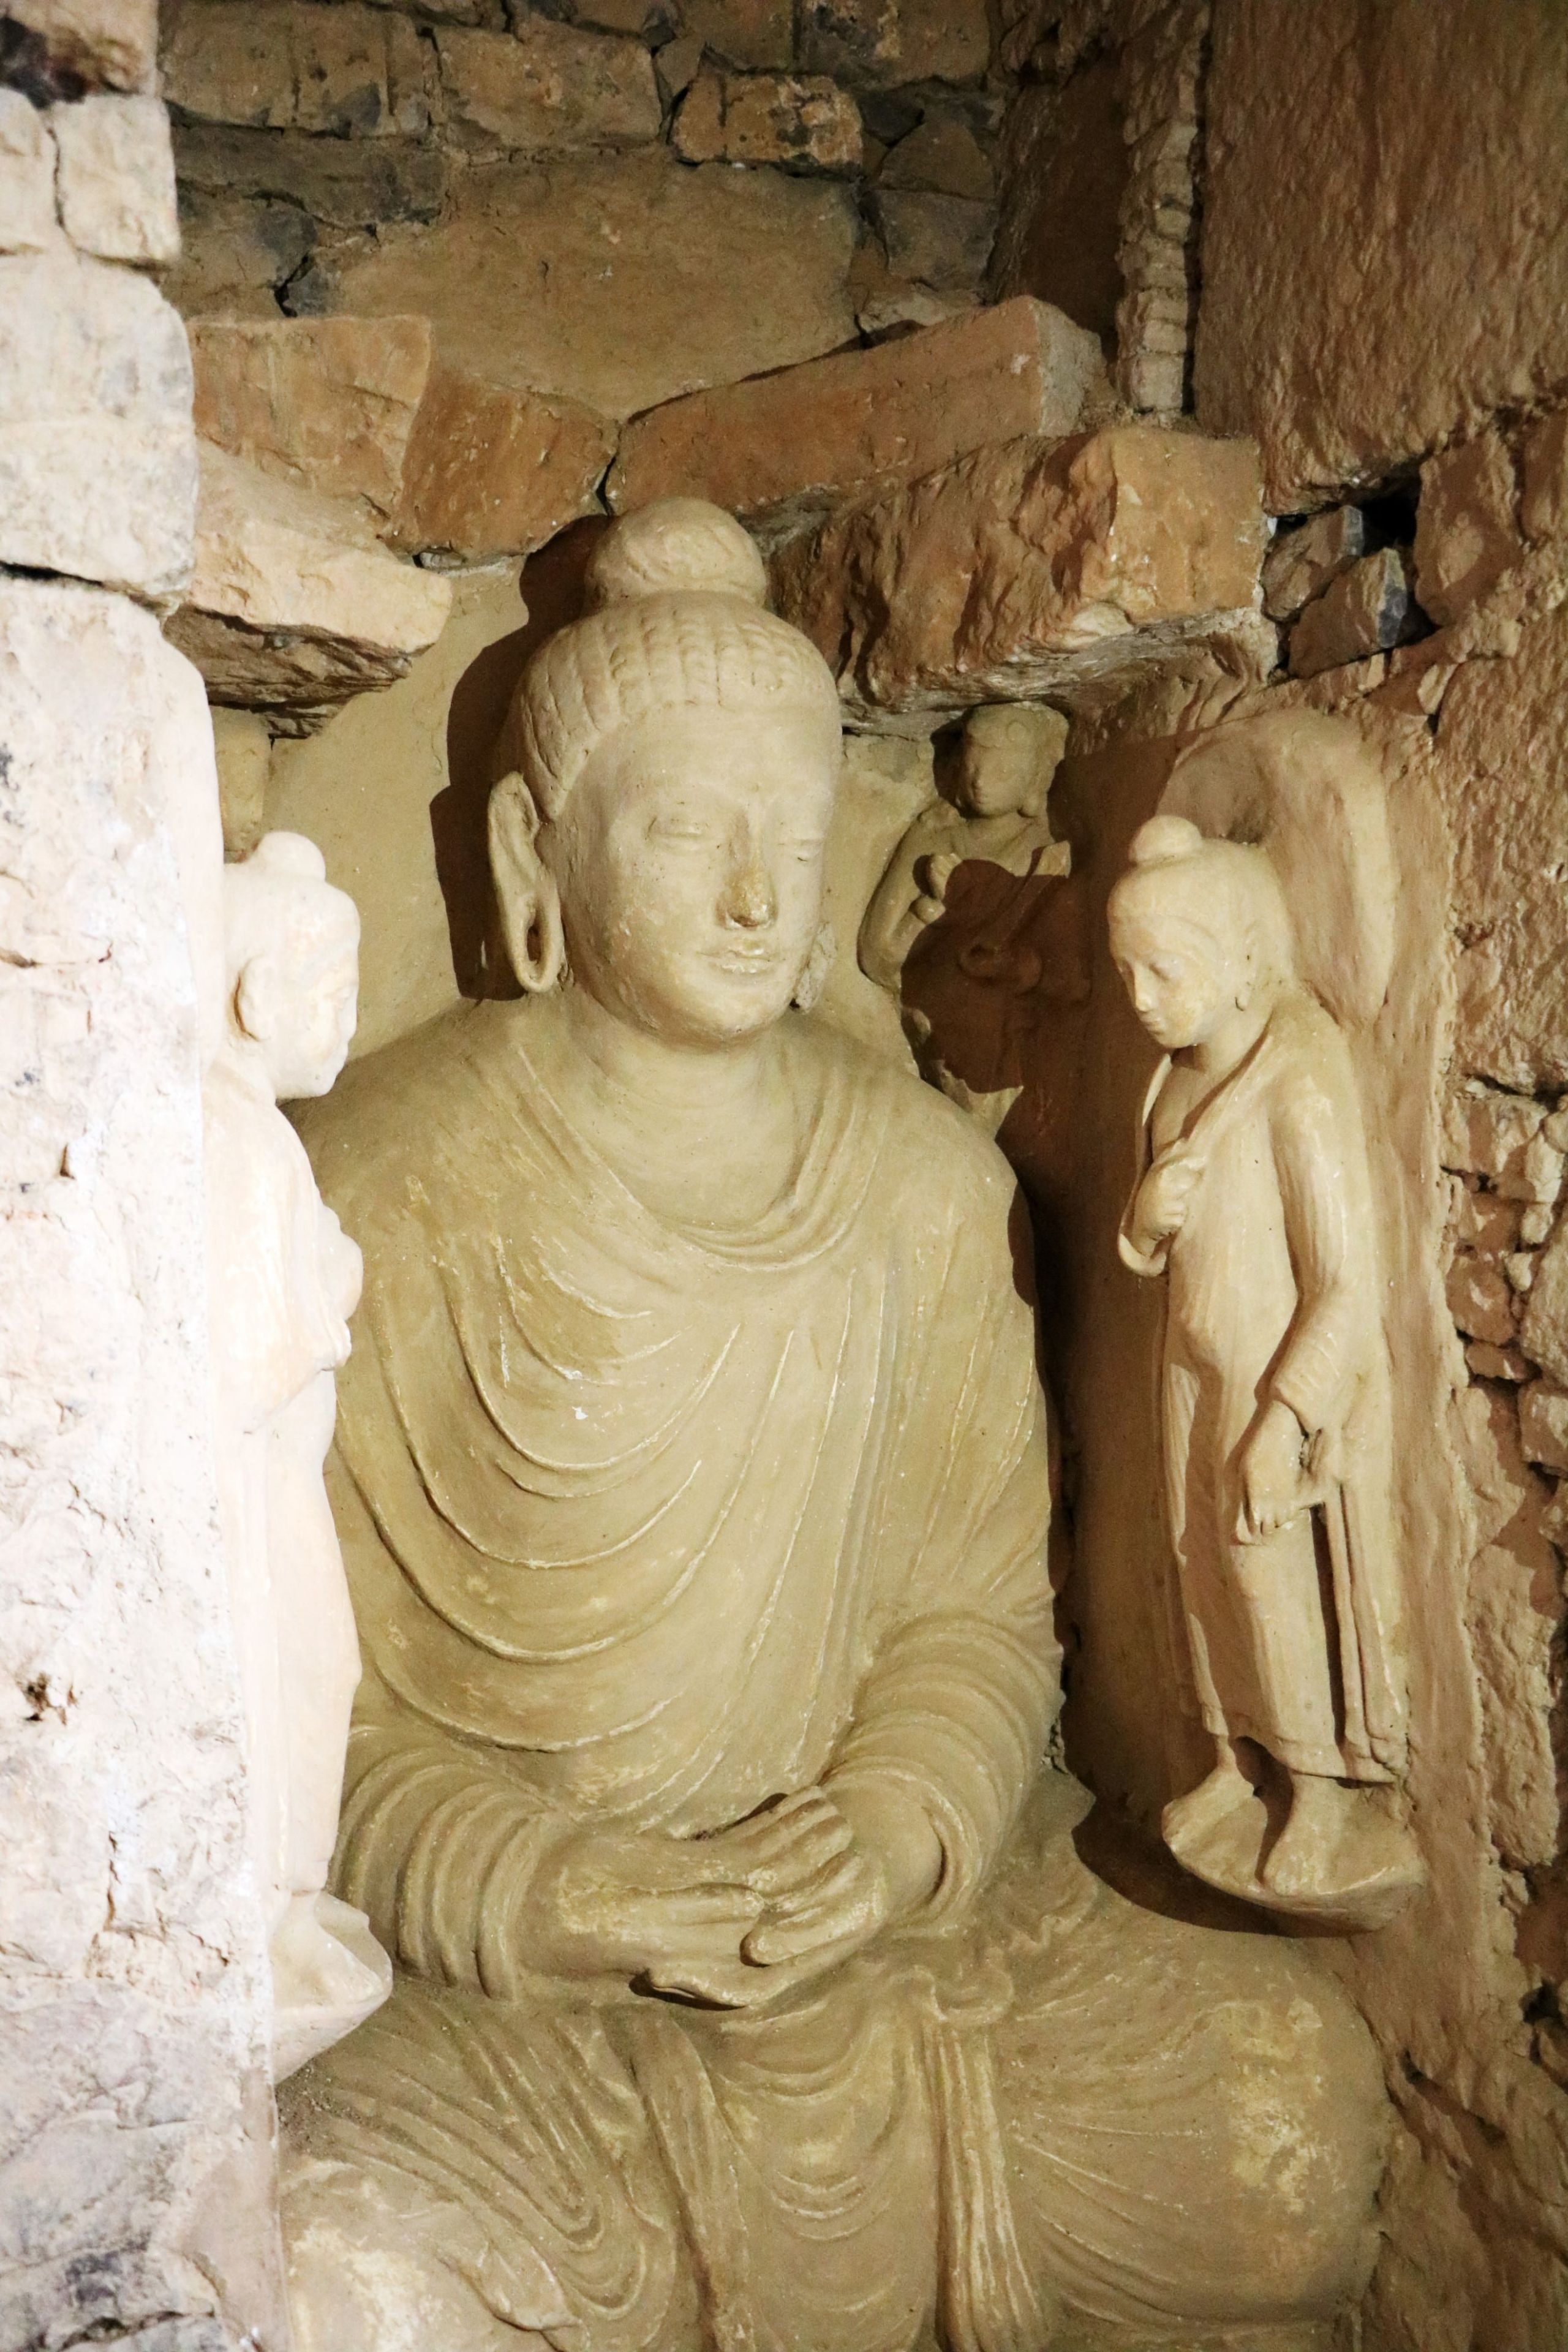
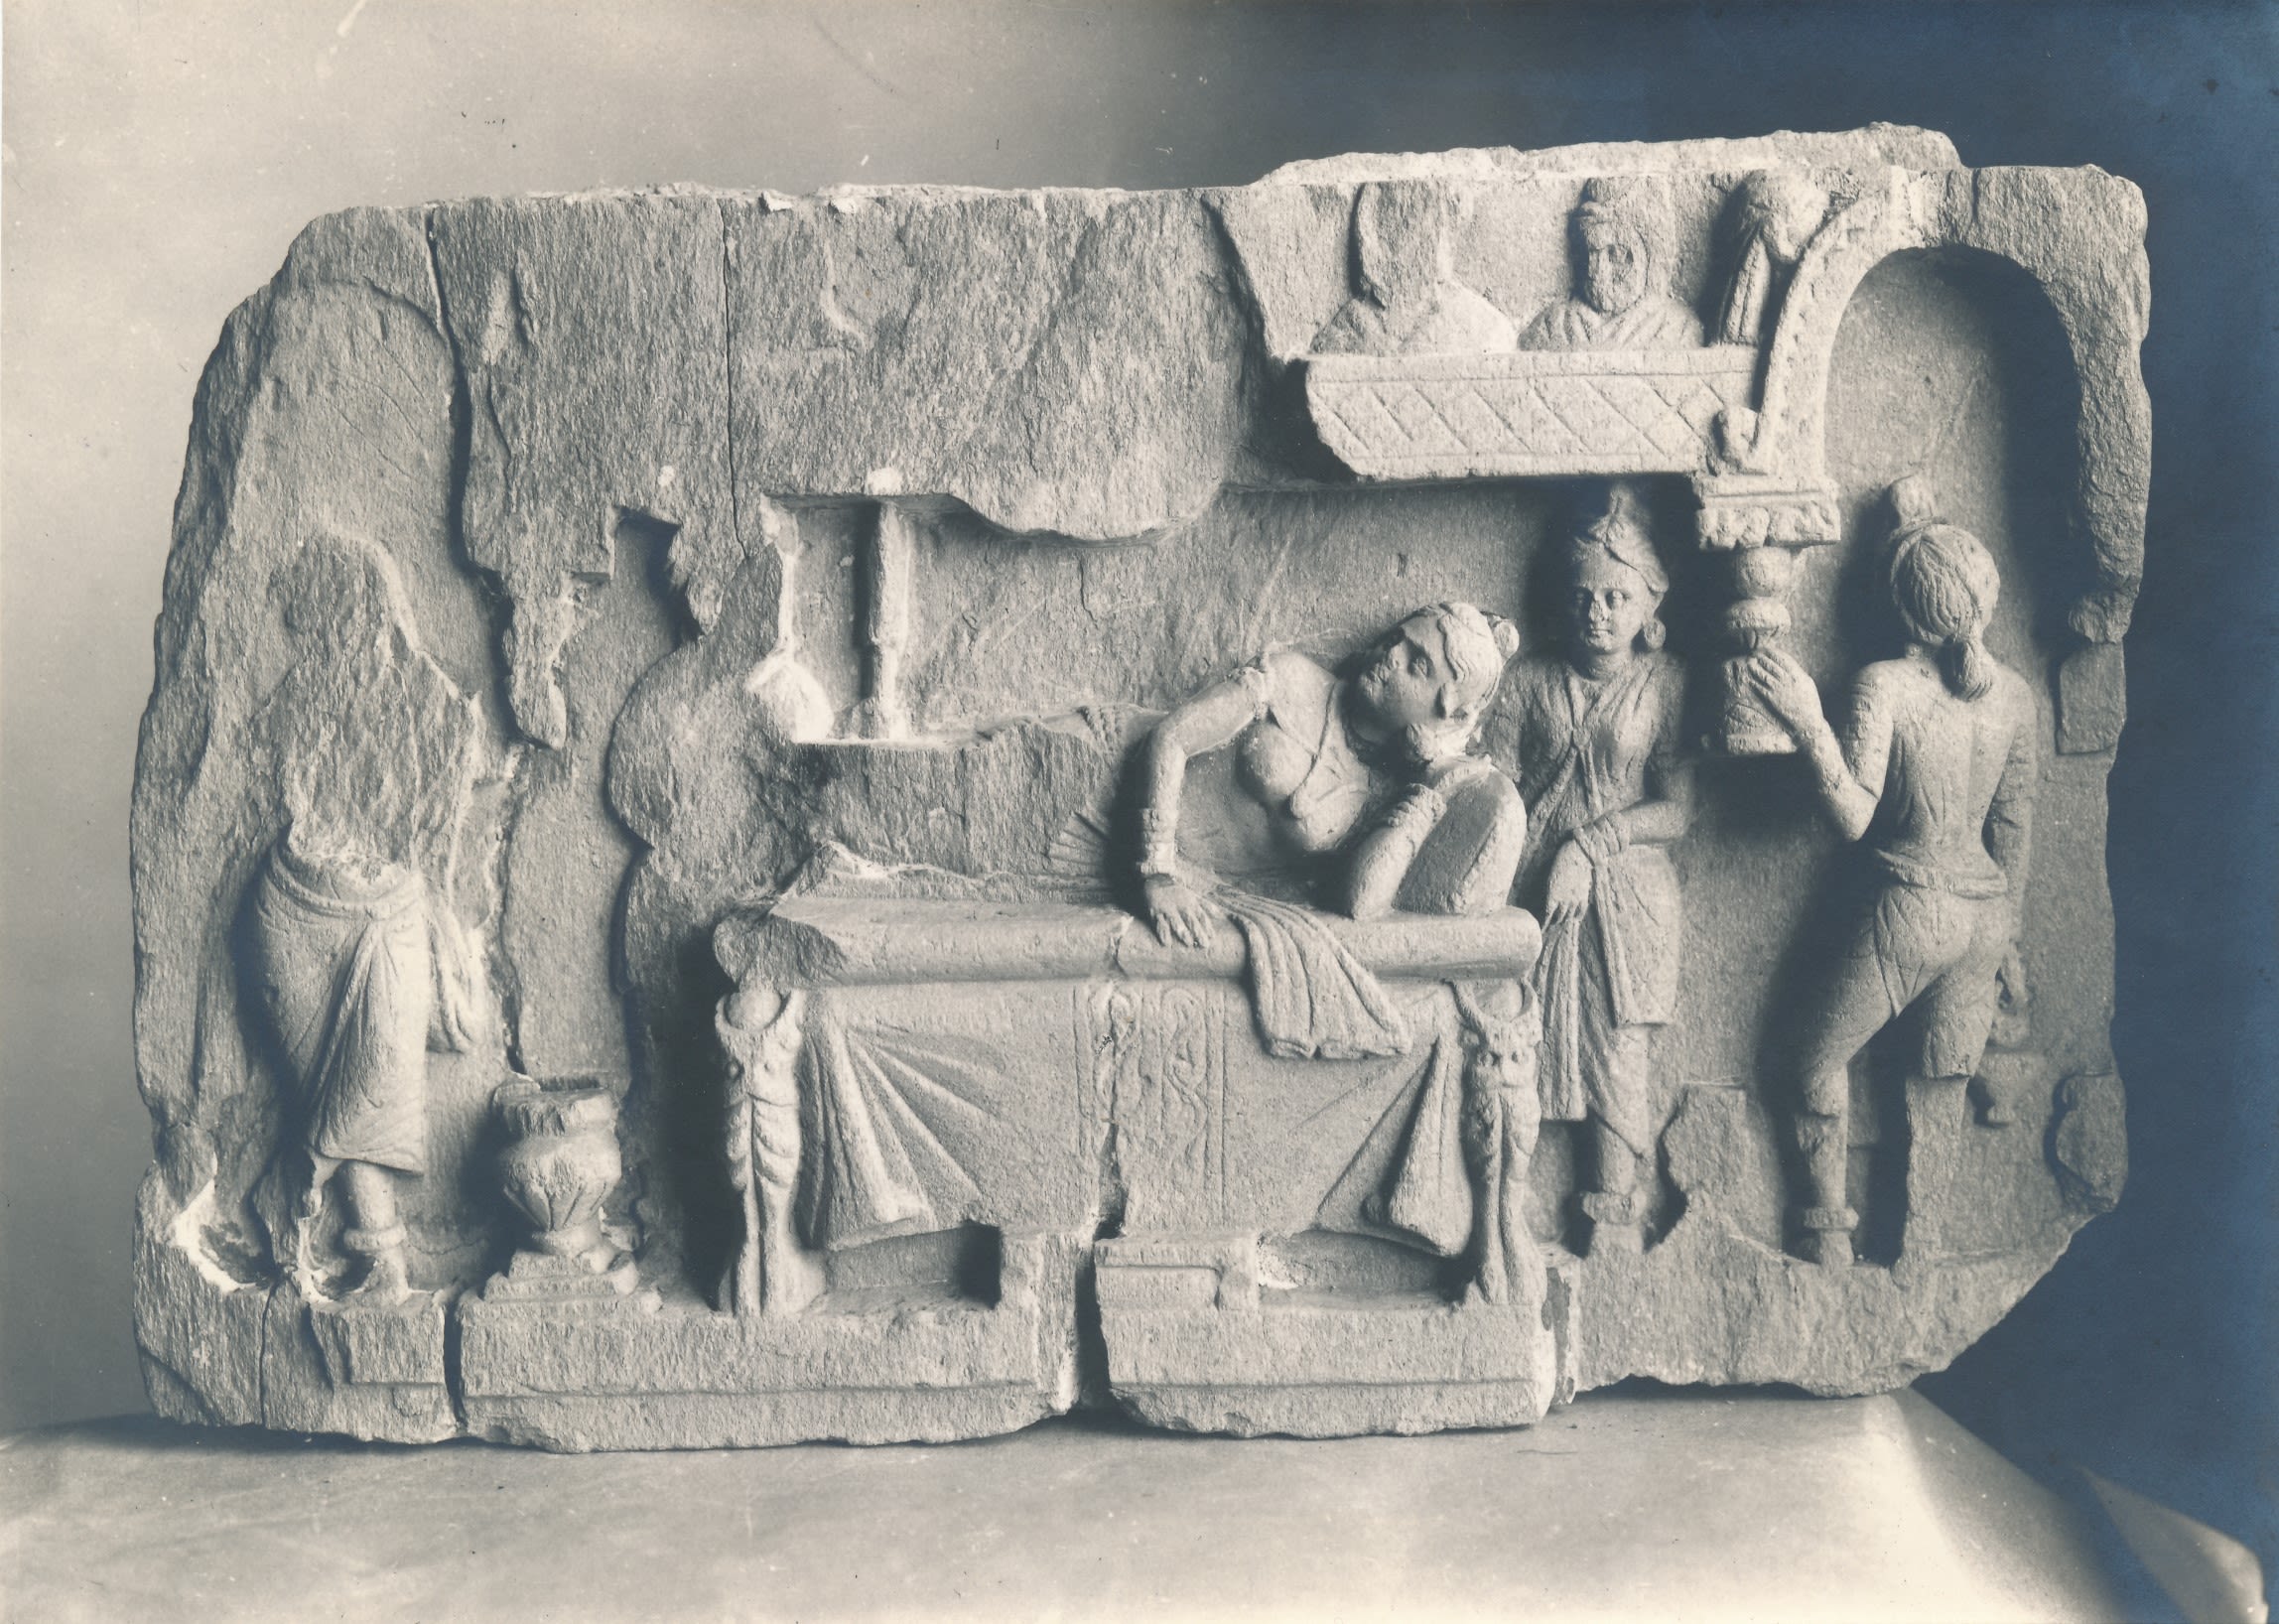
Stucco sculpture of a seated Buddha flanked by a standing Buddha and attendant figures in Chapel E1, Jaulian, Taxila, taken in 1917/1918, compared with view taken in 2019 by Dr Abdul Azeem. Sir John Marshall Collection, given by Dr and Mrs Spalding. DUROM.1957.1.1593
Stucco sculpture of a seated Buddha flanked by a standing Buddha and attendant figures in Chapel E1, Jaulian, Taxila, taken in 1917/1918, compared with view taken in 2019 by Dr Abdul Azeem. Sir John Marshall Collection, given by Dr and Mrs Spalding. DUROM.1957.1.1593
Stucco sculpture of a seated Buddha flanked by a standing Buddha and attendant figures in Chapel E1, Jaulian, Taxila, taken in 2019 by Dr Abdul Azeem.
Stucco sculpture of a seated Buddha flanked by a standing Buddha and attendant figures in Chapel E1, Jaulian, Taxila, taken in 2019 by Dr Abdul Azeem.

View of the interior of the monastic quadrangle at Jaulian, Taxila, from the east, taken in 1918/1919, compared with view taken in 2019 by Dr Abdul Azeem. Sir John Marshall Collection, given by Dr and Mrs Spalding. DUROM.1957.1.1598
View of the interior of the monastic quadrangle at Jaulian, Taxila, from the east, taken in 1918/1919, compared with view taken in 2019 by Dr Abdul Azeem. Sir John Marshall Collection, given by Dr and Mrs Spalding. DUROM.1957.1.1598
View of the interior of the monastic quadrangle at Jaulian, Taxila, from the east, taken in 2019 by Dr Abdul Azeem.
View of the interior of the monastic quadrangle at Jaulian, Taxila, from the east, taken in 2019 by Dr Abdul Azeem.

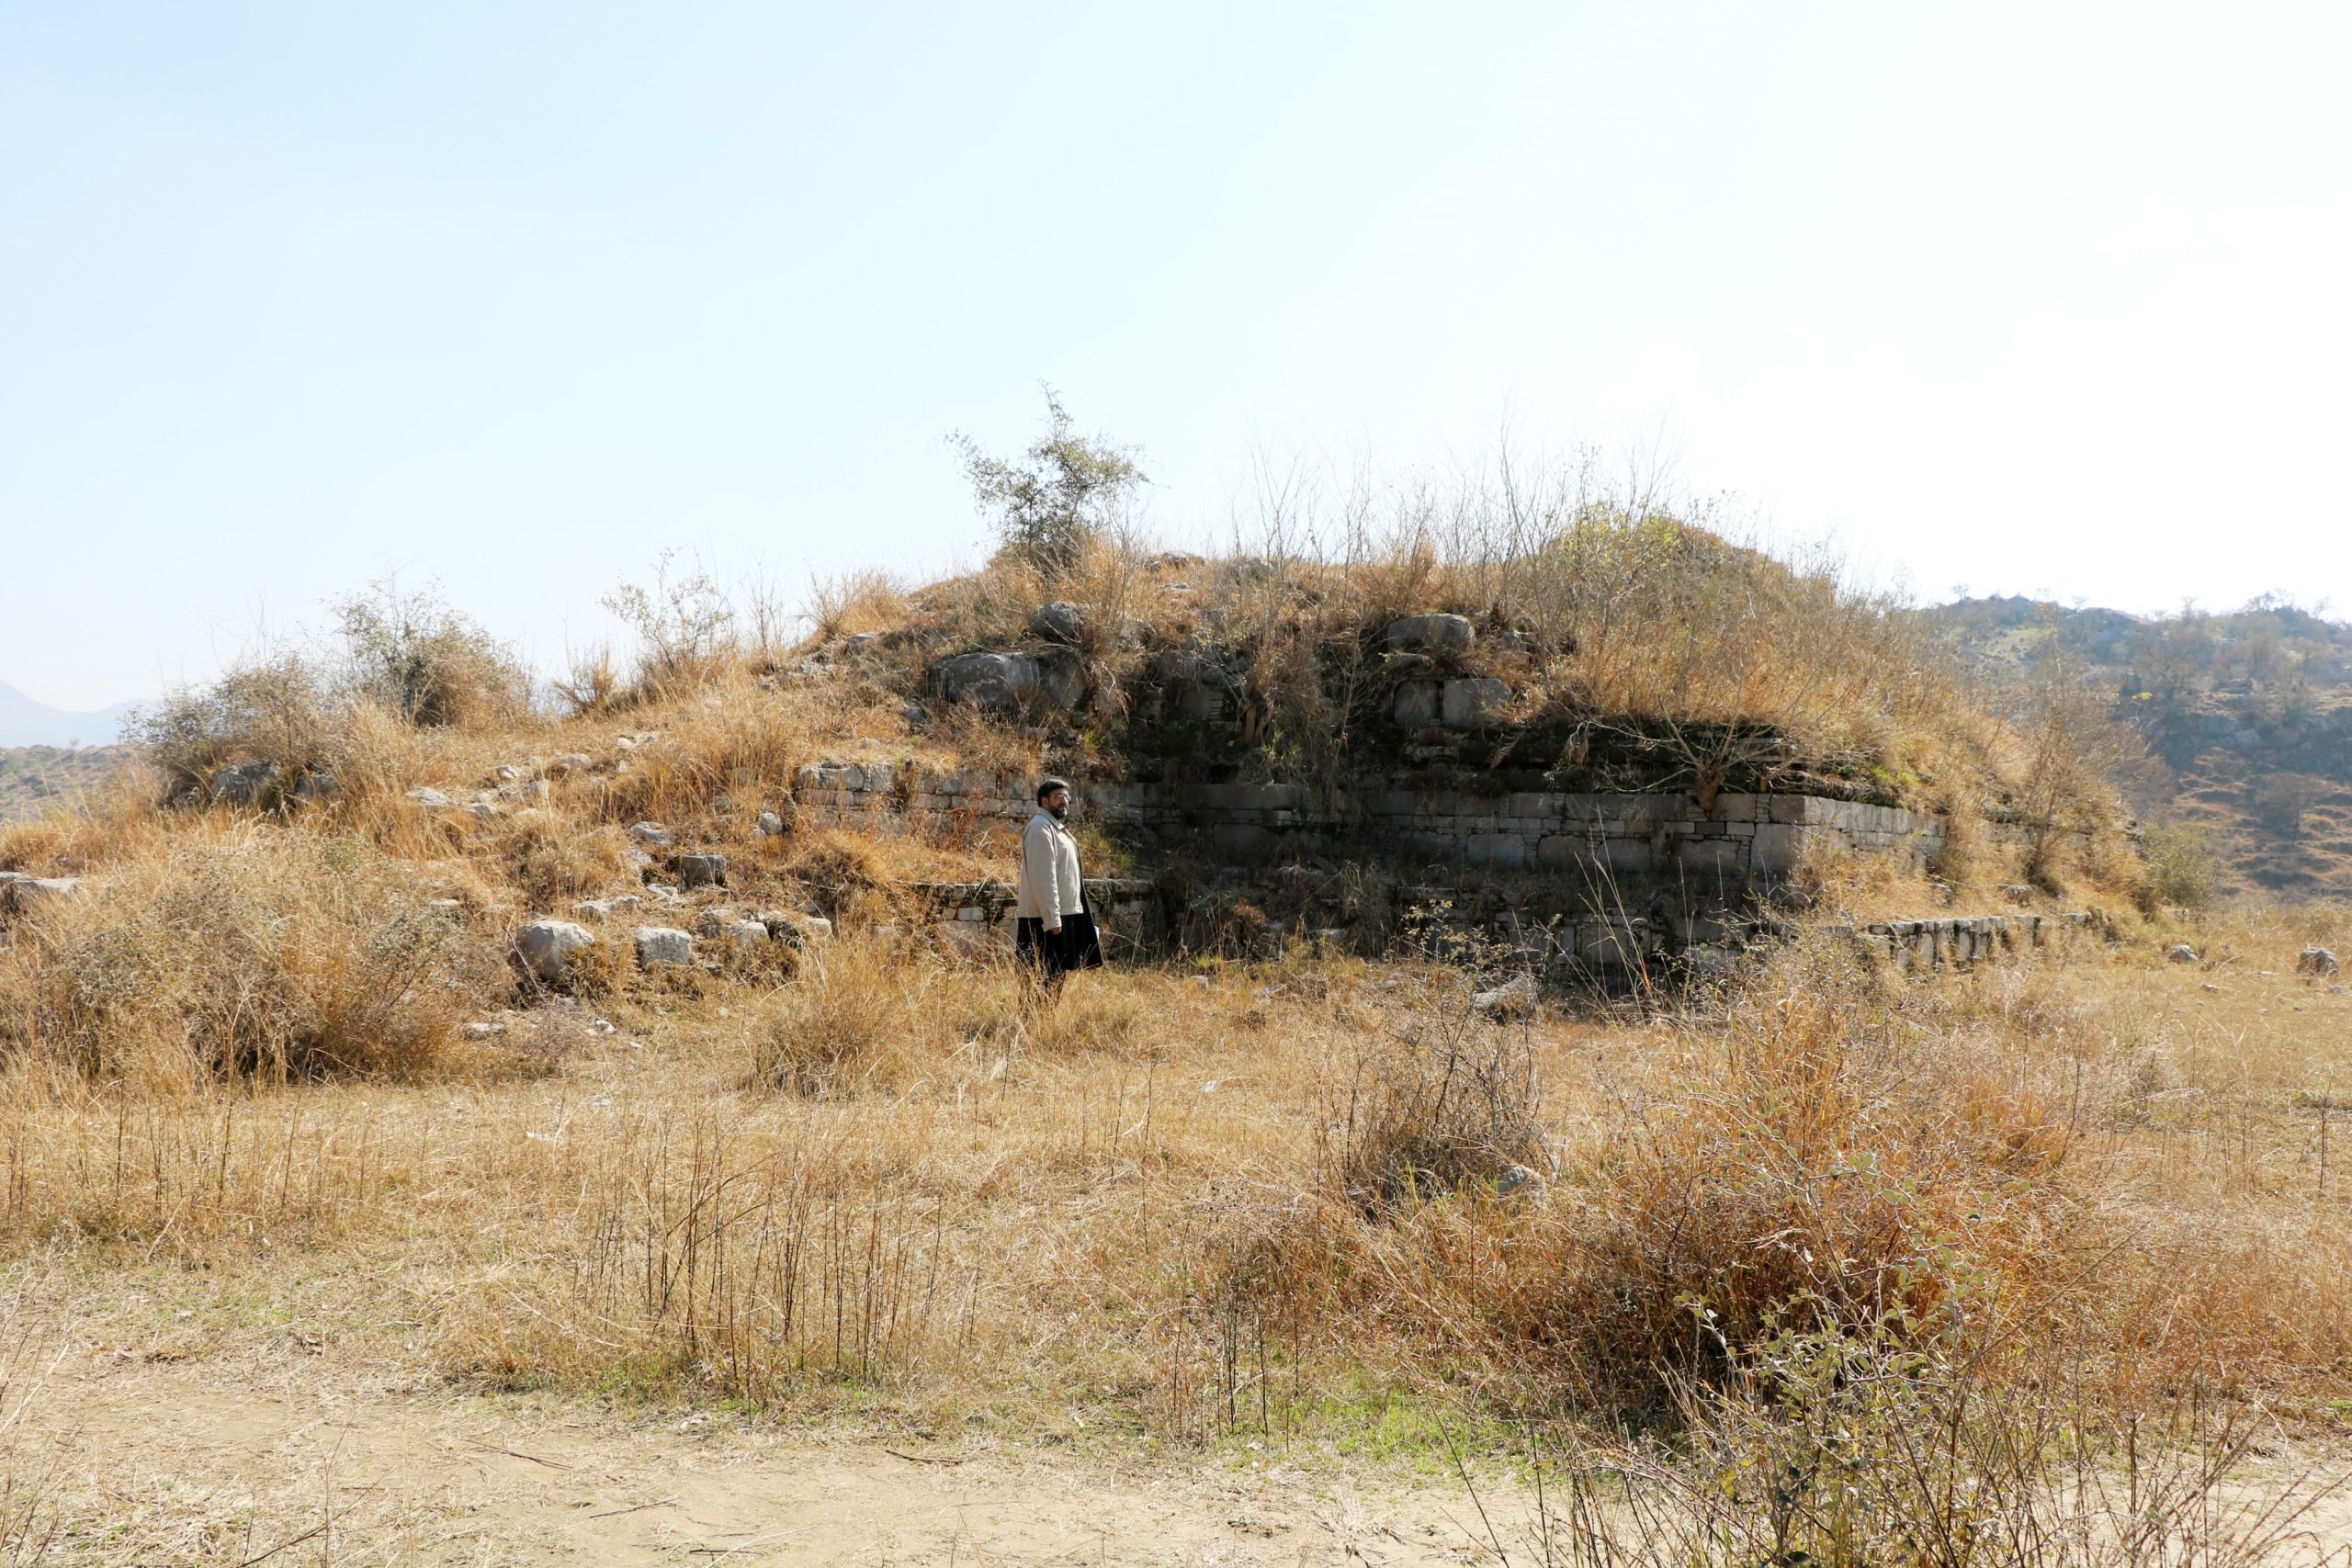
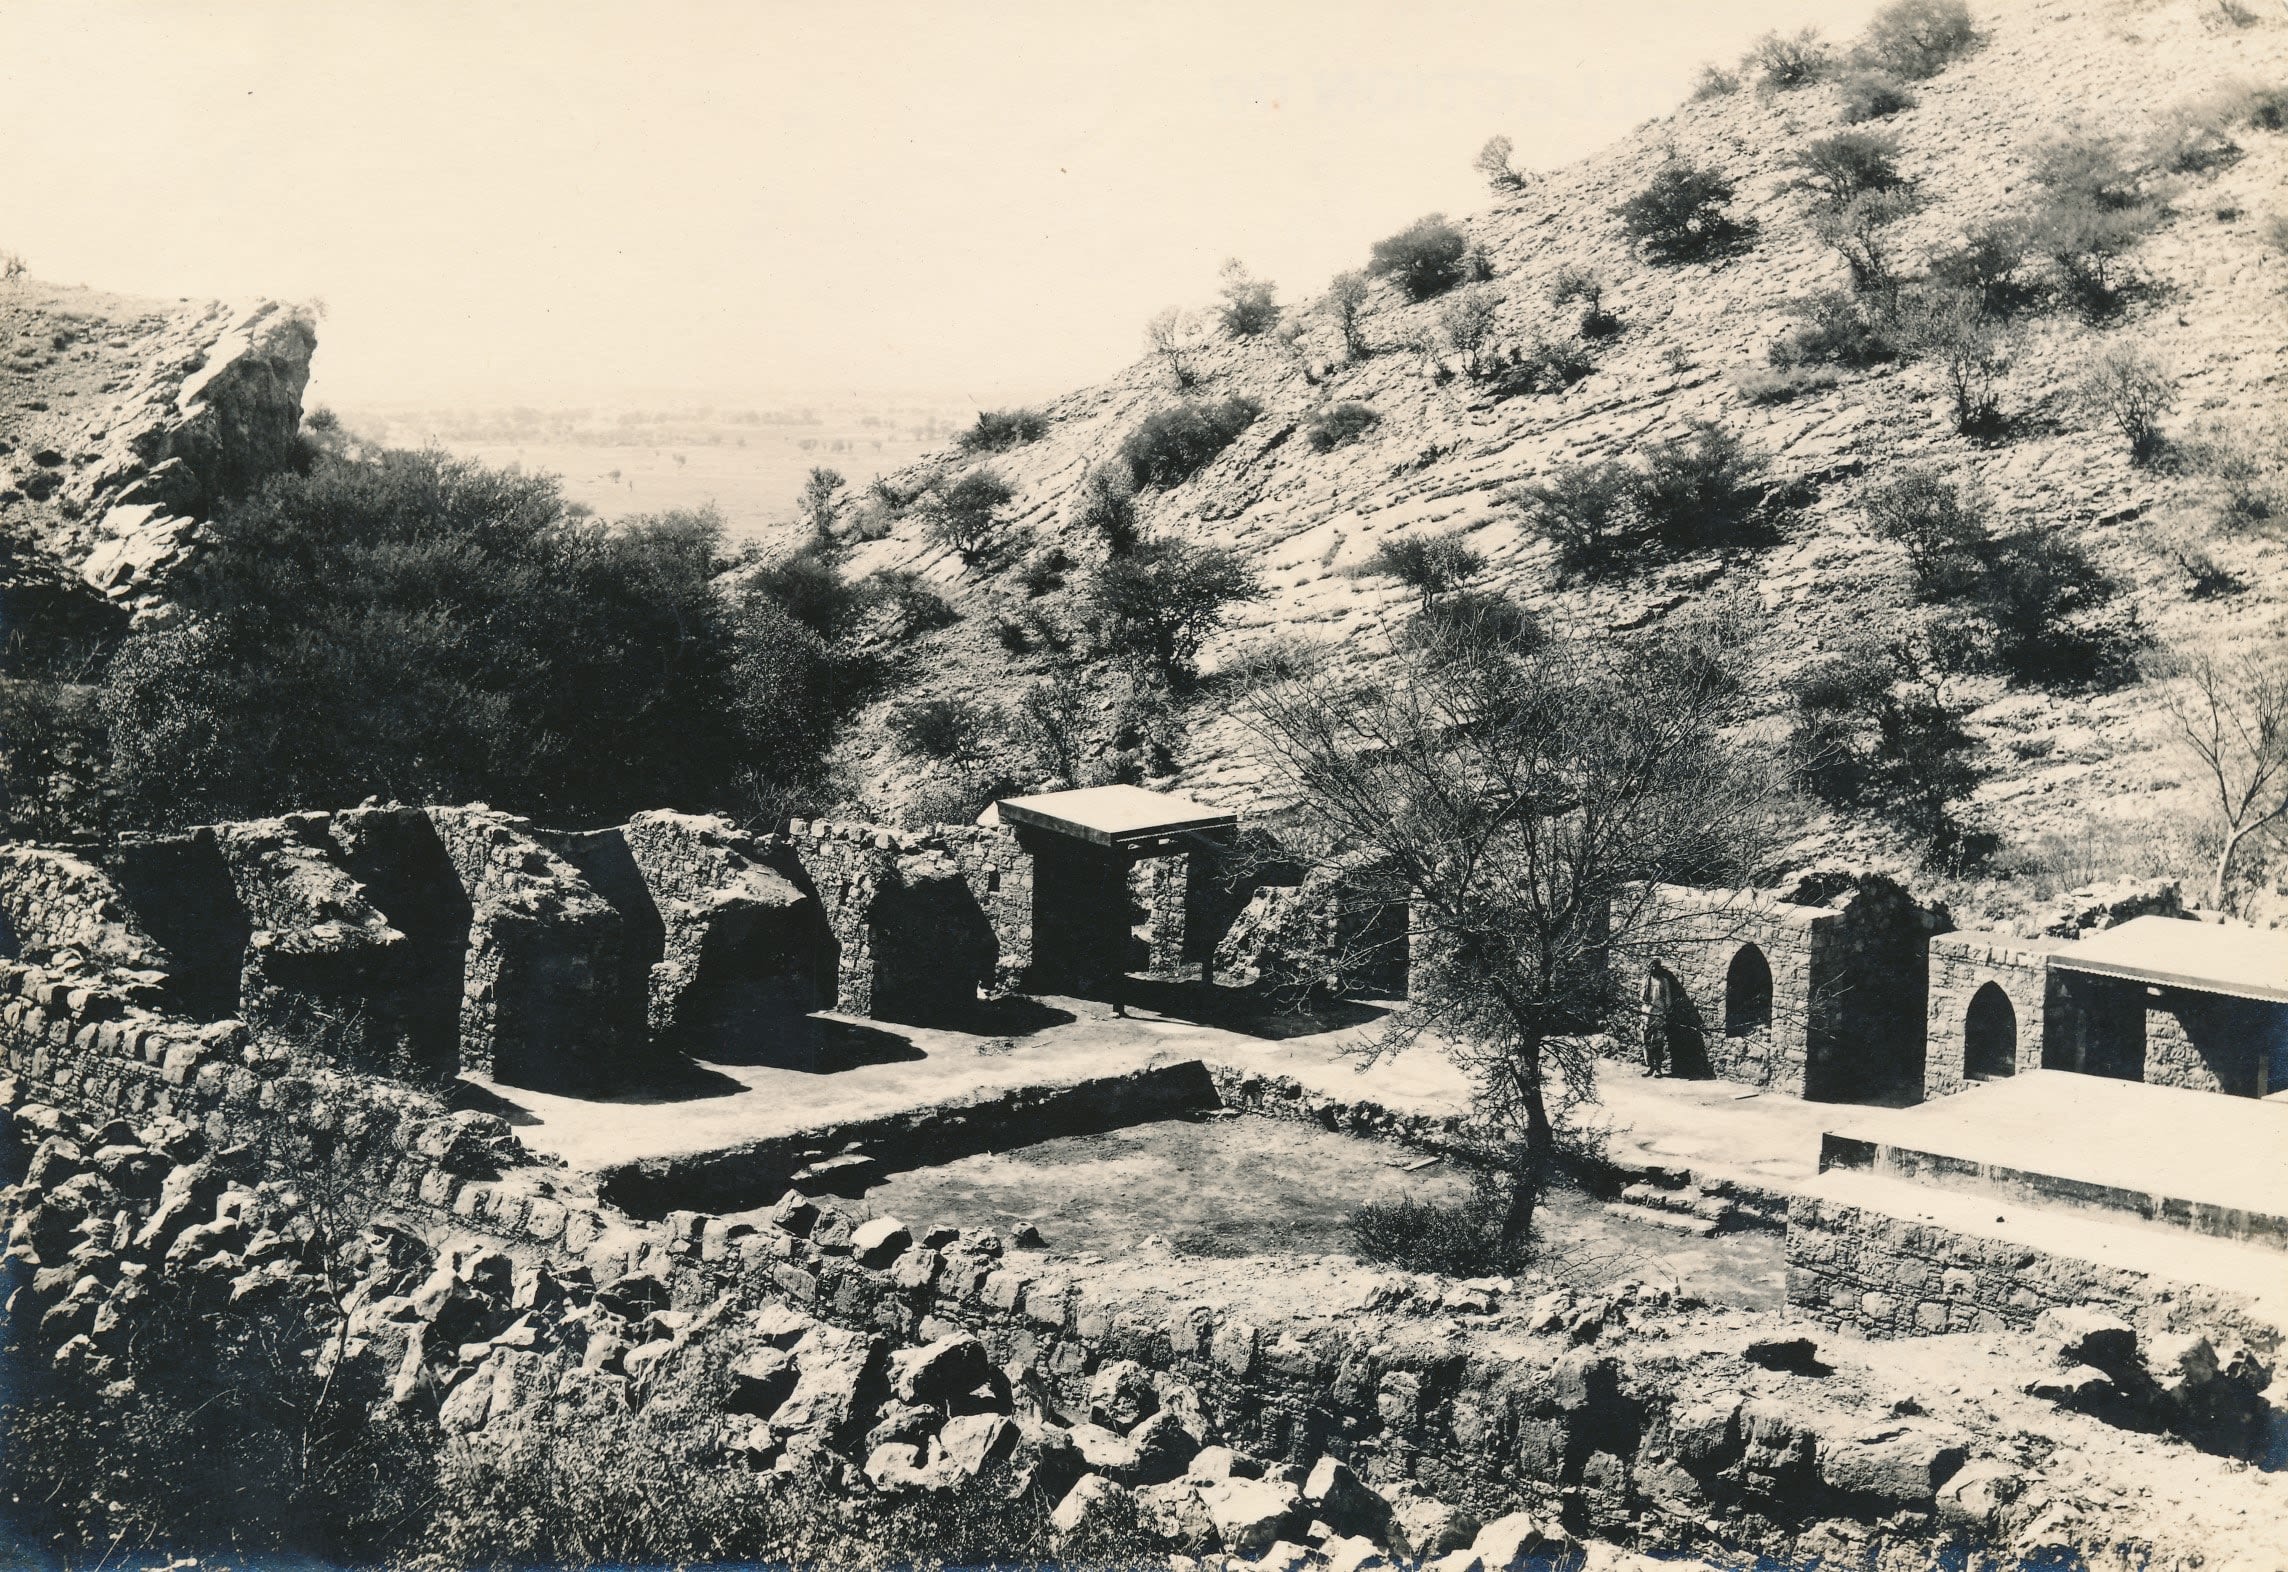
View of the Stupa at the Kunala Monastery, Taxila, from the northwest, taken in 1914/1915, compared with view taken in 2019 by Dr Abdul Azeem. Sir John Marshall Collection, given by Dr and Mrs Spalding. DUROM.1957.1.1666
View of the Stupa at the Kunala Monastery, Taxila, from the northwest, taken in 1914/1915, compared with view taken in 2019 by Dr Abdul Azeem. Sir John Marshall Collection, given by Dr and Mrs Spalding. DUROM.1957.1.1666
View of the Stupa at the Kunala Monastery, Taxila, from the northwest, taken in 2019 by Dr Abdul Azeem.
View of the Stupa at the Kunala Monastery, Taxila, from the northwest, taken in 2019 by Dr Abdul Azeem.
An additional threat is the deliberate destruction of heritage, broadly known as iconoclasm, which has seen the targeting of Buddhist iconography. Furthermore, the encroachment of unchecked developments in the area has resulted in the unintentional damage and destruction of archaeological monuments.
These are not new challenges. Looting of artefacts from the site was recorded as early as the 19th century, and Marshall also recognised that the monuments of Taxila were vulnerable to flooding as well to local residents using them as a source for building materials. He noted that monuments recorded by earlier archaeologists had vanished by the time he worked at the site, and some of the sites that Marshall recorded have now been lost.
In consequence, Durham University’s Marshall Collection represents a valuable international heritage resource as it provides vital information on sites that no longer exist. It also preserves some of the only records of material in the Taxila Museum destroyed by the 2005 earthquake.

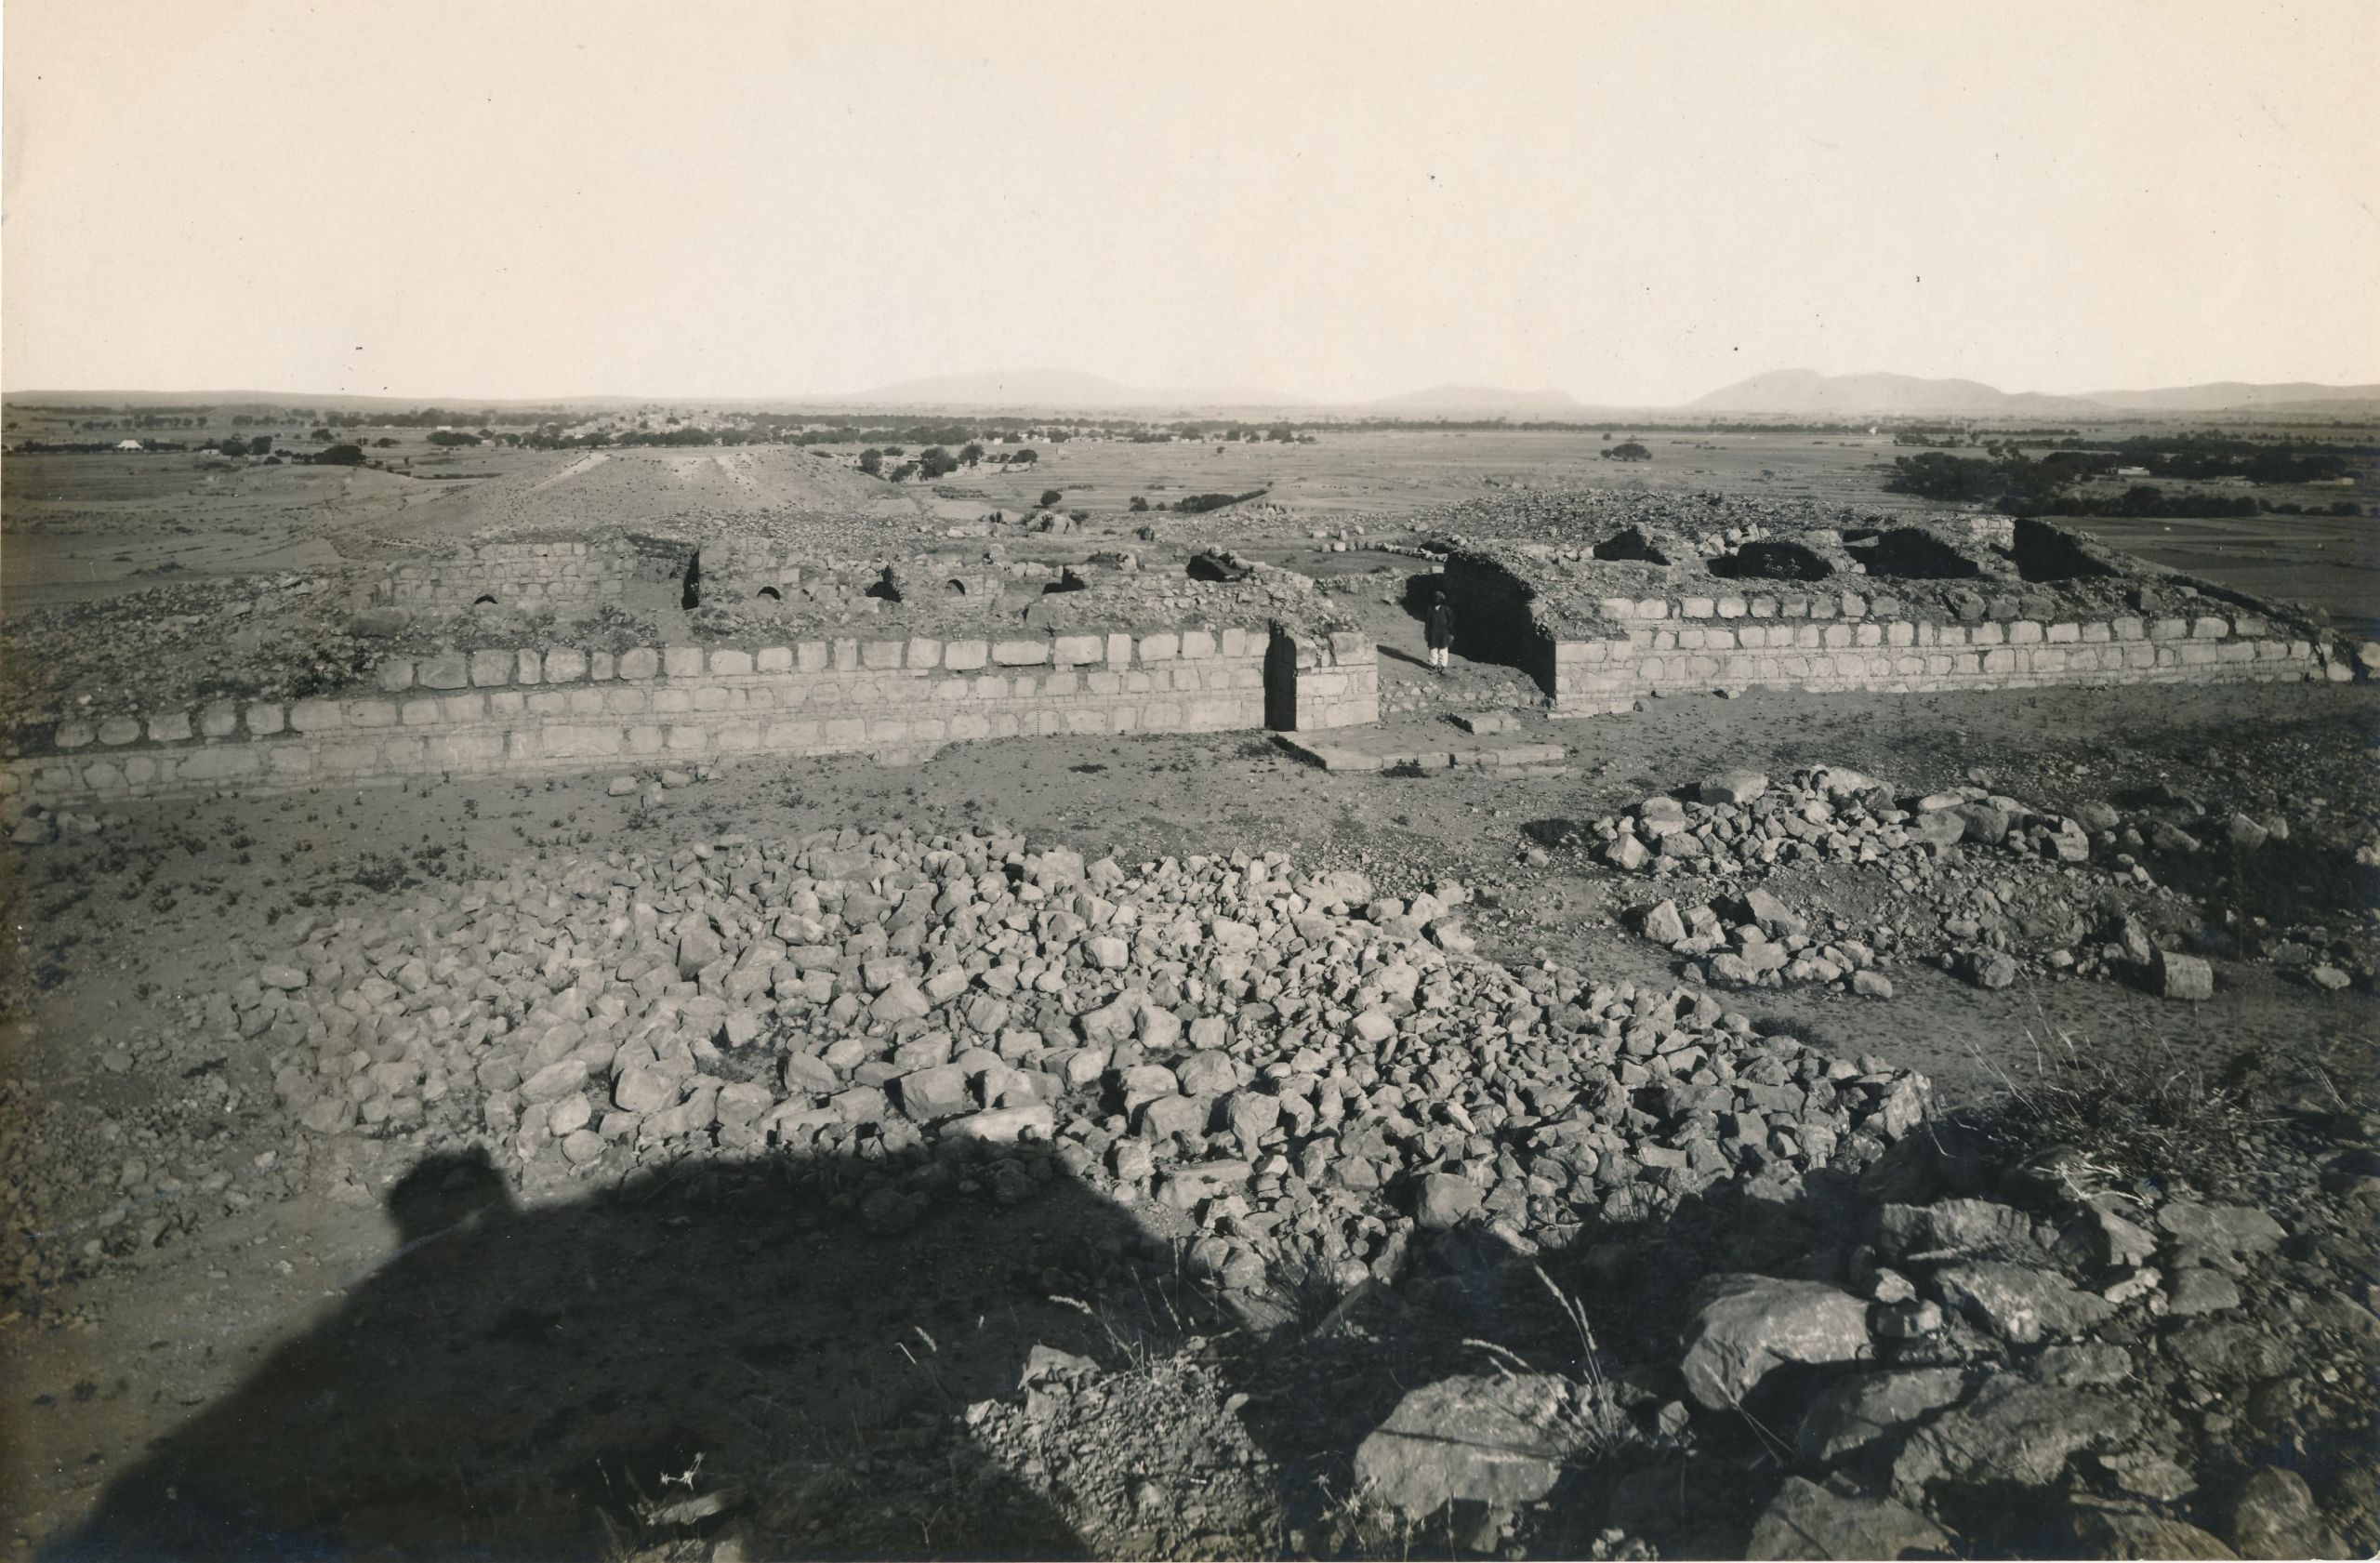

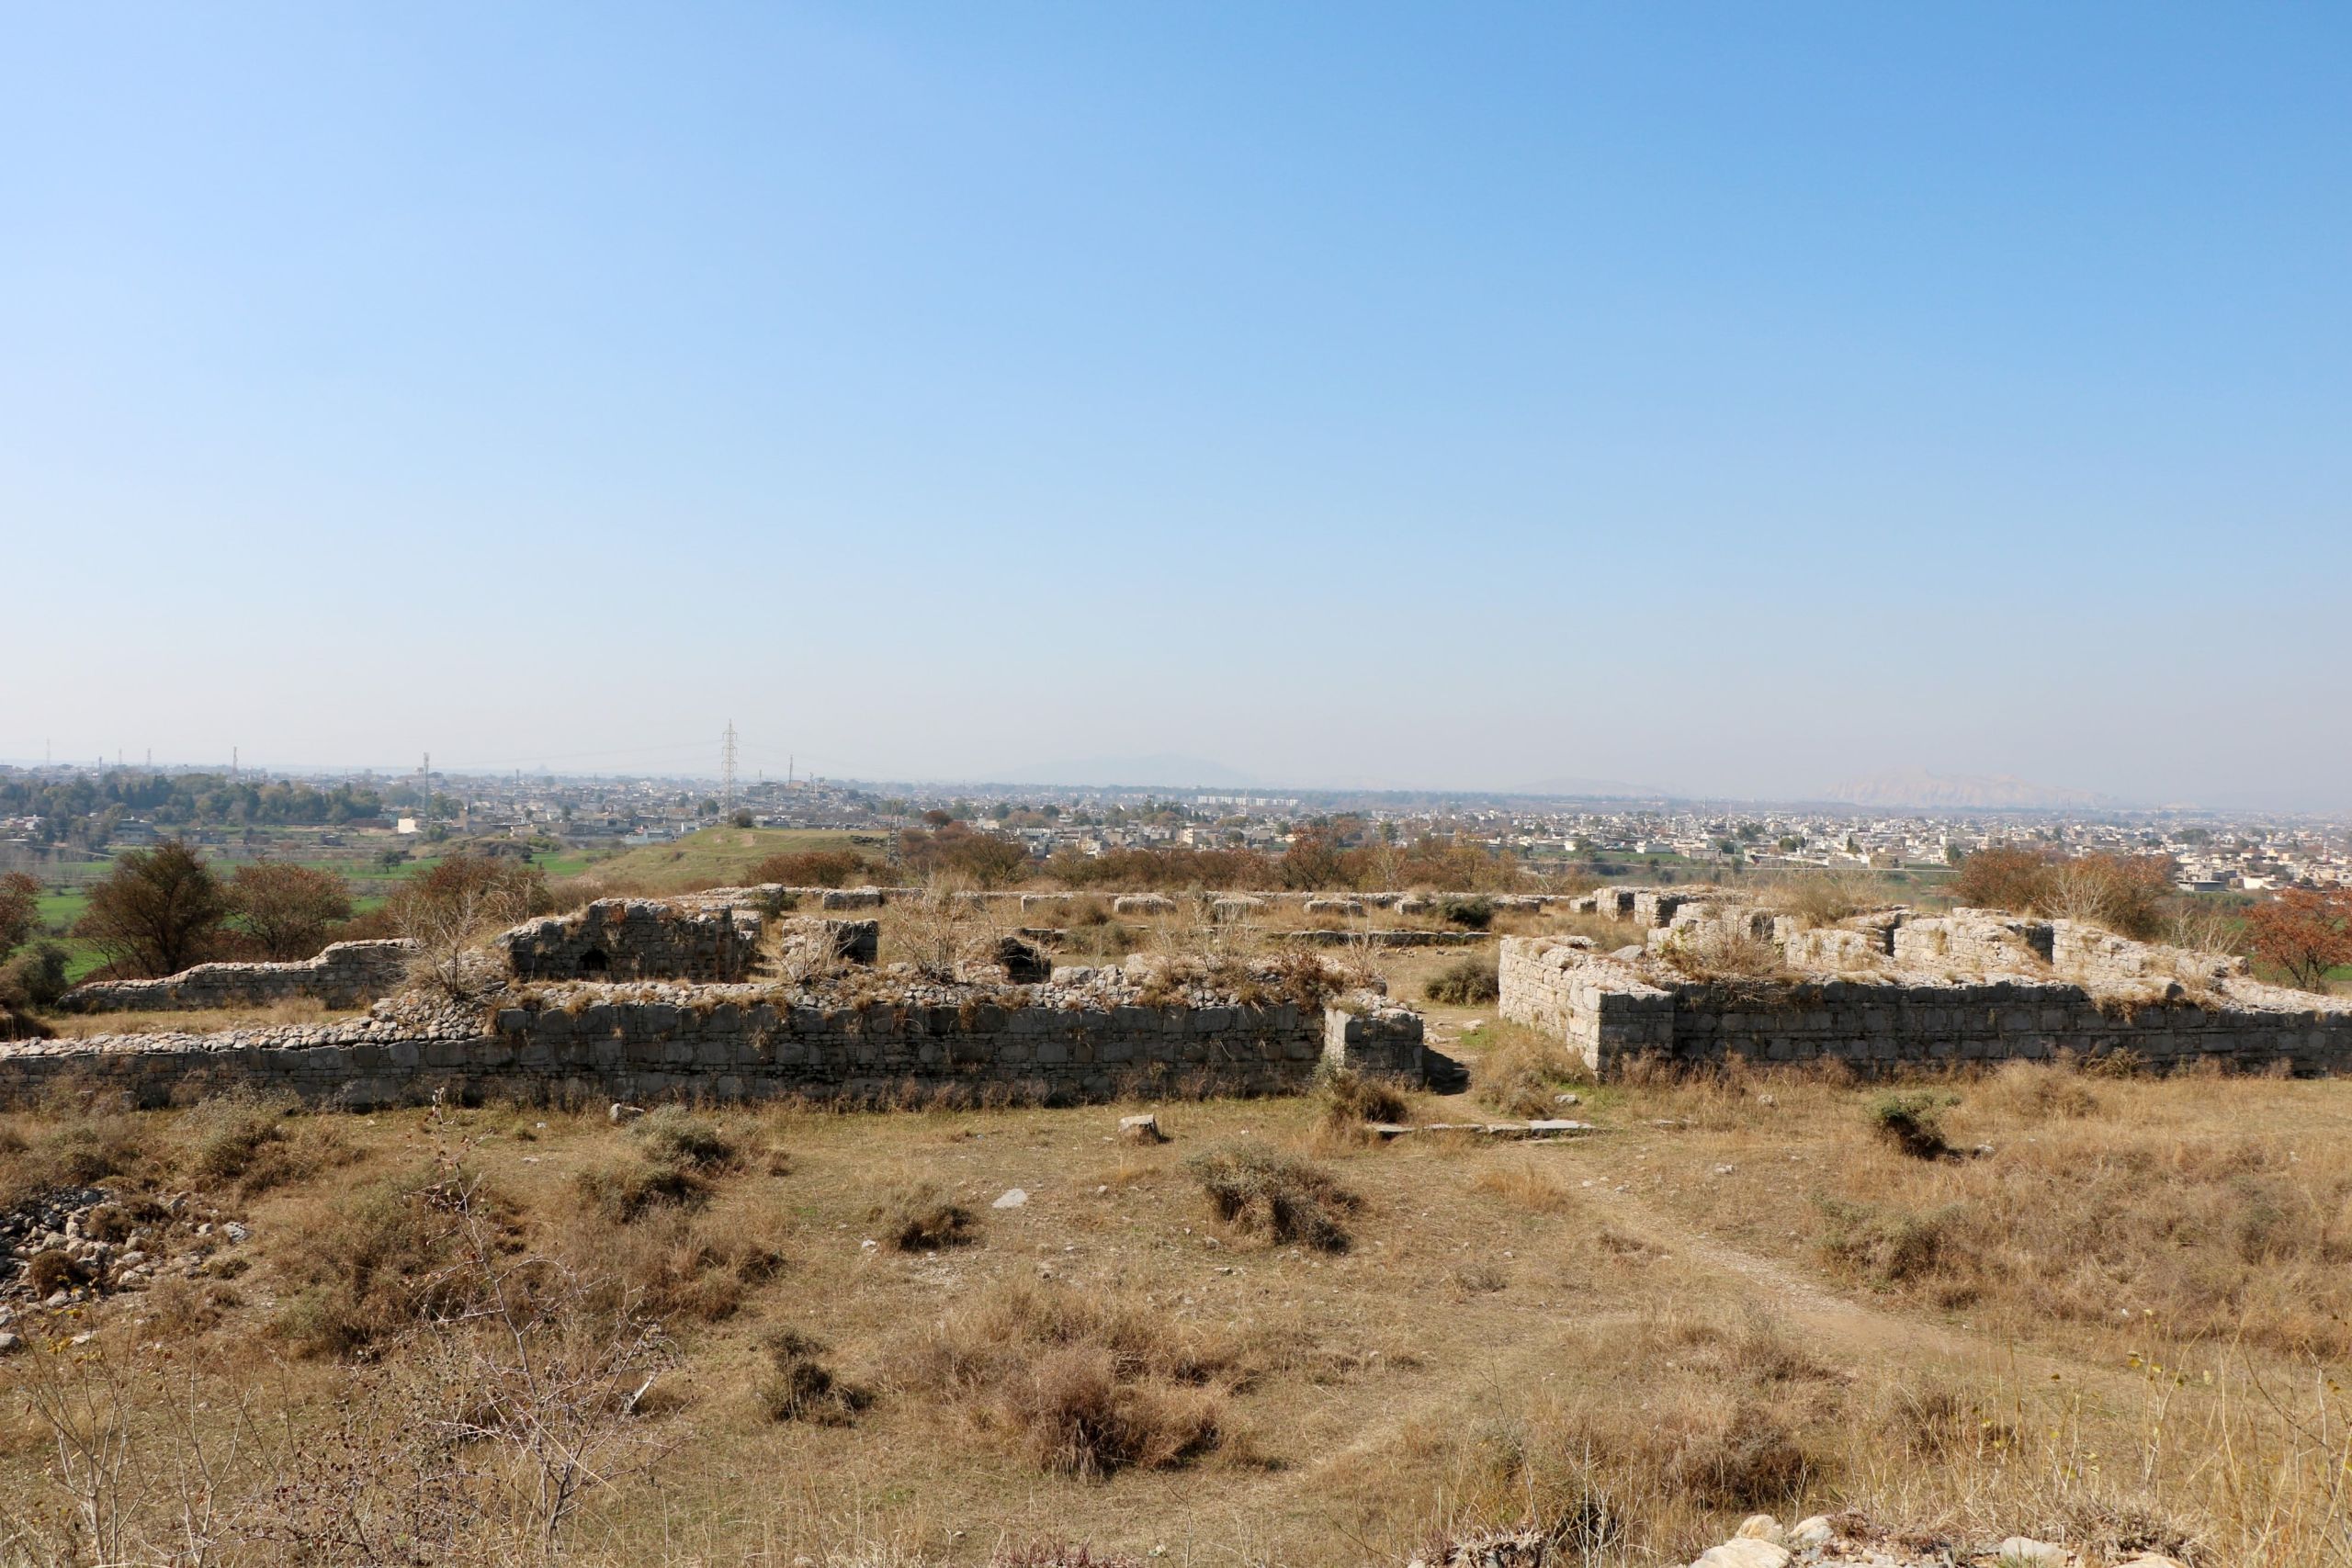


General view of the monastery at Kunala monastery from the top of the stupa, Taxila, taken in 1915/1916, compared with view taken in 2019 by Dr Abdul Azeem. Sir John Marshall Collection, given by Dr and Mrs Spalding. DUROM.1957.1.1669
General view of the monastery at Kunala monastery from the top of the stupa, Taxila, taken in 1915/1916, compared with view taken in 2019 by Dr Abdul Azeem. Sir John Marshall Collection, given by Dr and Mrs Spalding. DUROM.1957.1.1669
General view of the monastery at Kunala monastery from the top of the stupa, Taxila, taken in 2019 by Dr Abdul Azeem.
General view of the monastery at Kunala monastery from the top of the stupa, Taxila, taken in 2019 by Dr Abdul Azeem.

View of the interior of Lalchak monastery, Taxila, from the southeast, taken in 1915/1916, compared with view taken in 2019 by Dr Abdul Azeem. Sir John Marshall Collection, given by Dr and Mrs Spalding. DUROM.1957.1.1683
View of the interior of Lalchak monastery, Taxila, from the southeast, taken in 1915/1916, compared with view taken in 2019 by Dr Abdul Azeem. Sir John Marshall Collection, given by Dr and Mrs Spalding. DUROM.1957.1.1683
View of the interior of Lalchak monastery, Taxila, from the southeast, taken in 2019 by Dr Abdul Azeem.
View of the interior of Lalchak monastery, Taxila, from the southeast, taken in 2019 by Dr Abdul Azeem.

View of the monastic quadrangle at Mohra Moradu, Taxila, from the southeast, taken in 1915/1916, compared with a view taken in 2019 by Dr Abdul Azeem. Sir John Marshall Collection, given by Dr and Mrs Spalding. DUROM.1957.1.1717
View of the monastic quadrangle at Mohra Moradu, Taxila, from the southeast, taken in 1915/1916, compared with a view taken in 2019 by Dr Abdul Azeem. Sir John Marshall Collection, given by Dr and Mrs Spalding. DUROM.1957.1.1717
View of the monastic quadrangle at Mohra Moradu, Taxila, from the southeast, taken in 2019 by Dr Abdul Azeem.
View of the monastic quadrangle at Mohra Moradu, Taxila, from the southeast, taken in 2019 by Dr Abdul Azeem.
The ‘Crossroads of Asia’: Taxila, the Silk Roads and Cosmopolitanism
Taxila is located at the heart of an area that has become known as the ‘Crossroads of Asia’. Sitting astride strategically important trade routes to South Asia, Mesopotamia, the Mediterranean, Central Asia and East Asia, its citizens reaped cultural and commercial benefits from the Silk Roads.
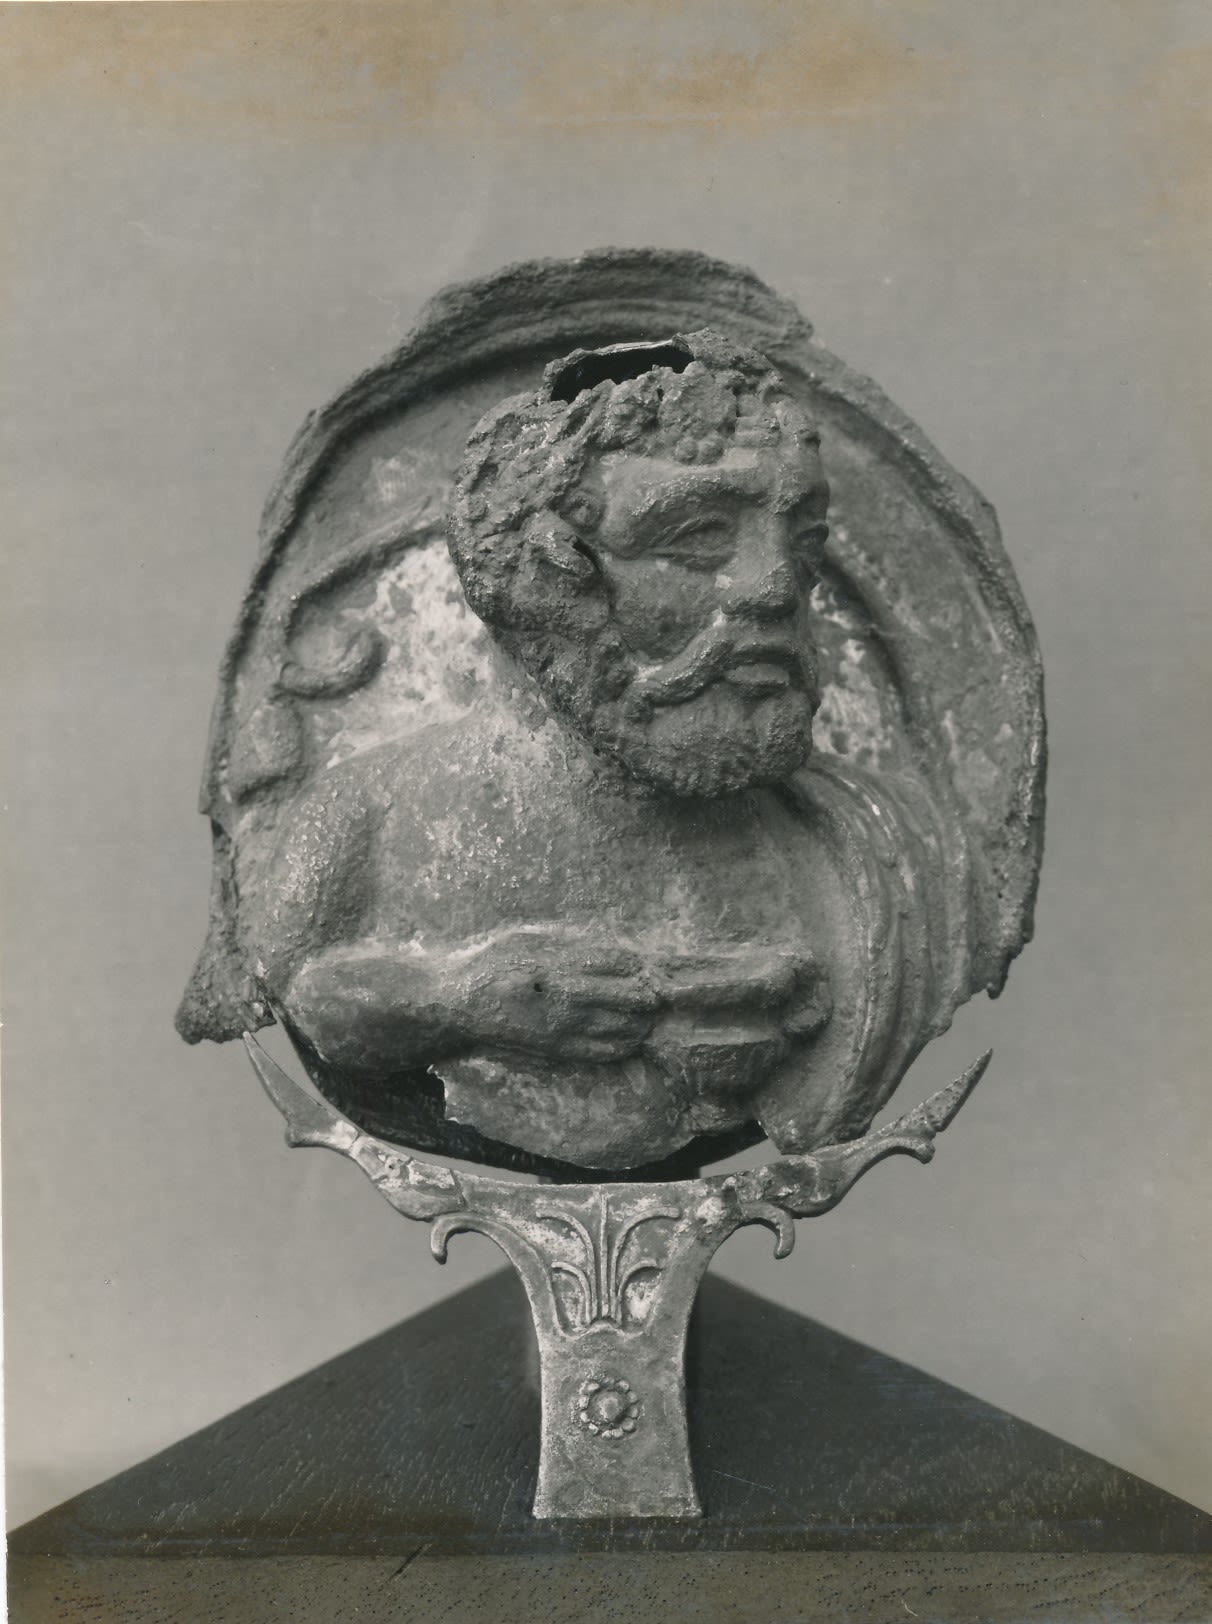
Silver repousse bust of bearded figure with grape-vine wreath and goblet, forming the handle of a bowl. (c. 1st century BCE) Sir John Marshall Collection, given by Dr and Mrs Spalding. DUROM.1957.1.1860
The movement of people and ideas led to Taxila becoming a cosmopolitan centre. Empires such as the Kushan, which formed a buffer zone between the large and powerful Roman and Han Chinese Empires, provided patronage to a variety of different religious beliefs and traditions.
During the 2nd century BCE, Taxila was absorbed into Indo-Greek kingdoms, descendants of Alexander the Great’s troops who had settled in Central Asia. Under their rule, the new city of Sirkap reflected Hellenistic civic planning, with the lower town below the acropolis divided into rectangular blocks and surrounded by a fortified wall. Marshall recognised representations of Greek deities within Sirkap, and finds recovered including a silver bust of Dionysus and a gold brooch of Aphrodite.
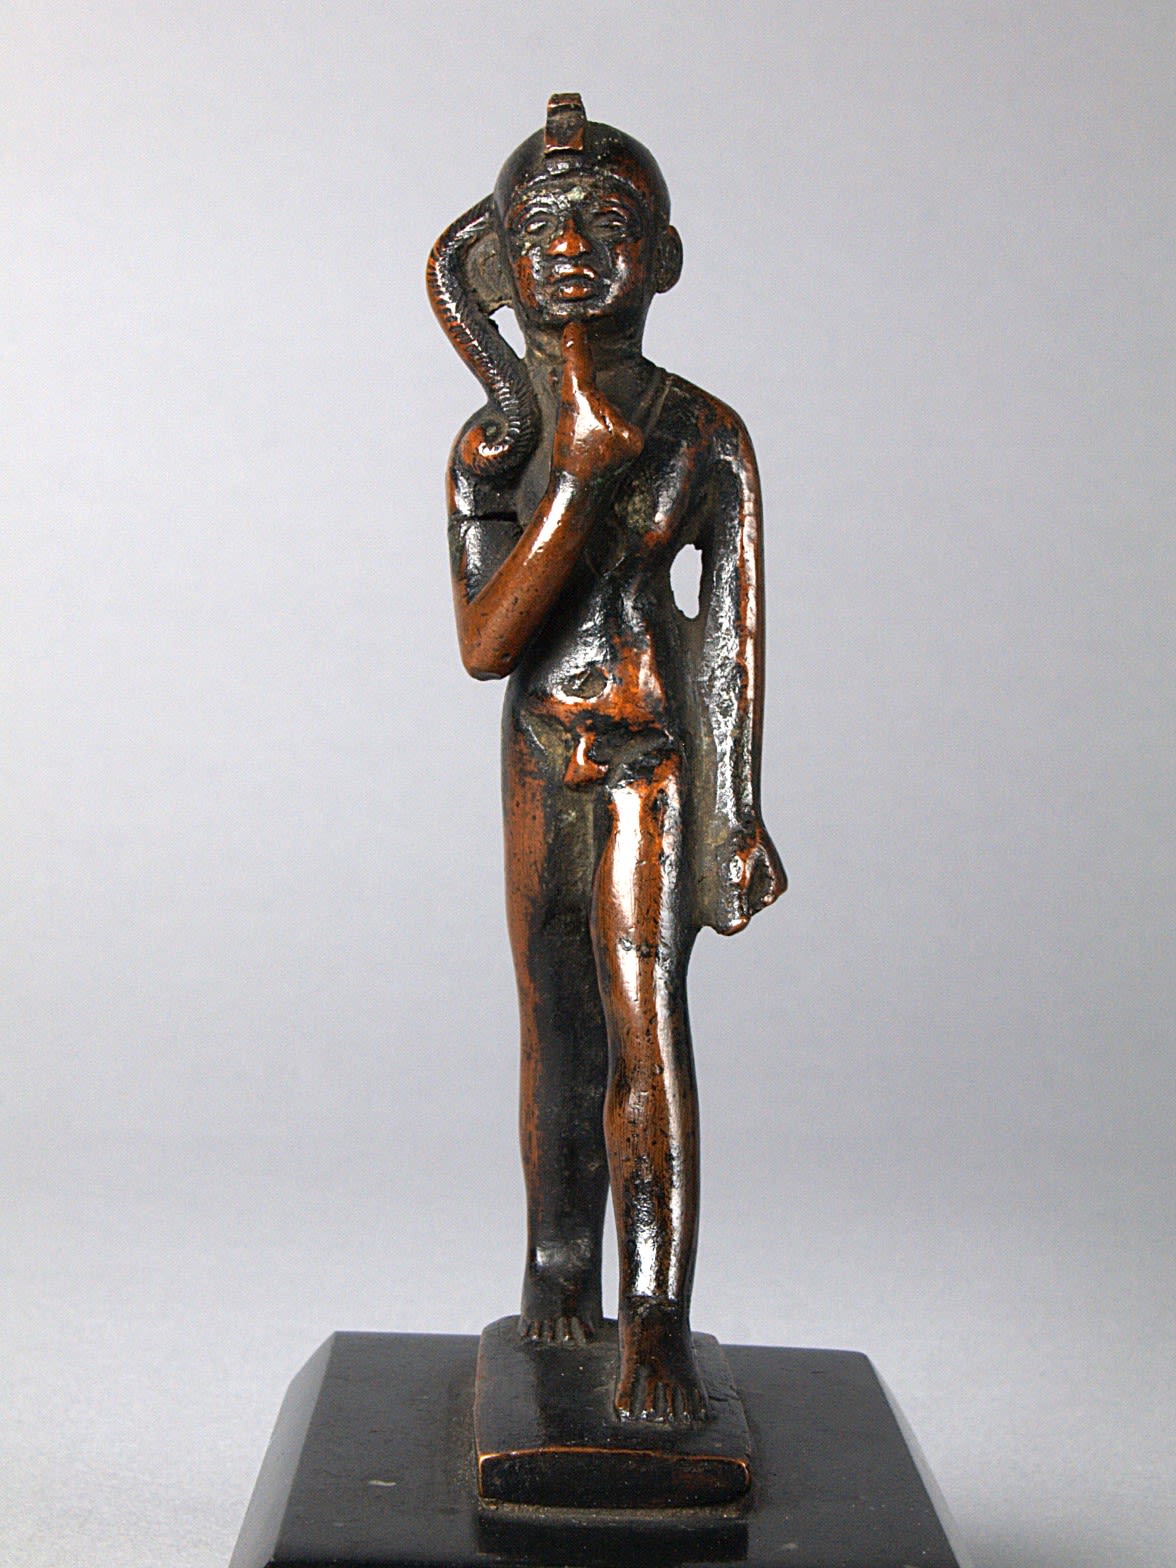
In addition, Marshall discovered a bronze statuette which he interpreted as the Egyptian protective god Harpocrates and a stone sculpture of the South Asian goddess Hariti. These discoveries attest to Hellenistic and Indic influences, but also the diverse cultures and beliefs of the inhabitants of Taxila.
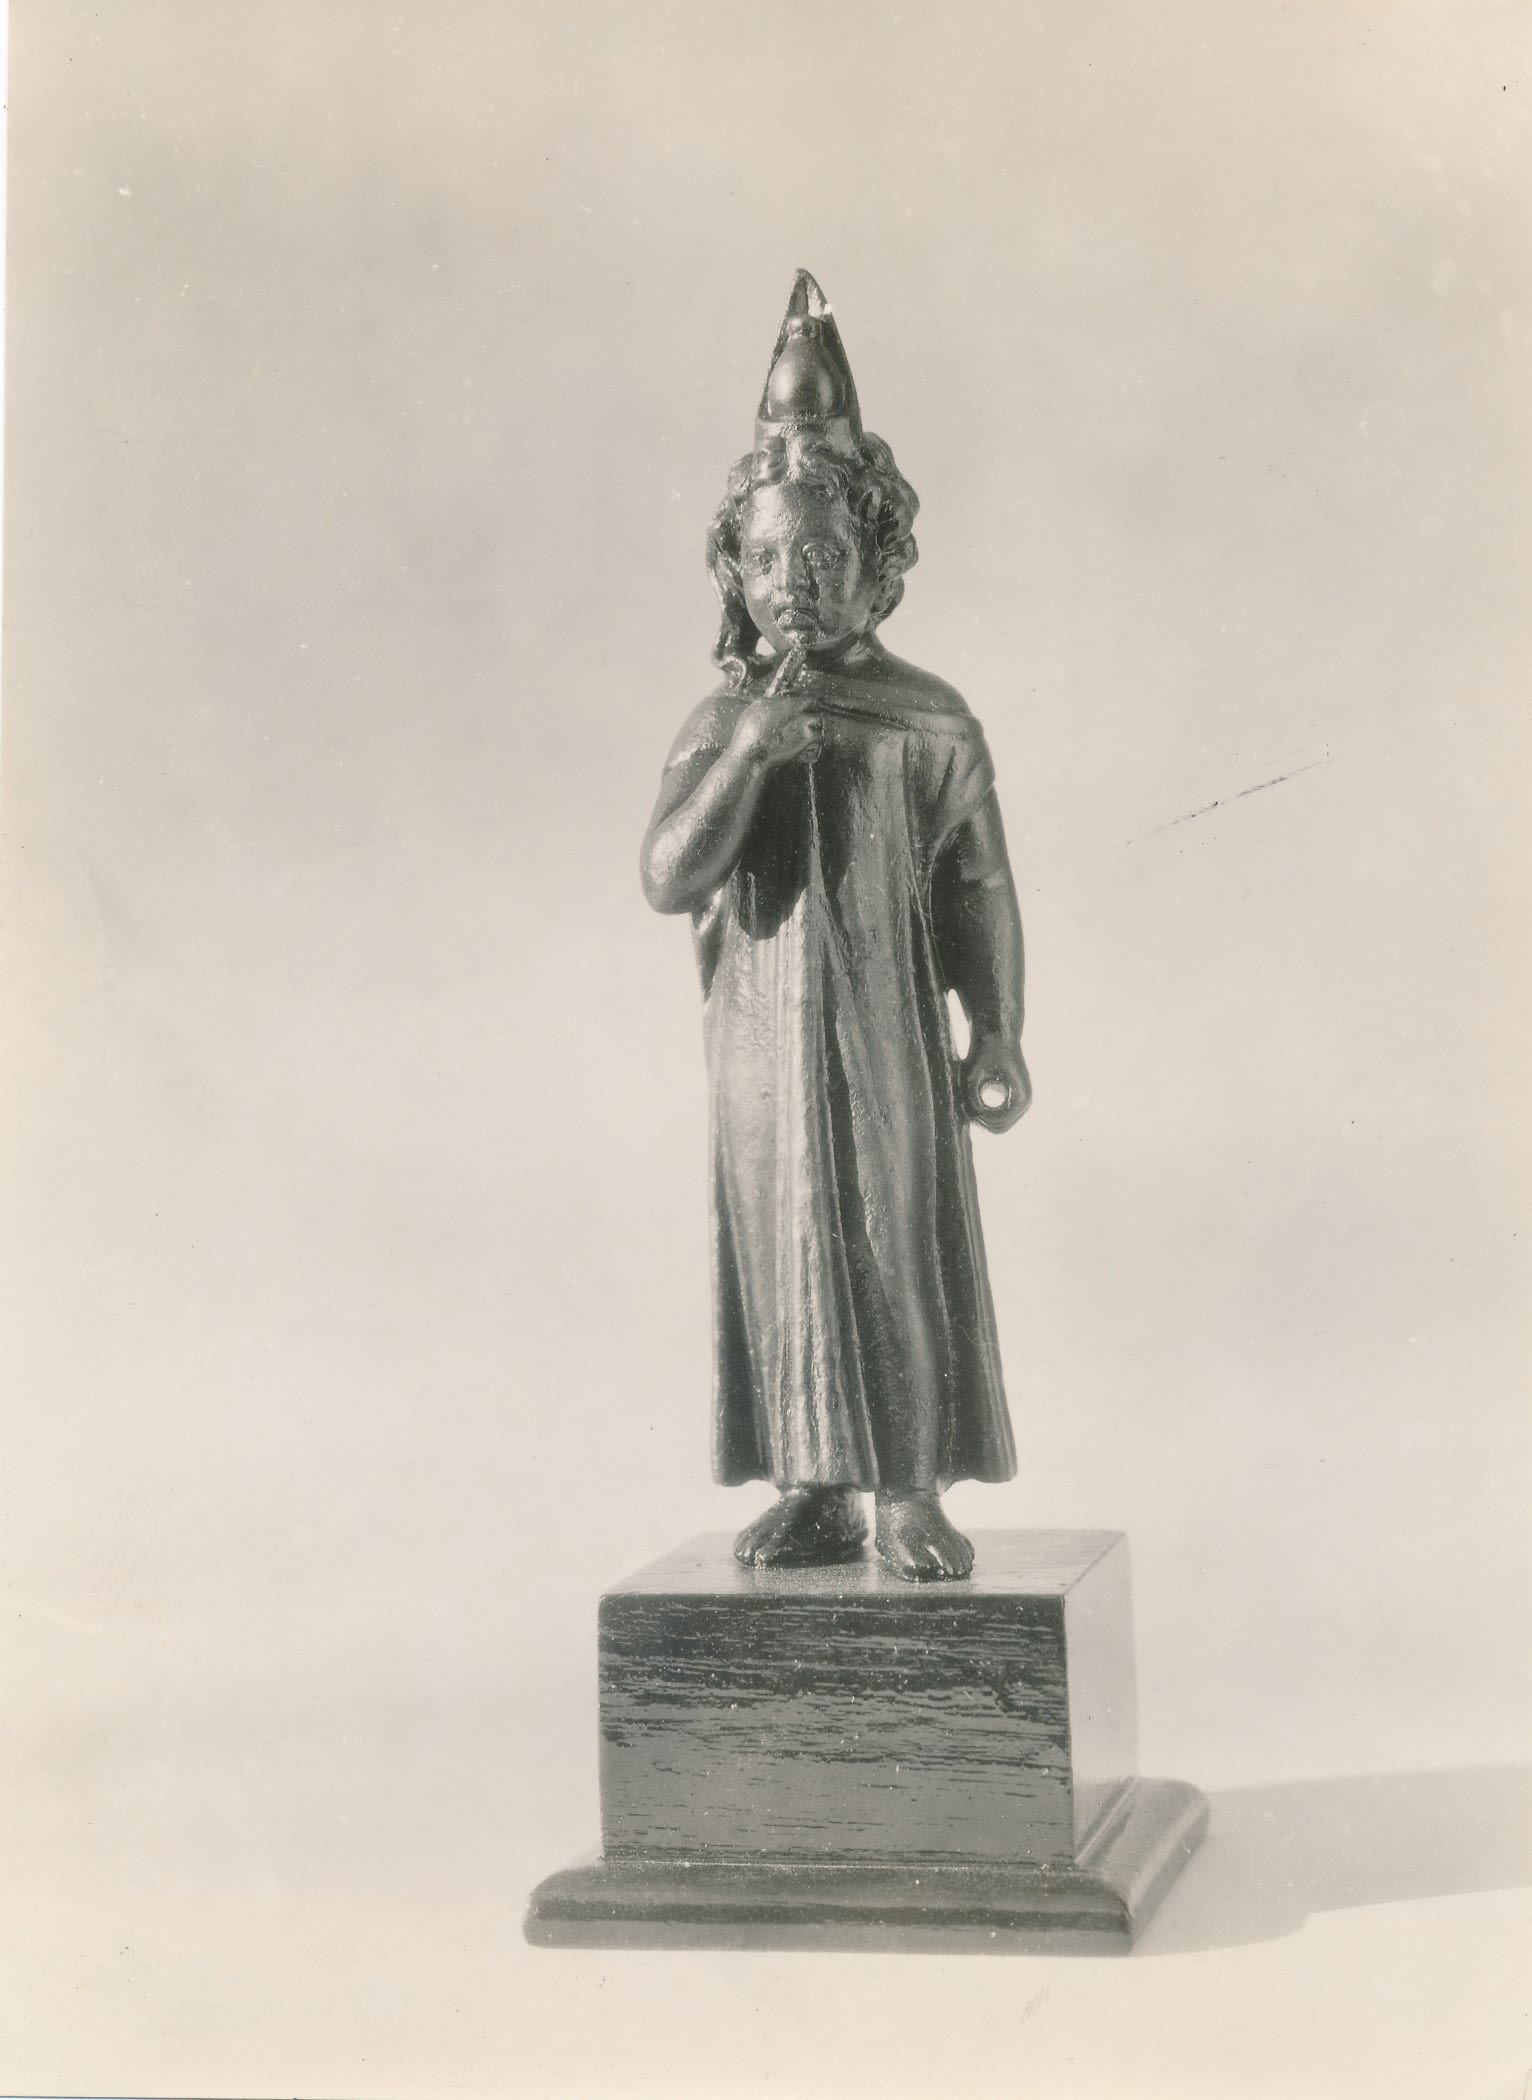
Copper statue of the Egyptian child-god Harpocrates wearing the crowns of the North and South Egypt. (c.1st century CE) Sir John Marshall Collection, given by Dr and Mrs Spalding. DUROM.1957.1.1889
This diversity was reflected in the coinage of Taxila. Kushan rulers, such as Kanishka (r. 127-147 CE), were portrayed alongside Hellenistic, Iranian and Buddhist imagery. In addition to Buddhist monasteries, monuments associated with other belief systems have been identified at Taxila. These include Jandial, which was interpreted as a Greek temple by Marshall, but has been interpreted by others as a Zoroastrian fire temple complex.

Silver repousse bust of bearded figure with grape-vine wreath and goblet, forming the handle of a bowl. (c. 1st century BCE) Sir John Marshall Collection, given by Dr and Mrs Spalding. DUROM.1957.1.1860
Silver repousse bust of bearded figure with grape-vine wreath and goblet, forming the handle of a bowl. (c. 1st century BCE) Sir John Marshall Collection, given by Dr and Mrs Spalding. DUROM.1957.1.1860

Copper statue of the Egyptian child-god Harpocrates wearing the crowns of the North and South Egypt. (c.1st century CE) Sir John Marshall Collection, given by Dr and Mrs Spalding. DUROM.1957.1.1889
Copper statue of the Egyptian child-god Harpocrates wearing the crowns of the North and South Egypt. (c.1st century CE) Sir John Marshall Collection, given by Dr and Mrs Spalding. DUROM.1957.1.1889


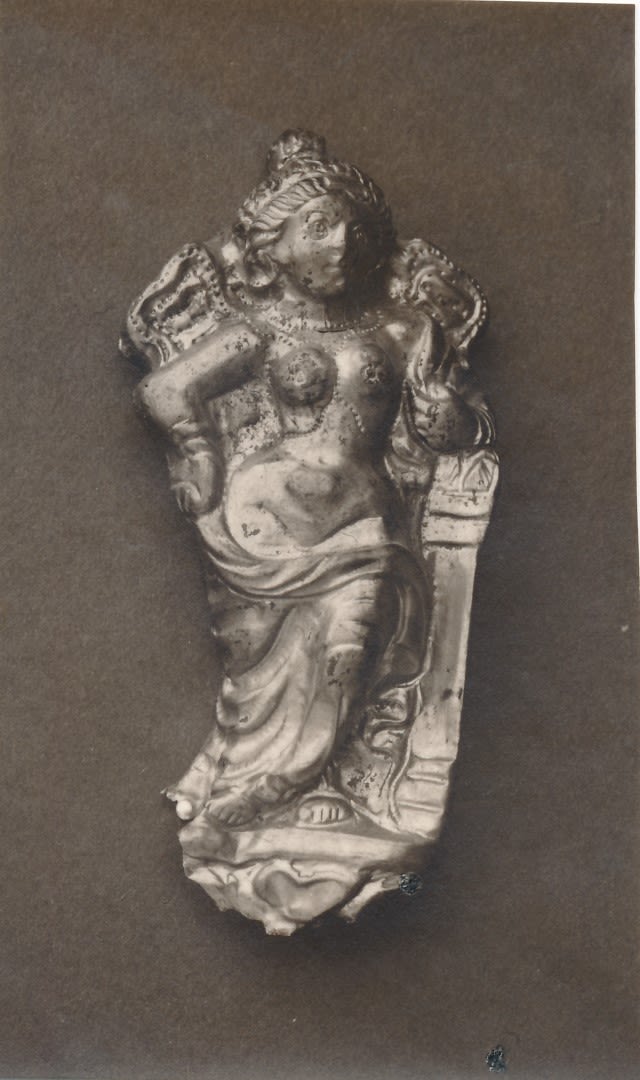


Silver repousse bust of bearded figure with grape-vine wreath and goblet, forming the handle of a bowl. Excavated in Block E of the lower city of Sirkap, Taxila, Marshall identified it as Dionysus, the Greek god of fertility and wine, or Dionysus’s companion Silenus. (c. 1st century BCE) Sir John Marshall Collection, given by Dr and Mrs Spalding. DUROM.1957.1.1860
Silver repousse bust of bearded figure with grape-vine wreath and goblet, forming the handle of a bowl. Excavated in Block E of the lower city of Sirkap, Taxila, Marshall identified it as Dionysus, the Greek god of fertility and wine, or Dionysus’s companion Silenus. (c. 1st century BCE) Sir John Marshall Collection, given by Dr and Mrs Spalding. DUROM.1957.1.1860
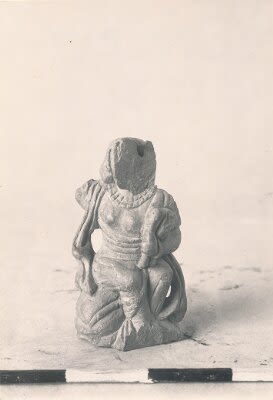
Copper statue of the Egyptian child-god Harpocrates wearing the crowns of the North and South Egypt. Excavated in Block E of the lower city of Sirkap, Taxila, Harpocrates was the Greek god of silence and adapted from the Egyptian god Horus. (c.1st century CE) Sir John Marshall Collection, given by Dr and Mrs Spalding. DUROM.1957.1.1889
Copper statue of the Egyptian child-god Harpocrates wearing the crowns of the North and South Egypt. Excavated in Block E of the lower city of Sirkap, Taxila, Harpocrates was the Greek god of silence and adapted from the Egyptian god Horus. (c.1st century CE) Sir John Marshall Collection, given by Dr and Mrs Spalding. DUROM.1957.1.1889

Gold repousse brooch excavated in Block E of the lower city of Sirkap, Taxila. Identified as a winged representation of either the Greek goddess of love and beauty, Aphrodite, or Psyche, goddess of the Soul. (c.1st century CE) Sir John Marshall Collection, given by Dr and Mrs Spalding. DUROM.1957.1.1851
Gold repousse brooch excavated in Block E of the lower city of Sirkap, Taxila. Identified as a winged representation of either the Greek goddess of love and beauty, Aphrodite, or Psyche, goddess of the Soul. (c.1st century CE) Sir John Marshall Collection, given by Dr and Mrs Spalding. DUROM.1957.1.1851

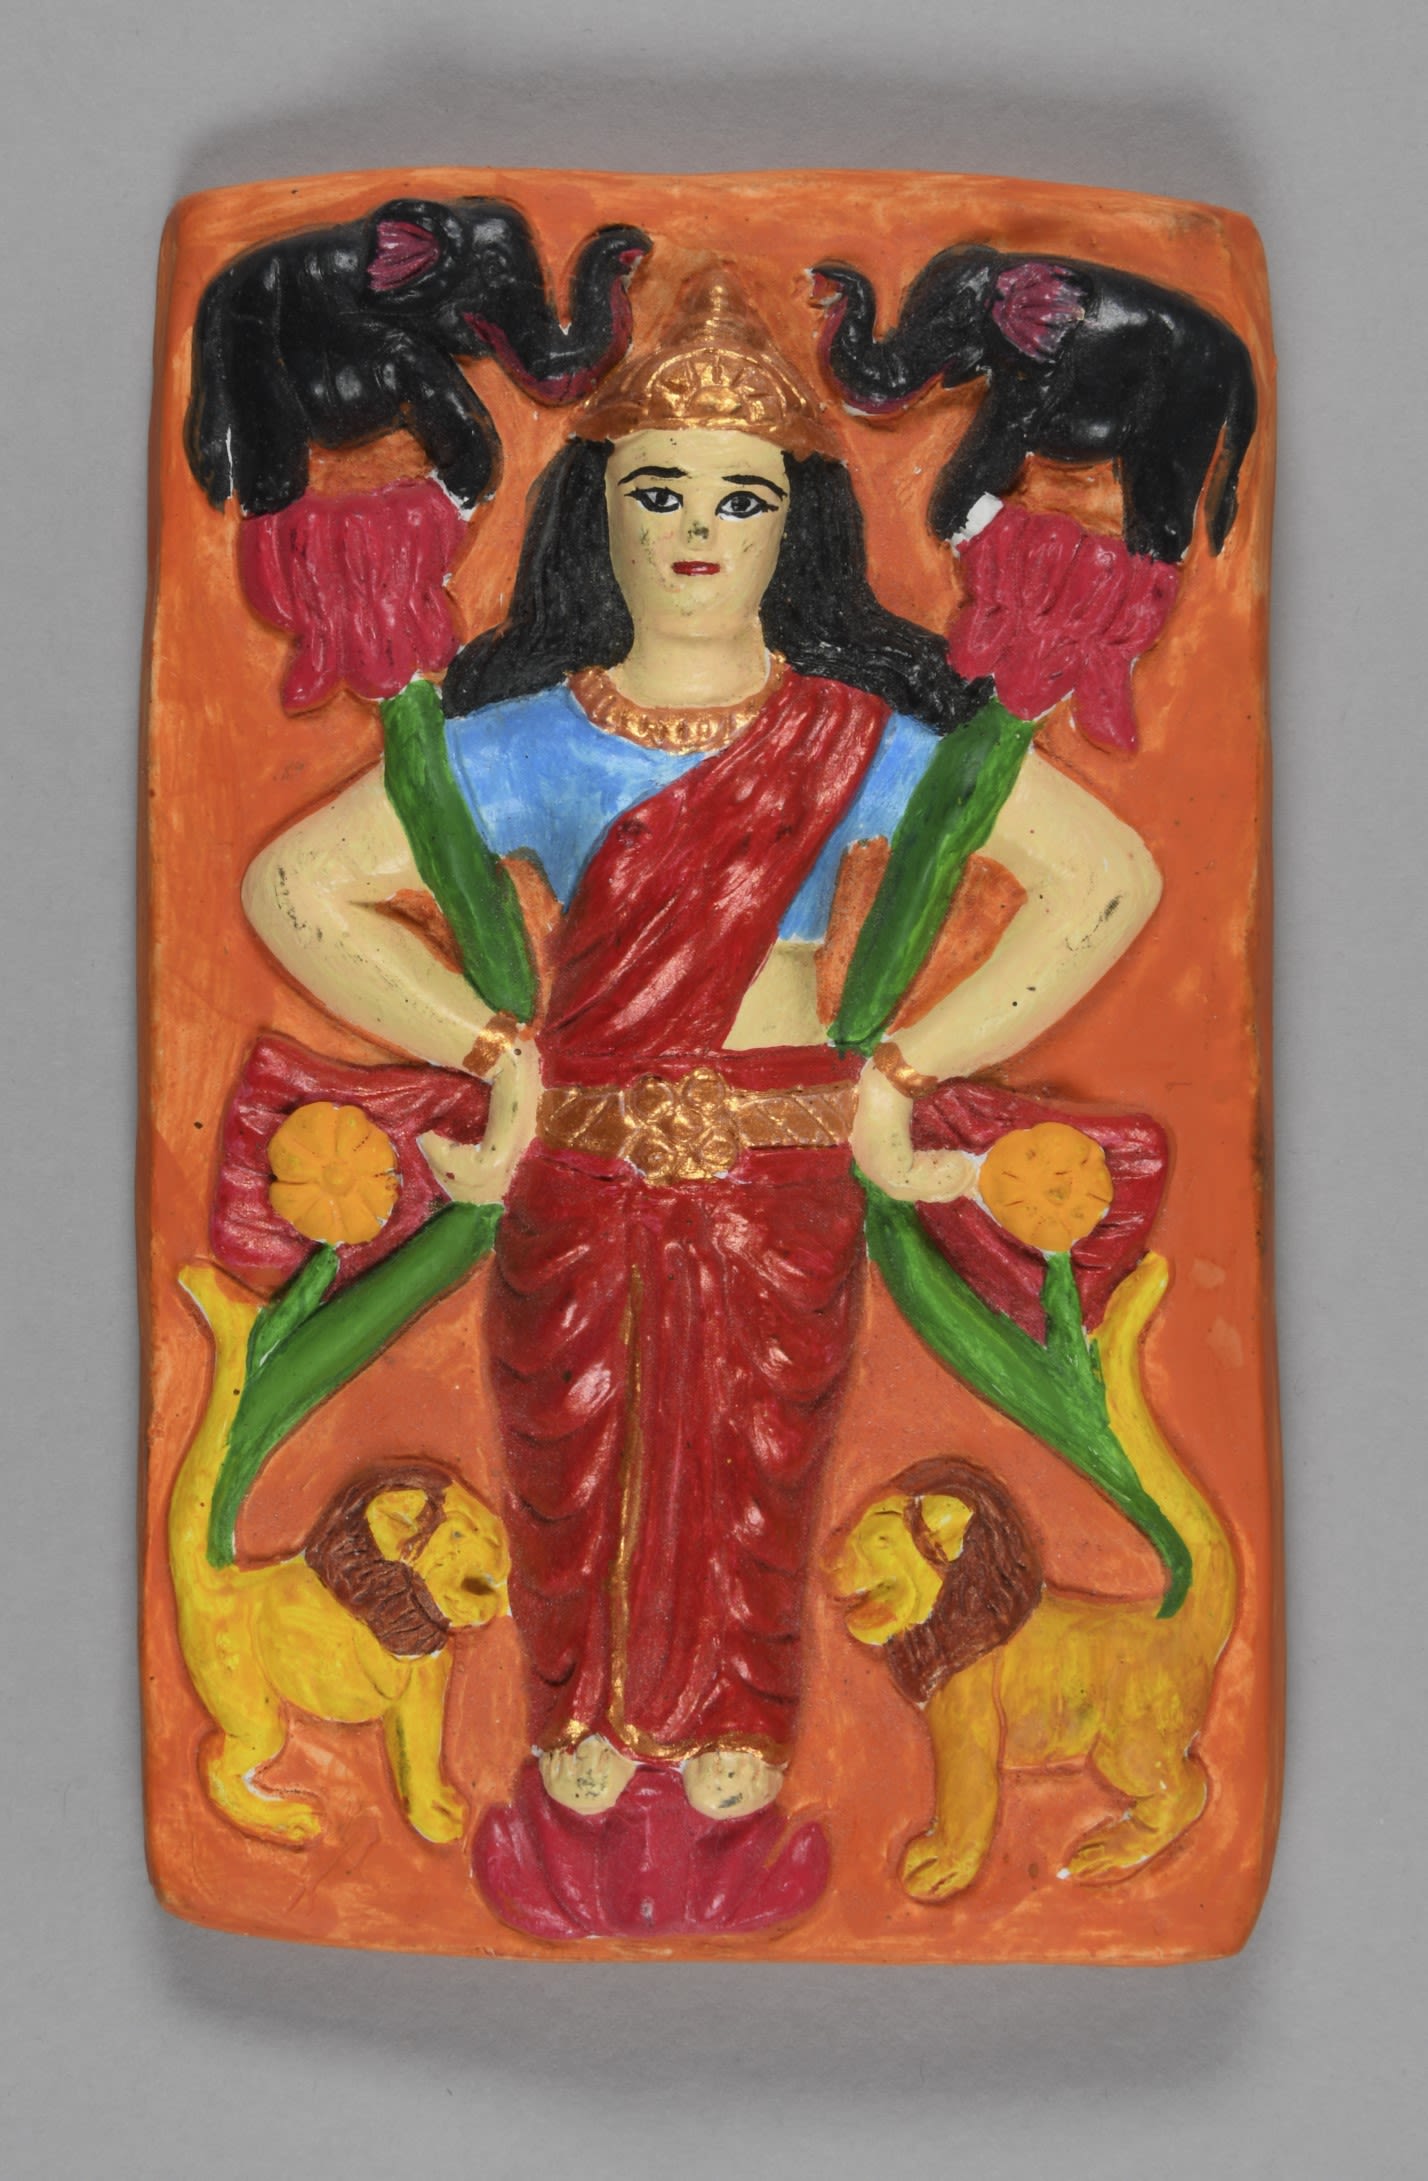
Stone sculpture of a woman holding a cornucopia and lotus from the Buddhist monastery at Bhamala, Taxila, taken in 1930/1931. Identified by Marshall as Hariti, a child-devouring demon whose conversion to Buddhism led her to becoming identified as a protector of children.(c.4th-5th century CE) Sir John Marshall Collection, given by Dr and Mrs Spalding. DUROM.1957.1.1330
Stone sculpture of a woman holding a cornucopia and lotus from the Buddhist monastery at Bhamala, Taxila, taken in 1930/1931. Identified by Marshall as Hariti, a child-devouring demon whose conversion to Buddhism led her to becoming identified as a protector of children.(c.4th-5th century CE) Sir John Marshall Collection, given by Dr and Mrs Spalding. DUROM.1957.1.1330

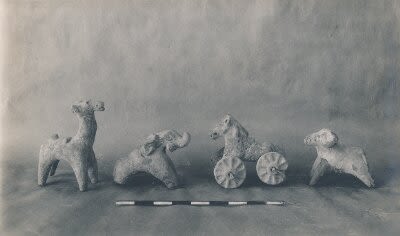
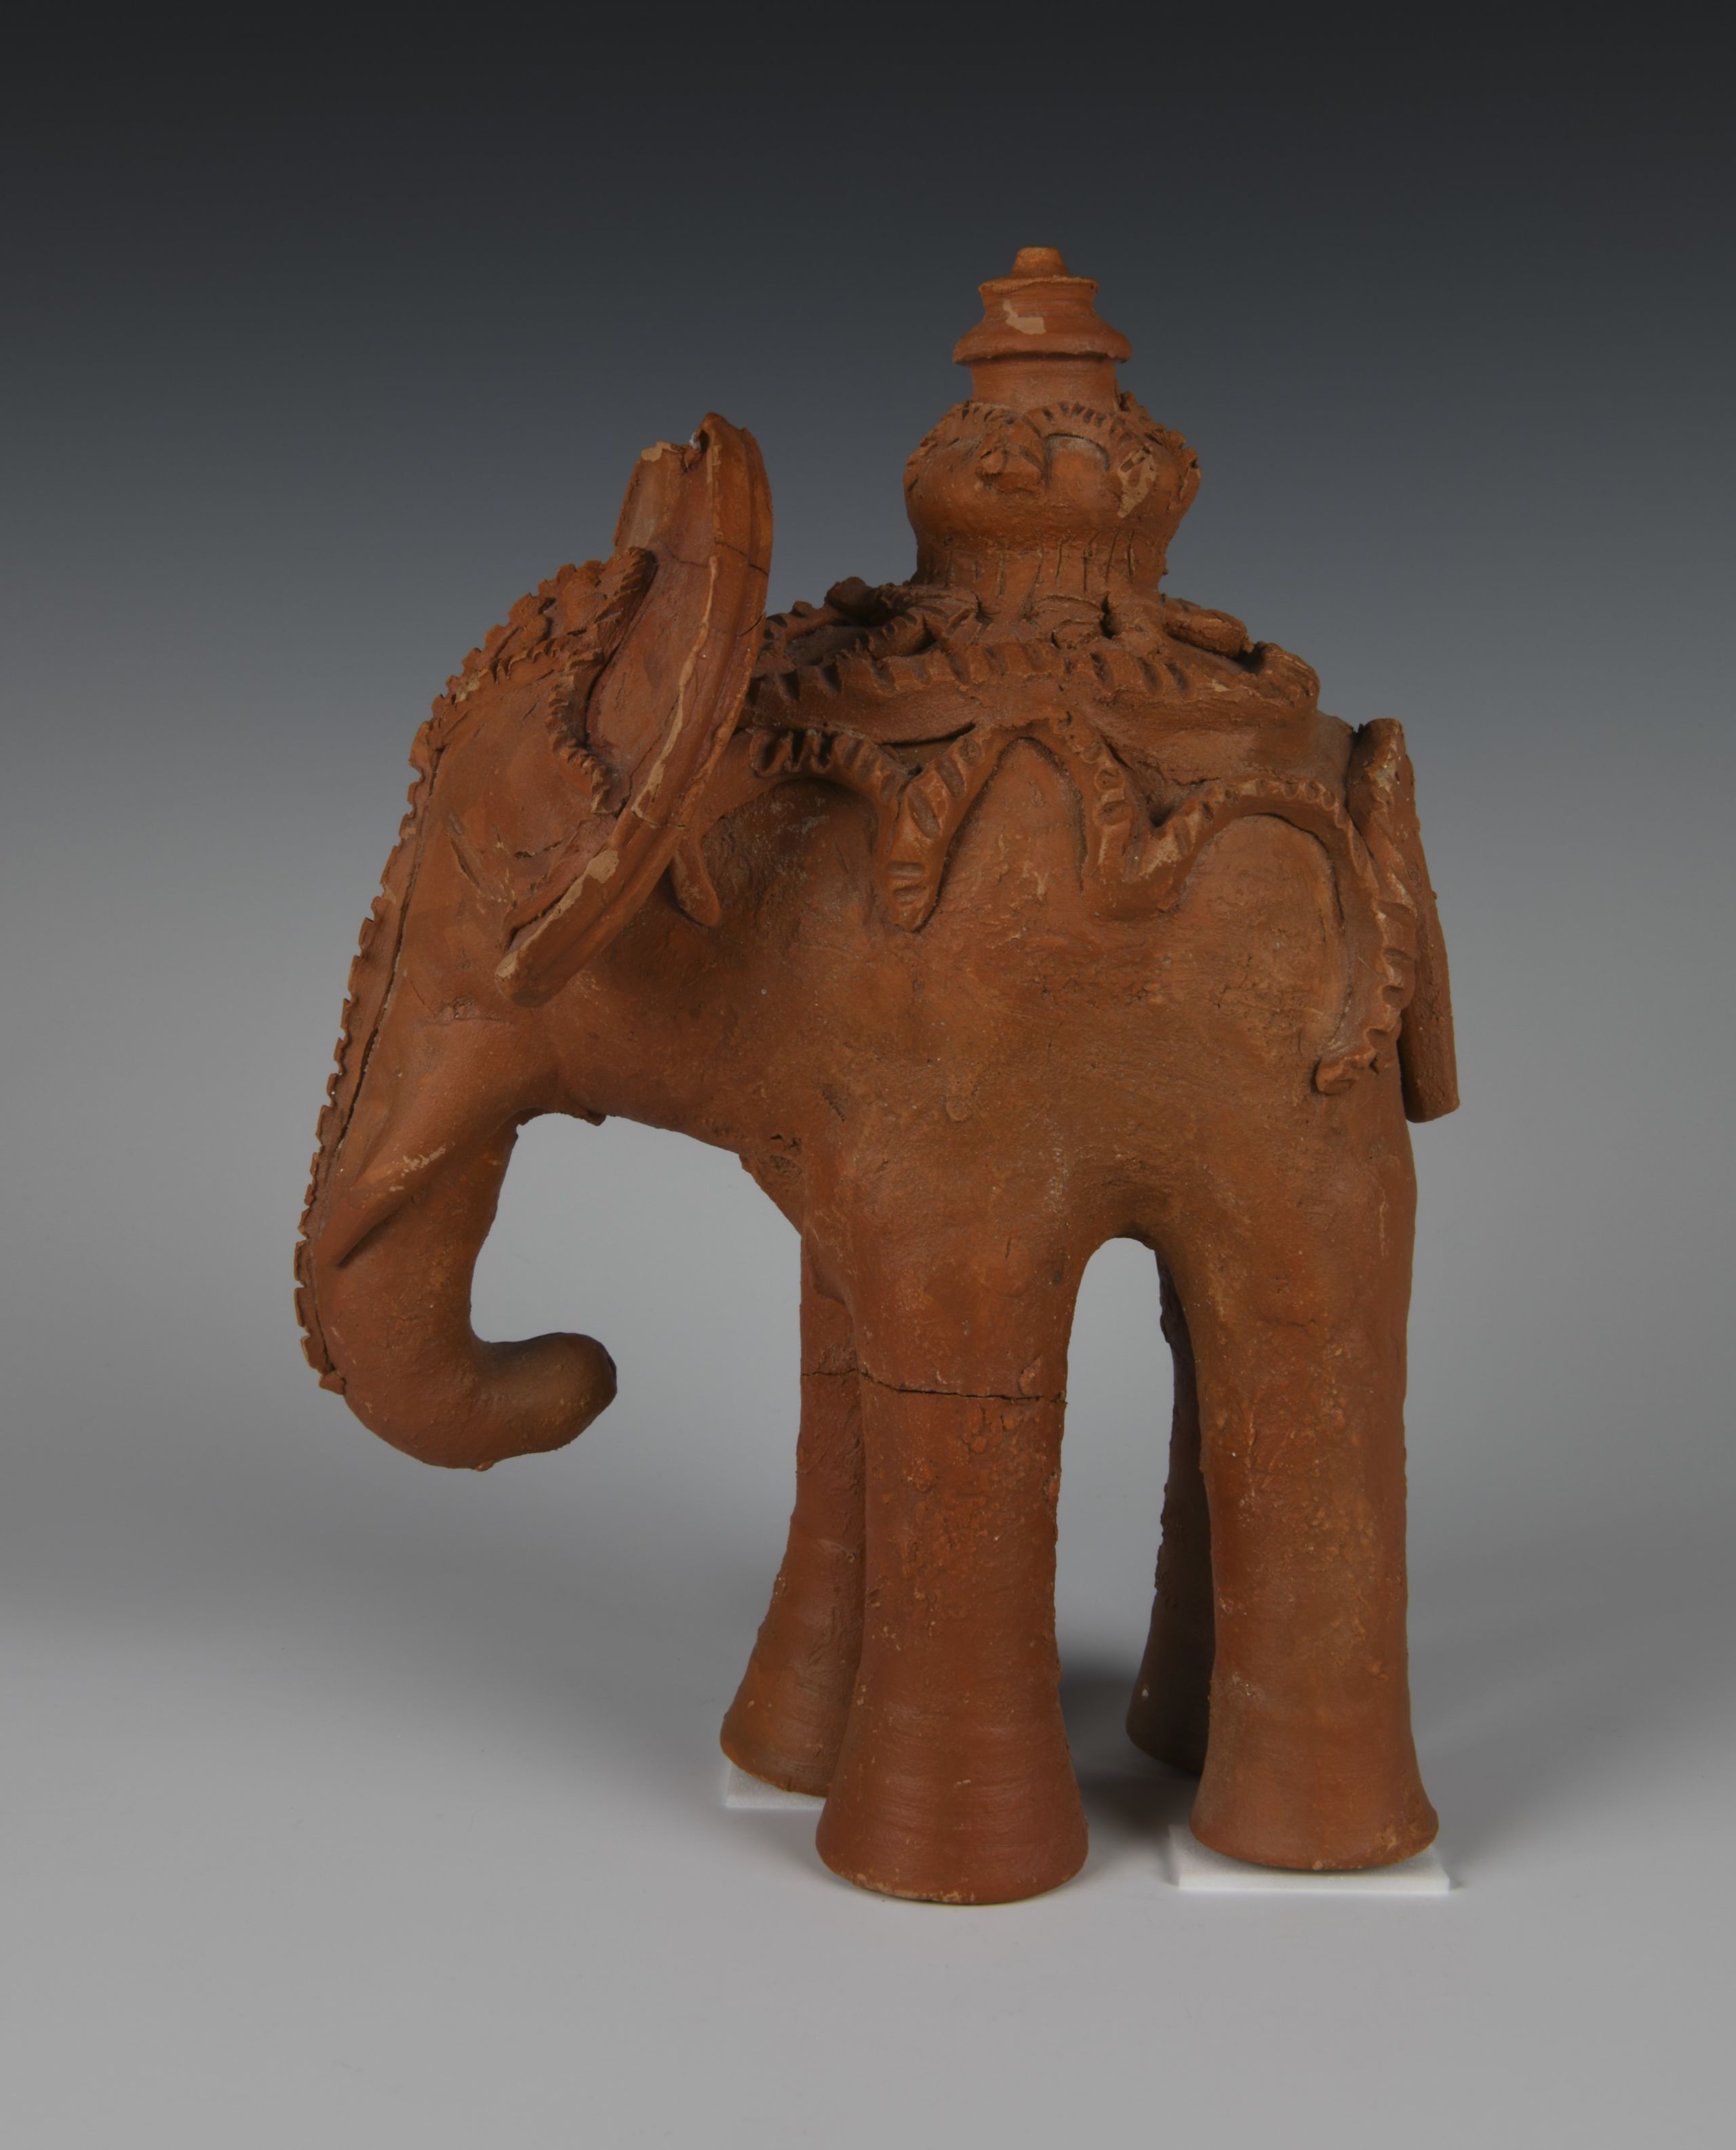
Terracotta figurines depicting a camel, elephant, a horse on four wheels, and a ram, excavated from the Bhir Mound, Taxila. Marshall identified these as toys but they may be votive figurines. (c.5th century BCE-1st century CE) Sir John Marshall Collection, given by Dr and Mrs Spalding. DUROM.1957.1.1359
Terracotta figurines depicting a camel, elephant, a horse on four wheels, and a ram, excavated from the Bhir Mound, Taxila. Marshall identified these as toys but they may be votive figurines. (c.5th century BCE-1st century CE) Sir John Marshall Collection, given by Dr and Mrs Spalding. DUROM.1957.1.1359

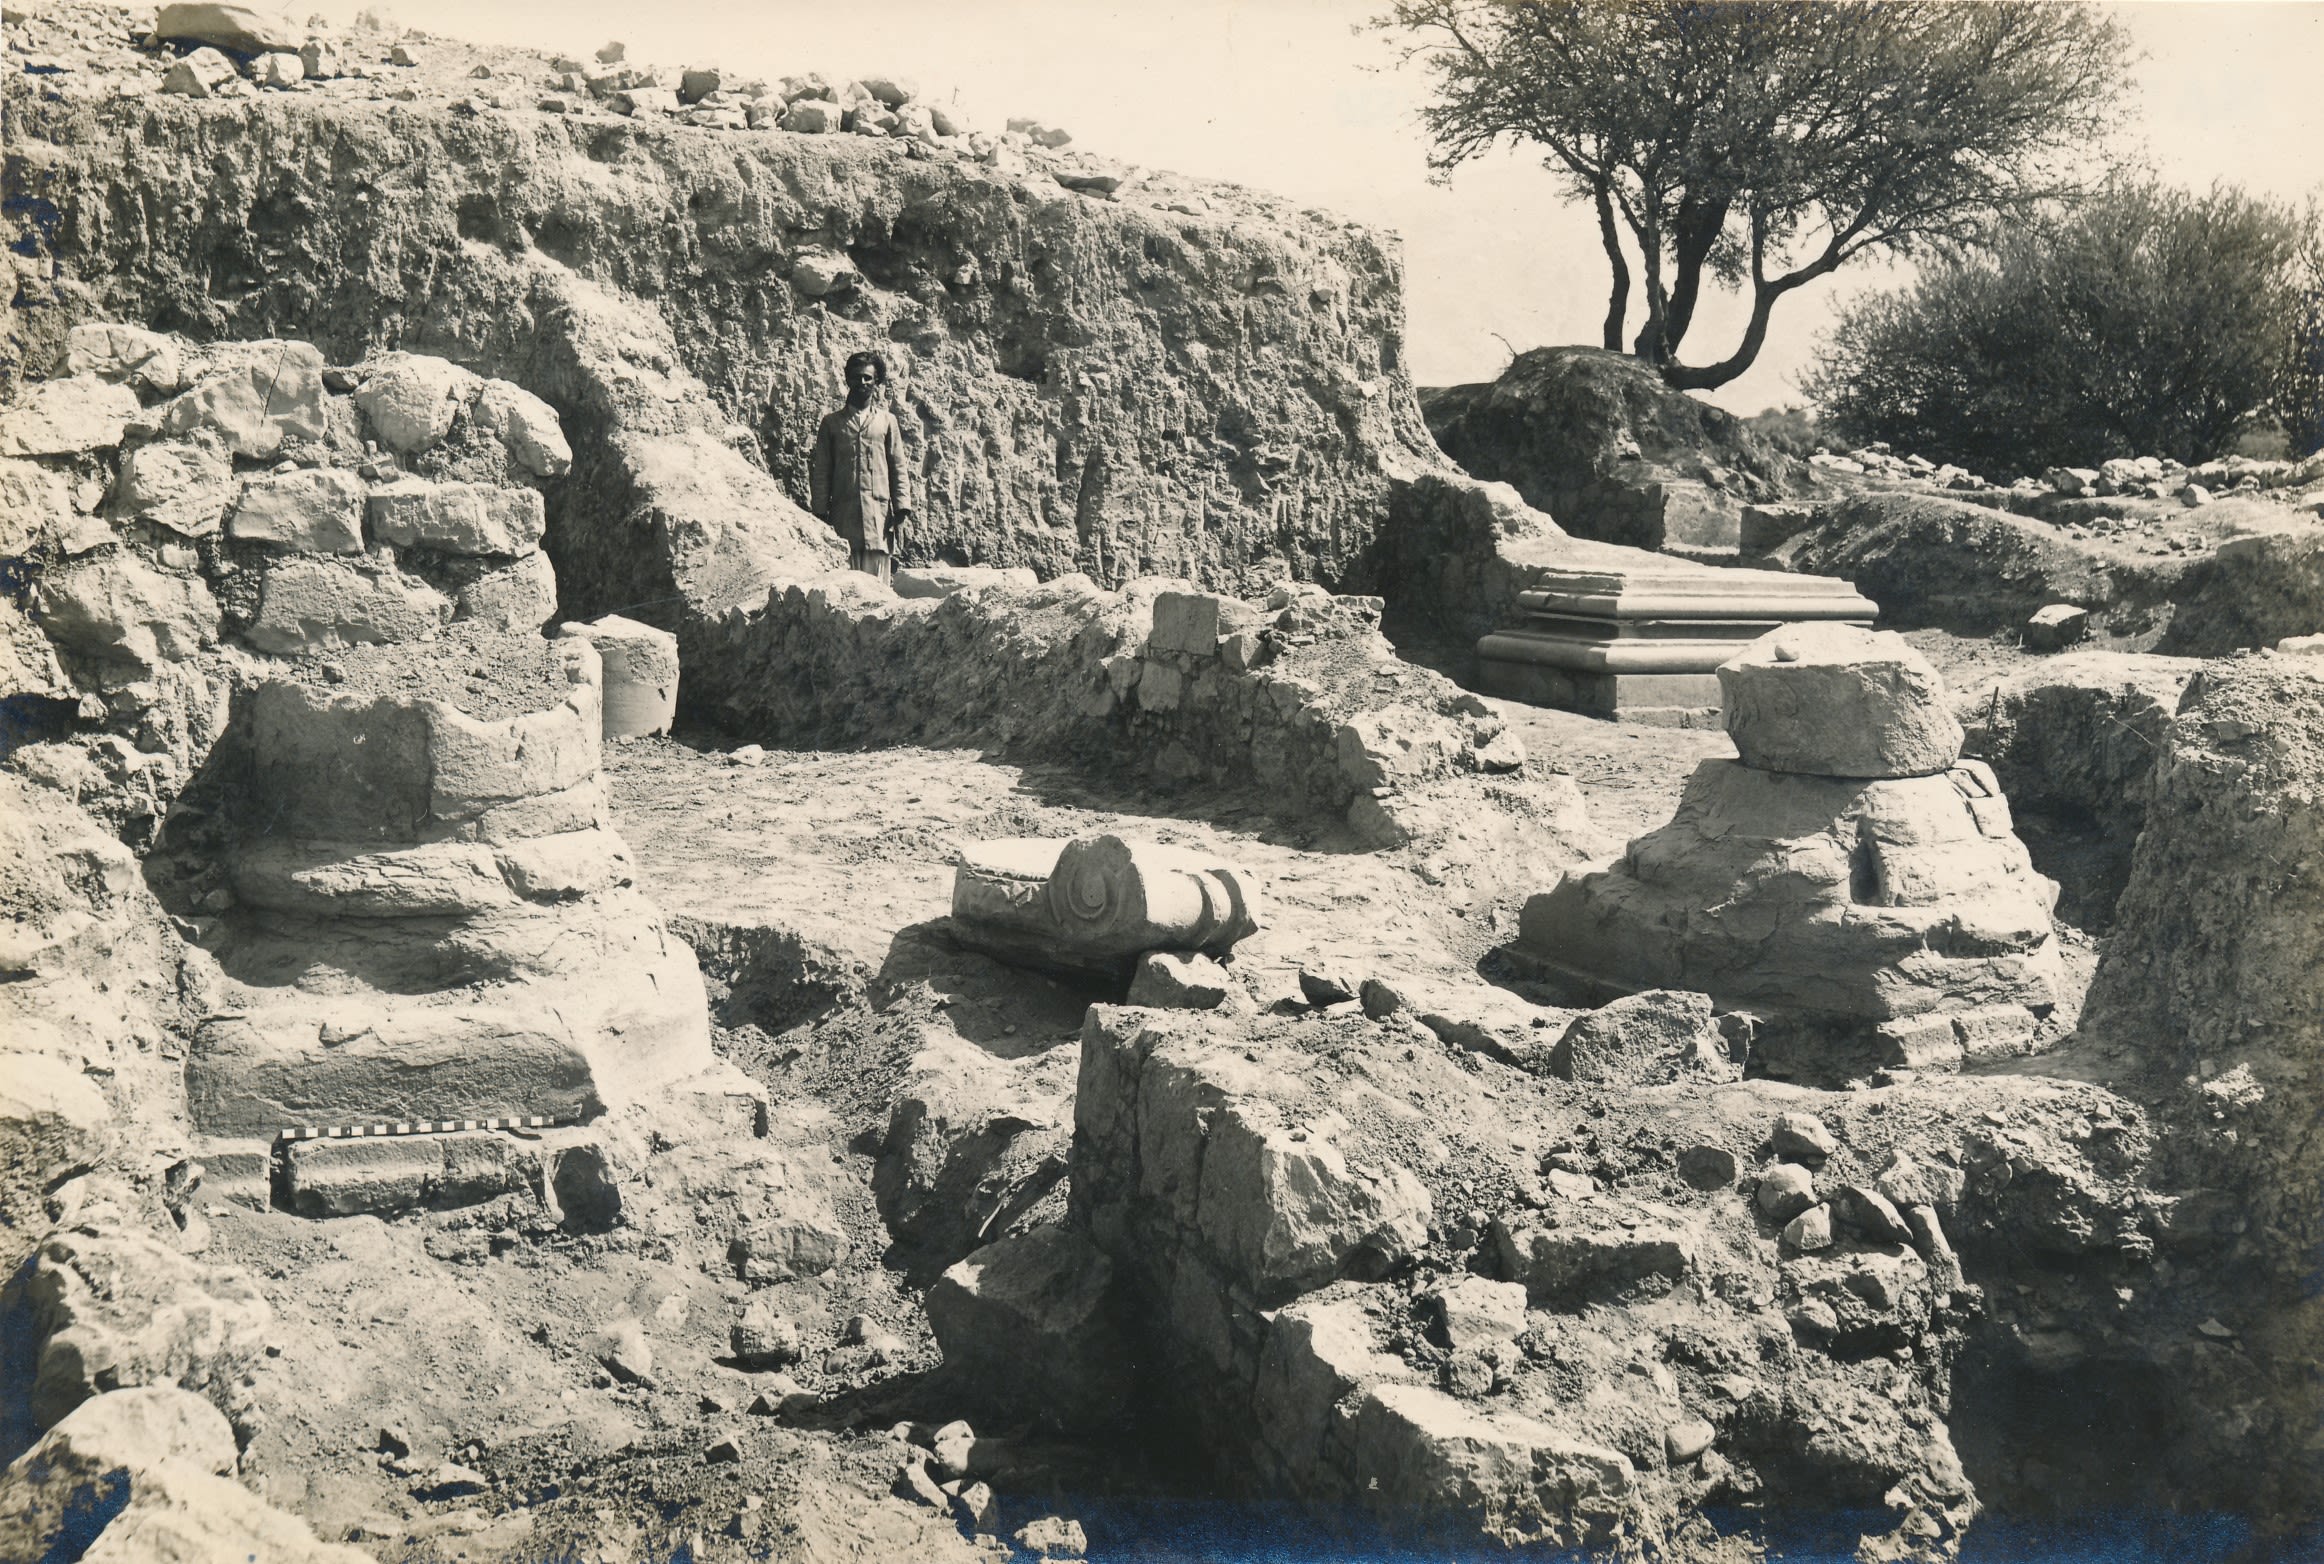
Pillar bases and ionic capital at the entrance of Jandial Temple C, Taxila, taken in 1912/1913. Identified as a Greek temple or Zoroastrian fire temple.(c.2nd-1st century BCE) Sir John Marshall Collection, given by Dr and Mrs Spalding. DUROM.1957.1.1520
Pillar bases and ionic capital at the entrance of Jandial Temple C, Taxila, taken in 1912/1913. Identified as a Greek temple or Zoroastrian fire temple.(c.2nd-1st century BCE) Sir John Marshall Collection, given by Dr and Mrs Spalding. DUROM.1957.1.1520

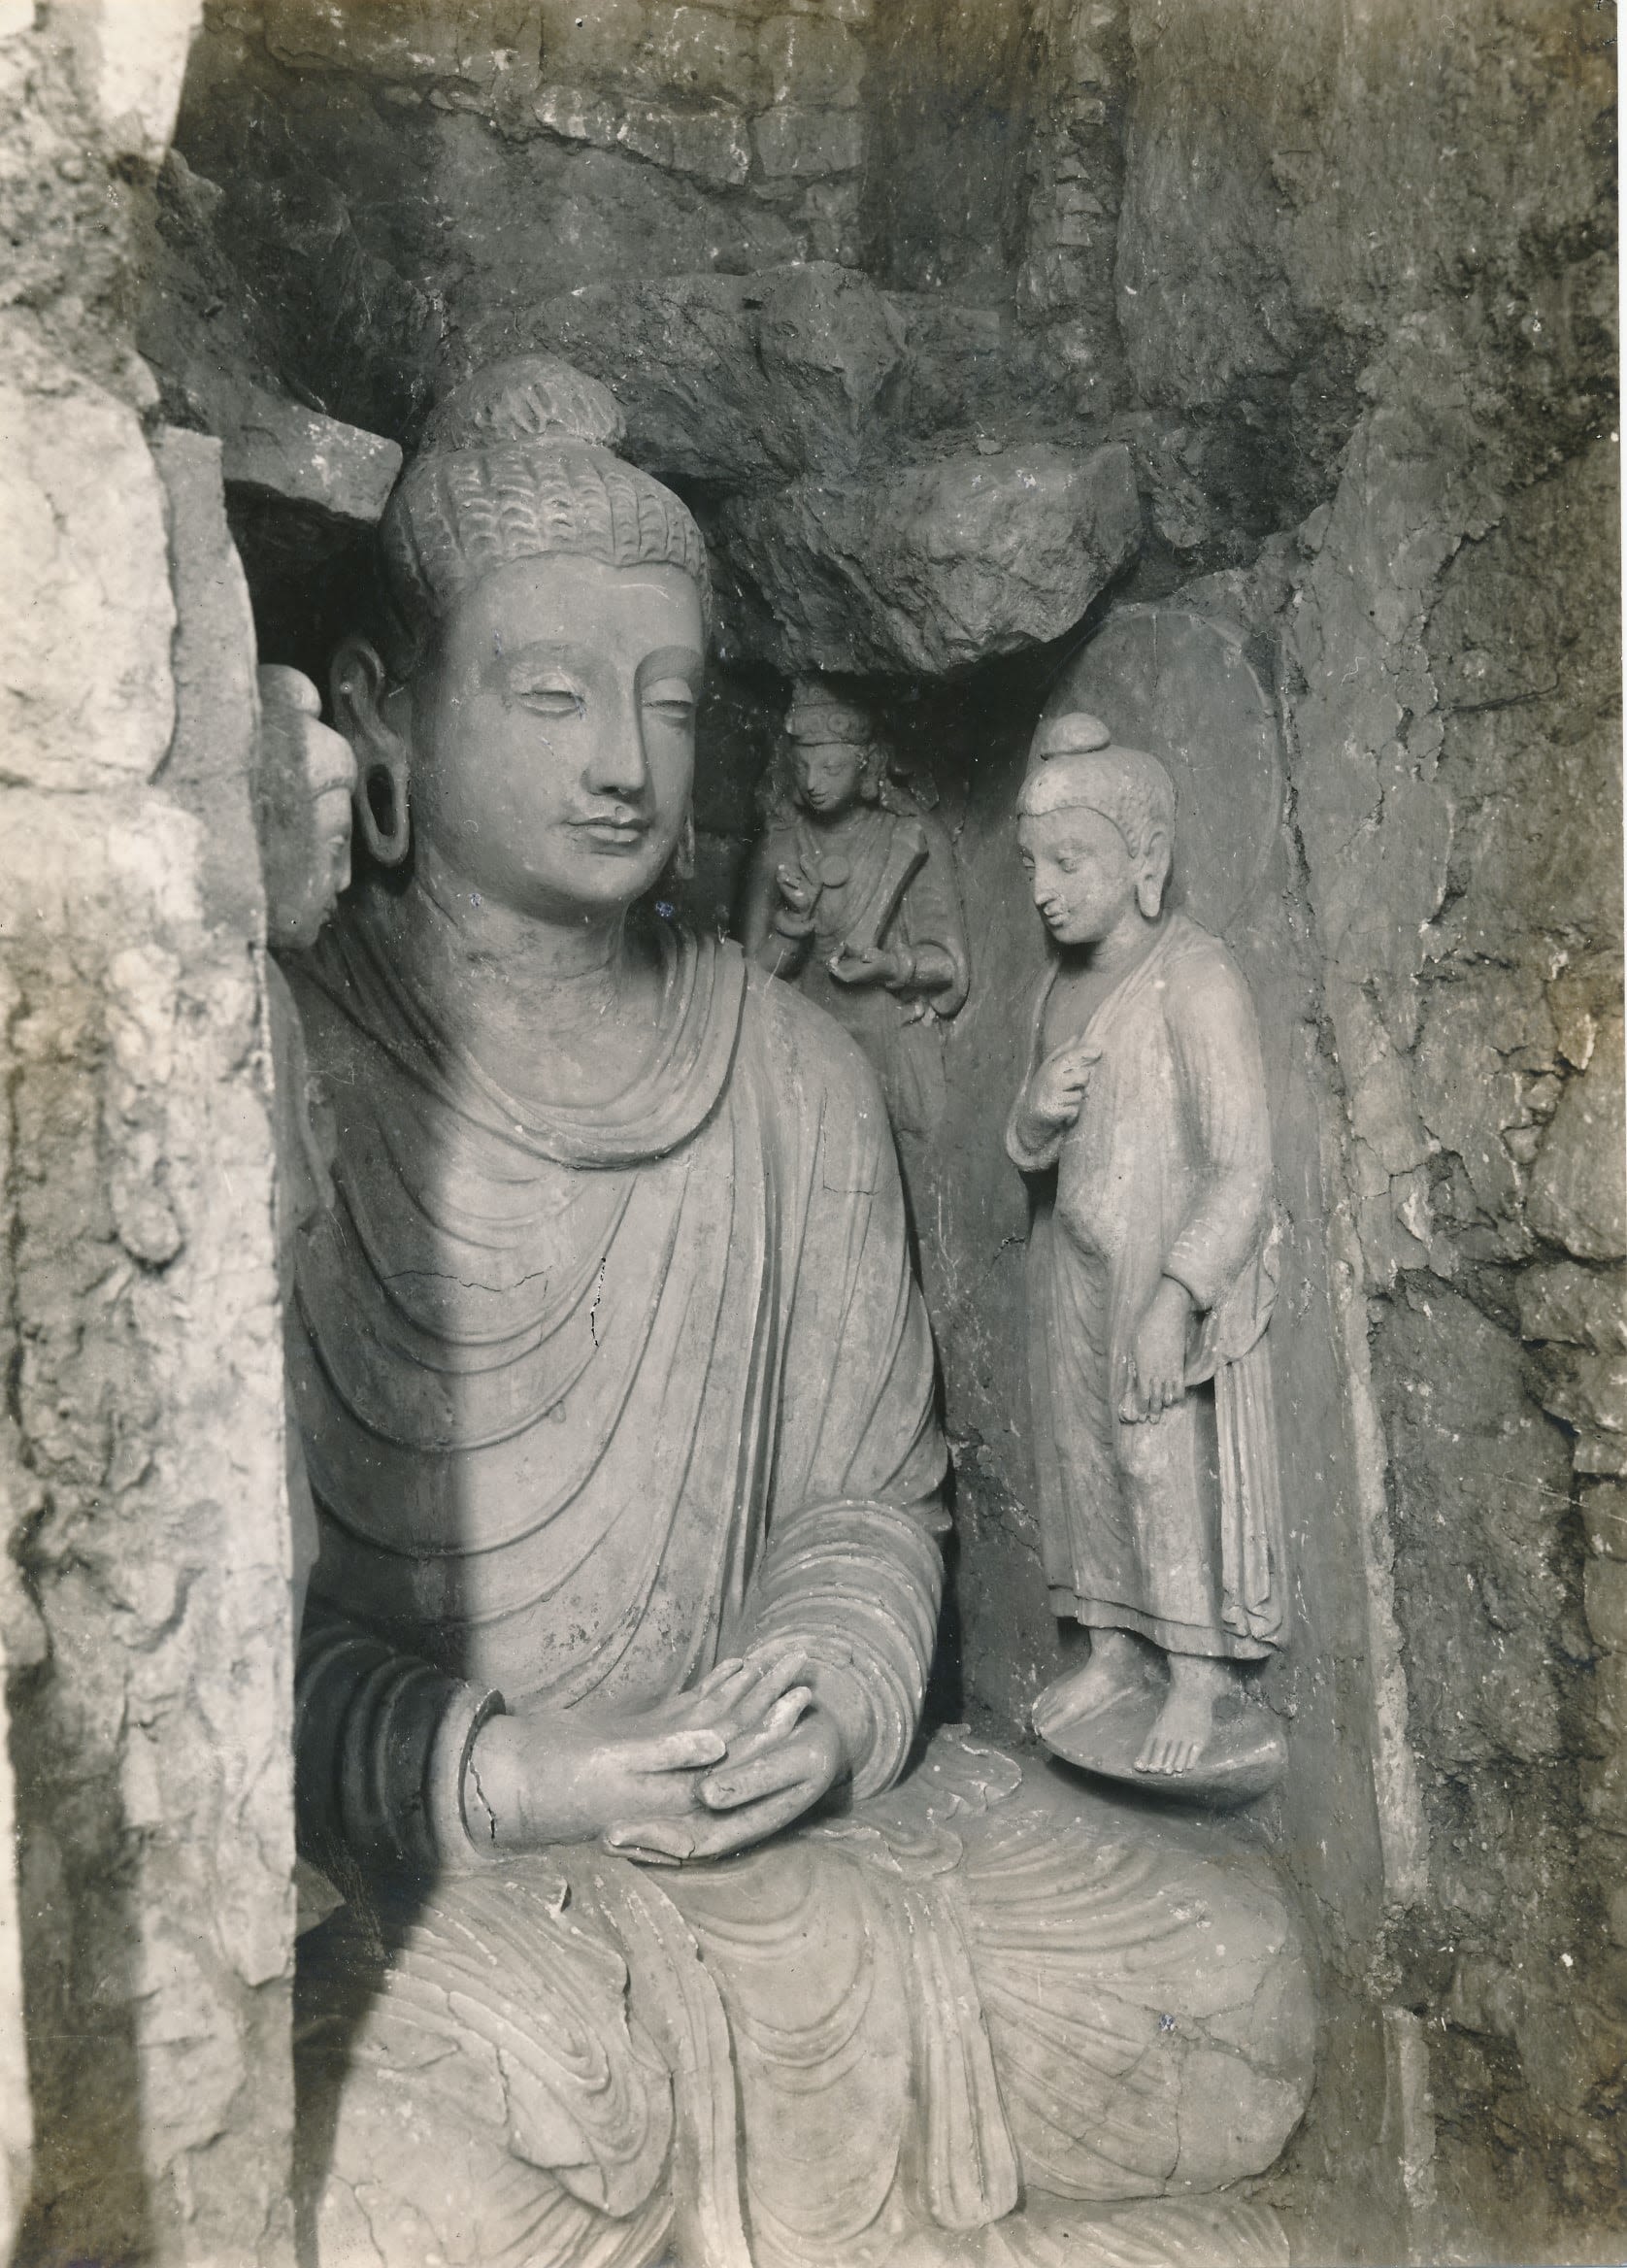
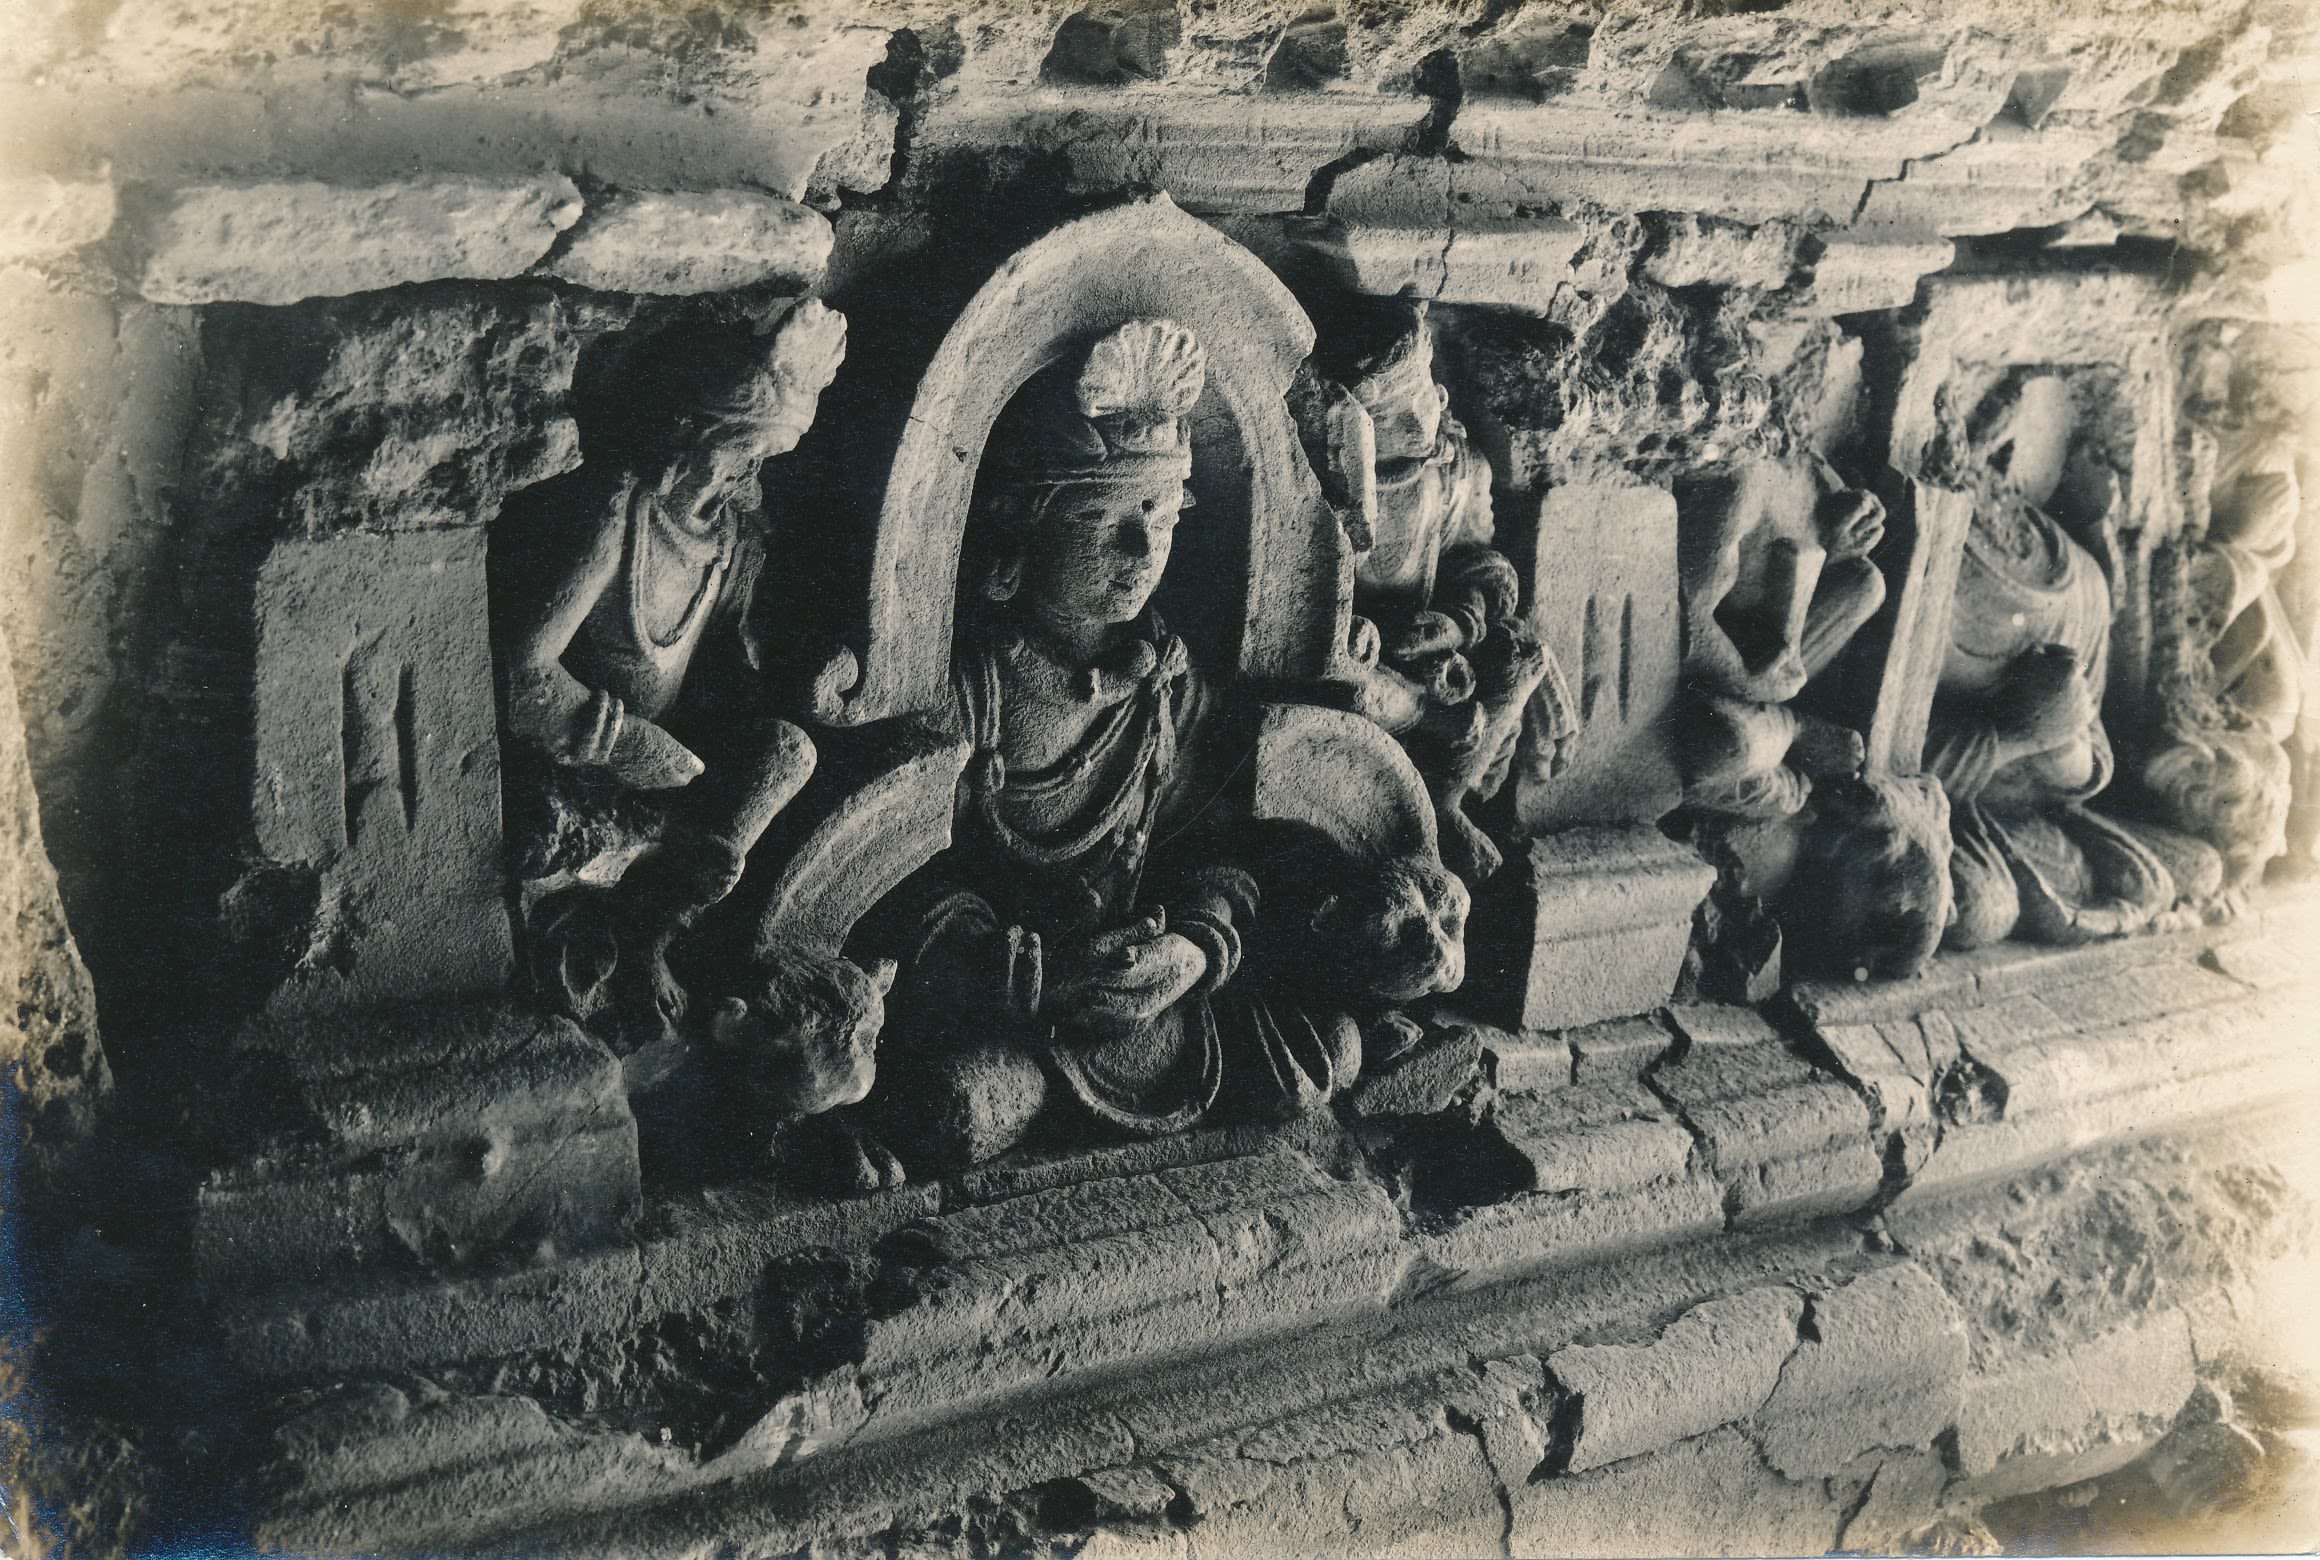
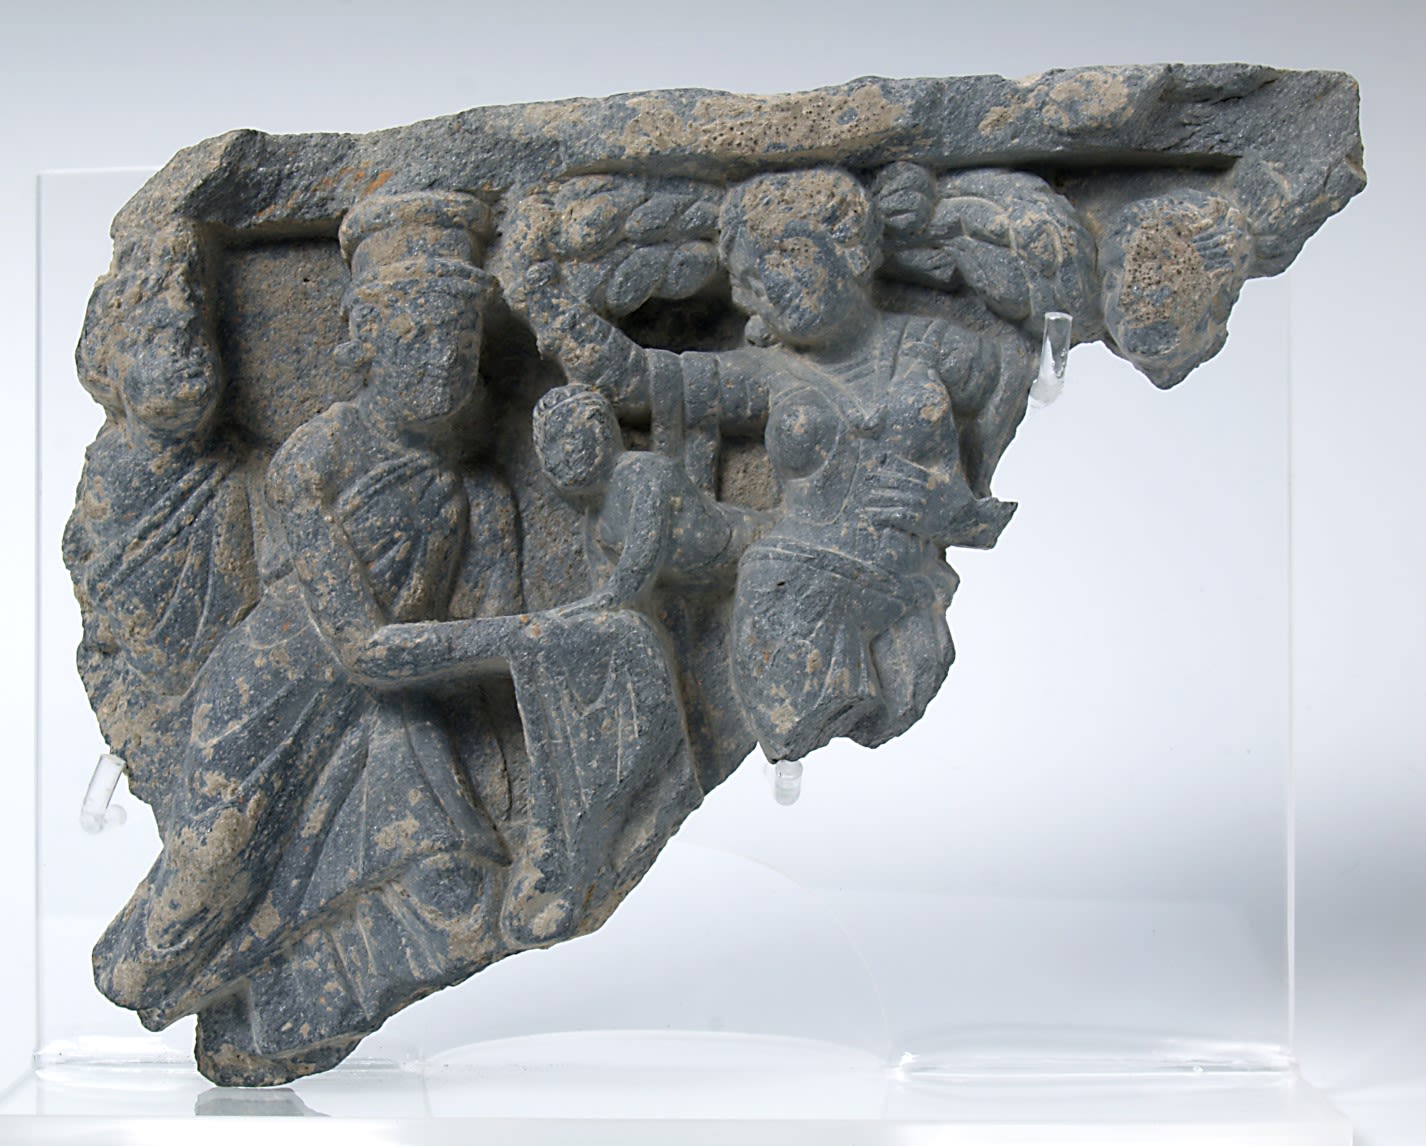
Stucco sculpture of seated Buddha flanked by two standing Buddhas and attendants, taken in 1931/1932 in Chapel E1 at the Jaulian monastery, Taxila. (c.2nd-5th century CE) Sir John Marshall Collection, given by Dr and Mrs Spalding. DUROM.1957.1.1591
Stucco sculpture of seated Buddha flanked by two standing Buddhas and attendants, taken in 1931/1932 in Chapel E1 at the Jaulian monastery, Taxila. (c.2nd-5th century CE) Sir John Marshall Collection, given by Dr and Mrs Spalding. DUROM.1957.1.1591

Harpocrates figurine | Harpocrates was the Greek god of silence, adapted from the Egyptian god Horus depicted as a child. The mythology associated with Horus includes his role as the son of the goddess Isis. Whilst for the Egyptians the pose of right index finger to mouth symbolised childhood, for the Greeks it depicted the gesture for silence and so the significance of this figurine this would have differed across the ancient world. 664-332 BCE. Egypt, bronze EG1615, transferred from the Wellcome Historical Medical Museum
Harpocrates figurine | Harpocrates was the Greek god of silence, adapted from the Egyptian god Horus depicted as a child. The mythology associated with Horus includes his role as the son of the goddess Isis. Whilst for the Egyptians the pose of right index finger to mouth symbolised childhood, for the Greeks it depicted the gesture for silence and so the significance of this figurine this would have differed across the ancient world. 664-332 BCE. Egypt, bronze EG1615, transferred from the Wellcome Historical Medical Museum

The ‘Shrine of the Double-Headed Eagle’ in Block F, Sirkap, Taxila, after excavation, 1913/1914. Marshall viewed it as a mixture of western Classical traditions and South Asian architectural designs. (c.1st century BCE-1st century CE) Sir John Marshall Collection, given by Dr and Mrs Spalding. DUROM.1957.1.1769
The ‘Shrine of the Double-Headed Eagle’ in Block F, Sirkap, Taxila, after excavation, 1913/1914. Marshall viewed it as a mixture of western Classical traditions and South Asian architectural designs. (c.1st century BCE-1st century CE) Sir John Marshall Collection, given by Dr and Mrs Spalding. DUROM.1957.1.1769

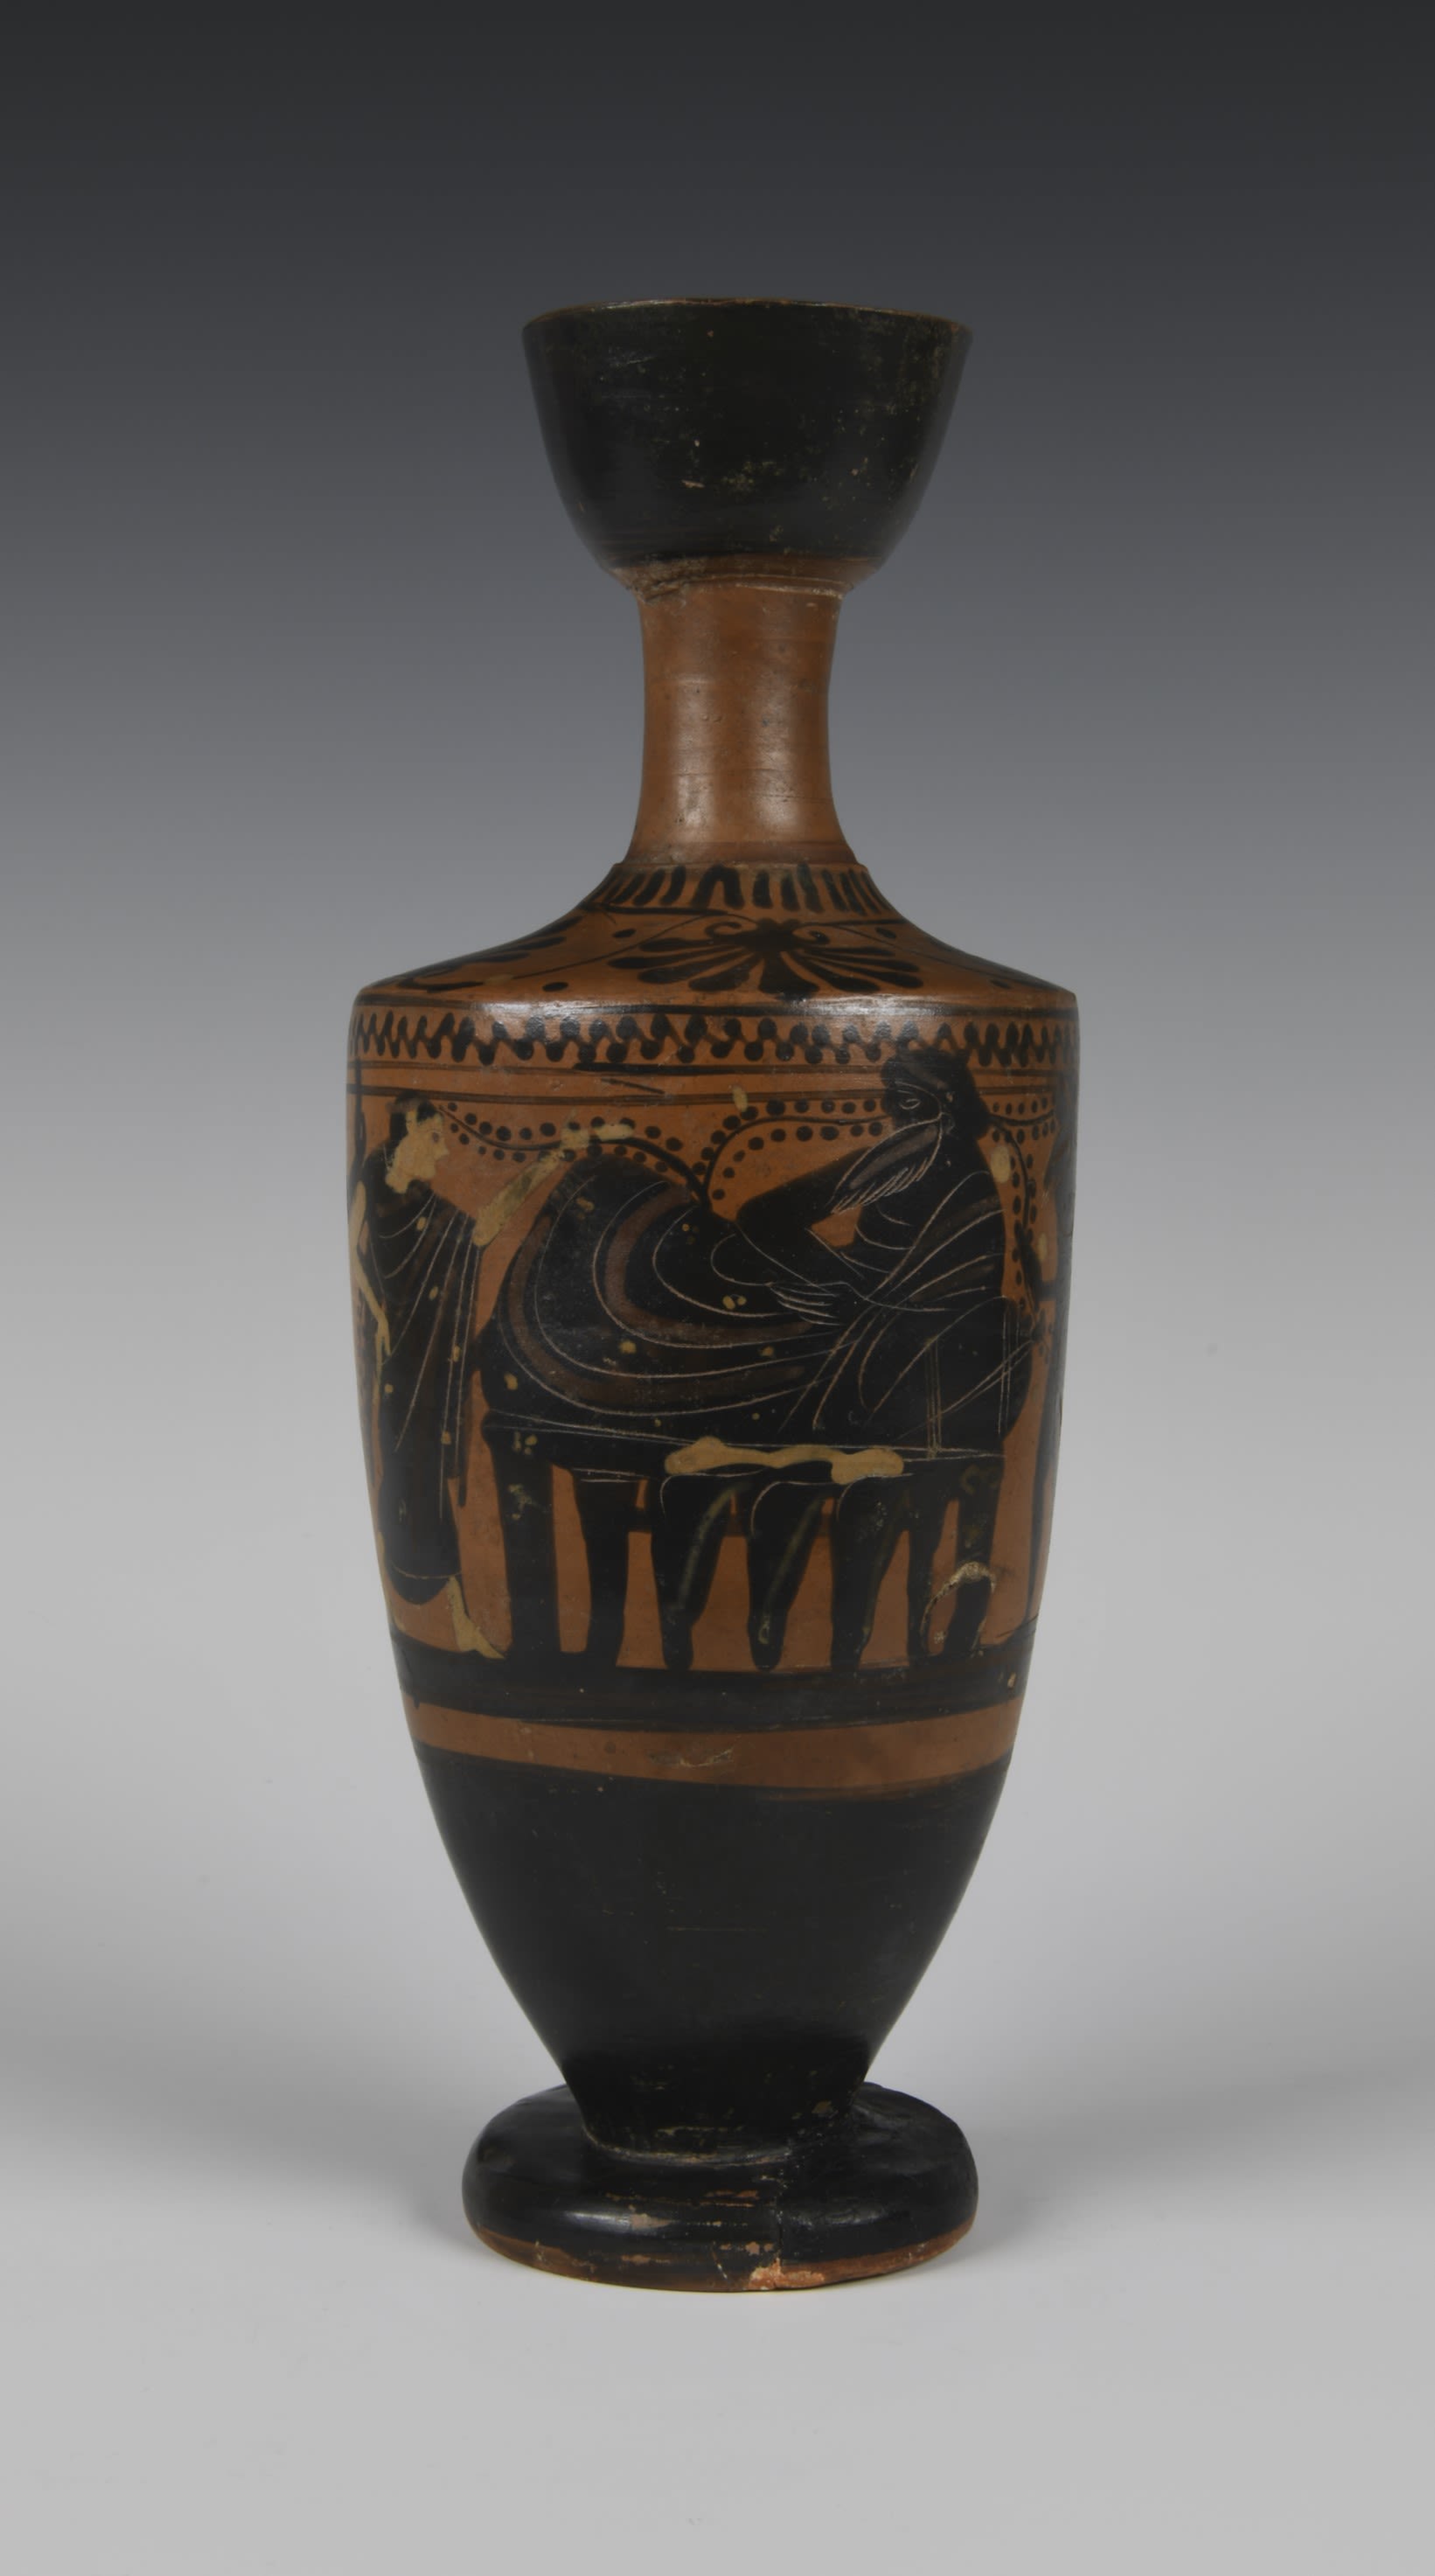
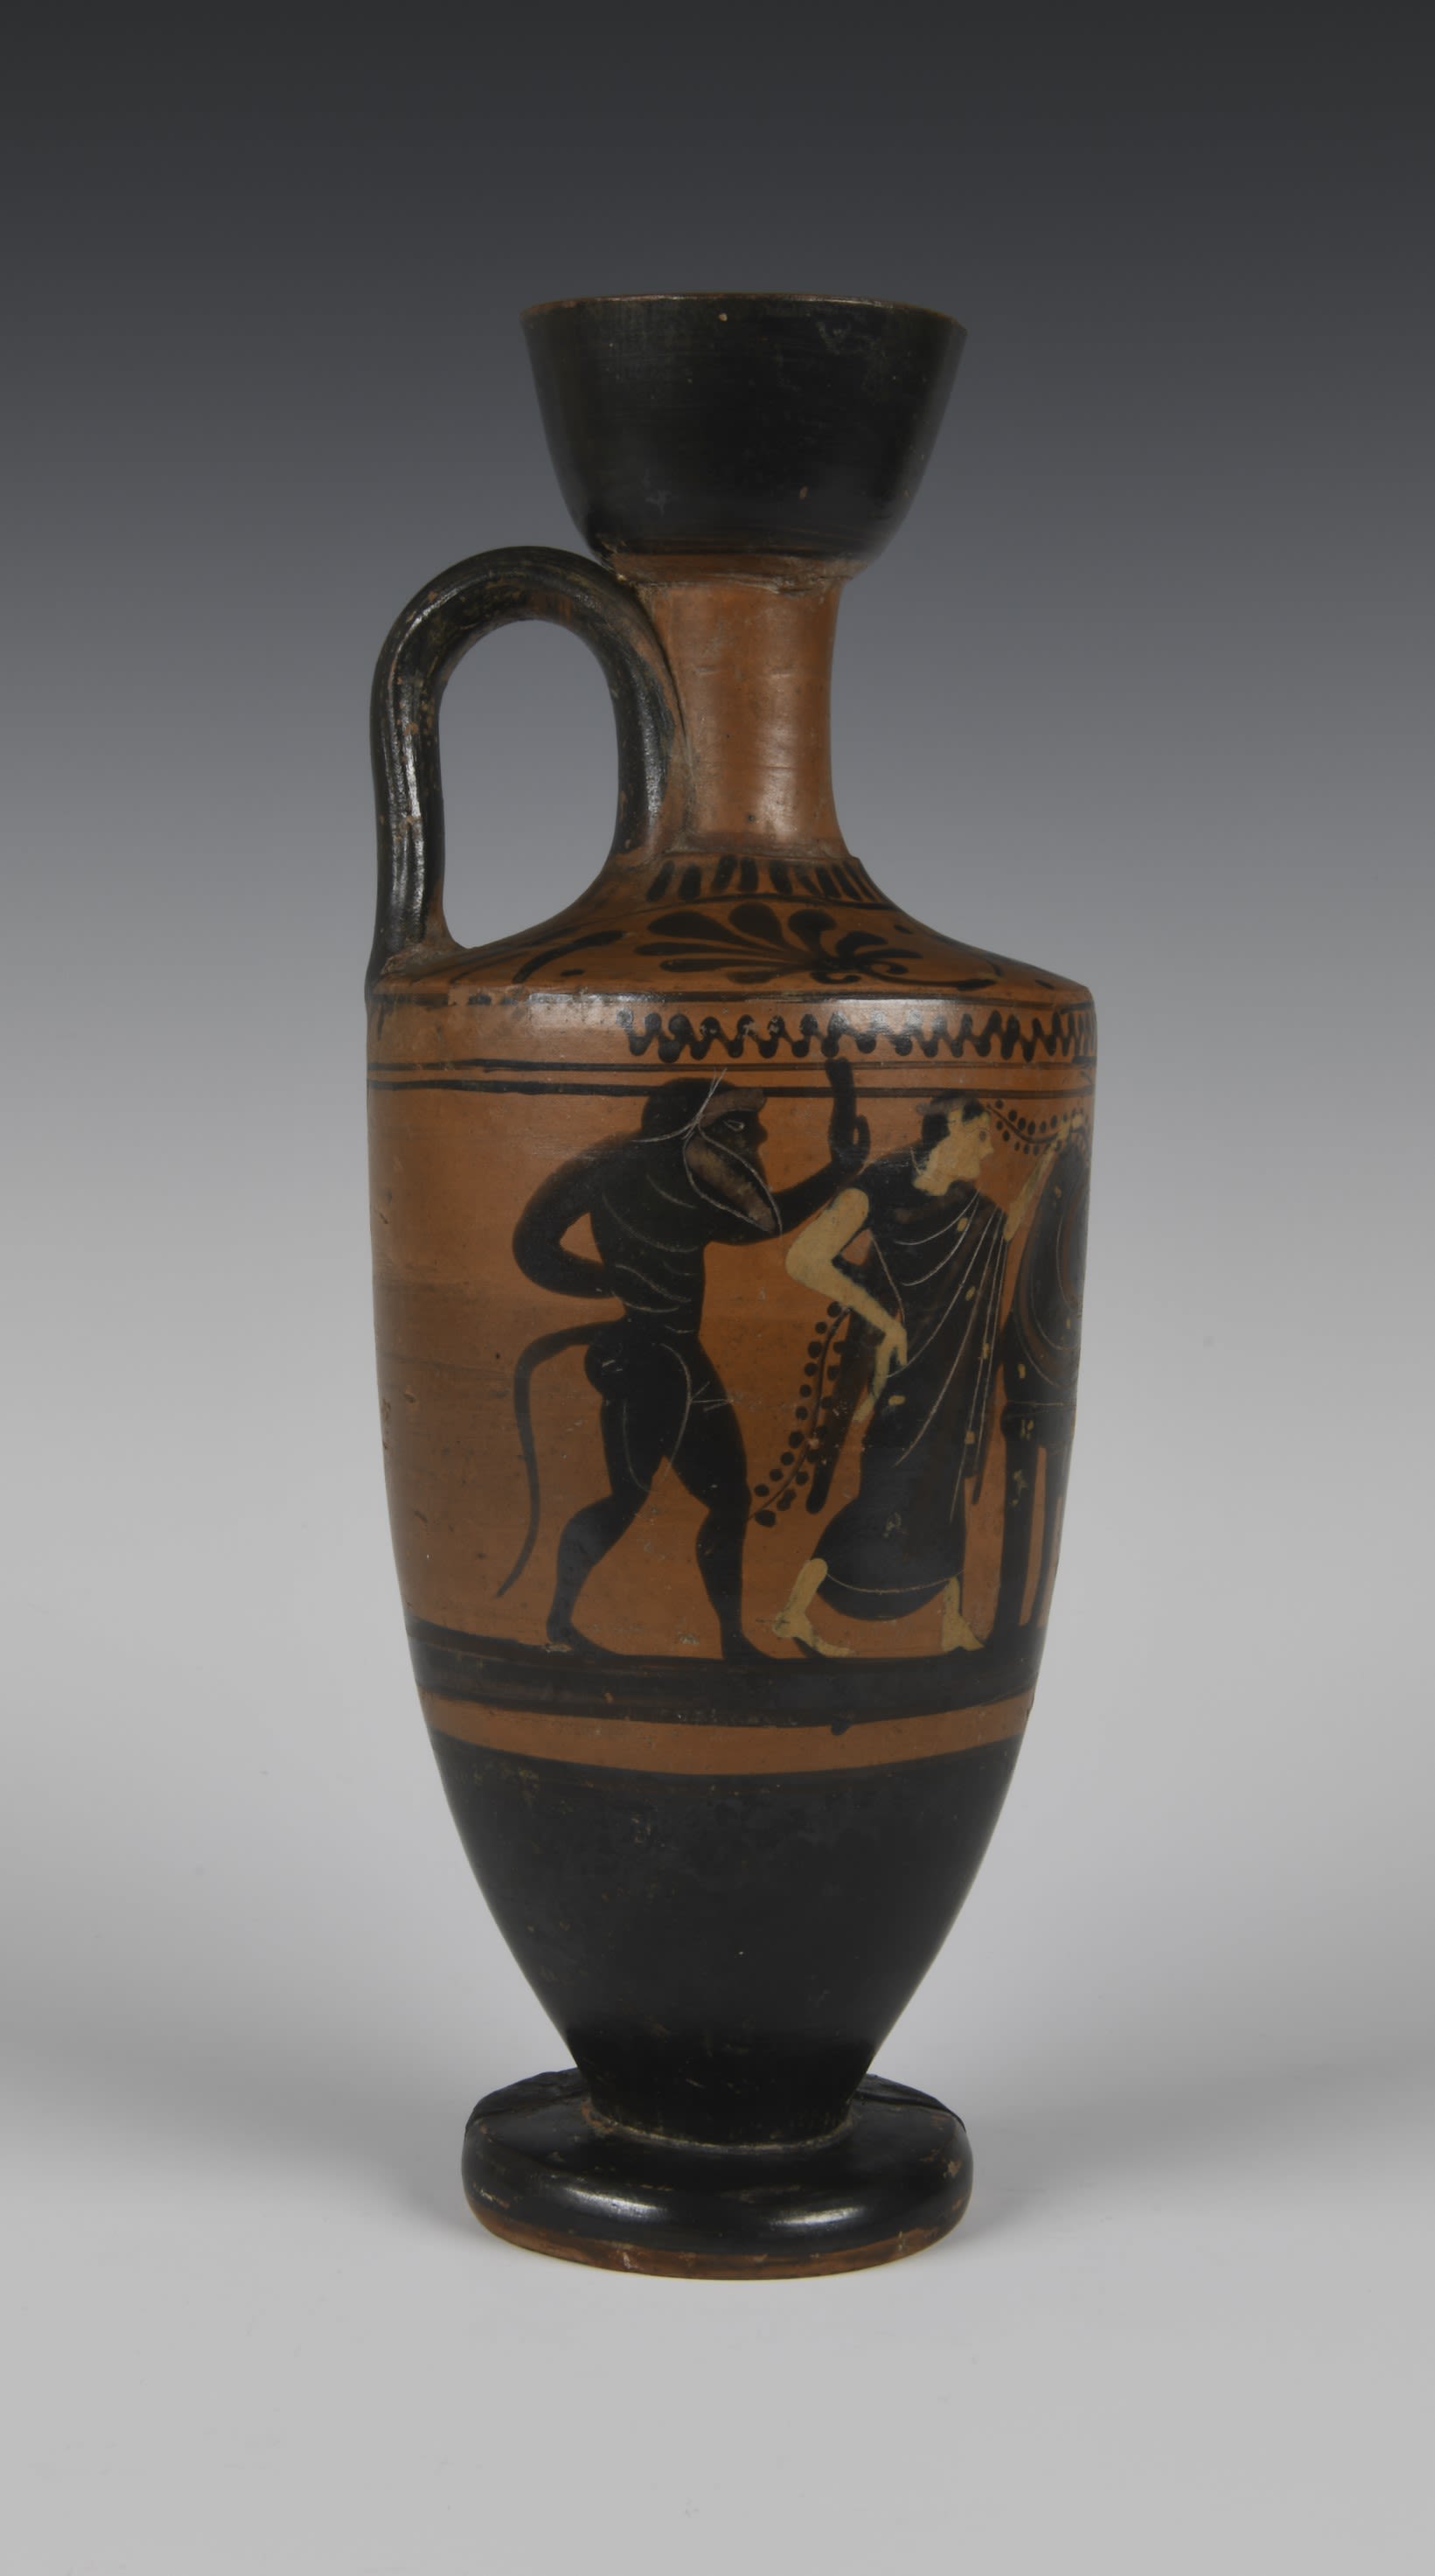
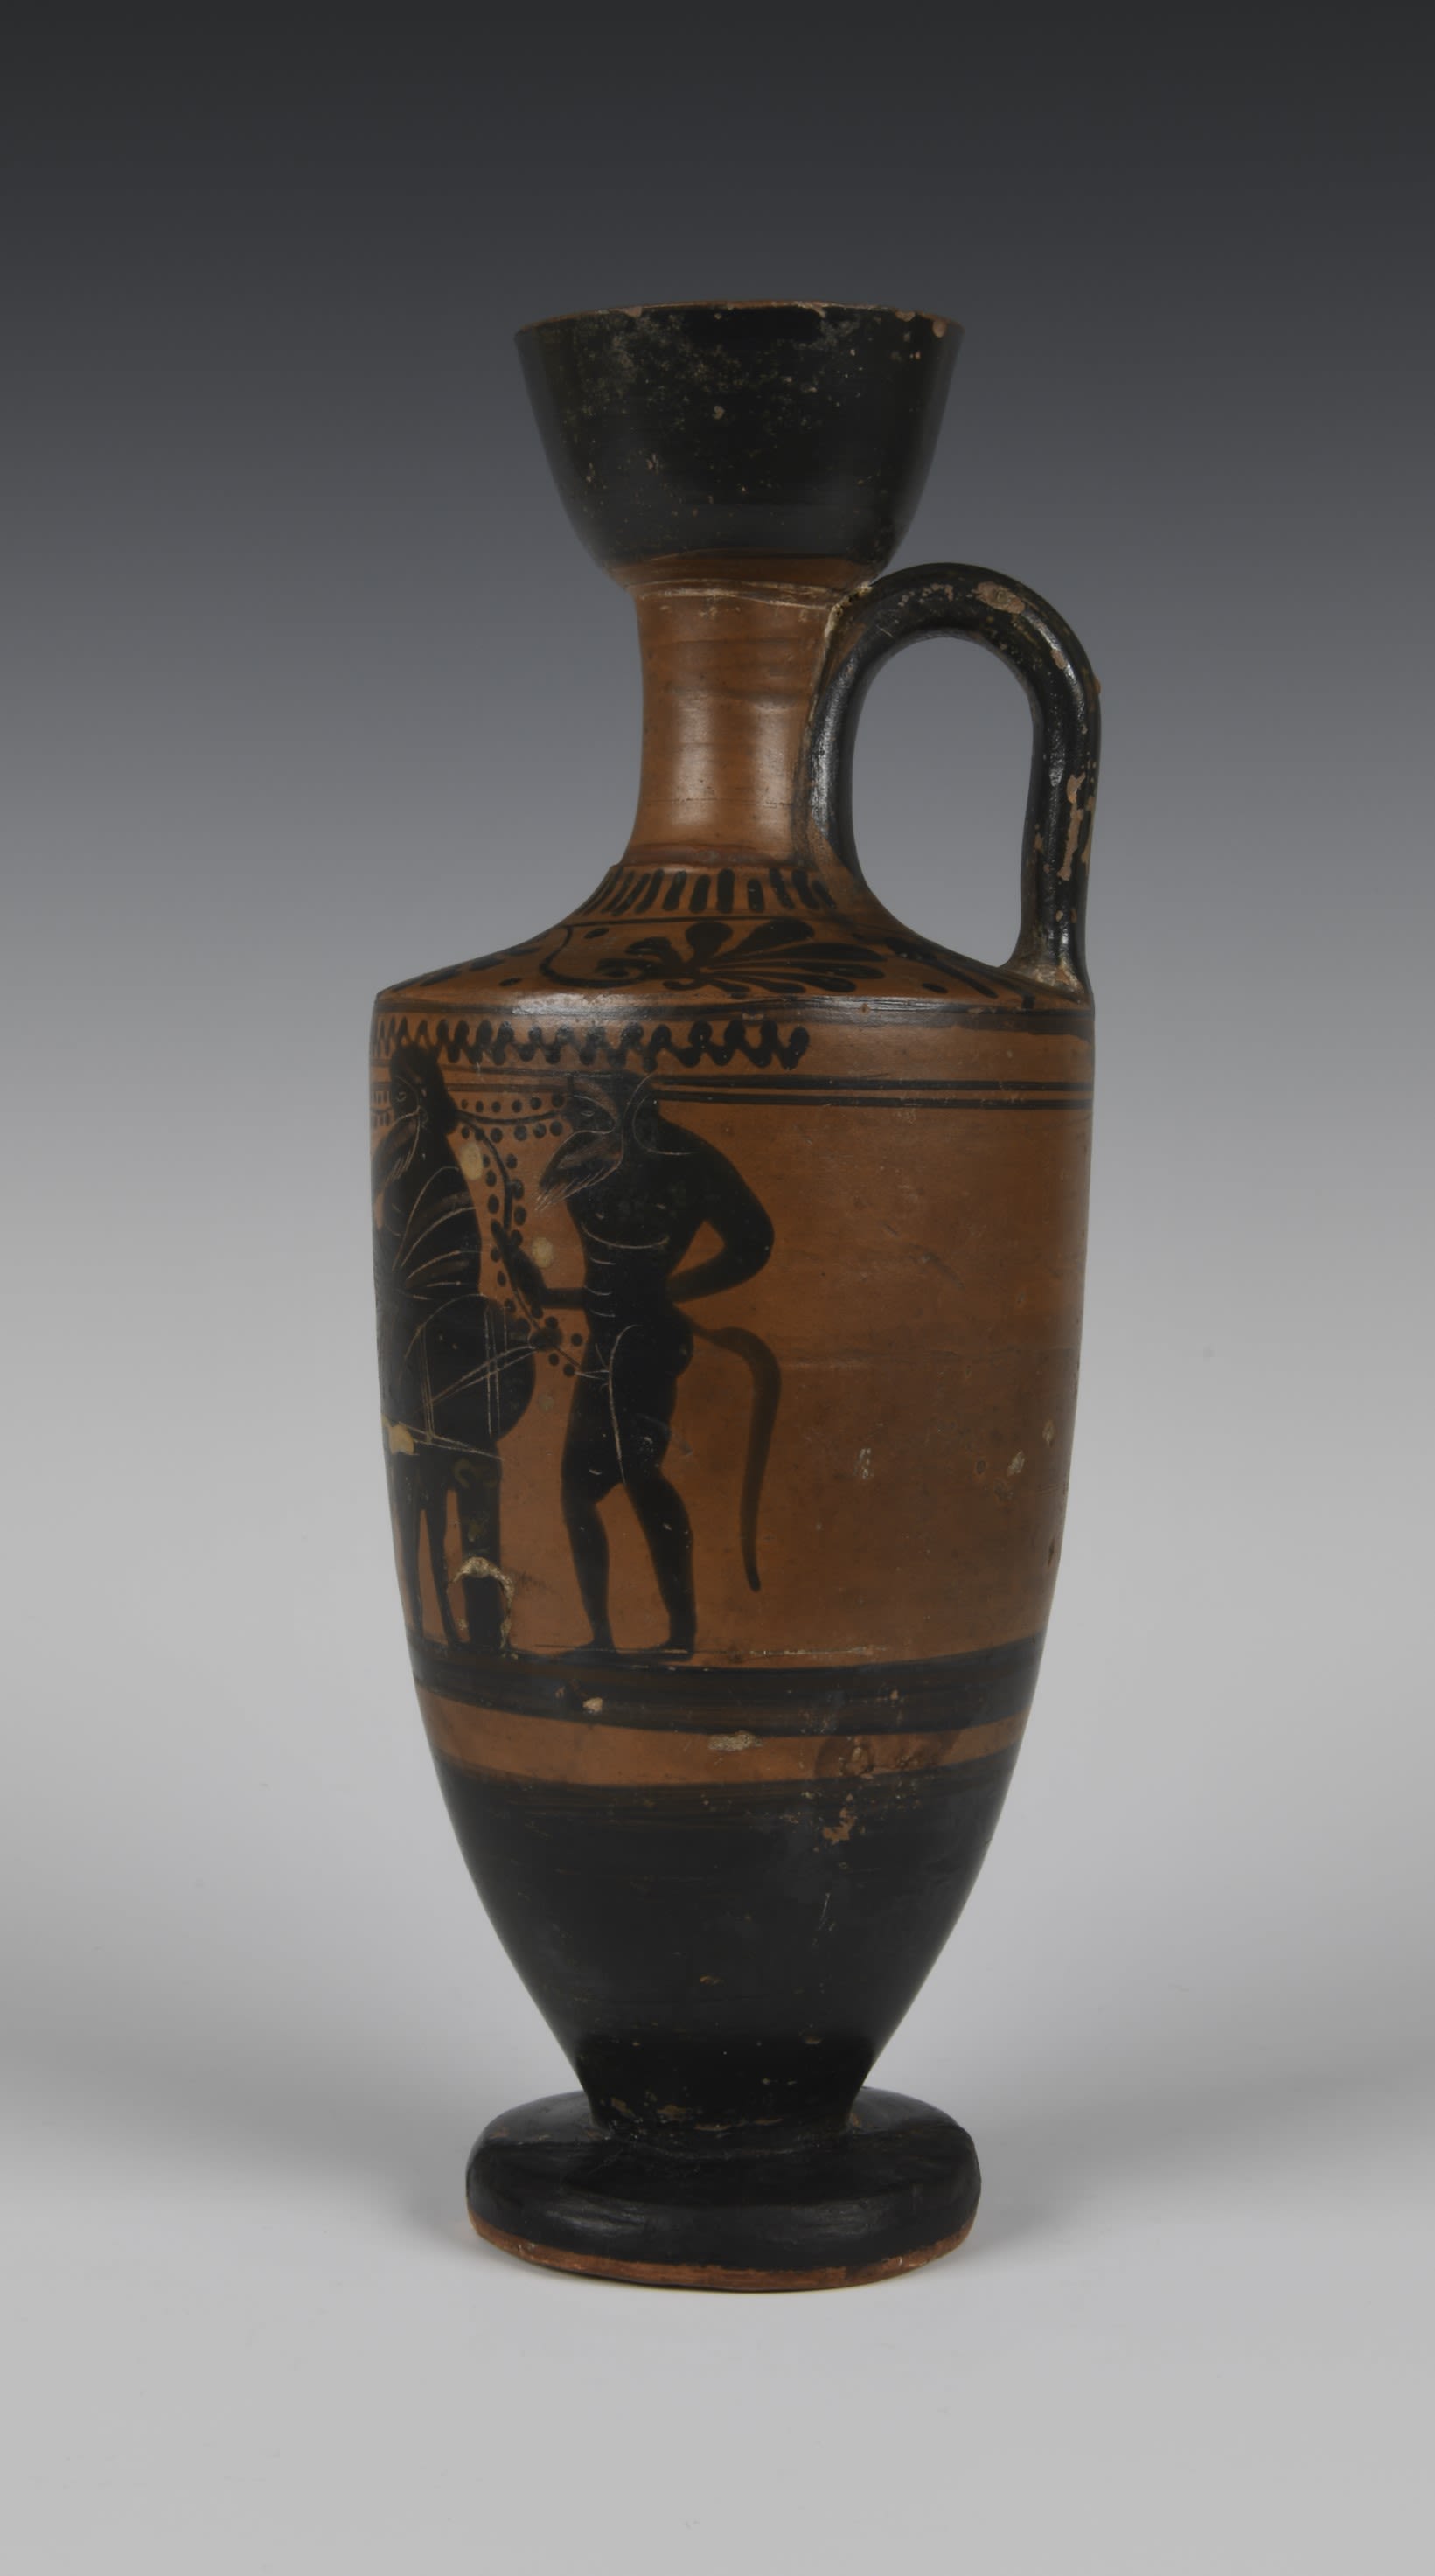
Lekythos with image of Dionysus | A lekythos is a type of vessel used by the ancient Greeks to hold oil. They are associated with funerary rites and often decorated with painted scenes. The Greek god Dionysus, known as Bacchus to the Romans, is shown here reclining on a couch behind a table laden for a feast.
Lekythos with image of Dionysus | A lekythos is a type of vessel used by the ancient Greeks to hold oil. They are associated with funerary rites and often decorated with painted scenes. The Greek god Dionysus, known as Bacchus to the Romans, is shown here reclining on a couch behind a table laden for a feast.
Lekythos with image of Dionysus | Dionysus is flanked by a maenad on the left and a satyr on the right. He was the god of the grape harvest and wine, fruit, fertility, festivity and theatre and was popular throughout the Greco-Roman world.
Lekythos with image of Dionysus | Dionysus is flanked by a maenad on the left and a satyr on the right. He was the god of the grape harvest and wine, fruit, fertility, festivity and theatre and was popular throughout the Greco-Roman world.
Lekythos with image of Dionysus | Dionysus is one of the Greek deities whose image Marshall encountered during his excavations at Taxila. Around 500 BCE. Greece, ceramic. DURMA.1991.1.2
Lekythos with image of Dionysus | Dionysus is one of the Greek deities whose image Marshall encountered during his excavations at Taxila. Around 500 BCE. Greece, ceramic. DURMA.1991.1.2

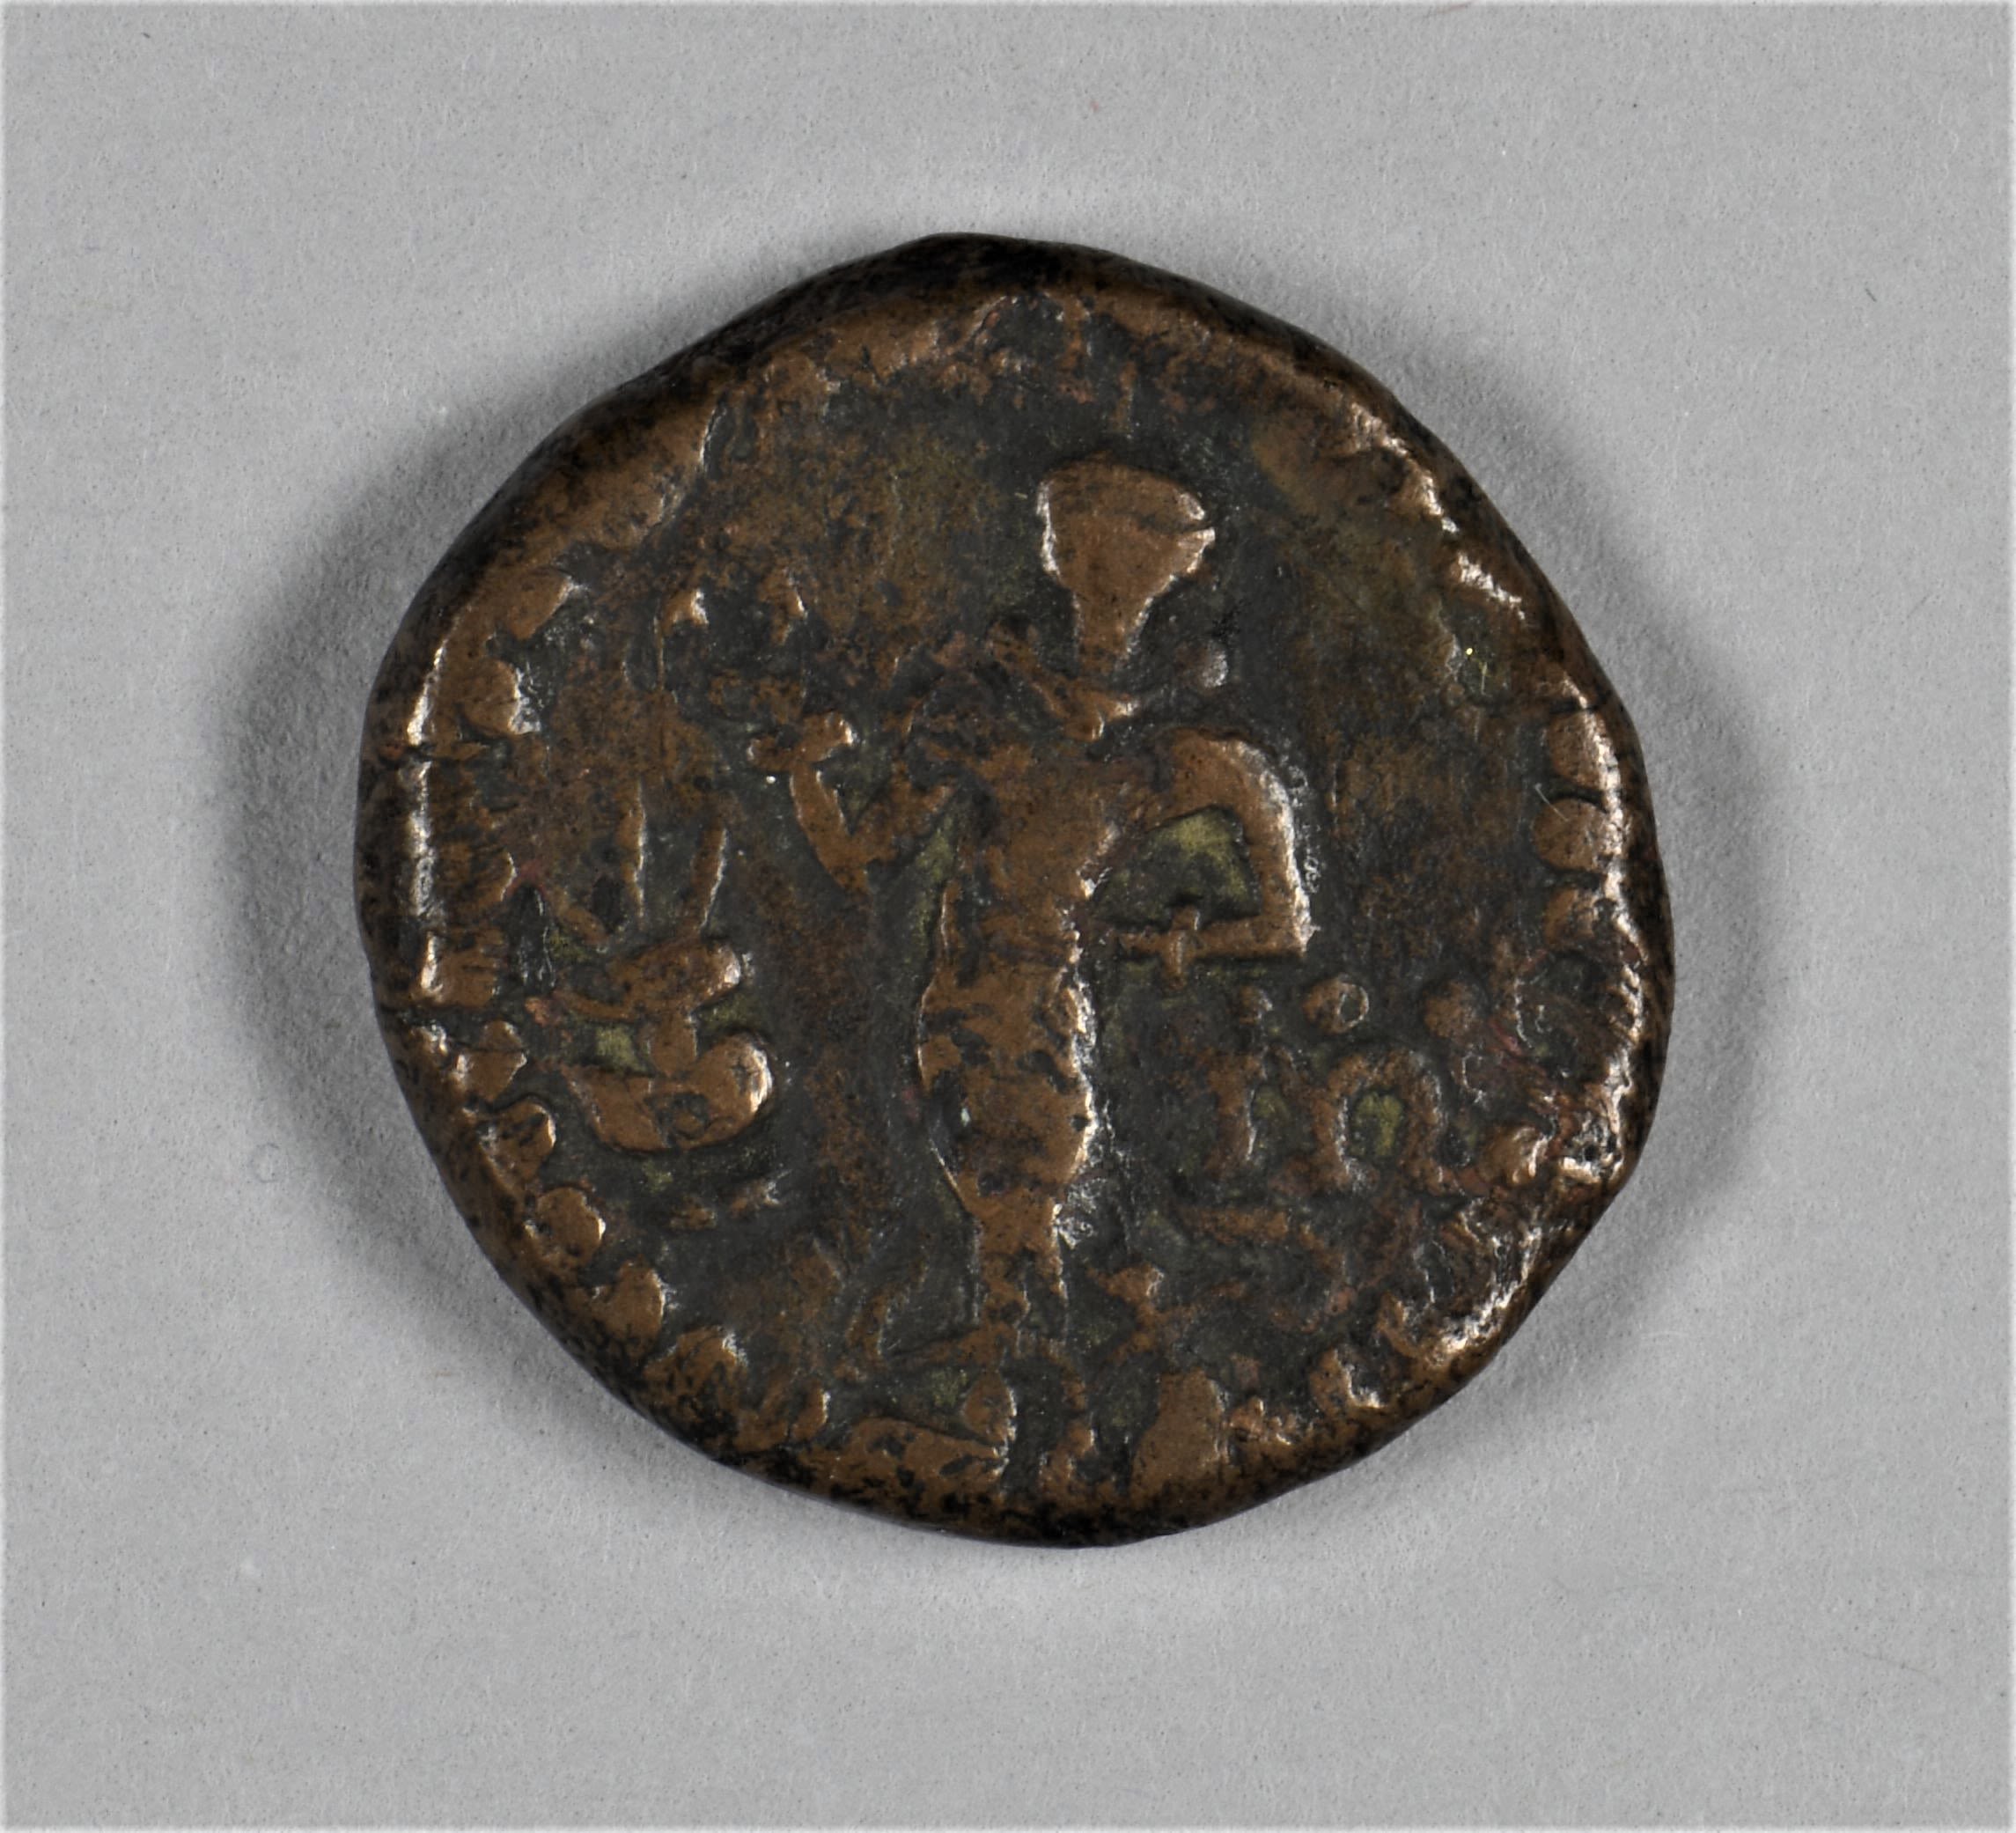
Coins | The coins struck and used in Taxila reflected the cosmopolitan nature of the city. During the first century BCE, Indo-Bactrian coins were produced that bore images of western Classical deities such as Athena and carried inscriptions written in both Greek and local Kharoshthi scripts. Cultural crossovers continued into the Kushan Period, and in the first century CE gold and copper coins of kings such as Vima Kadphises and Kanishka were struck bearing images of deities worshiped along the Silk Roads.
Coins | The coins struck and used in Taxila reflected the cosmopolitan nature of the city. During the first century BCE, Indo-Bactrian coins were produced that bore images of western Classical deities such as Athena and carried inscriptions written in both Greek and local Kharoshthi scripts. Cultural crossovers continued into the Kushan Period, and in the first century CE gold and copper coins of kings such as Vima Kadphises and Kanishka were struck bearing images of deities worshiped along the Silk Roads.
These included Greek gods such as Helios and Dionysus, as well as the Egyptian god Serapis. Buddhism was also represented on Kanishka’s coins, some of which bore images of the Gautama Buddha and the bodhisattva Maitreya. Kushan gods were often linked to the religions of neighbouring lands. Athsho, the Kushan god of fire and metals, was closely linked with Zoroastrian fire-worship, which had its origins in ancient Persia. The Kushan wind god Oesho is similarly associated with Vayu-Vata, the dual-natured Zoroastrian divinity of the wind and of the atmosphere, as well as with the Hindu deity Shiva.
These included Greek gods such as Helios and Dionysus, as well as the Egyptian god Serapis. Buddhism was also represented on Kanishka’s coins, some of which bore images of the Gautama Buddha and the bodhisattva Maitreya. Kushan gods were often linked to the religions of neighbouring lands. Athsho, the Kushan god of fire and metals, was closely linked with Zoroastrian fire-worship, which had its origins in ancient Persia. The Kushan wind god Oesho is similarly associated with Vayu-Vata, the dual-natured Zoroastrian divinity of the wind and of the atmosphere, as well as with the Hindu deity Shiva.

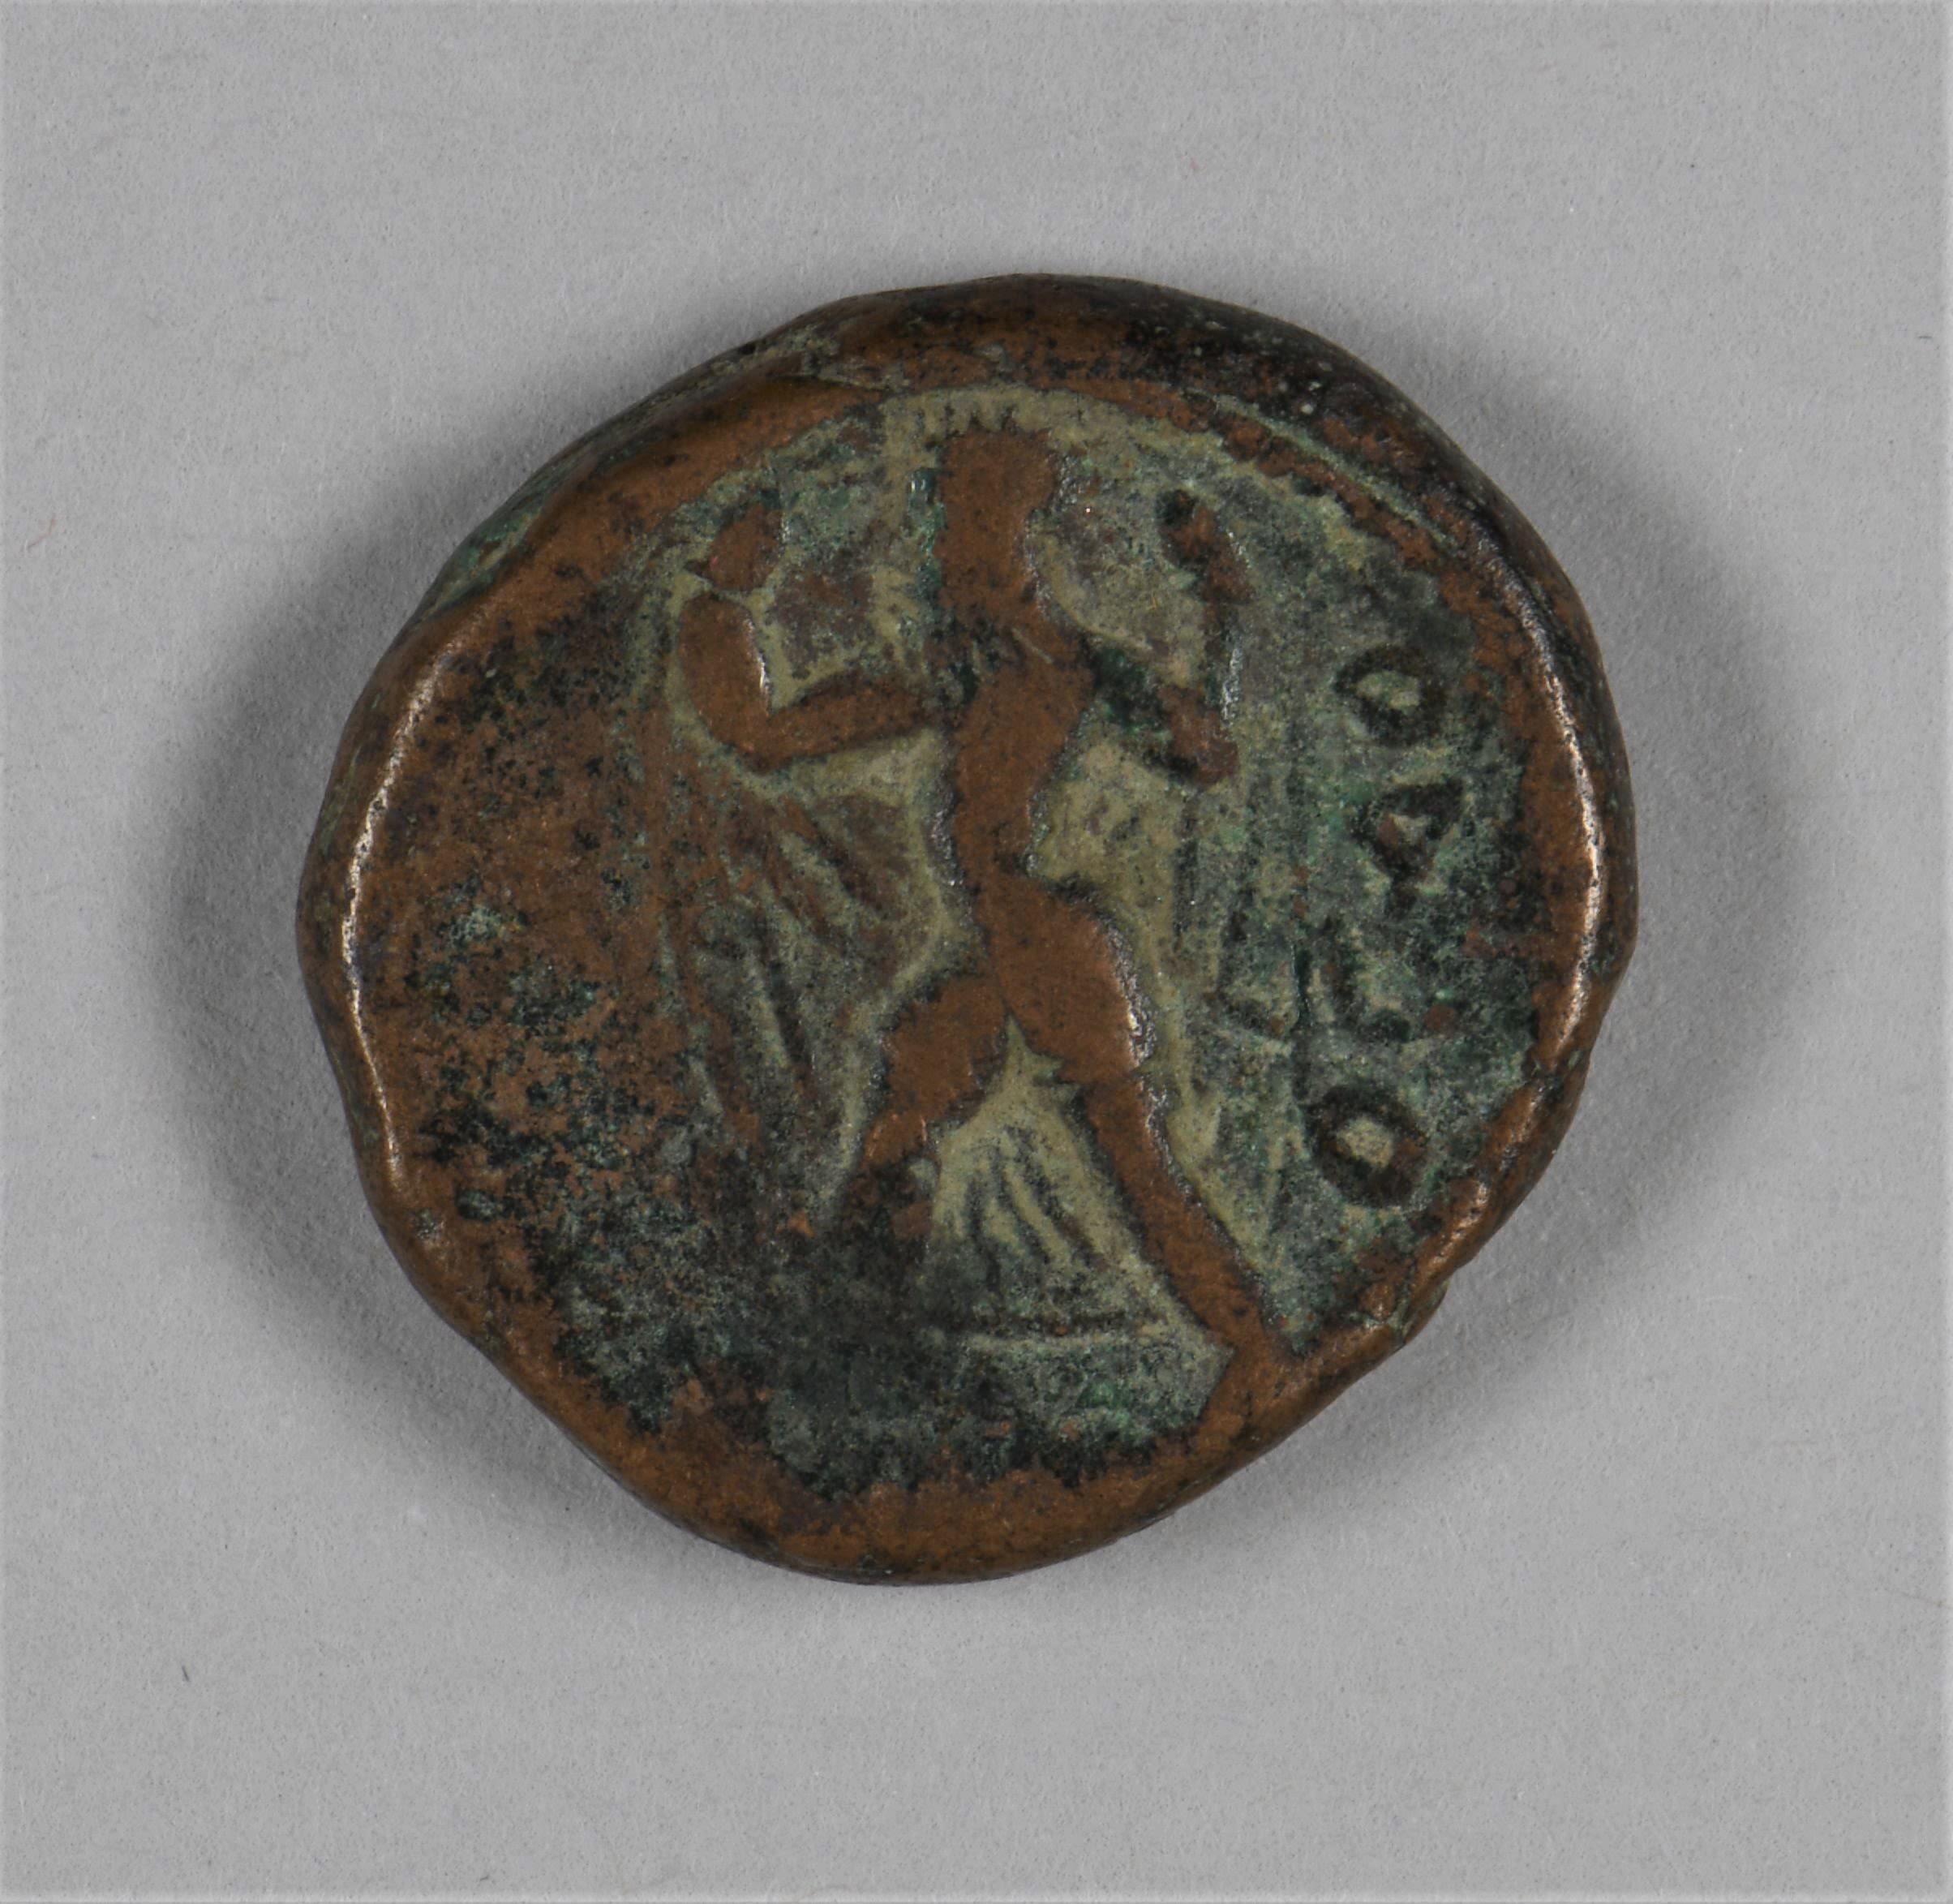
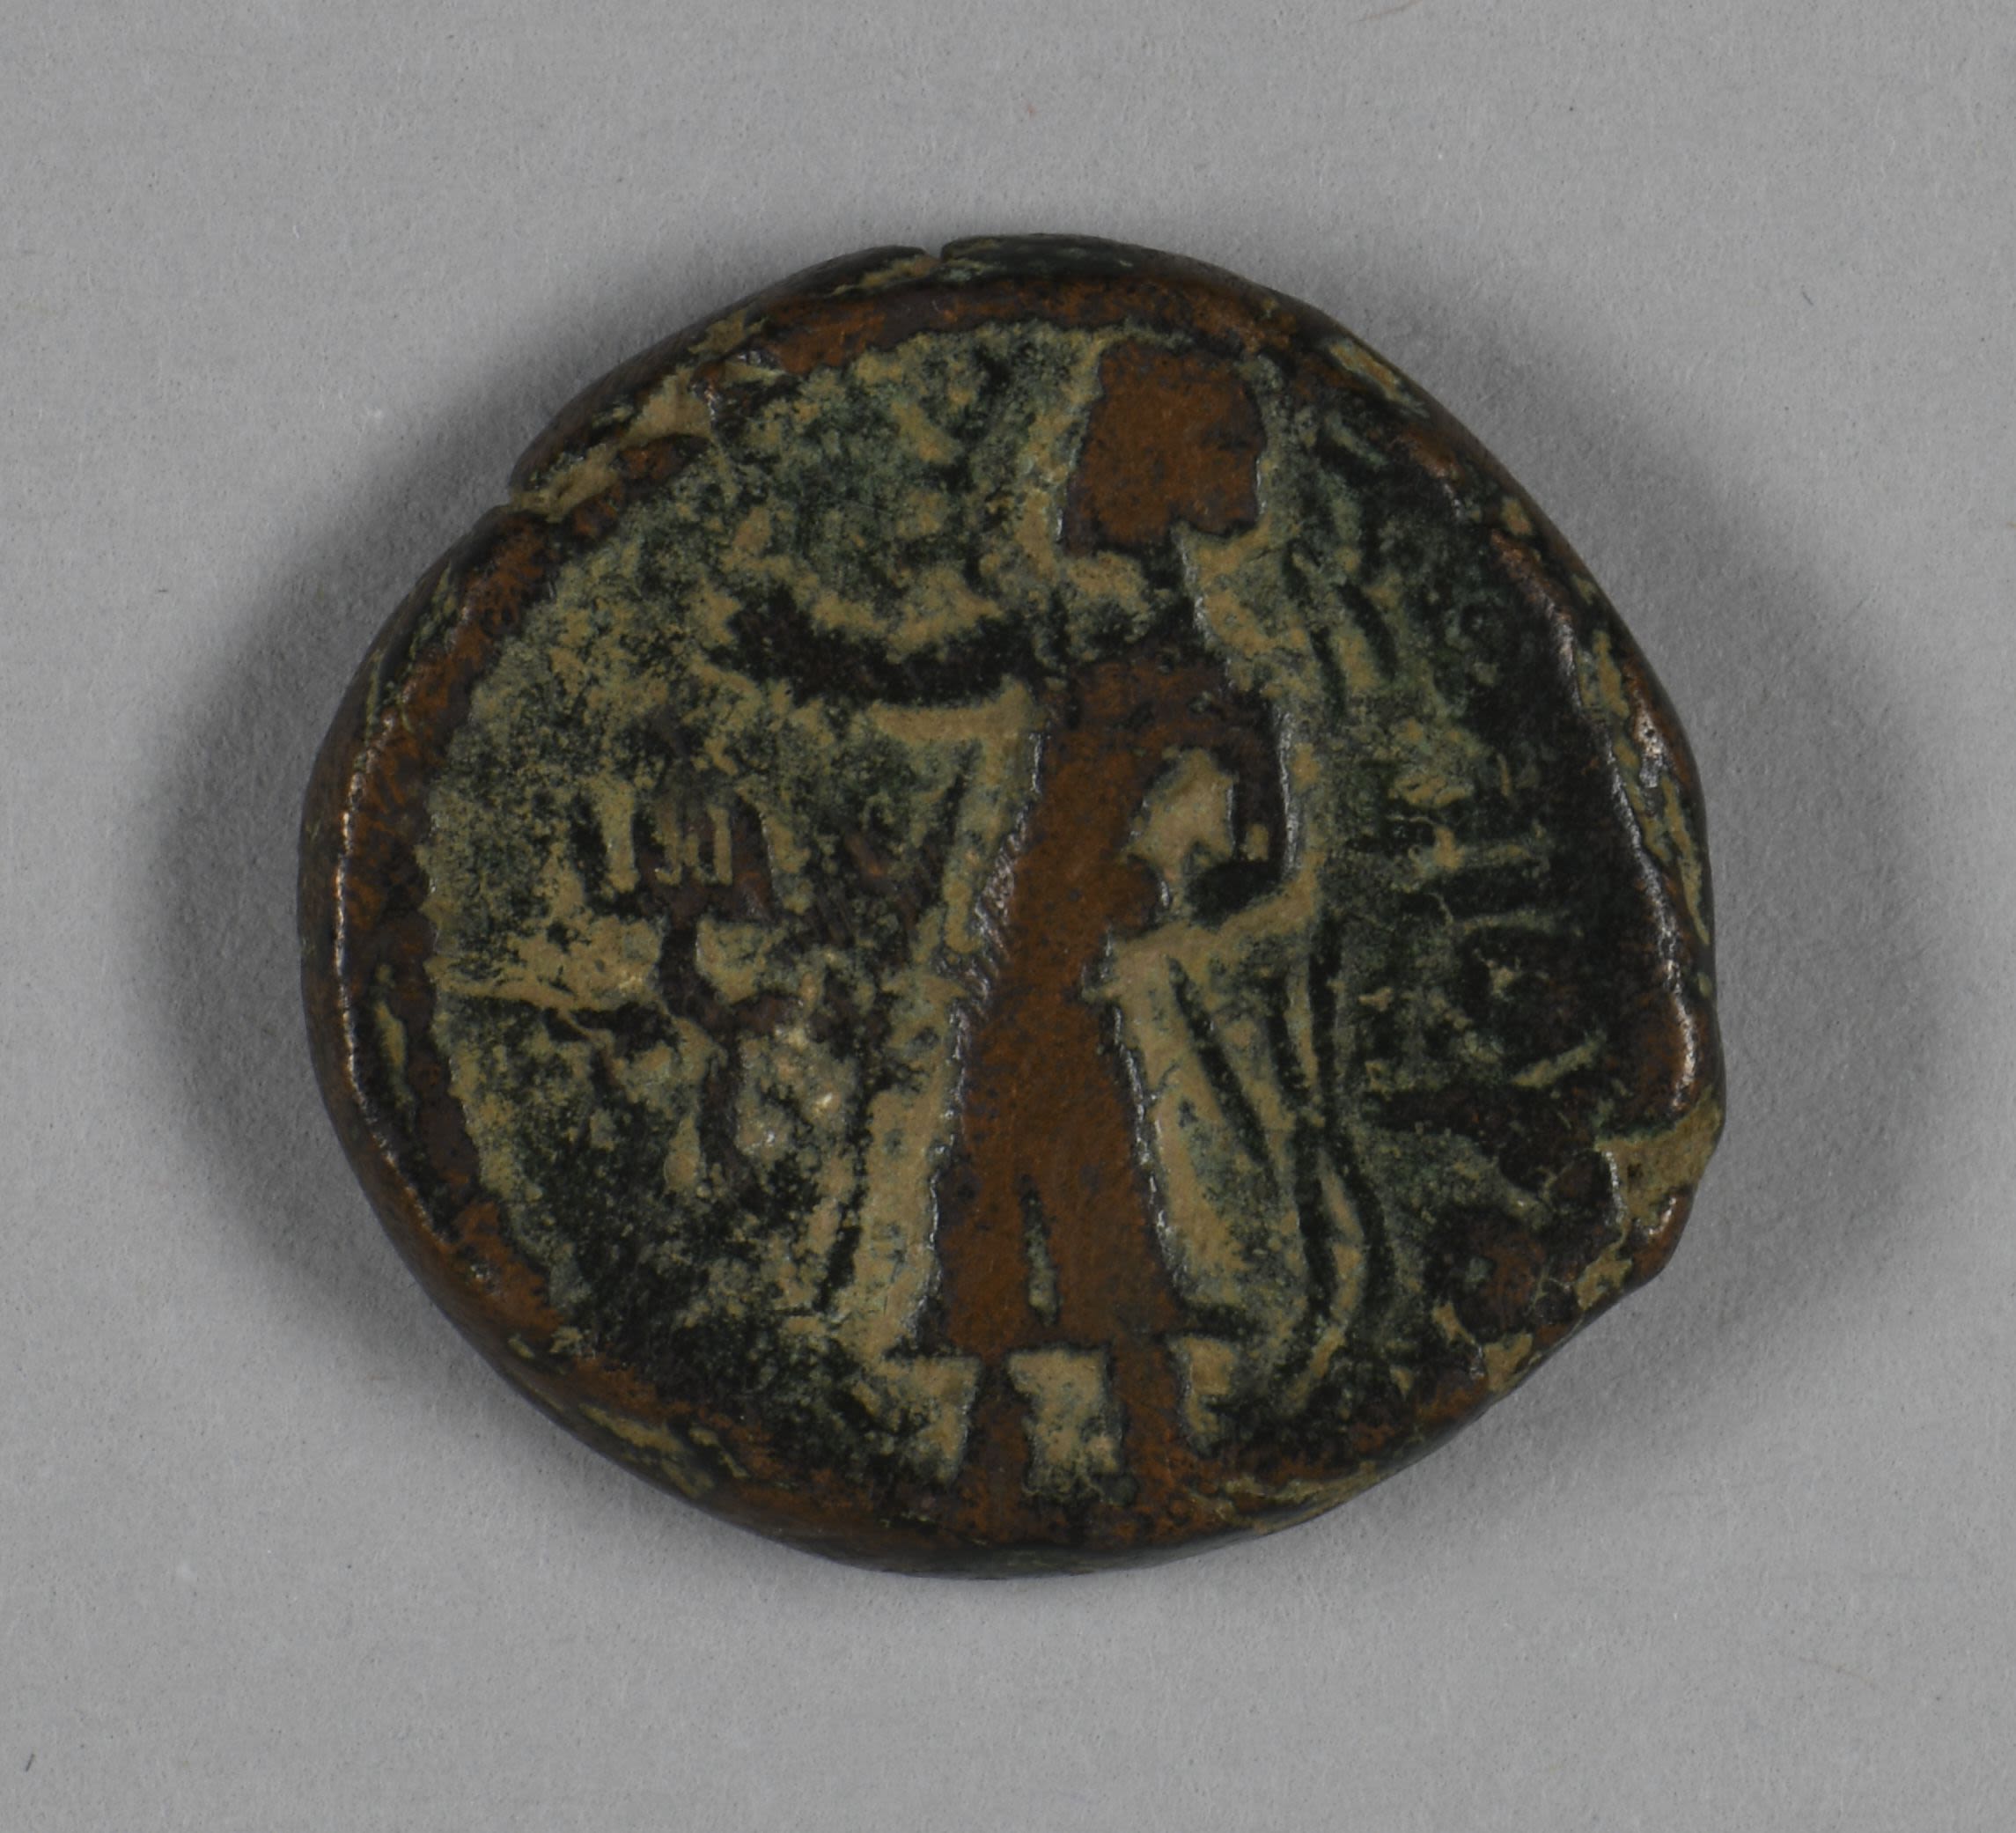
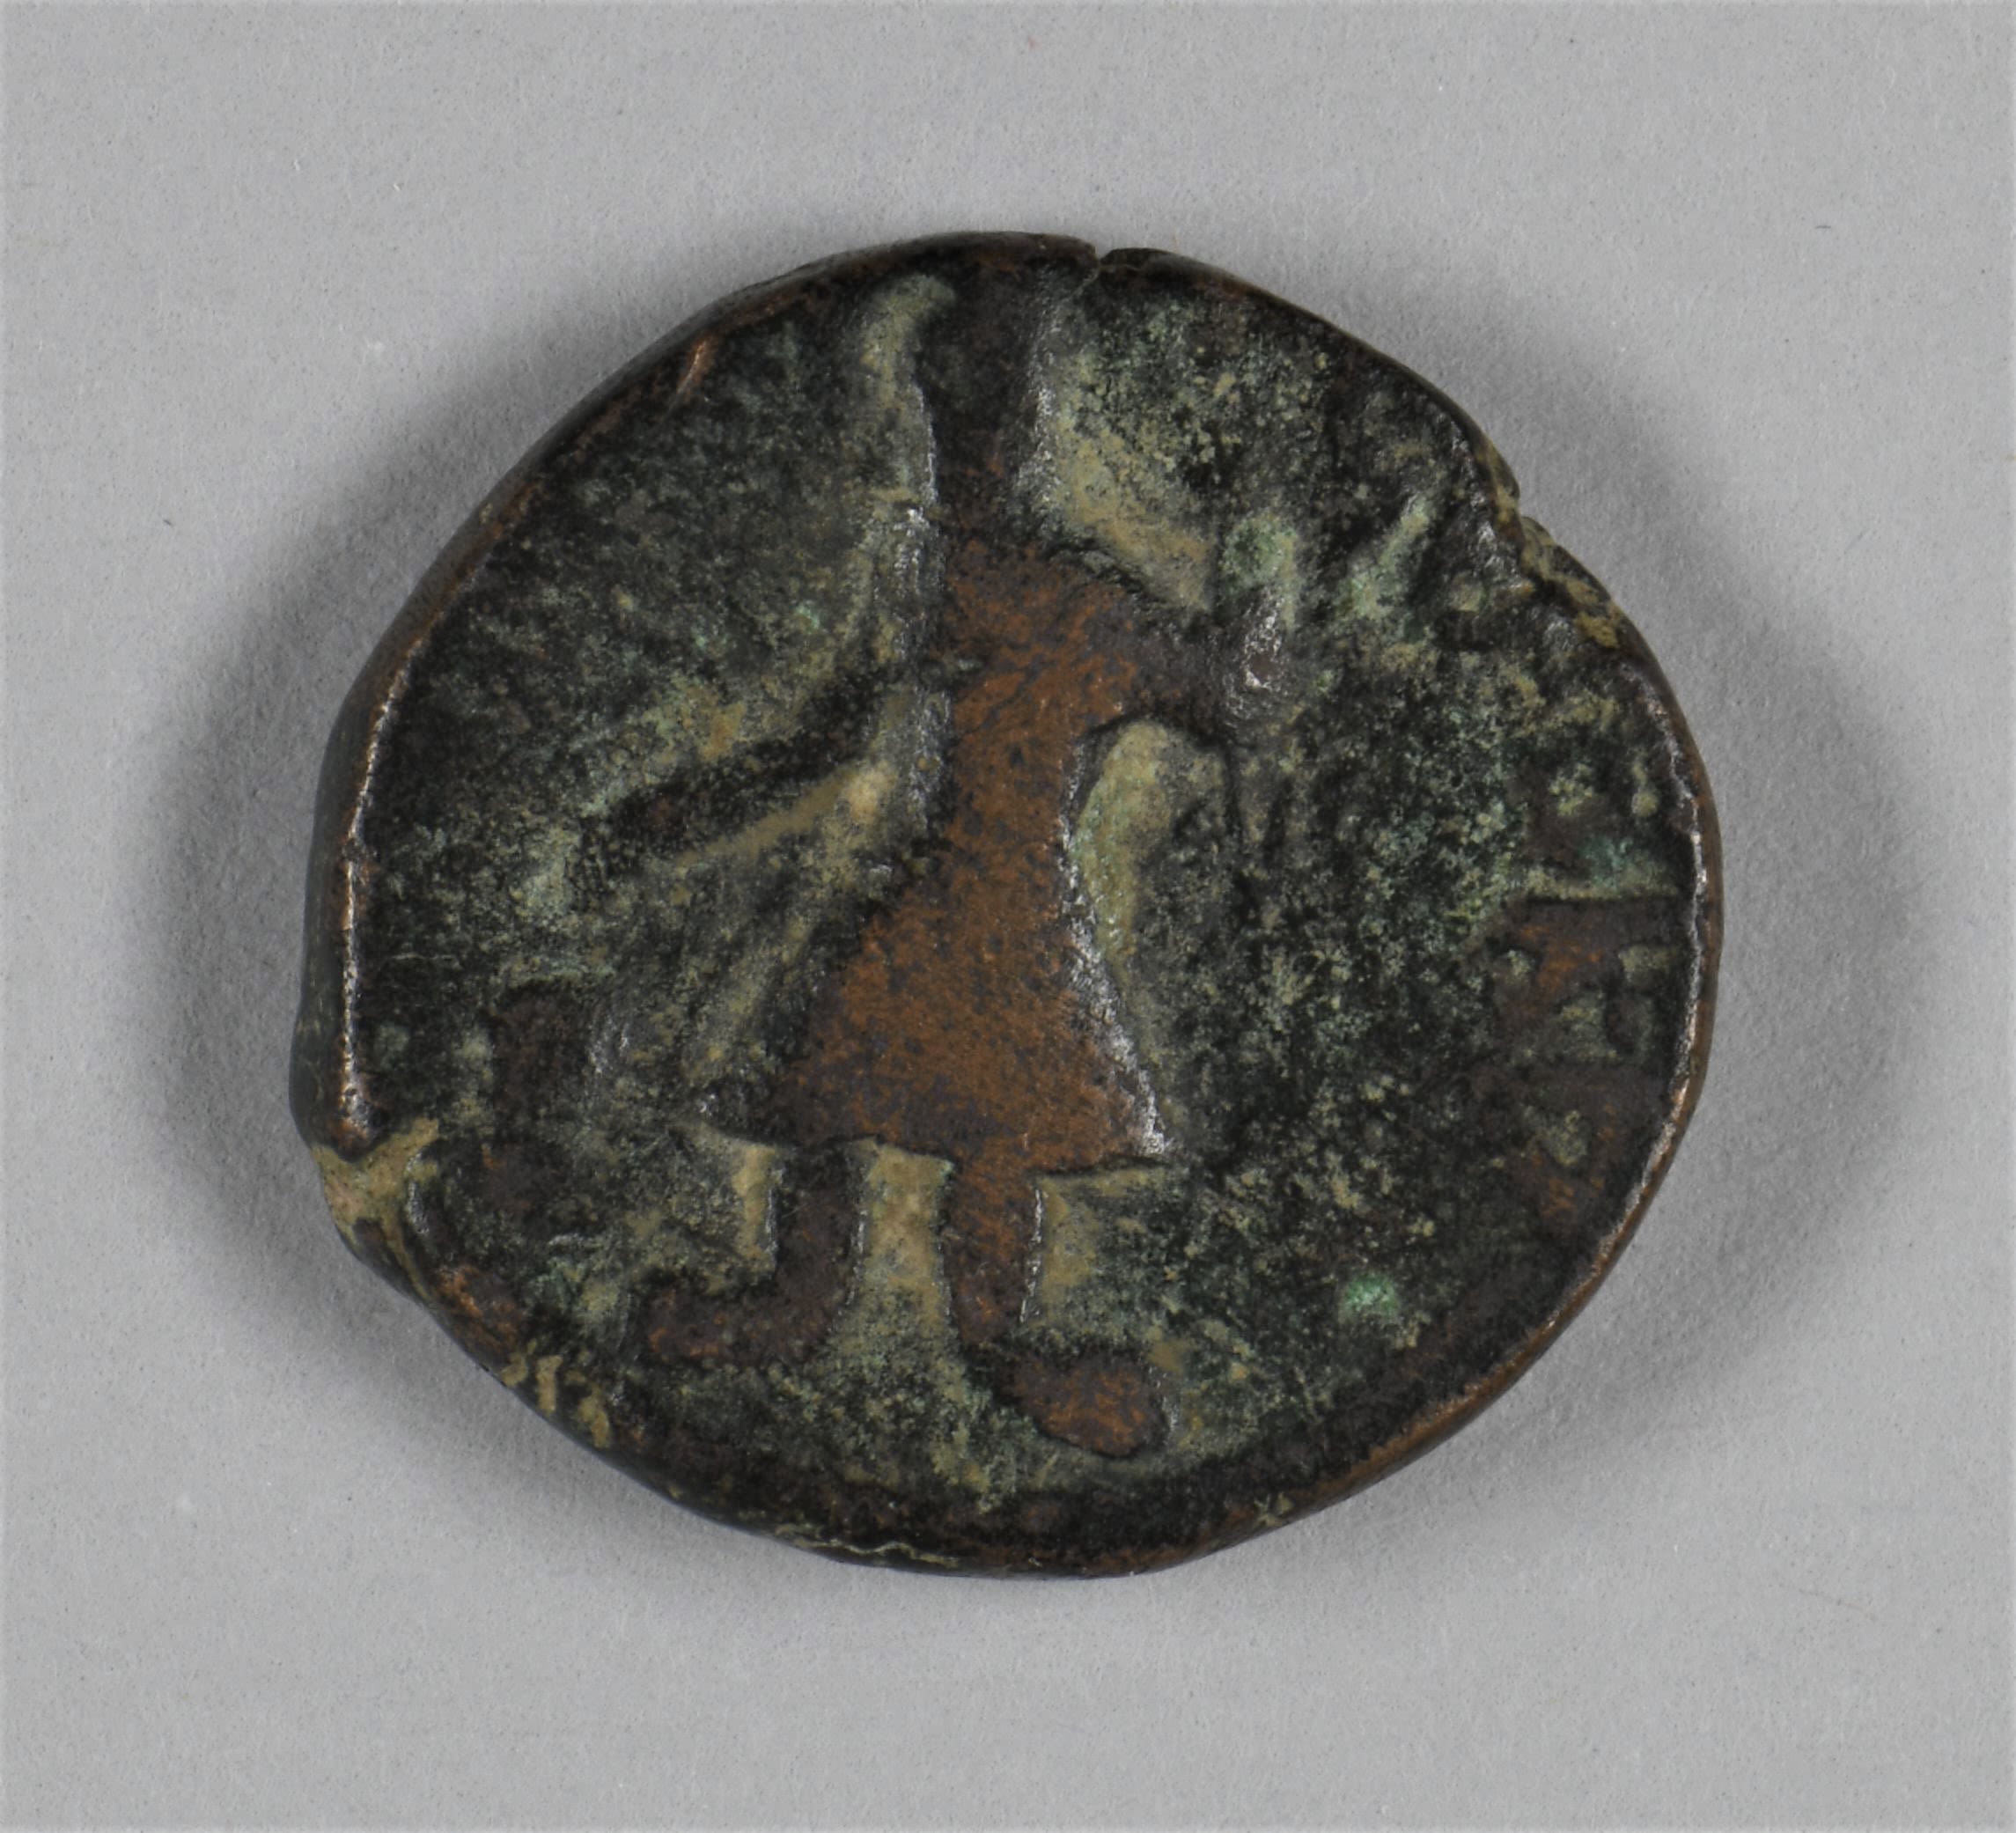
Kushan coins of Kanishka | The first four images in this gallery show two coins decorated on one side with a standing figure of the Kushan ruler Kanishka, who is described as Shah (Shao) rather than king.
Kushan coins of Kanishka | The first four images in this gallery show two coins decorated on one side with a standing figure of the Kushan ruler Kanishka, who is described as Shah (Shao) rather than king.
On the other side of each coin appears a representation of the wind god Oado. About 127-150 CE. Kushan, Bronze. DUROM. Scott 1971.1b.51.2; DUROM. Scott 1971.1b.61
On the other side of each coin appears a representation of the wind god Oado. About 127-150 CE. Kushan, Bronze. DUROM. Scott 1971.1b.51.2; DUROM. Scott 1971.1b.61

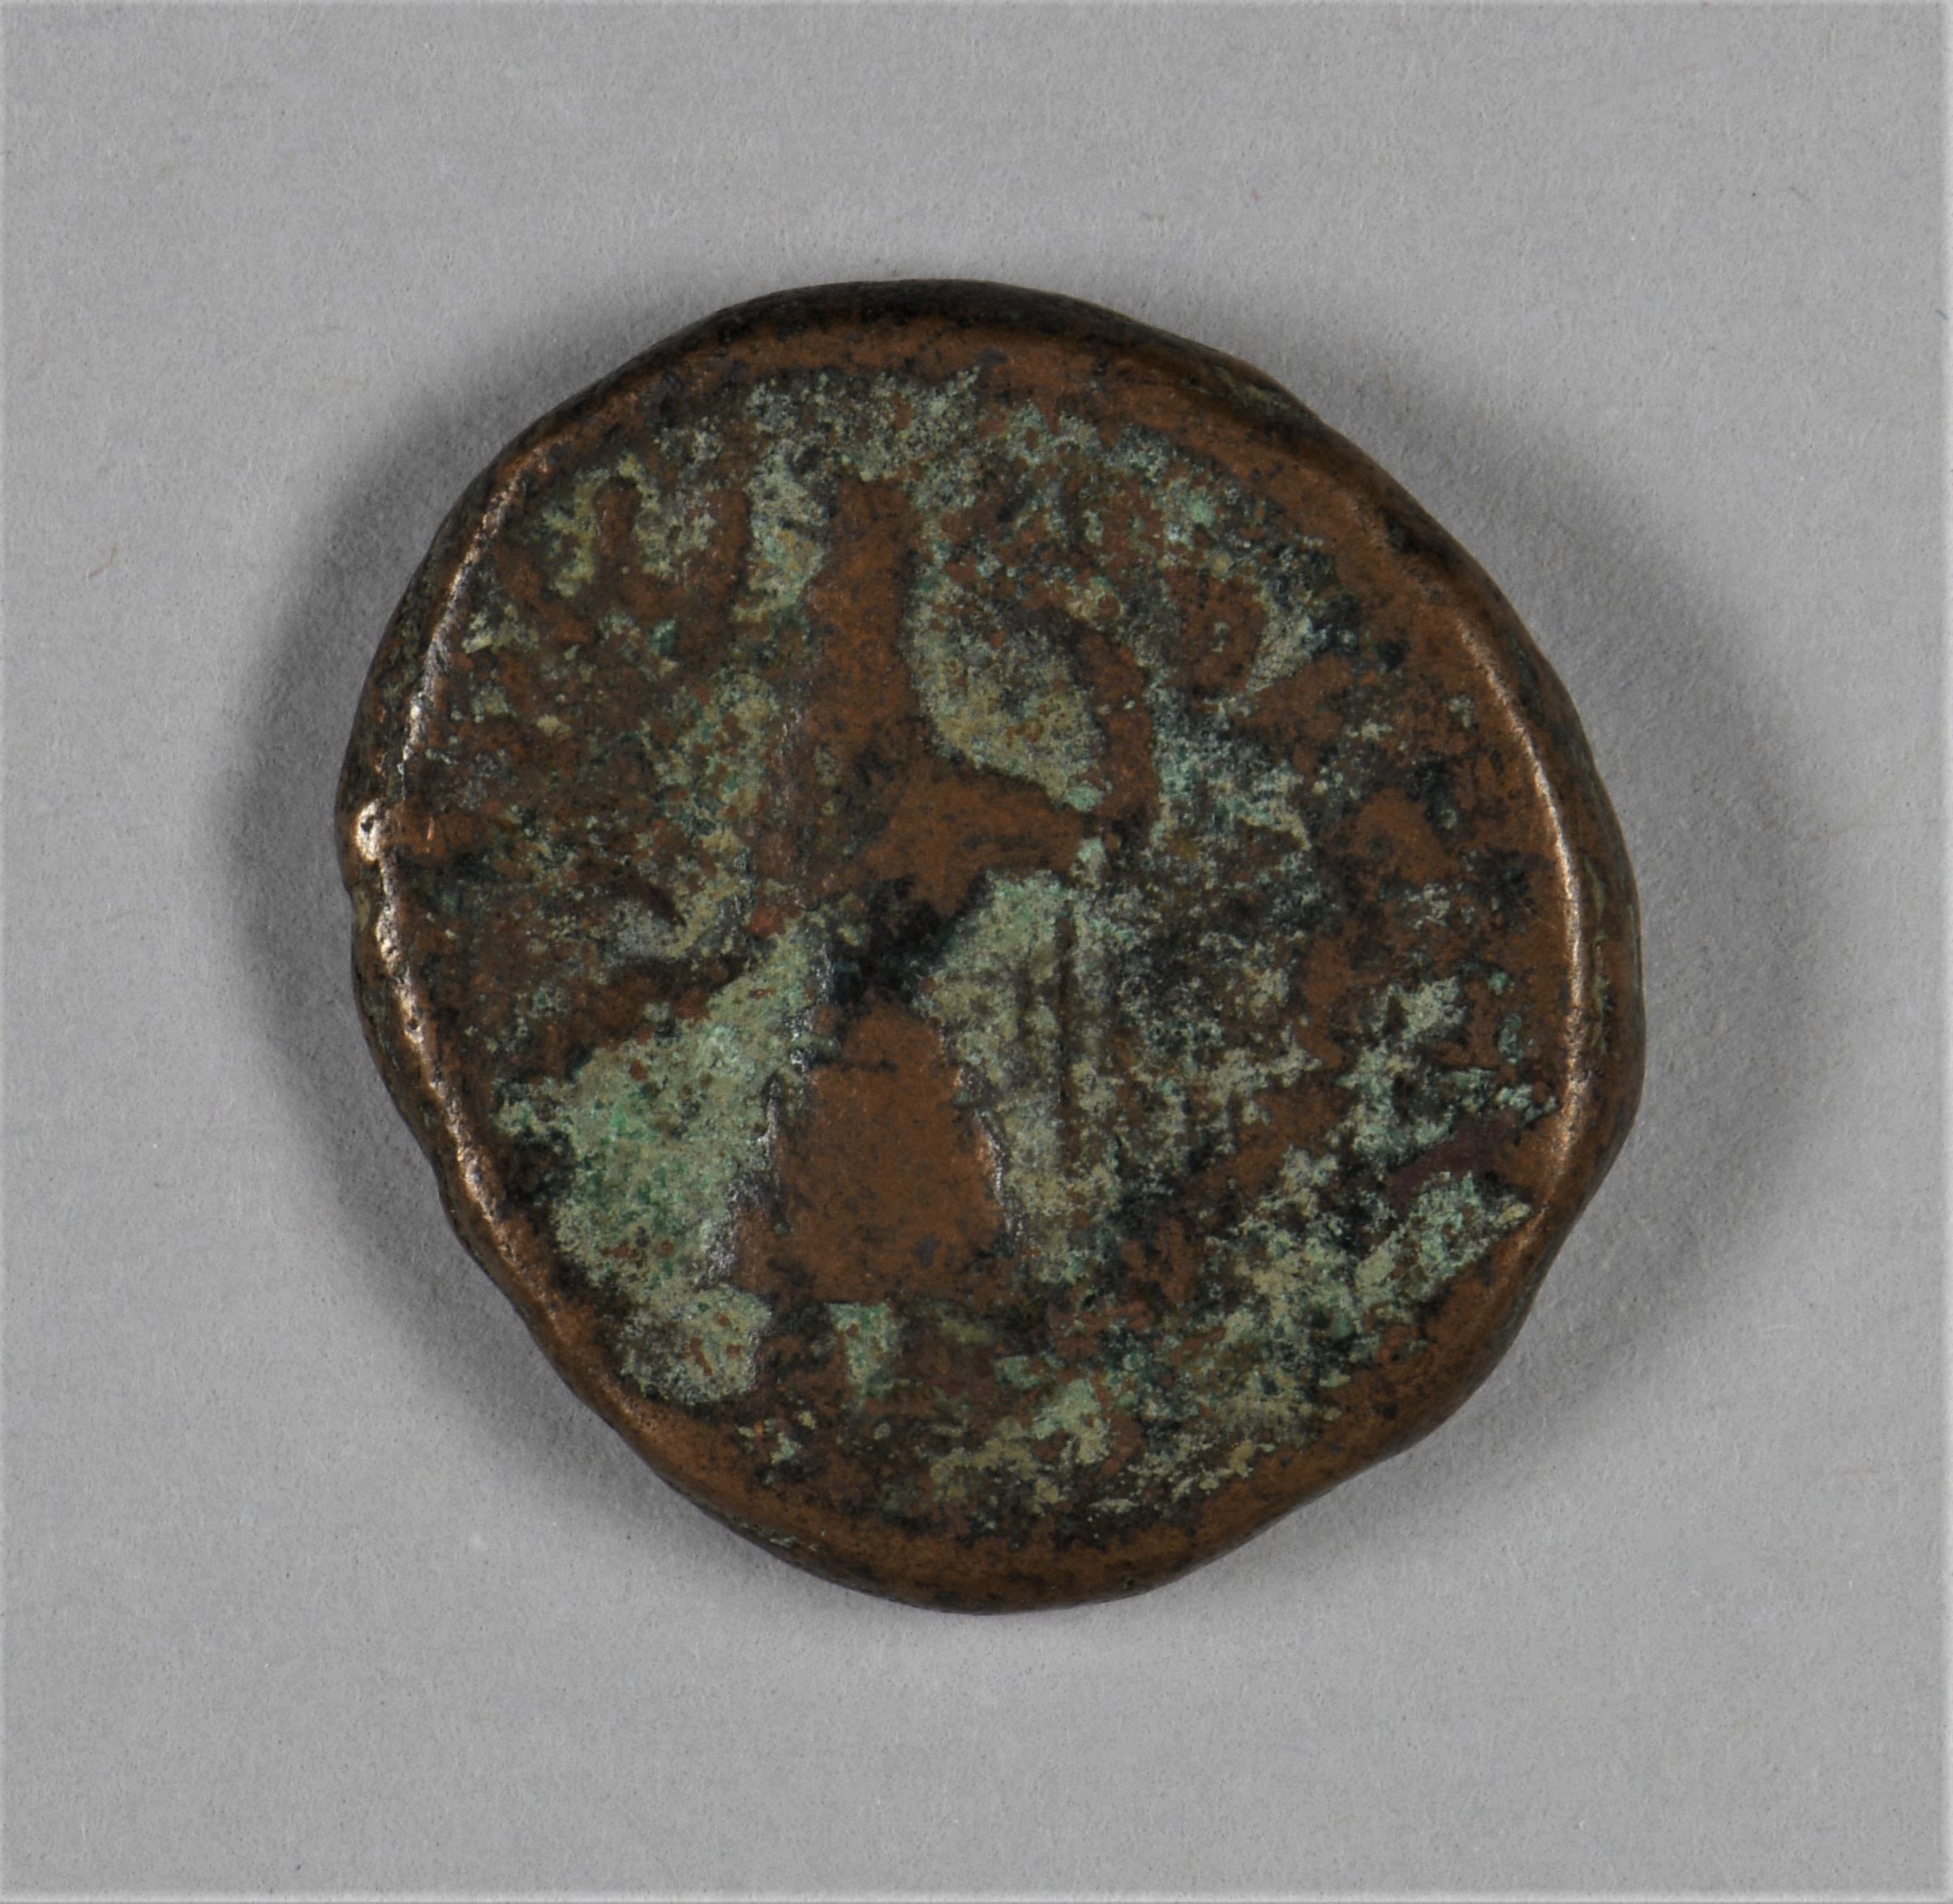
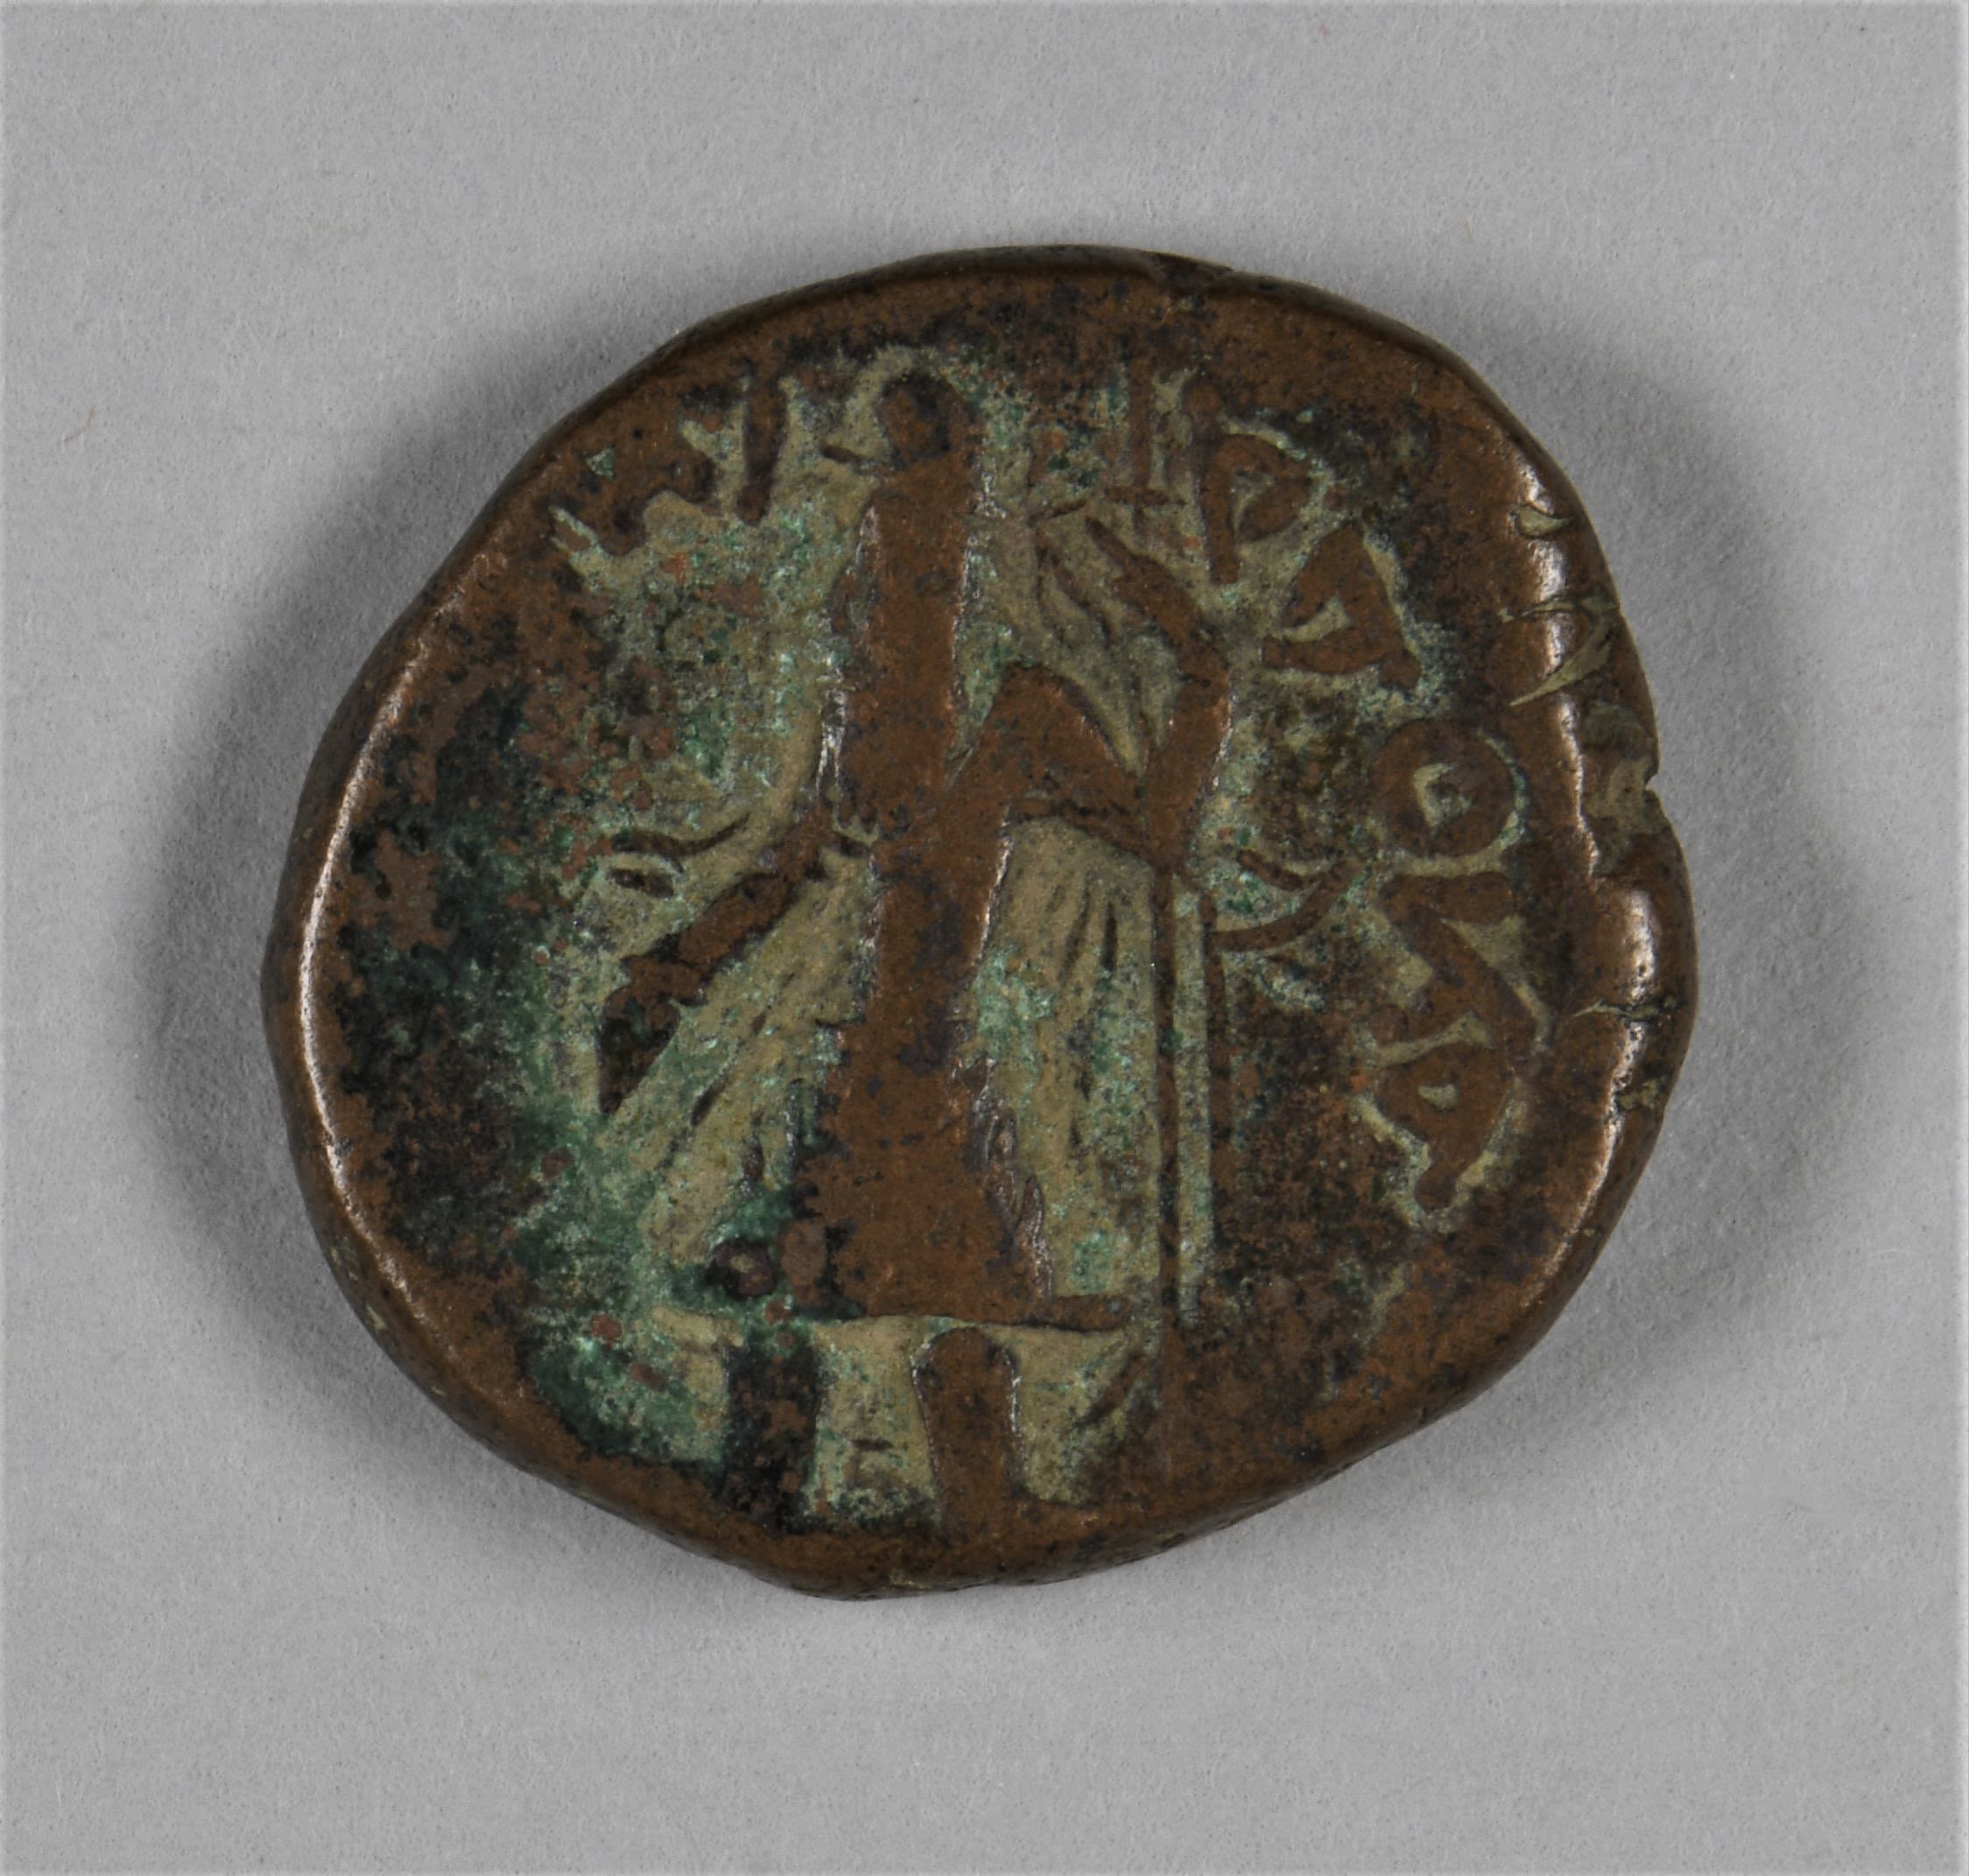
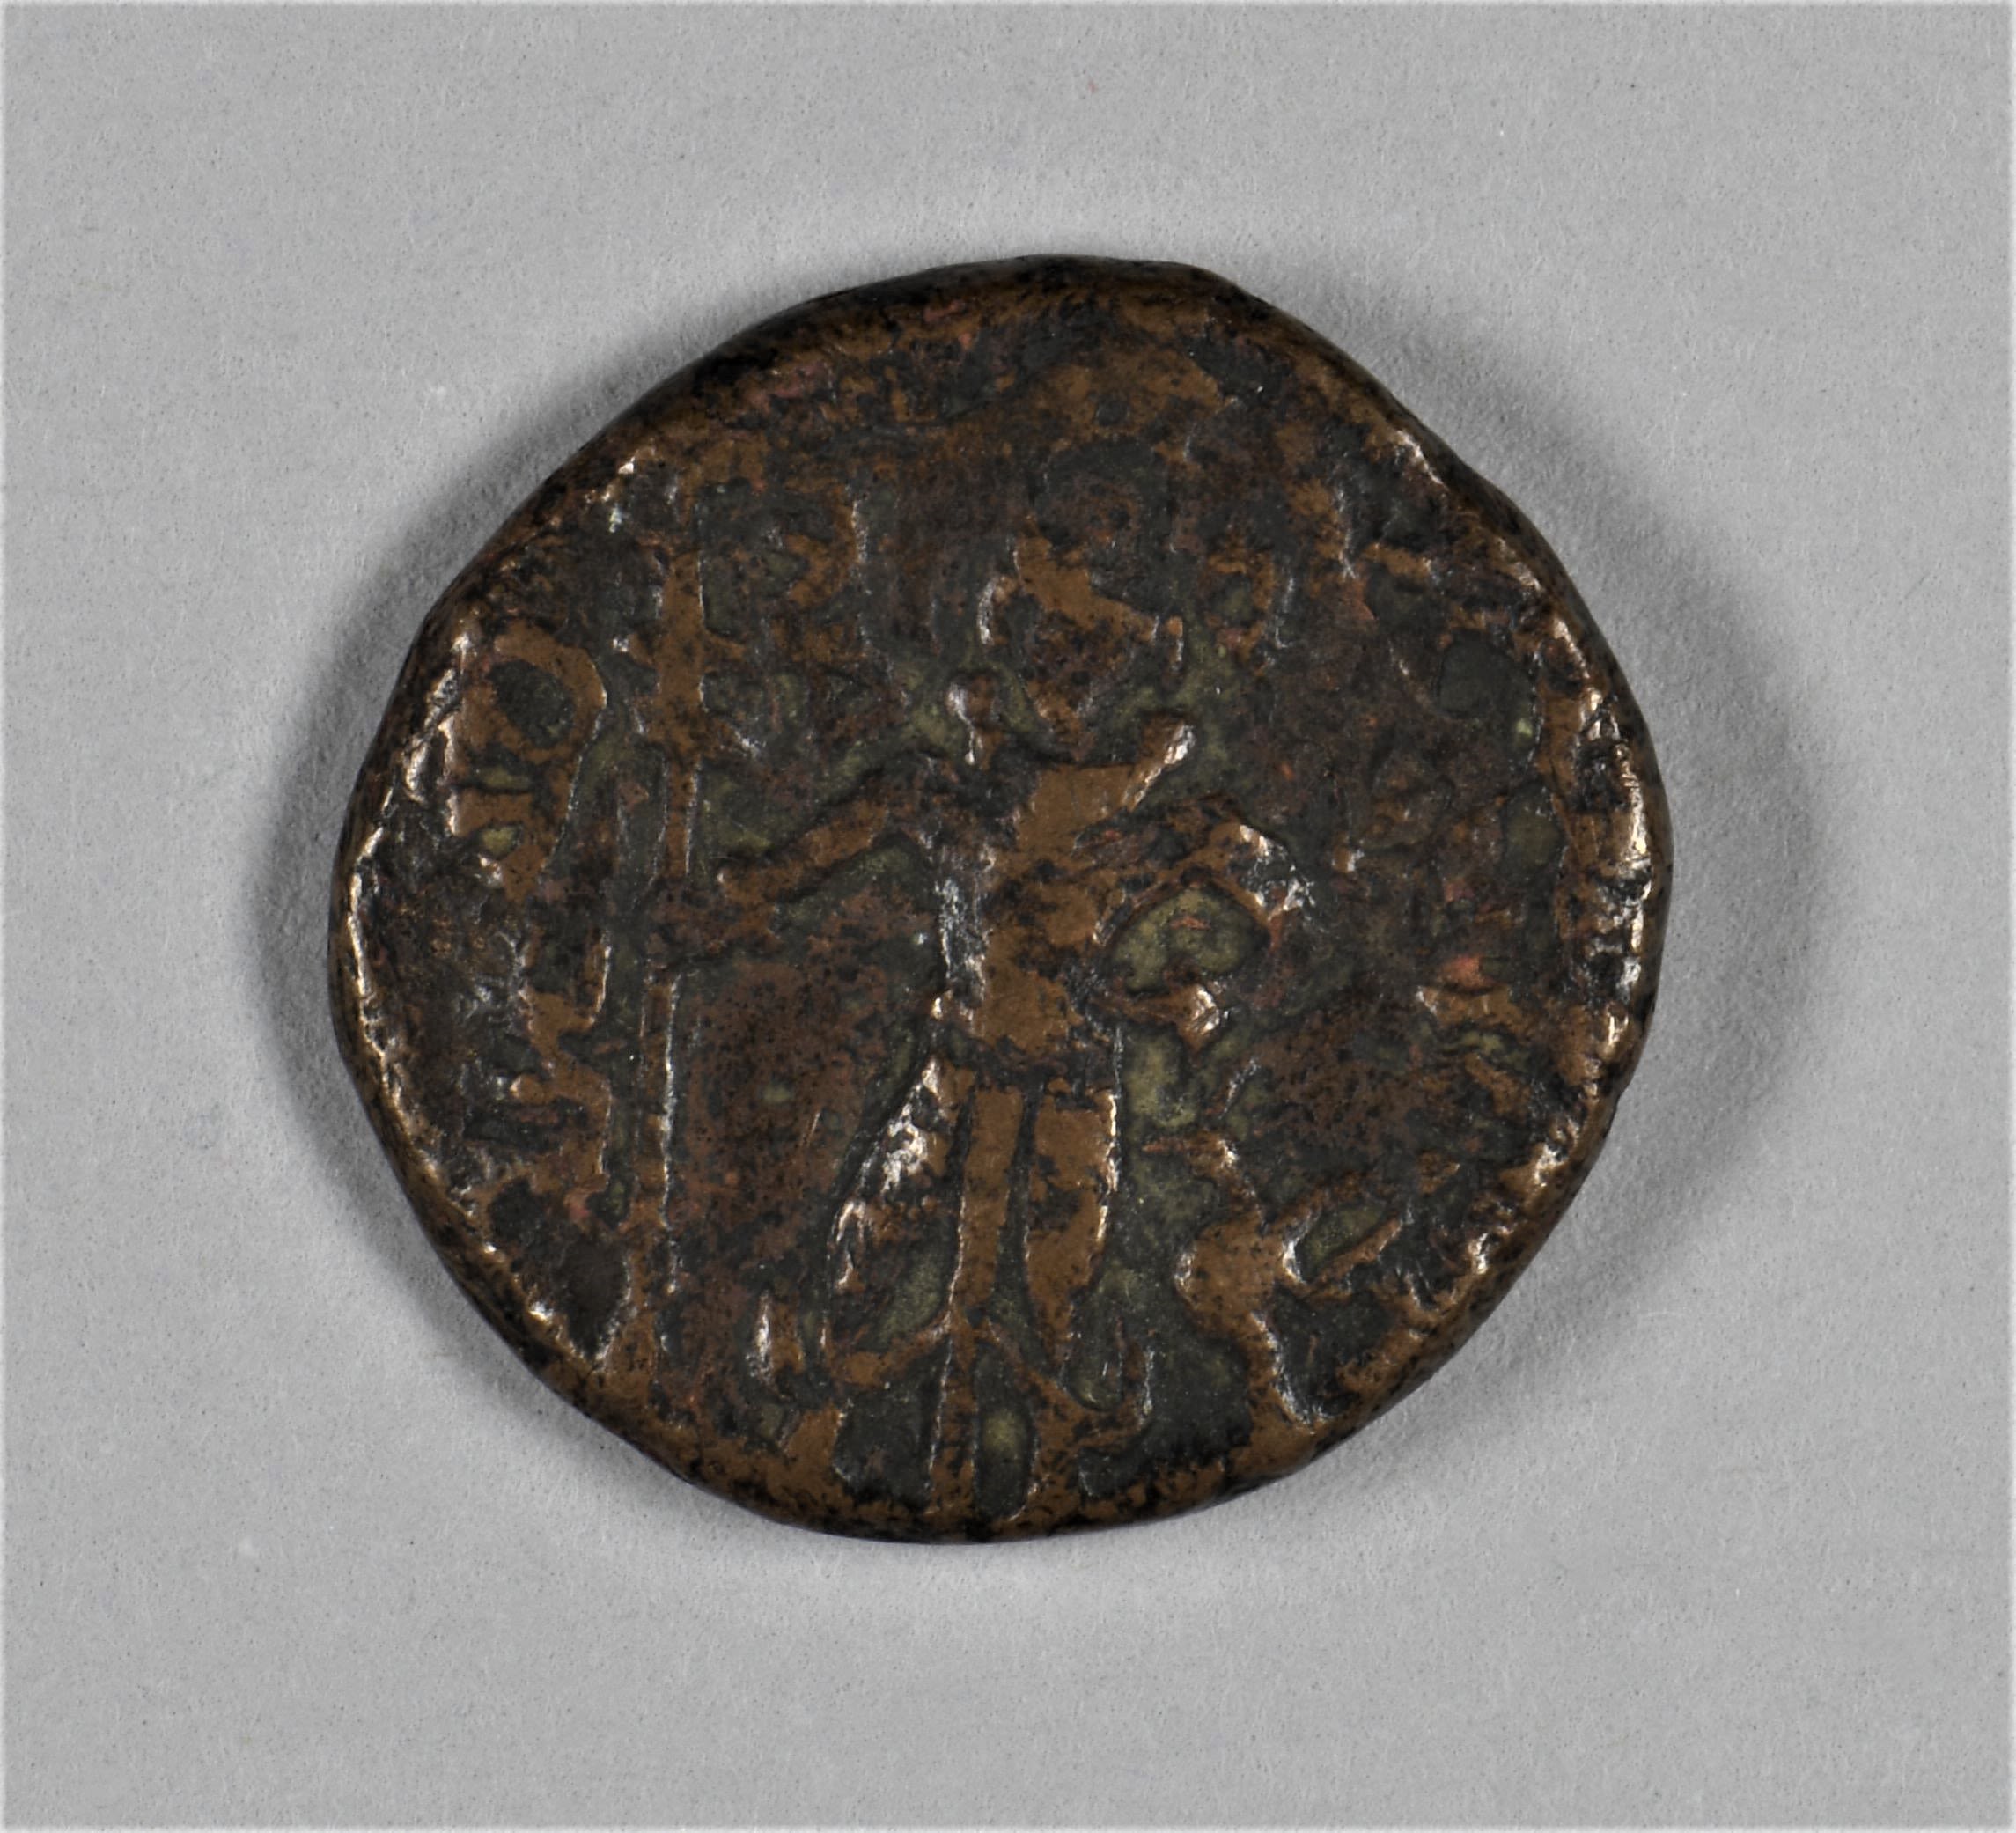
Kushan coins of Kanishka | As well as a highly stylised image of Kanishka, the next four images show two coins which bear a portrait of Athsho, the Kushan god of fire and metals. Athsho is portrayed with fire tongs held in his hand. The god can be linked with the Zoroastrian ‘Atar’ and the Persian ‘Atash’, or holy fire. About 127-150 CE. Kushan, Bronze. DUROM.Scott 1971.1b.51.1; DUROM.Scott 1971.1b.58
Kushan coins of Kanishka | As well as a highly stylised image of Kanishka, the next four images show two coins which bear a portrait of Athsho, the Kushan god of fire and metals. Athsho is portrayed with fire tongs held in his hand. The god can be linked with the Zoroastrian ‘Atar’ and the Persian ‘Atash’, or holy fire. About 127-150 CE. Kushan, Bronze. DUROM.Scott 1971.1b.51.1; DUROM.Scott 1971.1b.58
Kushan coins of Kanishka | About 127-150 CEKushan, Bronze. DUROM.Scott 1971.1b.51.1; DUROM.Scott 1971.1b.58
Kushan coins of Kanishka | About 127-150 CEKushan, Bronze. DUROM.Scott 1971.1b.51.1; DUROM.Scott 1971.1b.58

Kushan coins of Kanishka | About 127-150 CEKushan, Bronze. DUROM.Scott 1971.1b.51.1; DUROM.Scott 1971.1b.58
Kushan coins of Kanishka | About 127-150 CEKushan, Bronze. DUROM.Scott 1971.1b.51.1; DUROM.Scott 1971.1b.58
Kushan coins of Kanishka | About 127-150 CEKushan, Bronze. DUROM.Scott 1971.1b.51.1; DUROM.Scott 1971.1b.58
Kushan coins of Kanishka | About 127-150 CEKushan, Bronze. DUROM.Scott 1971.1b.51.1; DUROM.Scott 1971.1b.58
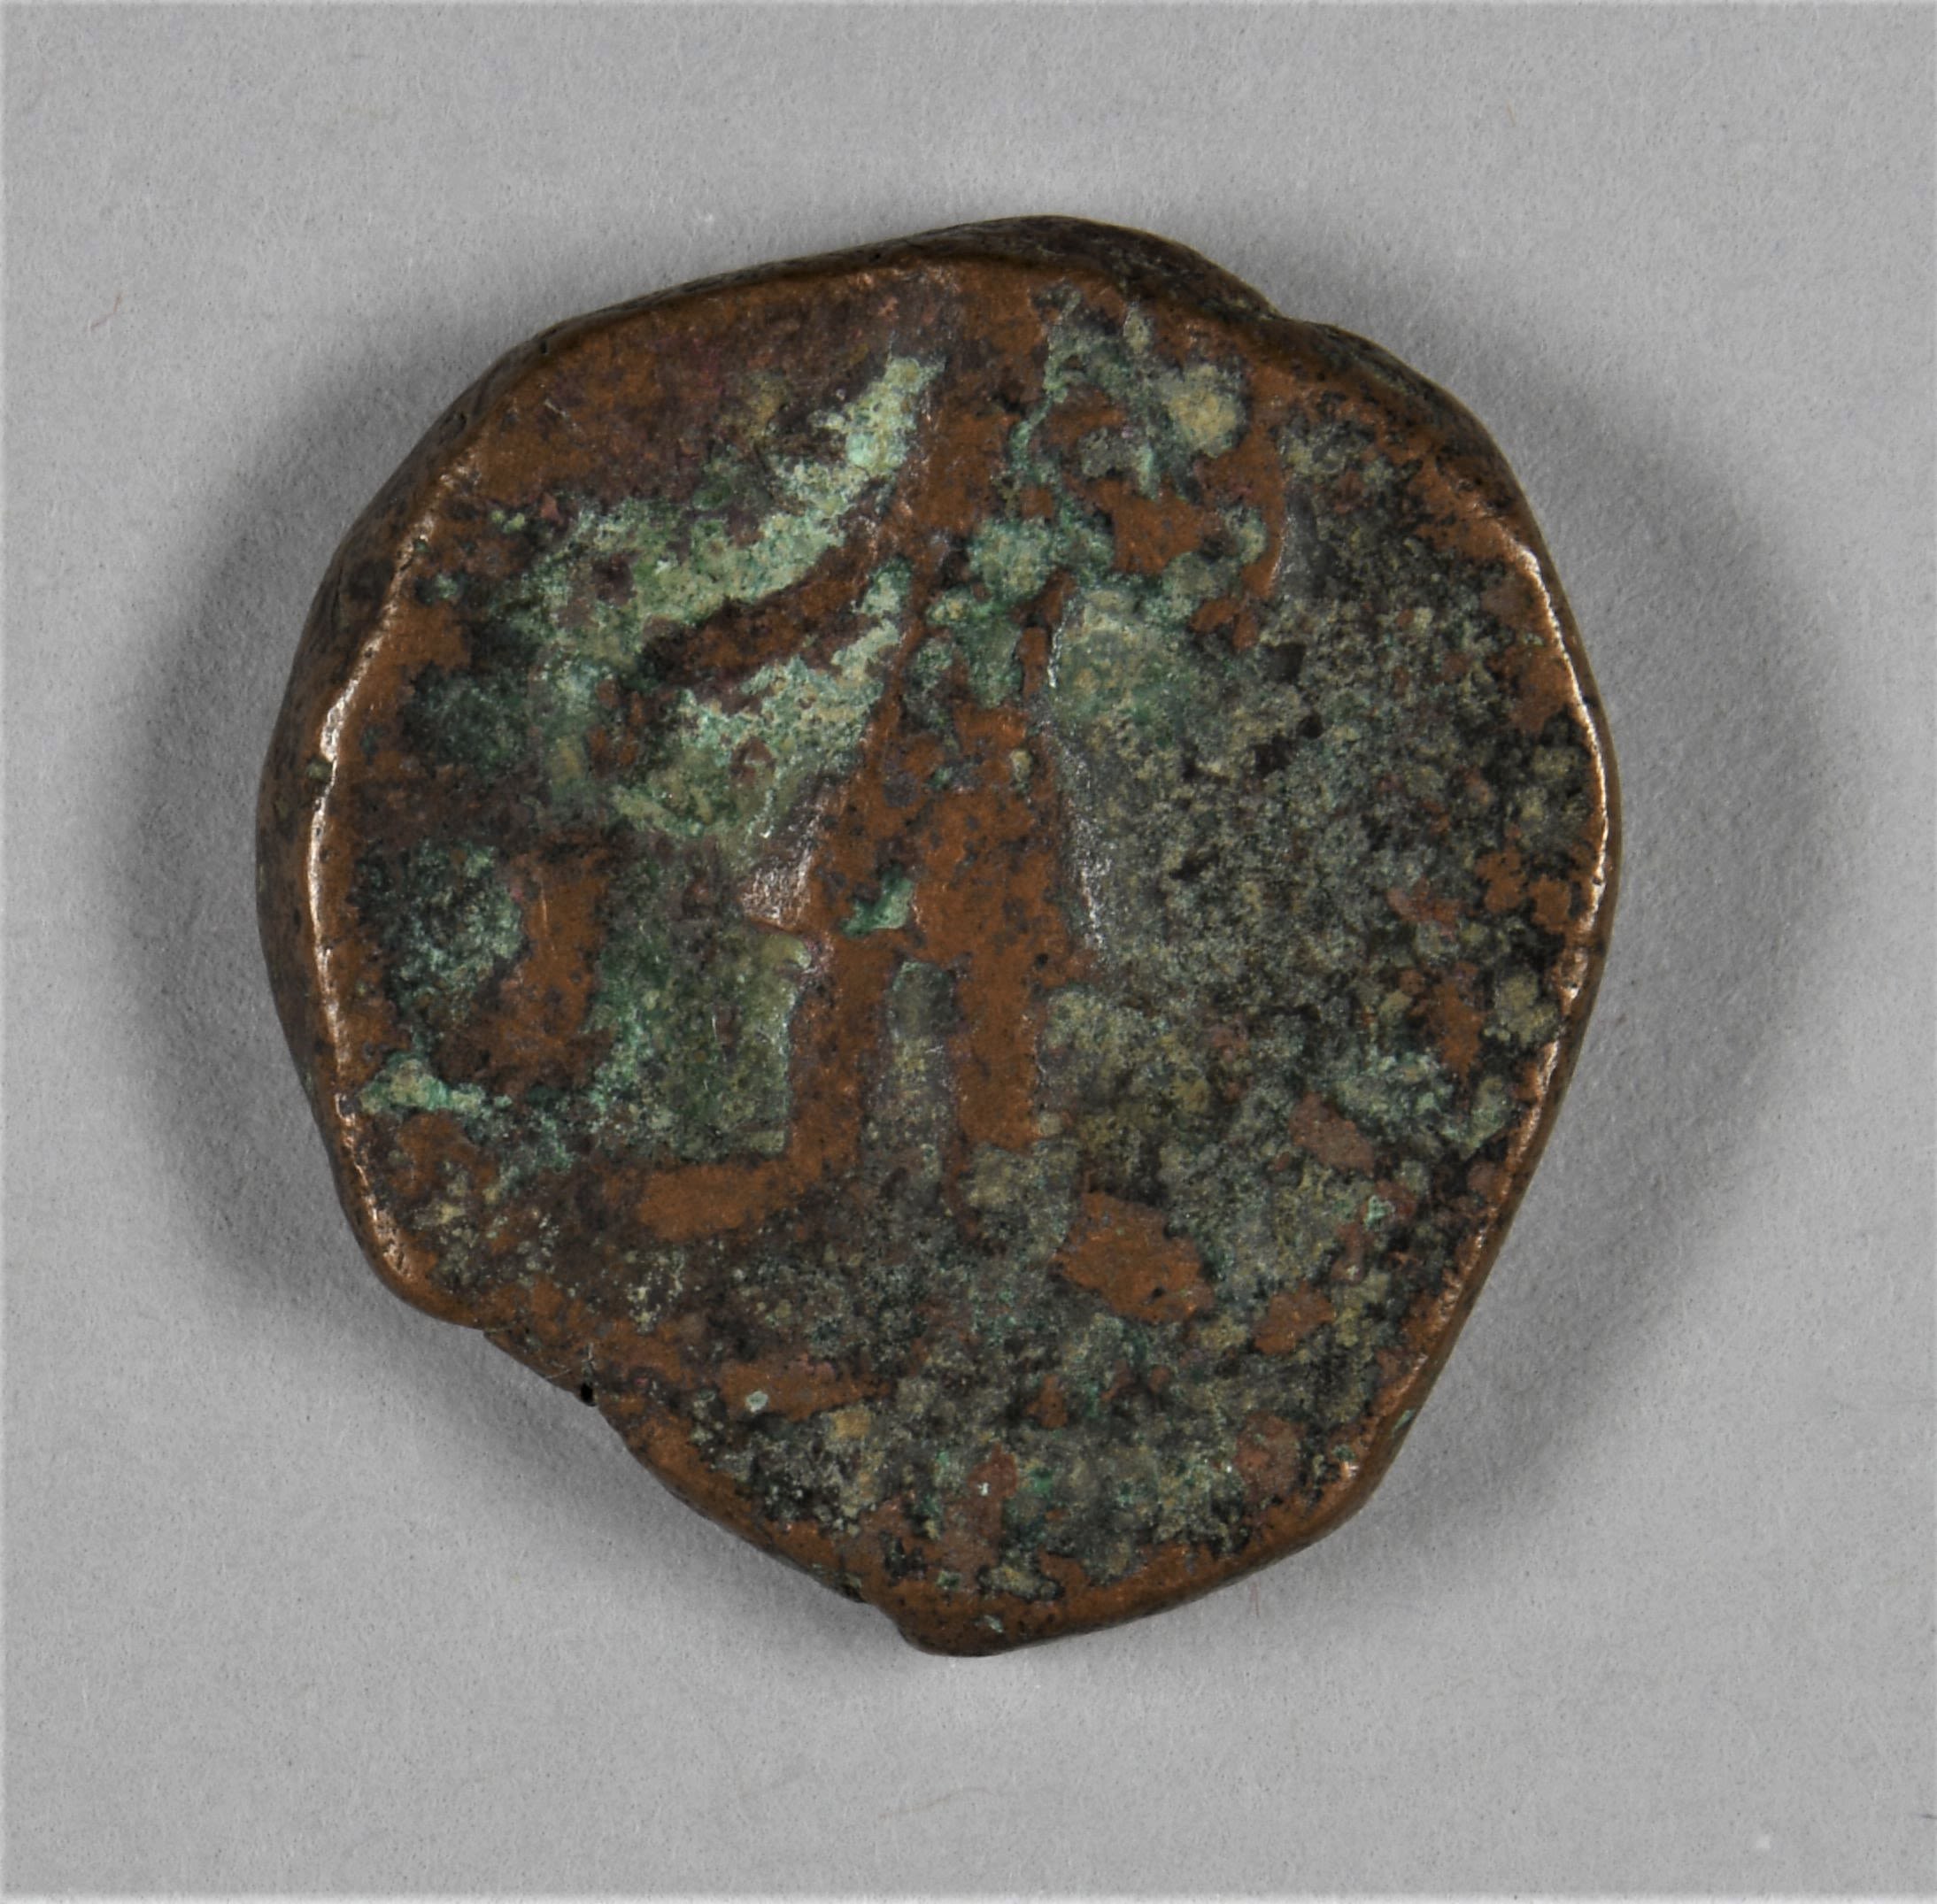
Coin of the Yaudheya Confederation | The coins of the Kushans were sometimes imitated by their neighbours. This coin closely resembles a Kushan piece. The image of the king has however been replaced by that of the war god Kartikeya, whilst his consort Devasena appears on the other side of the coin. The inscriptions are in Brahmi.
Coin of the Yaudheya Confederation | The coins of the Kushans were sometimes imitated by their neighbours. This coin closely resembles a Kushan piece. The image of the king has however been replaced by that of the war god Kartikeya, whilst his consort Devasena appears on the other side of the coin. The inscriptions are in Brahmi.
About 200-400 CE. Yaudheya Confederation, Bronze. DUROM.Scott 1971.1.15
About 200-400 CE. Yaudheya Confederation, Bronze. DUROM.Scott 1971.1.15

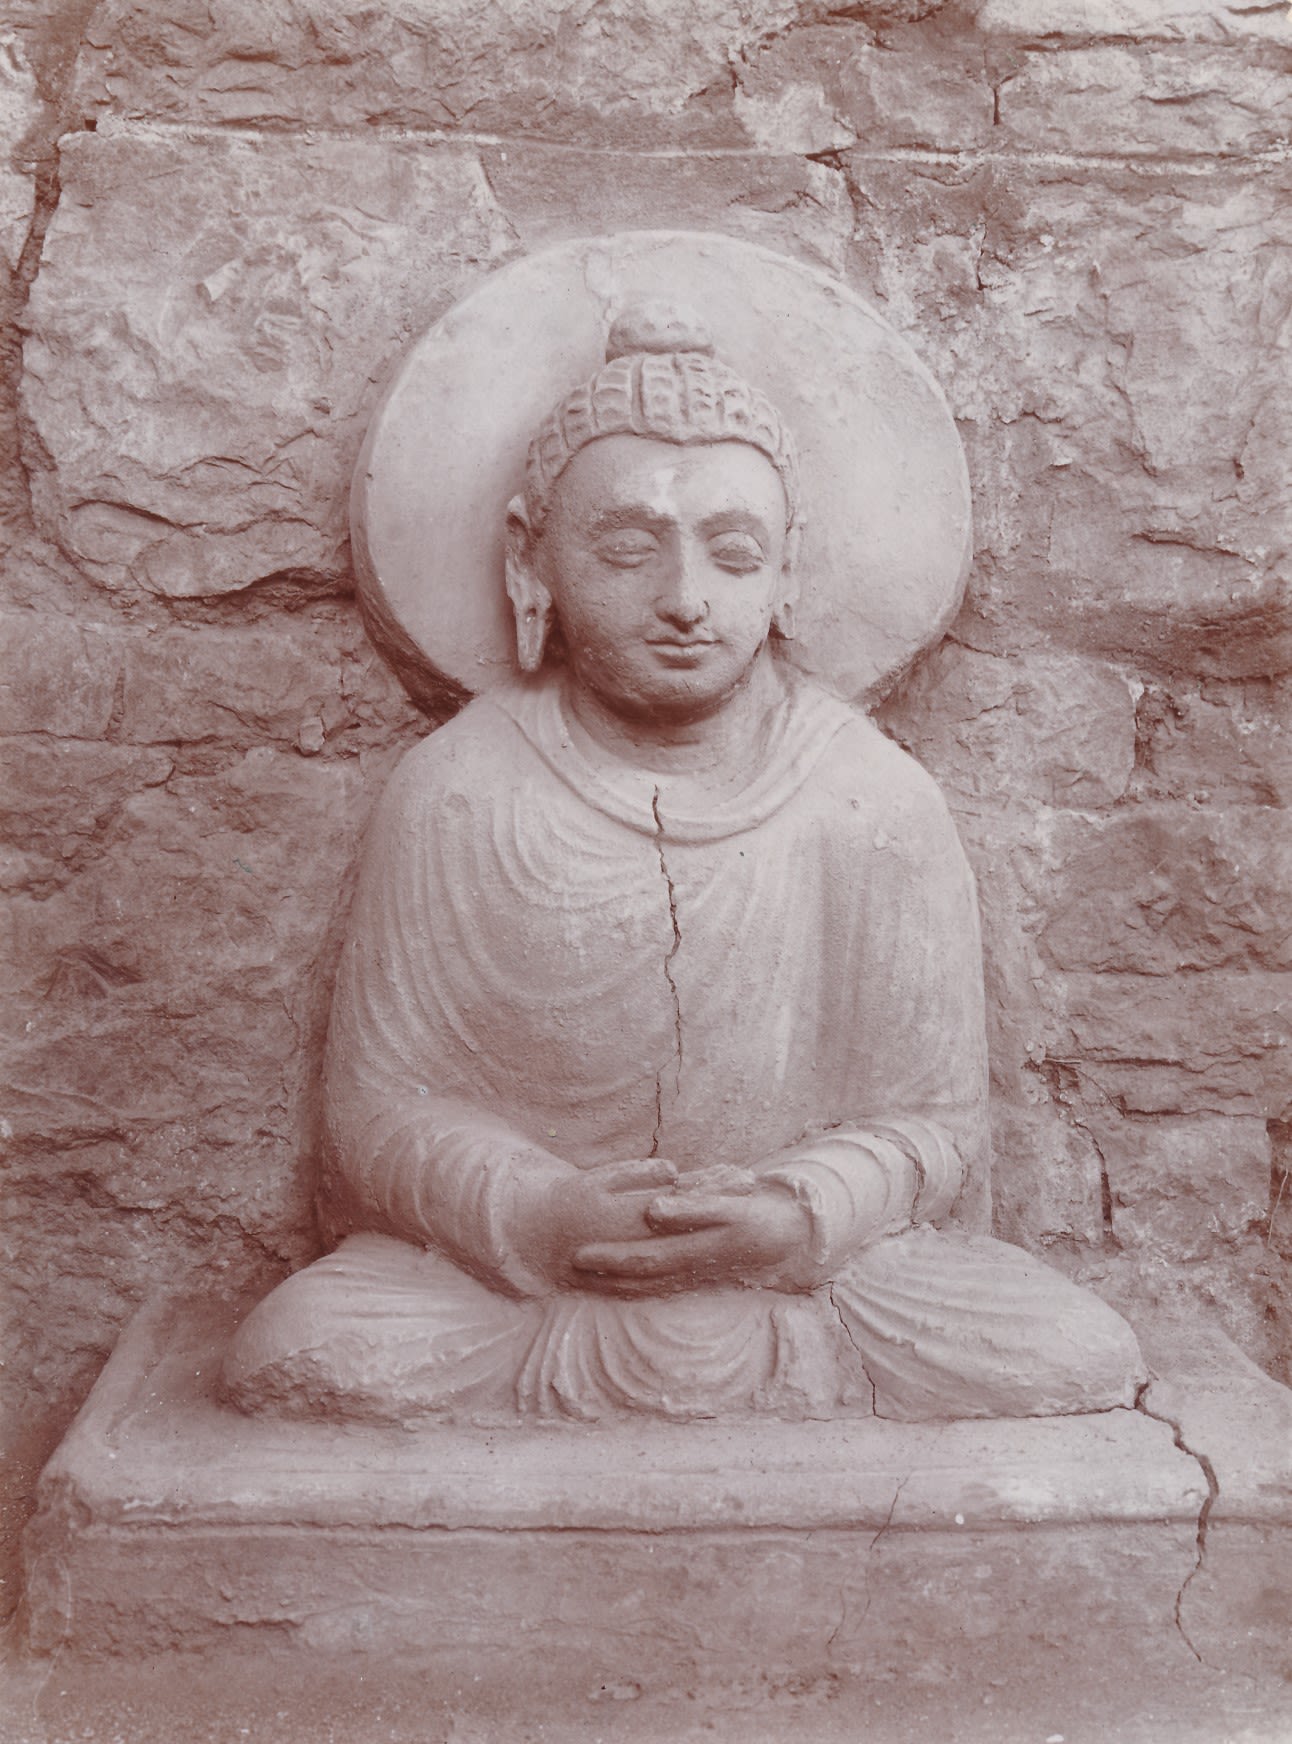
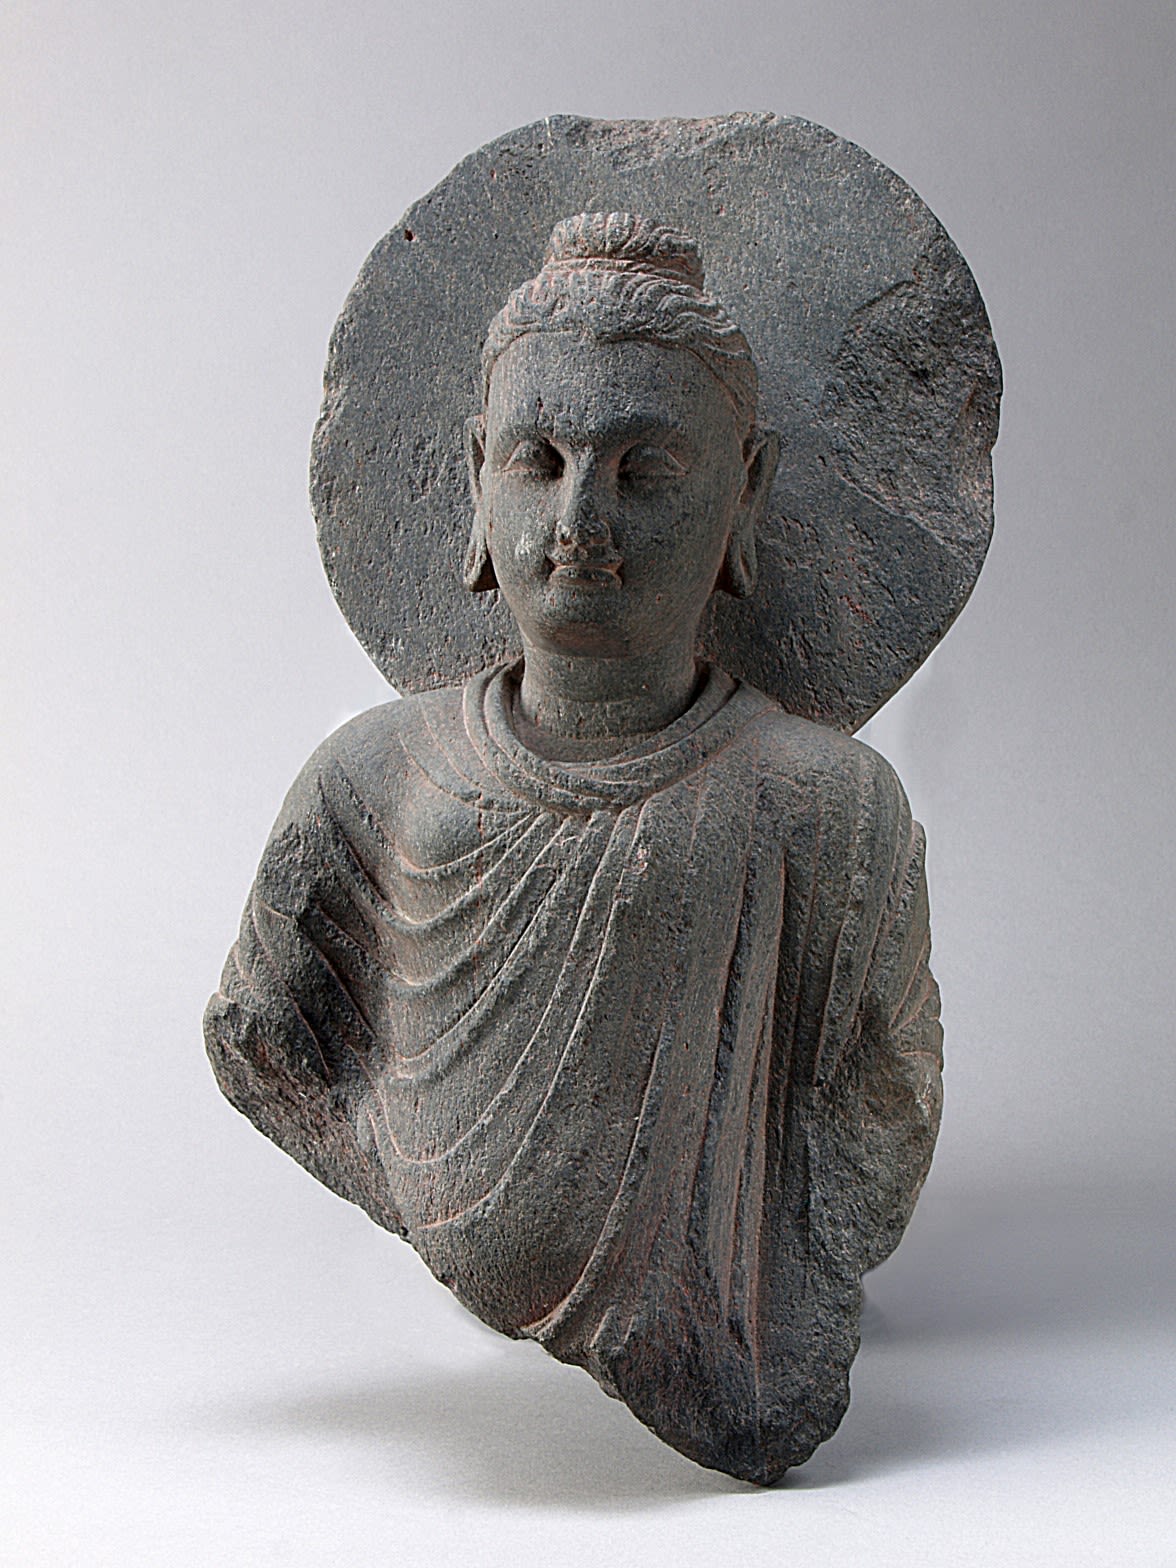
Seated stucco Buddha in Chapel C19 at Jaulian, Taxila, taken in 1917/1918. Gandharan Buddha figures are often depicted with halos and drapery folds. (c.2nd-5th century CE) Sir John Marshall Collection, given by Dr and Mrs Spalding. DUROM.1957.1.1566
Seated stucco Buddha in Chapel C19 at Jaulian, Taxila, taken in 1917/1918. Gandharan Buddha figures are often depicted with halos and drapery folds. (c.2nd-5th century CE) Sir John Marshall Collection, given by Dr and Mrs Spalding. DUROM.1957.1.1566

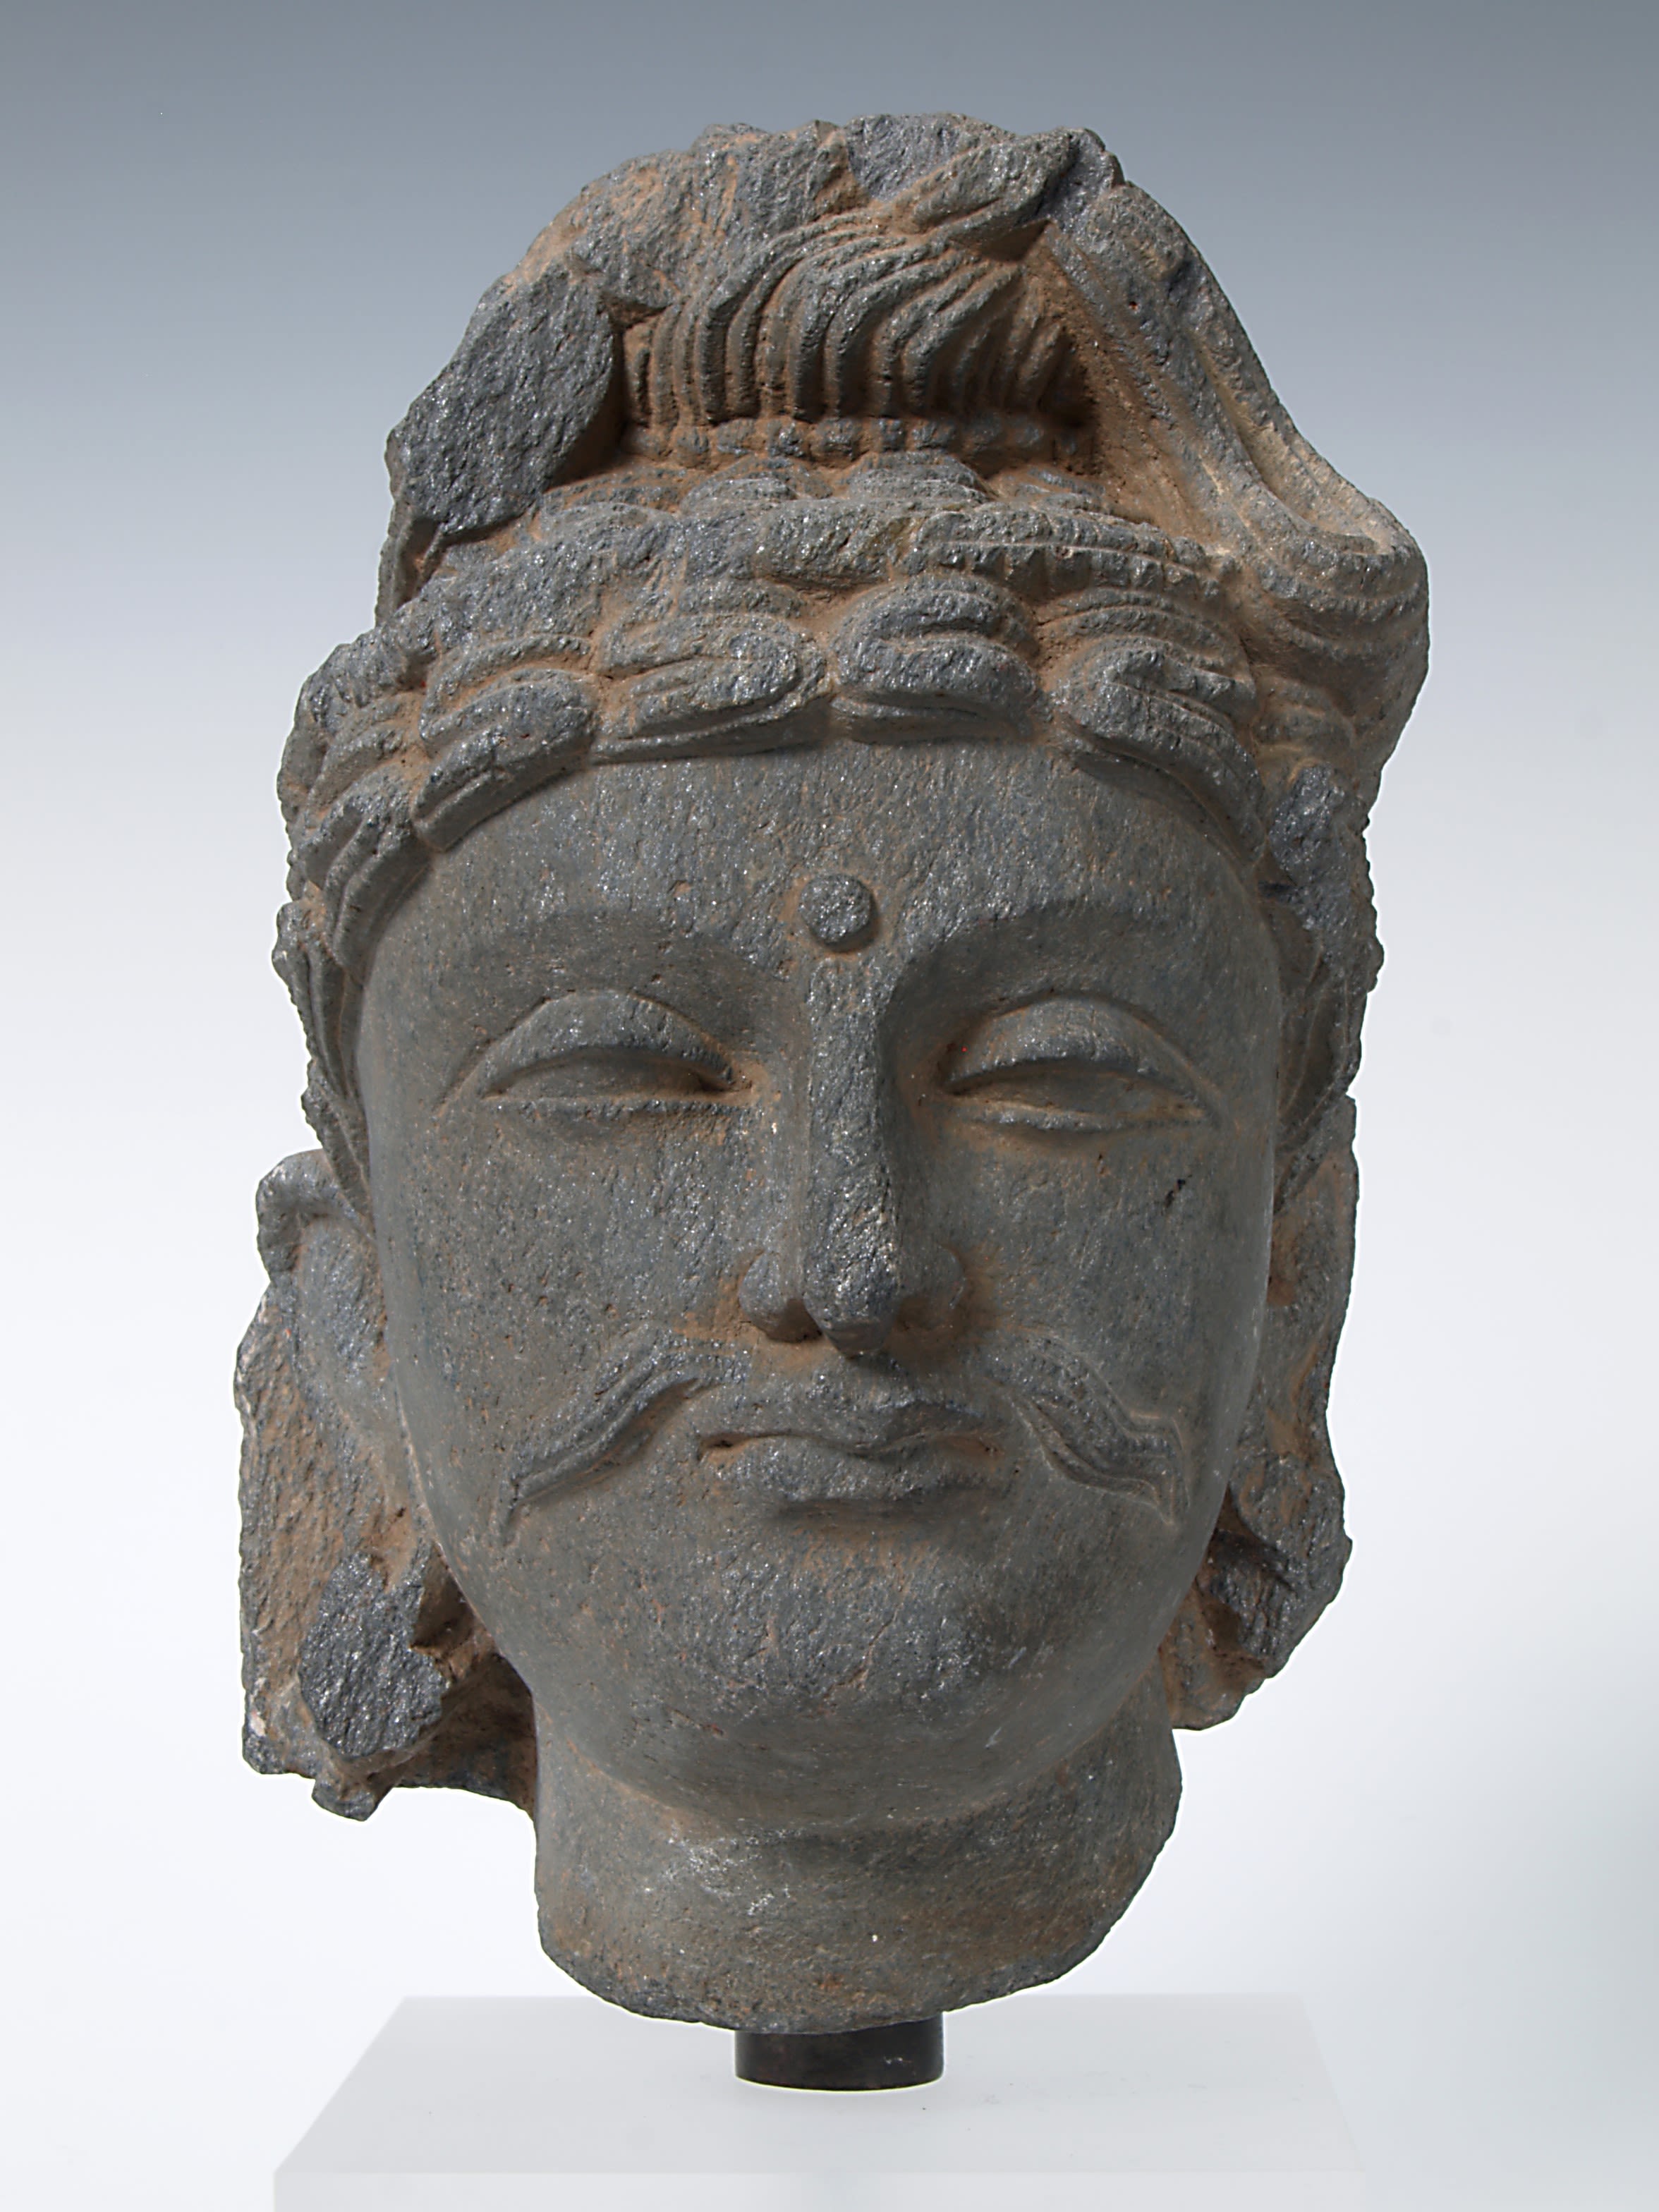
Head of a Bodhisattva, 100-300 CE. Gandhara, Schist. DUROM.1969.346, MacDonald Collection
Head of a Bodhisattva, 100-300 CE. Gandhara, Schist. DUROM.1969.346, MacDonald Collection
Gandharan Sculpture
The cosmopolitan nature of sites like Taxila along the Silk Roads led to the exchange and mixing of multiple cultural influences. The most tangible result of this process was the development of sculpture that combined Asian imagery with Hellenistic and Greco-Roman sculptural traditions.
Head of a Bodhisattva, 100-300 CE. Gandhara, Schist. DUROM.1969.346, MacDonald Collection
Gandharan Sculpture, named after the ancient territory that coincides with large areas of northern Pakistan and Afghanistan in which these artefacts are found, was created and installed in the hundreds of Buddhist monasteries that flourished under the patronage of the Kushan Empire during the early centuries of the first millennium CE. Crafted from schist stone, or moulded in plaster, many Gandharan sculptures depict important scenes from the Buddha’s life.
Although created in Asia, these artworks incorporated multiple elements derived from western Classical art, including figures with curled hair and draped robes, motifs such as vine scrolls and columns topped by Corinthian capitals. The Gandharan sculptural tradition produced some of the first depictions of the Buddha in human form. These images may have been produced to help spread the message of Buddha’s teachings across linguistic and cultural barriers.
Seated stucco Buddha in Chapel C19 at Jaulian, Taxila, taken in 1917/1918. Gandharan Buddha figures are often depicted with halos and drapery folds. (c.2nd-5th century CE) Sir John Marshall Collection, given by Dr and Mrs Spalding. DUROM.1957.1.1566
The presence of representations of Bodhisattvas, individuals who had achieved enlightenment but chose to delay reaching Nirvana in order to help others, also provides evidence for the development of Mahayana Buddhist concepts in the region at this time.
The intermingling of traditions from East and West in Gandharan sculpture attracted Colonial interest and pieces became much sought after by European officials and collectors. This led to its widespread looting from sites across northern Pakistan and Afghanistan.

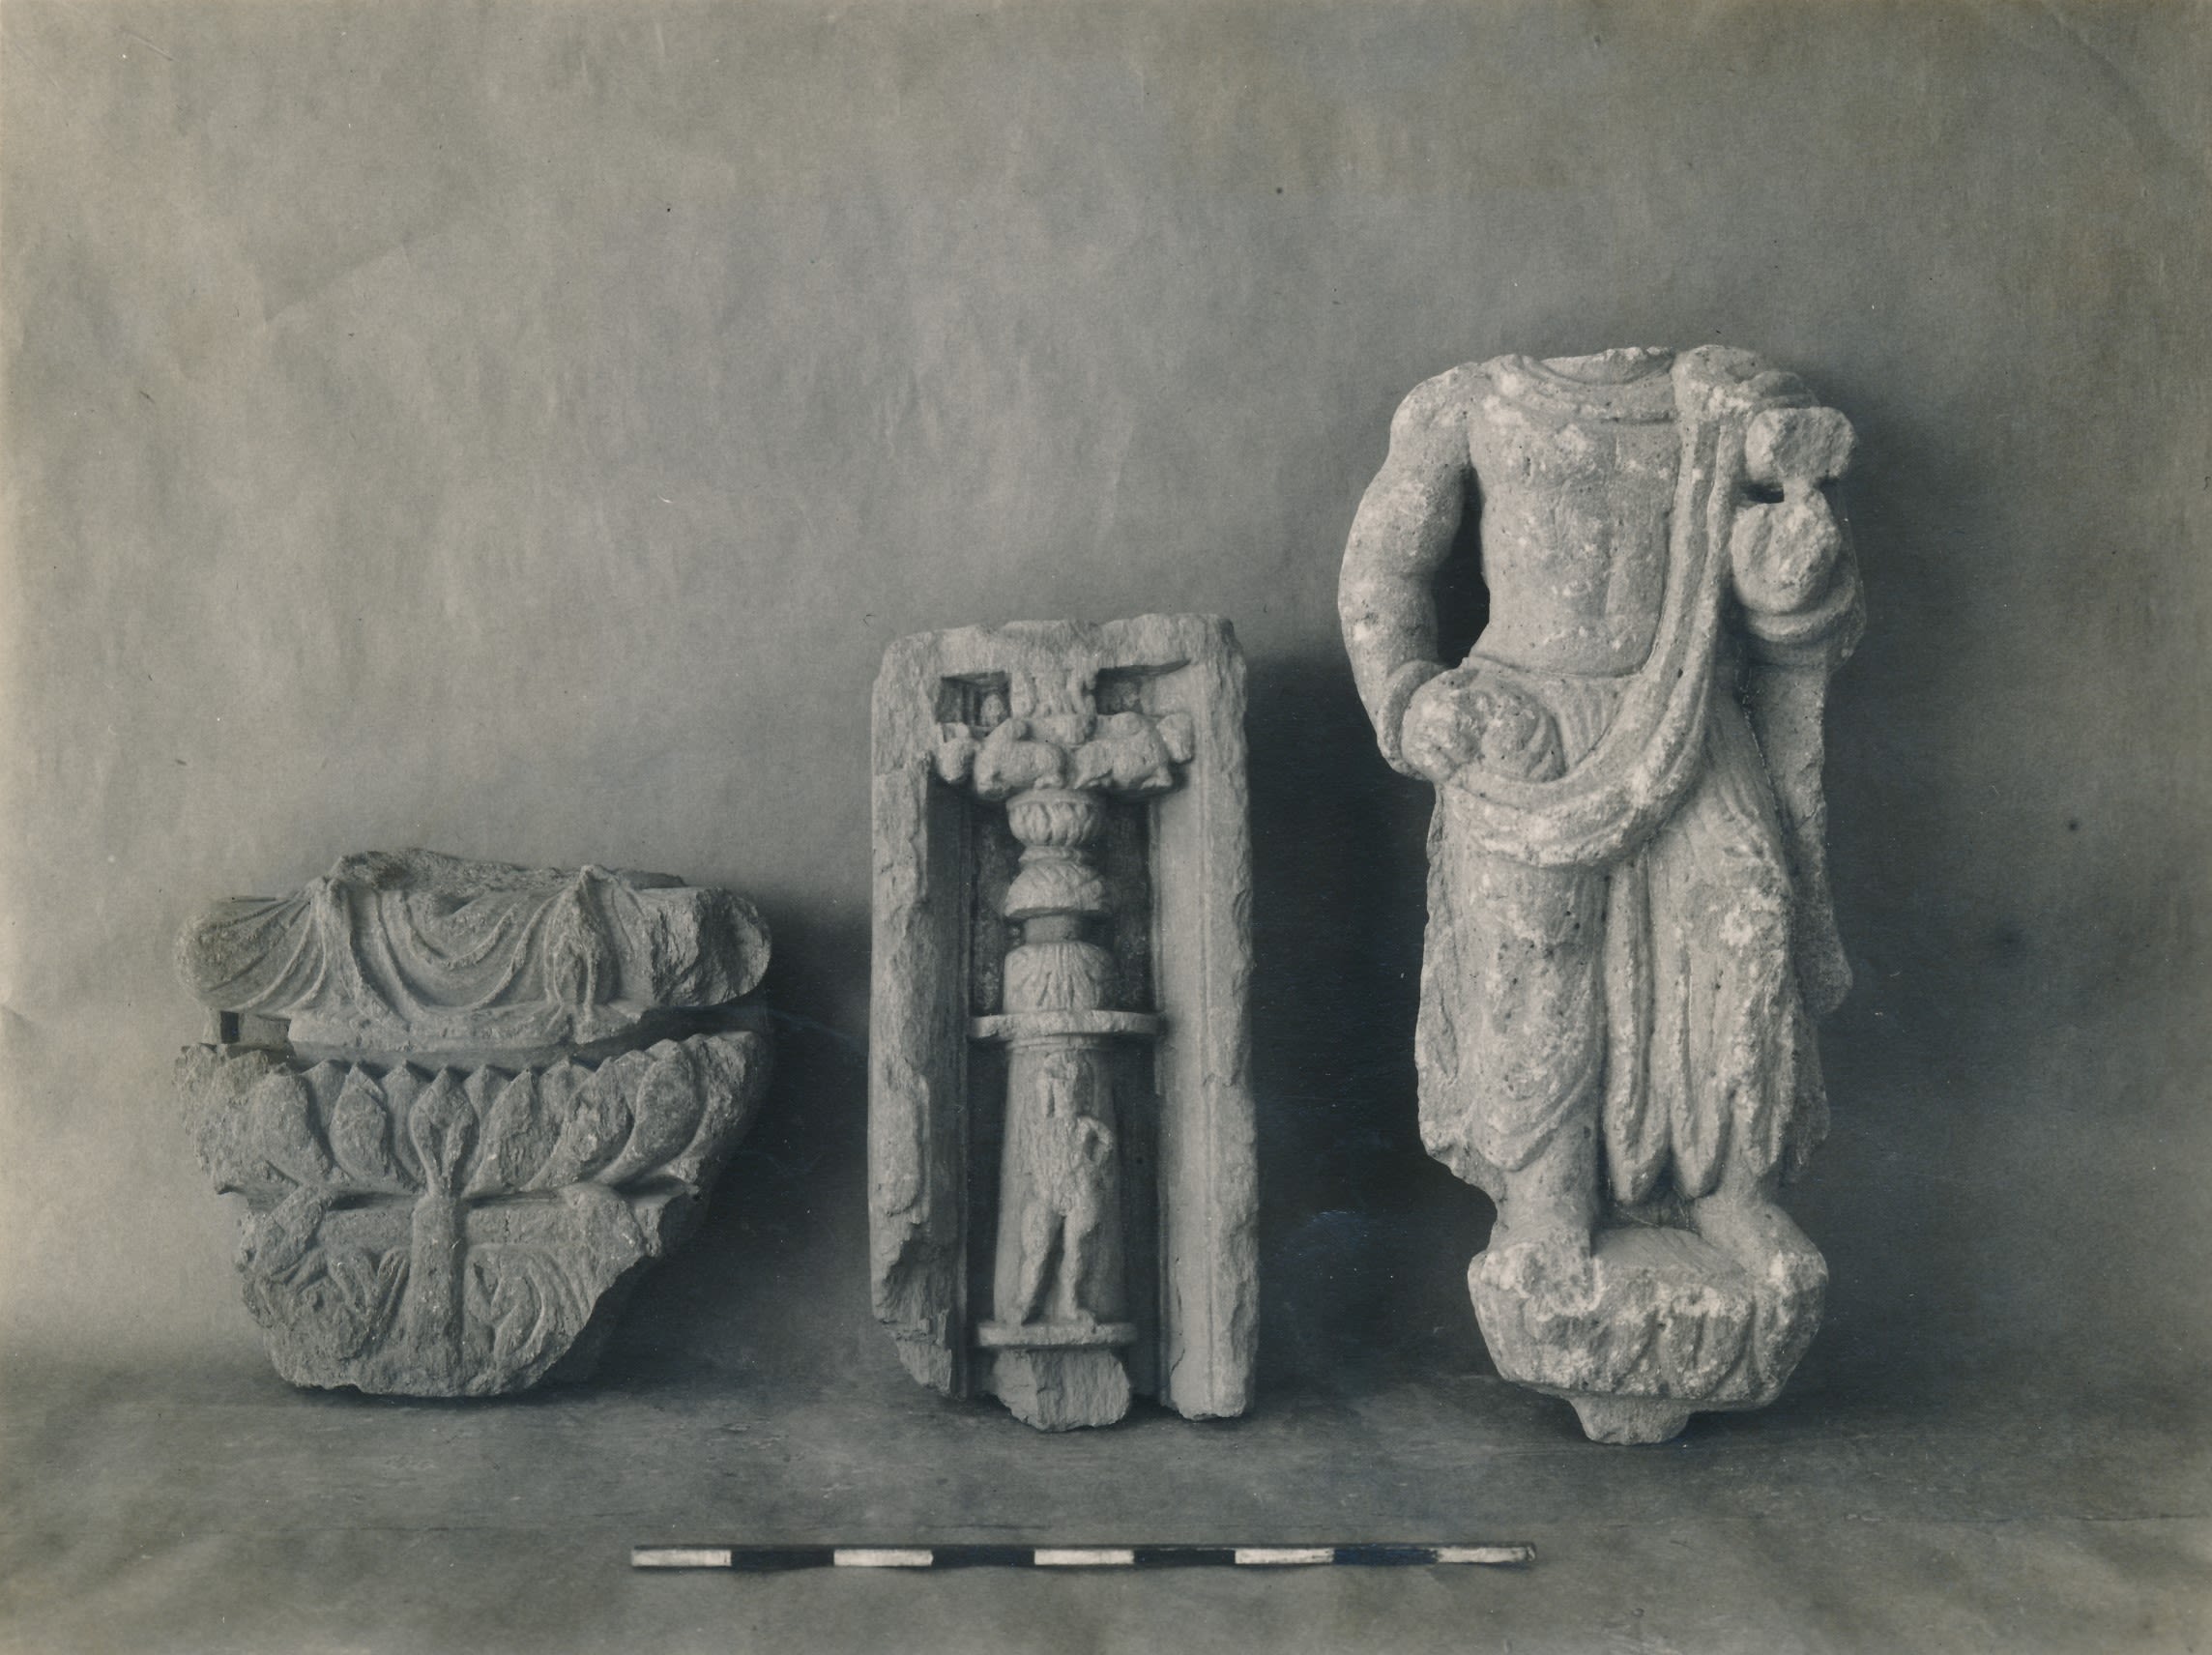


Stone sculptural fragments from Dharmarajika, Taxila, including a lotus throne for a seated Buddha, a framed Persopolitan pilaster with Yaksha figure, and a robed figure on a lotus plinth. (c.1st-5th century CE) Sir John Marshall Collection, given by Dr and Mrs Spalding. DUROM.1957.1.1485
Stone sculptural fragments from Dharmarajika, Taxila, including a lotus throne for a seated Buddha, a framed Persopolitan pilaster with Yaksha figure, and a robed figure on a lotus plinth. (c.1st-5th century CE) Sir John Marshall Collection, given by Dr and Mrs Spalding. DUROM.1957.1.1485

Detail of stucco sculpture on the south face of Stupa D4 at Jaulian, Taxila, taken in 1917/1918. Framed by pilasters with Corinthian capitals, a Bodhisattva is seated within an archway and flanked by attendants.(c.2nd-5th century CE) Sir John Marshall Collection, given by Dr and Mrs Spalding. DUROM.1957.1.1552
Detail of stucco sculpture on the south face of Stupa D4 at Jaulian, Taxila, taken in 1917/1918. Framed by pilasters with Corinthian capitals, a Bodhisattva is seated within an archway and flanked by attendants.(c.2nd-5th century CE) Sir John Marshall Collection, given by Dr and Mrs Spalding. DUROM.1957.1.1552

Schist sculpture from the lower Stupa Court at Jaulian, Taxila, taken in 1916/1917, depicting the visit of the god Indra to the Buddha, while he was living in the cave known as Indrasailaguha. (c. 2nd-5th century CE) Sir John Marshall Collection, given by Dr and Mrs Spalding. DUROM.1957.1.1555
Schist sculpture from the lower Stupa Court at Jaulian, Taxila, taken in 1916/1917, depicting the visit of the god Indra to the Buddha, while he was living in the cave known as Indrasailaguha. (c. 2nd-5th century CE) Sir John Marshall Collection, given by Dr and Mrs Spalding. DUROM.1957.1.1555

Stucco Buddha heads from the Main Stupa court at Jaulian, Taxila, taken in 1916/1917. Elongated earlobes, wavy hair in an ushnisha, and an urna, an auspicious mark above the eyes, are typical Gandharan styles. (c. 2nd-5th century CE) Sir John Marshall Collection, given by Dr and Mrs Spalding. DUROM.1957.1.1577
Stucco Buddha heads from the Main Stupa court at Jaulian, Taxila, taken in 1916/1917. Elongated earlobes, wavy hair in an ushnisha, and an urna, an auspicious mark above the eyes, are typical Gandharan styles. (c. 2nd-5th century CE) Sir John Marshall Collection, given by Dr and Mrs Spalding. DUROM.1957.1.1577

Schist relief from Shrine A1 at Kalawan, Taxila, taken in 1931/1932. Interpreted as Queen Maya Devi’s dream of an elephant entering her side, foretelling her conception of a child who would be a ruler or Buddha. (c.1st-5th century CE) Sir John Marshall Collection, given by Dr and Mrs Spalding. DUROM.1957.1.1644
Schist relief from Shrine A1 at Kalawan, Taxila, taken in 1931/1932. Interpreted as Queen Maya Devi’s dream of an elephant entering her side, foretelling her conception of a child who would be a ruler or Buddha. (c.1st-5th century CE) Sir John Marshall Collection, given by Dr and Mrs Spalding. DUROM.1957.1.1644

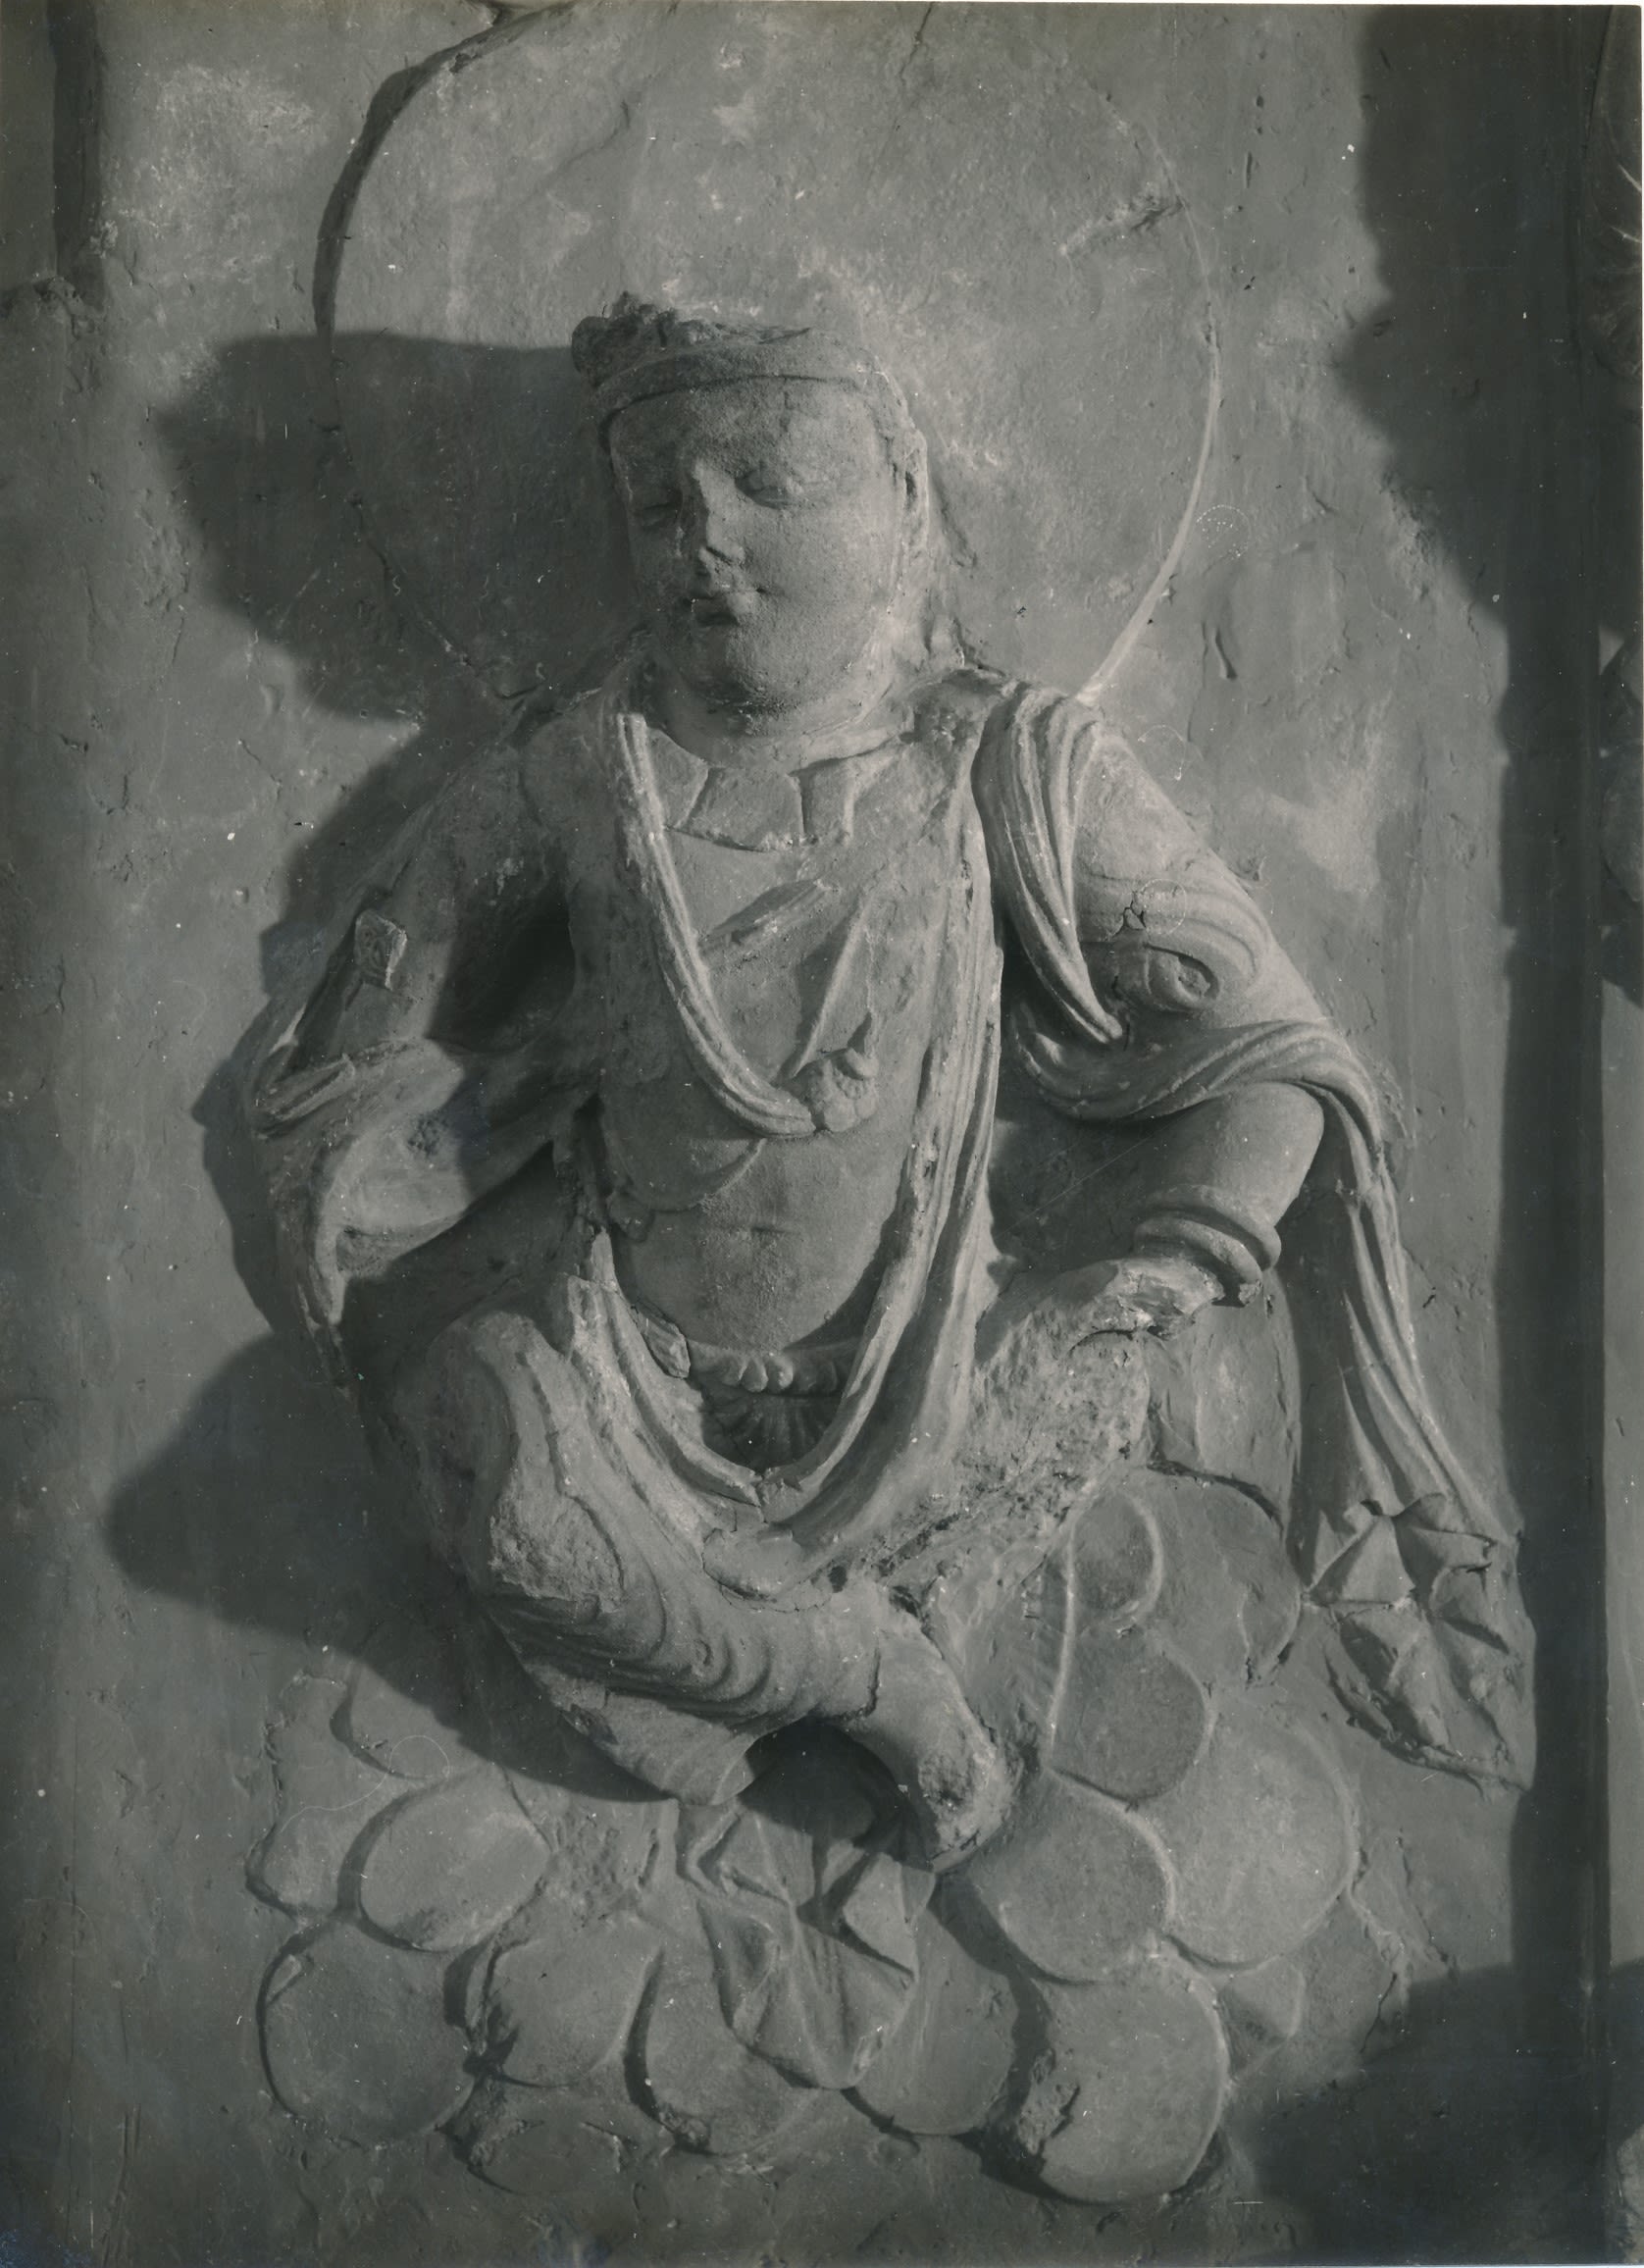
Stucco Bodhisattva from Mohra Moradu’s Main Stupa, then transferred to the Museum, taken 1932/1933. Bodhisattvas are powerful figures who have achieved enlightenment but remain to aid others to obtain bliss. (c.2nd-5th century CE) Sir John Marshall Collection, given by Dr and Mrs Spalding. DUROM.1957.1.1703
Stucco Bodhisattva from Mohra Moradu’s Main Stupa, then transferred to the Museum, taken 1932/1933. Bodhisattvas are powerful figures who have achieved enlightenment but remain to aid others to obtain bliss. (c.2nd-5th century CE) Sir John Marshall Collection, given by Dr and Mrs Spalding. DUROM.1957.1.1703

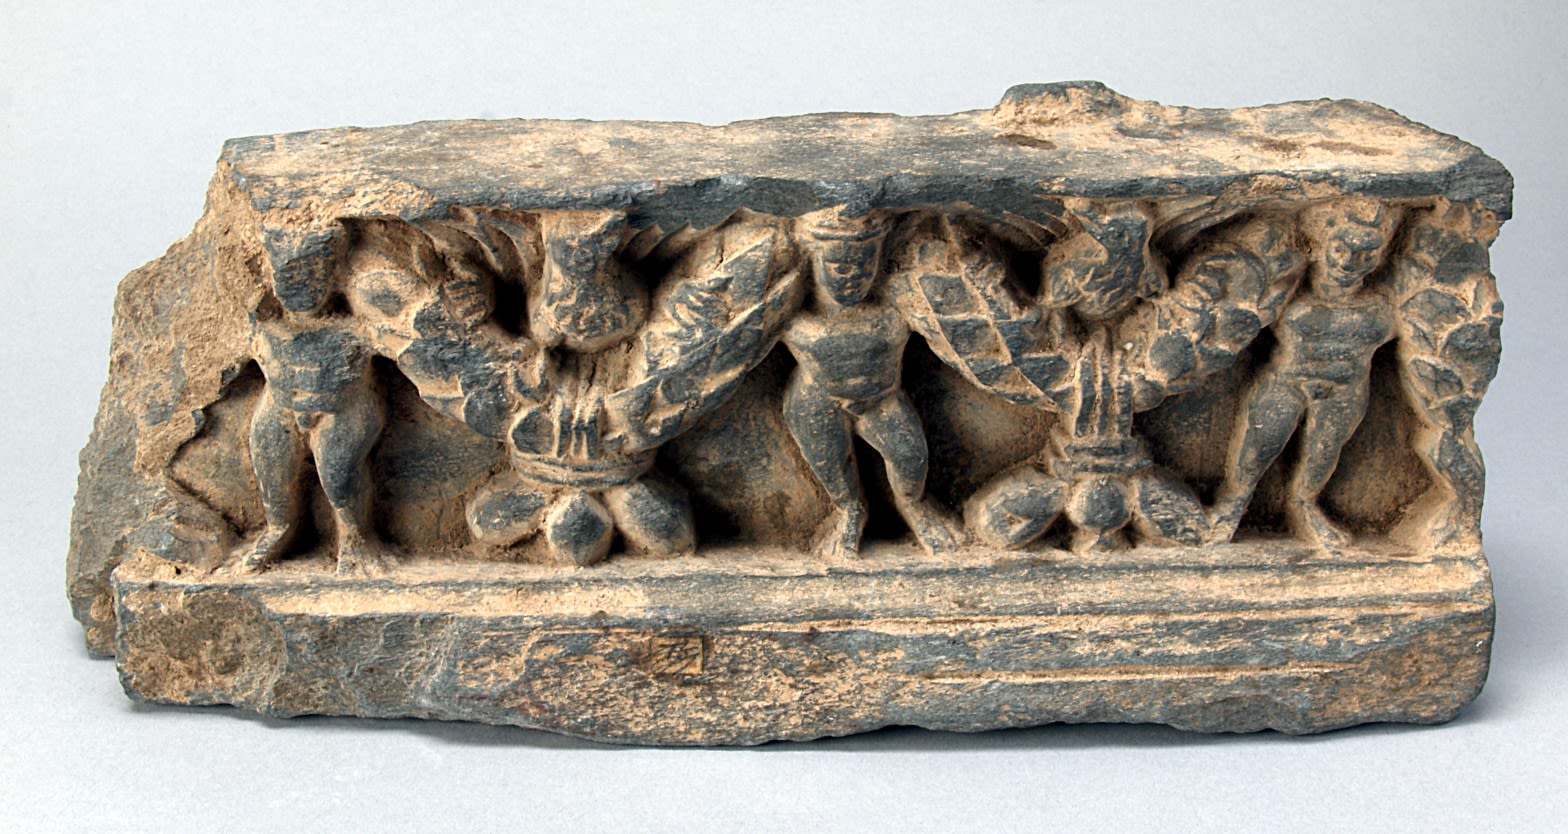
Frieze Fragment showing Persian, South Asian and Hellenistic motifs | This section of decorative frieze illustrates the wide variety of influences combined within Gandharan art. On the far left is a figure that has been interpreted as Atlas, the Greek Titan who held up the sky. The next compartment contains a stupa. The third and fourth compartments also contain Atlas but the fifth holds a figure who might represent a Bodhisattva or a worshipper. The final section contains an image of the Roman god Cupid. This mixture of influences reflects Gandhara’s position as a major crossroads on the Silk Roads. 100-500 CE. Gandhara, Schist. DUROM.1952.1.18, Burn Collection
Frieze Fragment showing Persian, South Asian and Hellenistic motifs | This section of decorative frieze illustrates the wide variety of influences combined within Gandharan art. On the far left is a figure that has been interpreted as Atlas, the Greek Titan who held up the sky. The next compartment contains a stupa. The third and fourth compartments also contain Atlas but the fifth holds a figure who might represent a Bodhisattva or a worshipper. The final section contains an image of the Roman god Cupid. This mixture of influences reflects Gandhara’s position as a major crossroads on the Silk Roads. 100-500 CE. Gandhara, Schist. DUROM.1952.1.18, Burn Collection

Frieze Fragment with cupids | In Greek and Roman mythology Cupid (or Eros) was the god of attraction, desire and affection. Multiple cupids, called amores, or amorini in later European art history, are a common motif in late Roman art. This Gandharan fragment shows this clear influence combined with garlands of leaves, another common Roman motif. 100-500 CE. Gandhara, Schist. DUROM.1952.1.16, Burn Collection
Frieze Fragment with cupids | In Greek and Roman mythology Cupid (or Eros) was the god of attraction, desire and affection. Multiple cupids, called amores, or amorini in later European art history, are a common motif in late Roman art. This Gandharan fragment shows this clear influence combined with garlands of leaves, another common Roman motif. 100-500 CE. Gandhara, Schist. DUROM.1952.1.16, Burn Collection
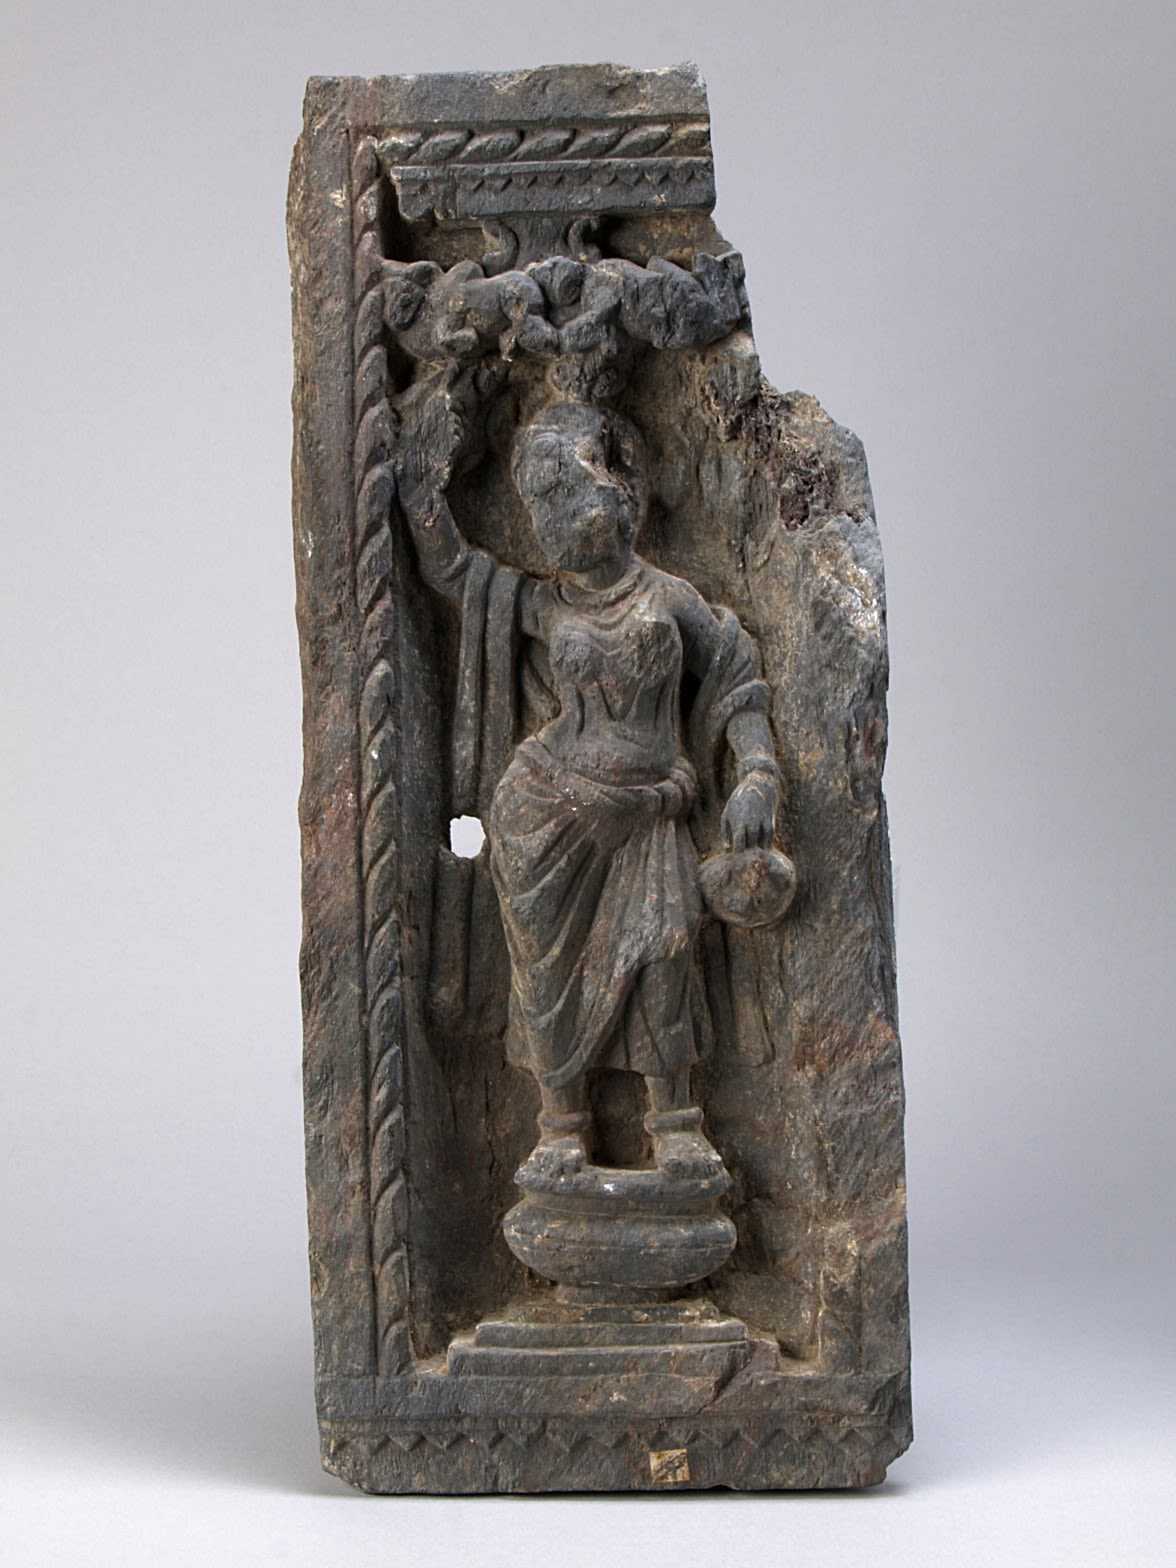
Architectural fragment depicting a Yaksi figure | This fragment shows a pillar formed by a yaksi figure holding on to a tree branch. Yaksi are mythical figures frequently found in Buddhist, Hindu and Jain art. They are benevolent female guardian figures. 100-500 CE. Gandhara, Schist. DUROM.1952.1.5, Burn Collection
Architectural fragment depicting a Yaksi figure | This fragment shows a pillar formed by a yaksi figure holding on to a tree branch. Yaksi are mythical figures frequently found in Buddhist, Hindu and Jain art. They are benevolent female guardian figures. 100-500 CE. Gandhara, Schist. DUROM.1952.1.5, Burn Collection

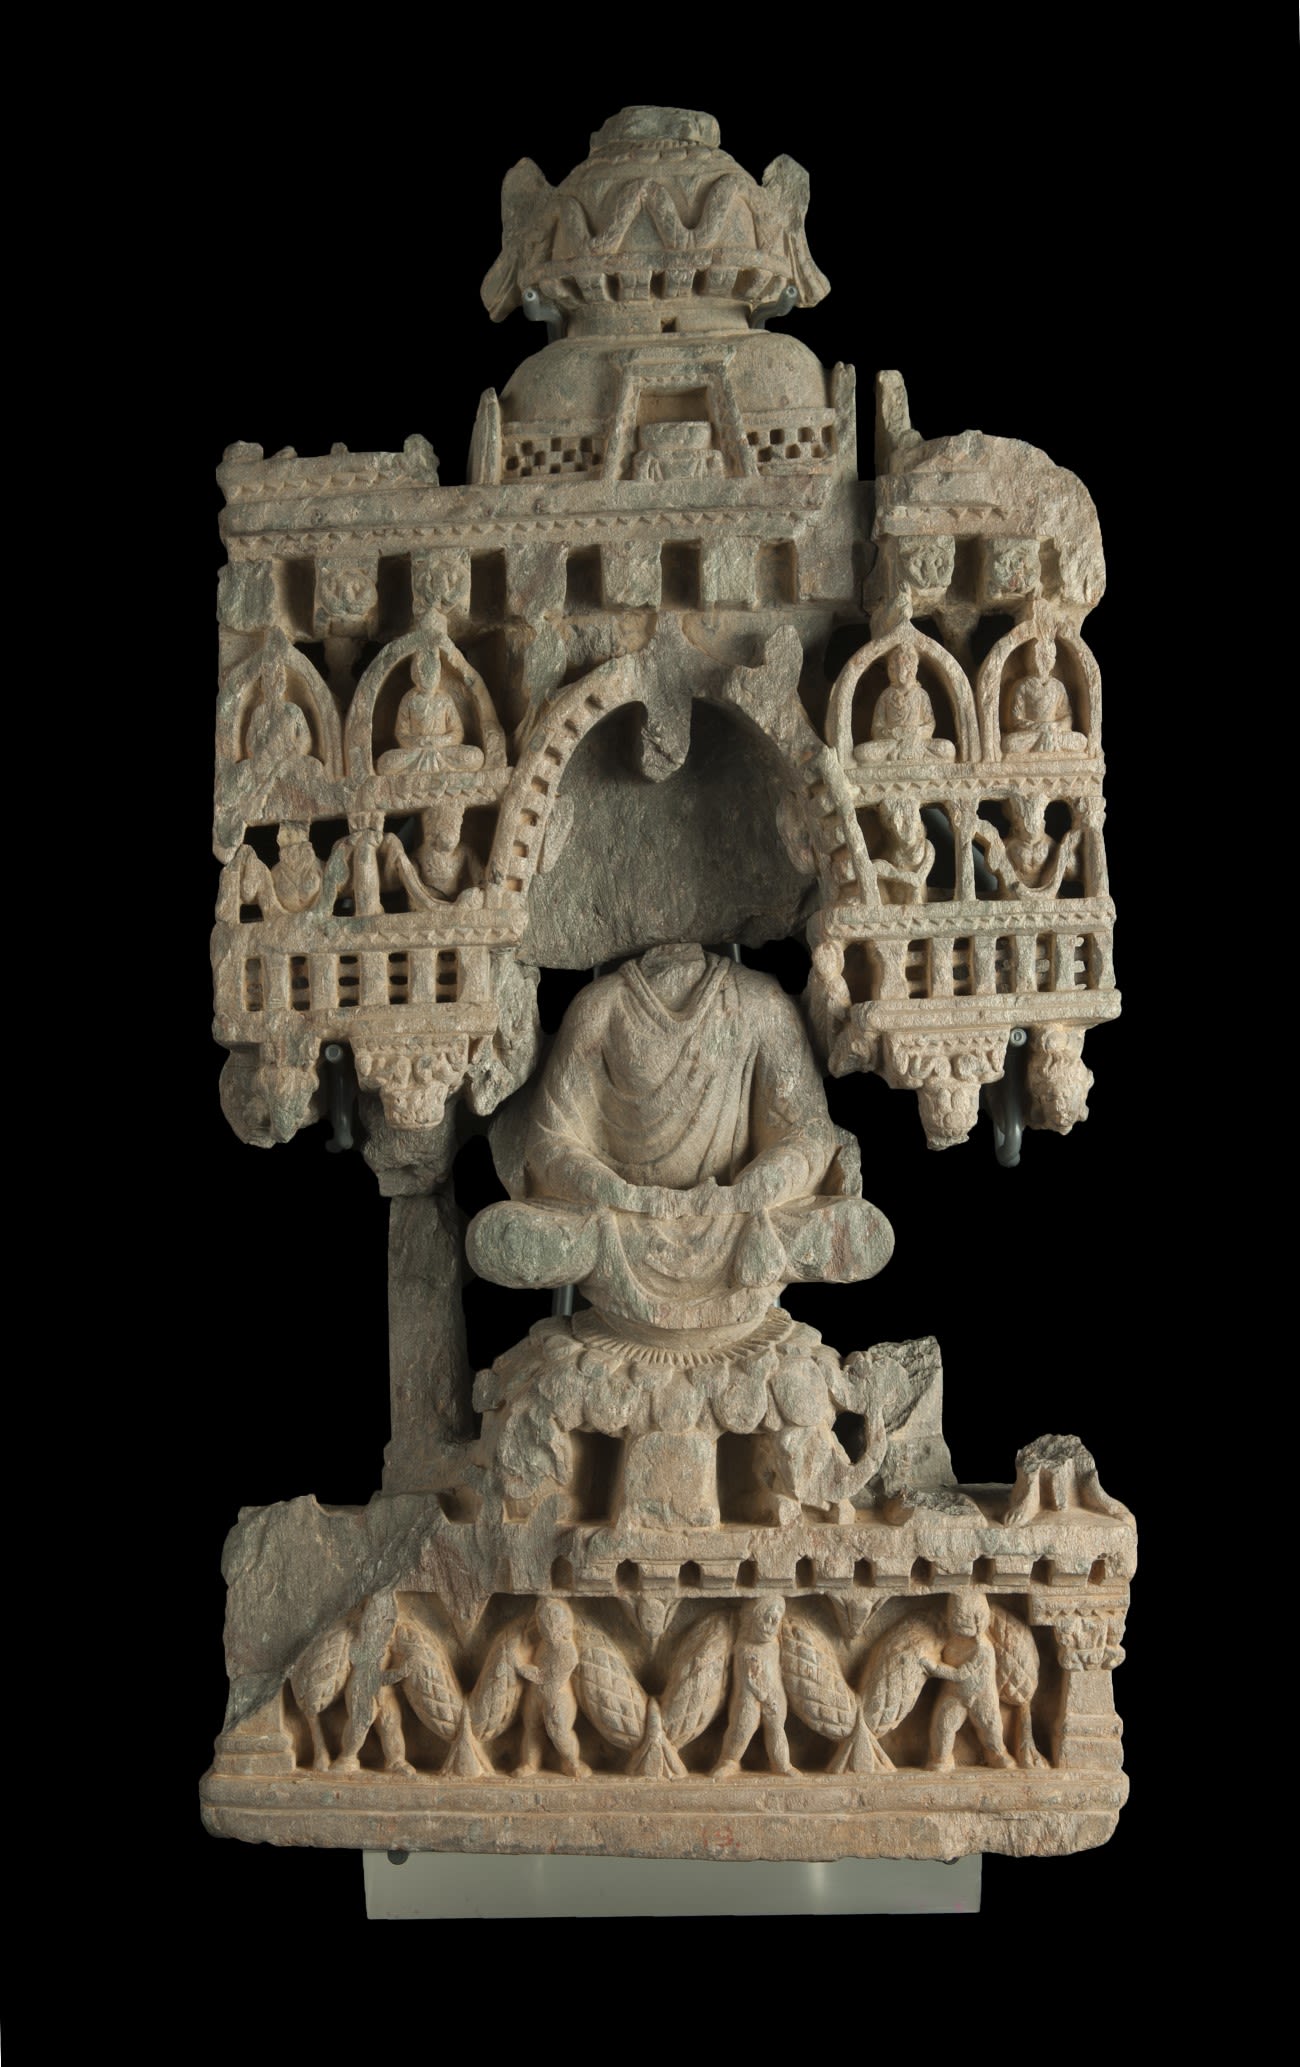
Portable Shrine | A Buddha figure on a lotus throne, which is supported by elephants is depicted in this portable shrine. Above him, in a niche, is his alms bowl and the shrine is topped by a stupa. Mixed with these iconic Buddhist depictions are narrow Persian Persepolitan columns, with strong western Classical elements, such as Corinthian capitals above. The base comprises cupids supporting a garland. 100-500 CE. Gandhara, schist. DUROM.U10258 and U92
Portable Shrine | A Buddha figure on a lotus throne, which is supported by elephants is depicted in this portable shrine. Above him, in a niche, is his alms bowl and the shrine is topped by a stupa. Mixed with these iconic Buddhist depictions are narrow Persian Persepolitan columns, with strong western Classical elements, such as Corinthian capitals above. The base comprises cupids supporting a garland. 100-500 CE. Gandhara, schist. DUROM.U10258 and U92

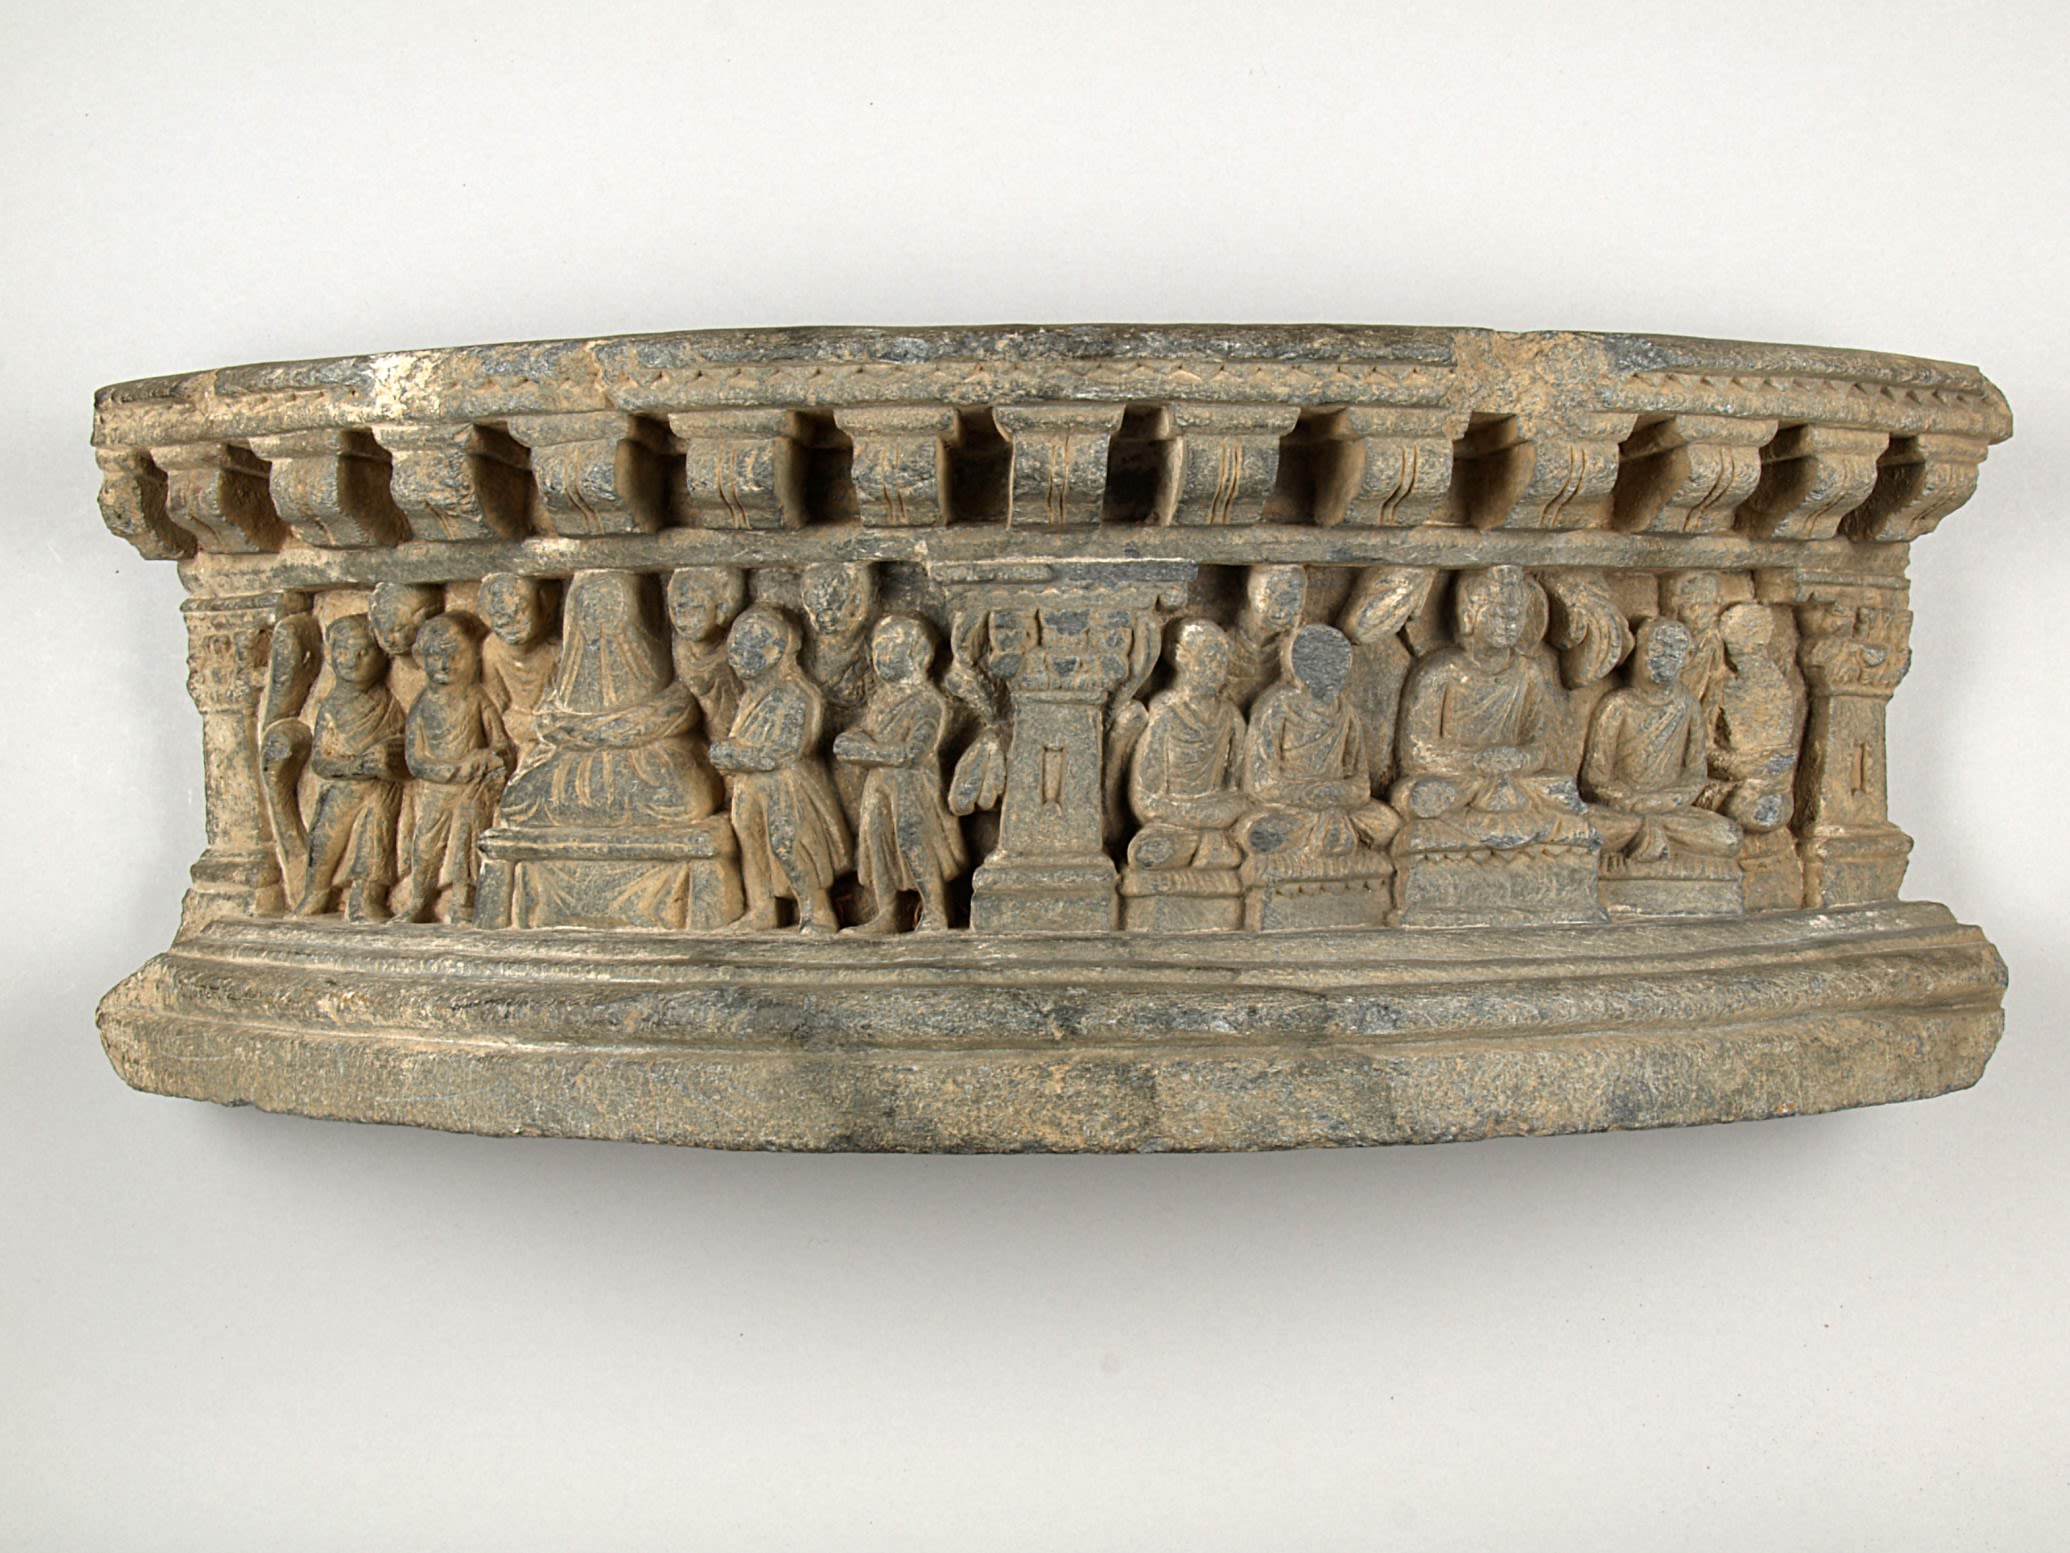
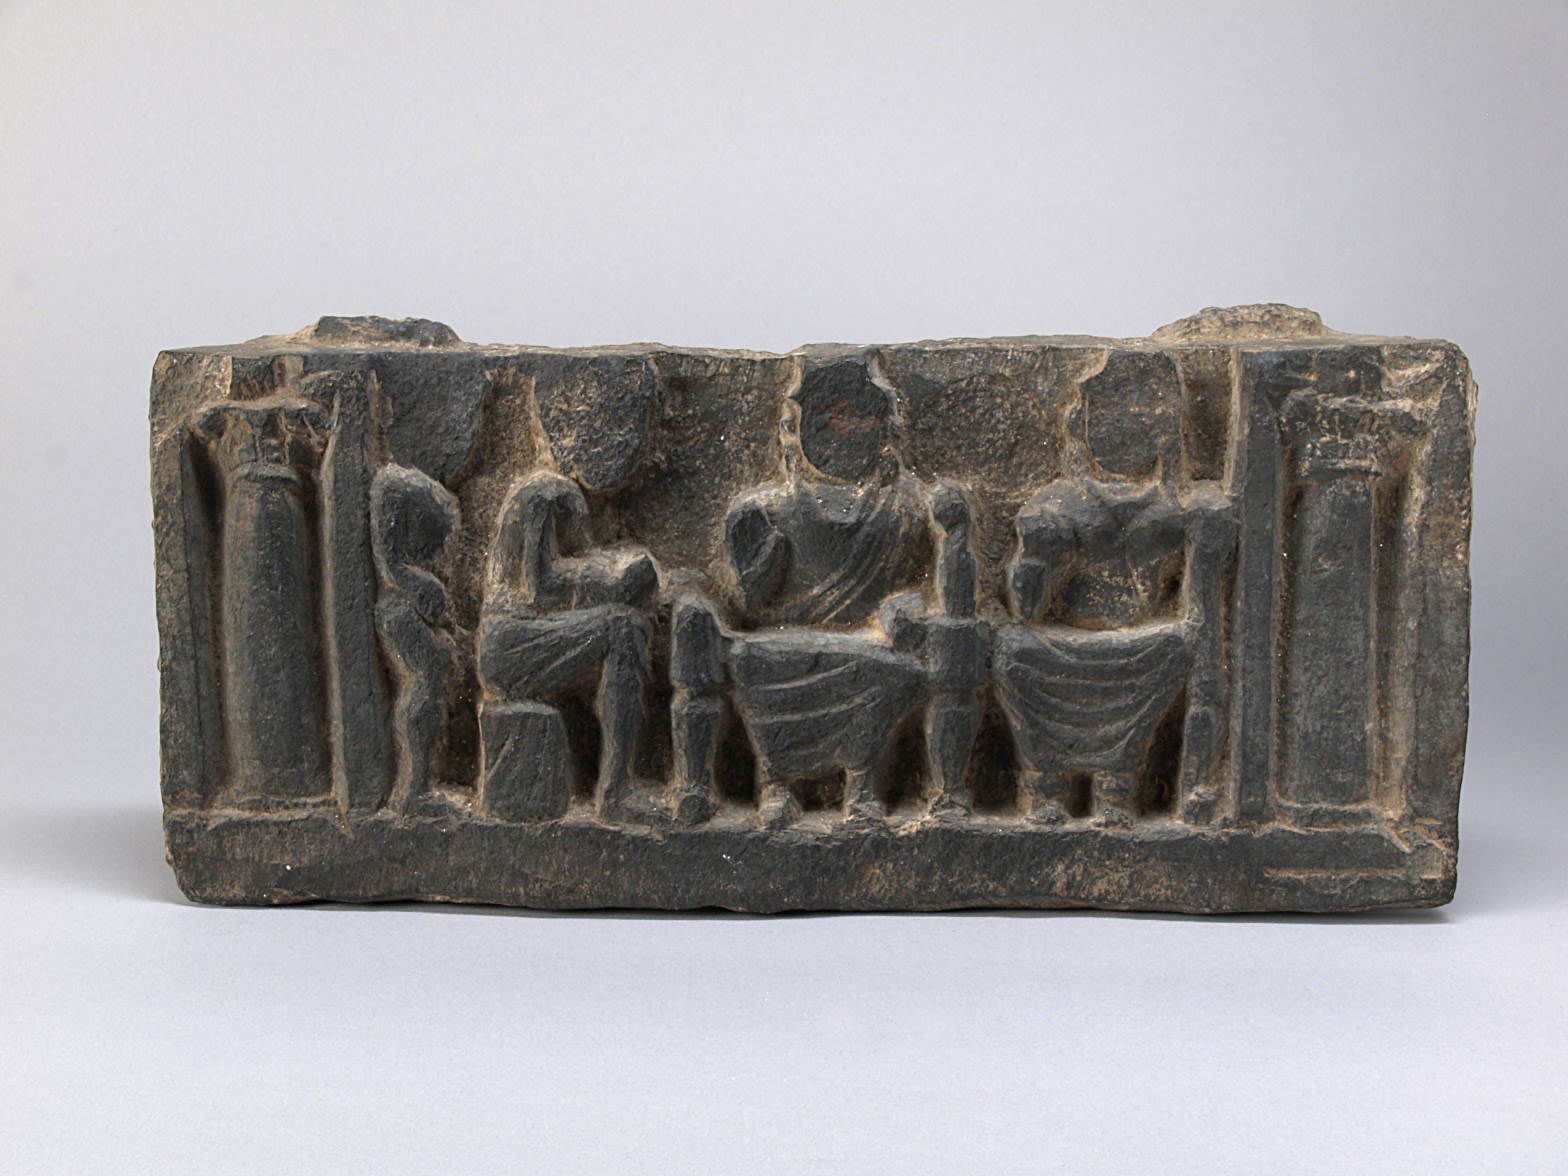
Drum frieze showing veneration of the Buddha | This curved panel was originally part of the base of a stupa and would have been viewed by pilgrims as they circumambulated around the monument. This piece indicates such a practice, with the scene on the left depicting the practice of stupa veneration, with worshippers gathering around a central draped and garlanded stupa. The scene on the right depicts a central seated Buddha flanked by monks, three on either side. The Buddha is seated in meditation. 100-300 CE. Gandhara, Schist. DUROM.1952.1.14, Burn Collection
Drum frieze showing veneration of the Buddha | This curved panel was originally part of the base of a stupa and would have been viewed by pilgrims as they circumambulated around the monument. This piece indicates such a practice, with the scene on the left depicting the practice of stupa veneration, with worshippers gathering around a central draped and garlanded stupa. The scene on the right depicts a central seated Buddha flanked by monks, three on either side. The Buddha is seated in meditation. 100-300 CE. Gandhara, Schist. DUROM.1952.1.14, Burn Collection
Standing Buddha | A halo encircles the head of this finely carved Buddha. He wears a serene facial expression with well-defined features. The draped robes show clear western Classical influences. The Buddha’s left arm was originally raised in a gesture of protection, peace, benevolence and dispelling fear. The damage to the halo above the left shoulder indicates where the raised hand would have been. 100-300 CE. Gandhara, Schist. DUROM.1952.1.23, Burn Collection
Standing Buddha | A halo encircles the head of this finely carved Buddha. He wears a serene facial expression with well-defined features. The draped robes show clear western Classical influences. The Buddha’s left arm was originally raised in a gesture of protection, peace, benevolence and dispelling fear. The damage to the halo above the left shoulder indicates where the raised hand would have been. 100-300 CE. Gandhara, Schist. DUROM.1952.1.23, Burn Collection
Head of a Bodhisattva | Bodhisattvas are individuals who had achieved nirvana, an ultimate state of nothingness, but were able to help others to obtain bliss. In Gandharan art, Bodhisattvas are depicted as powerful princely figures. Unlike the unadorned Buddha images, they epitomise the wealth and power of the noble classes with features such as jewellery, moustaches and elaborate hairstyles. This Bodhisattva head would originally been part of a statue that is likely to have been a key icon in a major shrine. 100-300 CE. Gandhara, Schist. DUROM.1969.346, MacDonald Collection
Head of a Bodhisattva | Bodhisattvas are individuals who had achieved nirvana, an ultimate state of nothingness, but were able to help others to obtain bliss. In Gandharan art, Bodhisattvas are depicted as powerful princely figures. Unlike the unadorned Buddha images, they epitomise the wealth and power of the noble classes with features such as jewellery, moustaches and elaborate hairstyles. This Bodhisattva head would originally been part of a statue that is likely to have been a key icon in a major shrine. 100-300 CE. Gandhara, Schist. DUROM.1969.346, MacDonald Collection

Seated Bodhisattva | This Bodhisattva is shown sitting on a draped throne. The legs of the throne are in the form of lions while the back is visible behind his right shoulder and shows a lotus decoration. The remains of a halo are visible at the shoulders. The Bodhisattva’s rich ornaments include ear pendants and both a long and short necklace. 100-200 CE. Gandhara, Sandstone. DUROM.1952.1.45, Burn Collection
Seated Bodhisattva | This Bodhisattva is shown sitting on a draped throne. The legs of the throne are in the form of lions while the back is visible behind his right shoulder and shows a lotus decoration. The remains of a halo are visible at the shoulders. The Bodhisattva’s rich ornaments include ear pendants and both a long and short necklace. 100-200 CE. Gandhara, Sandstone. DUROM.1952.1.45, Burn Collection

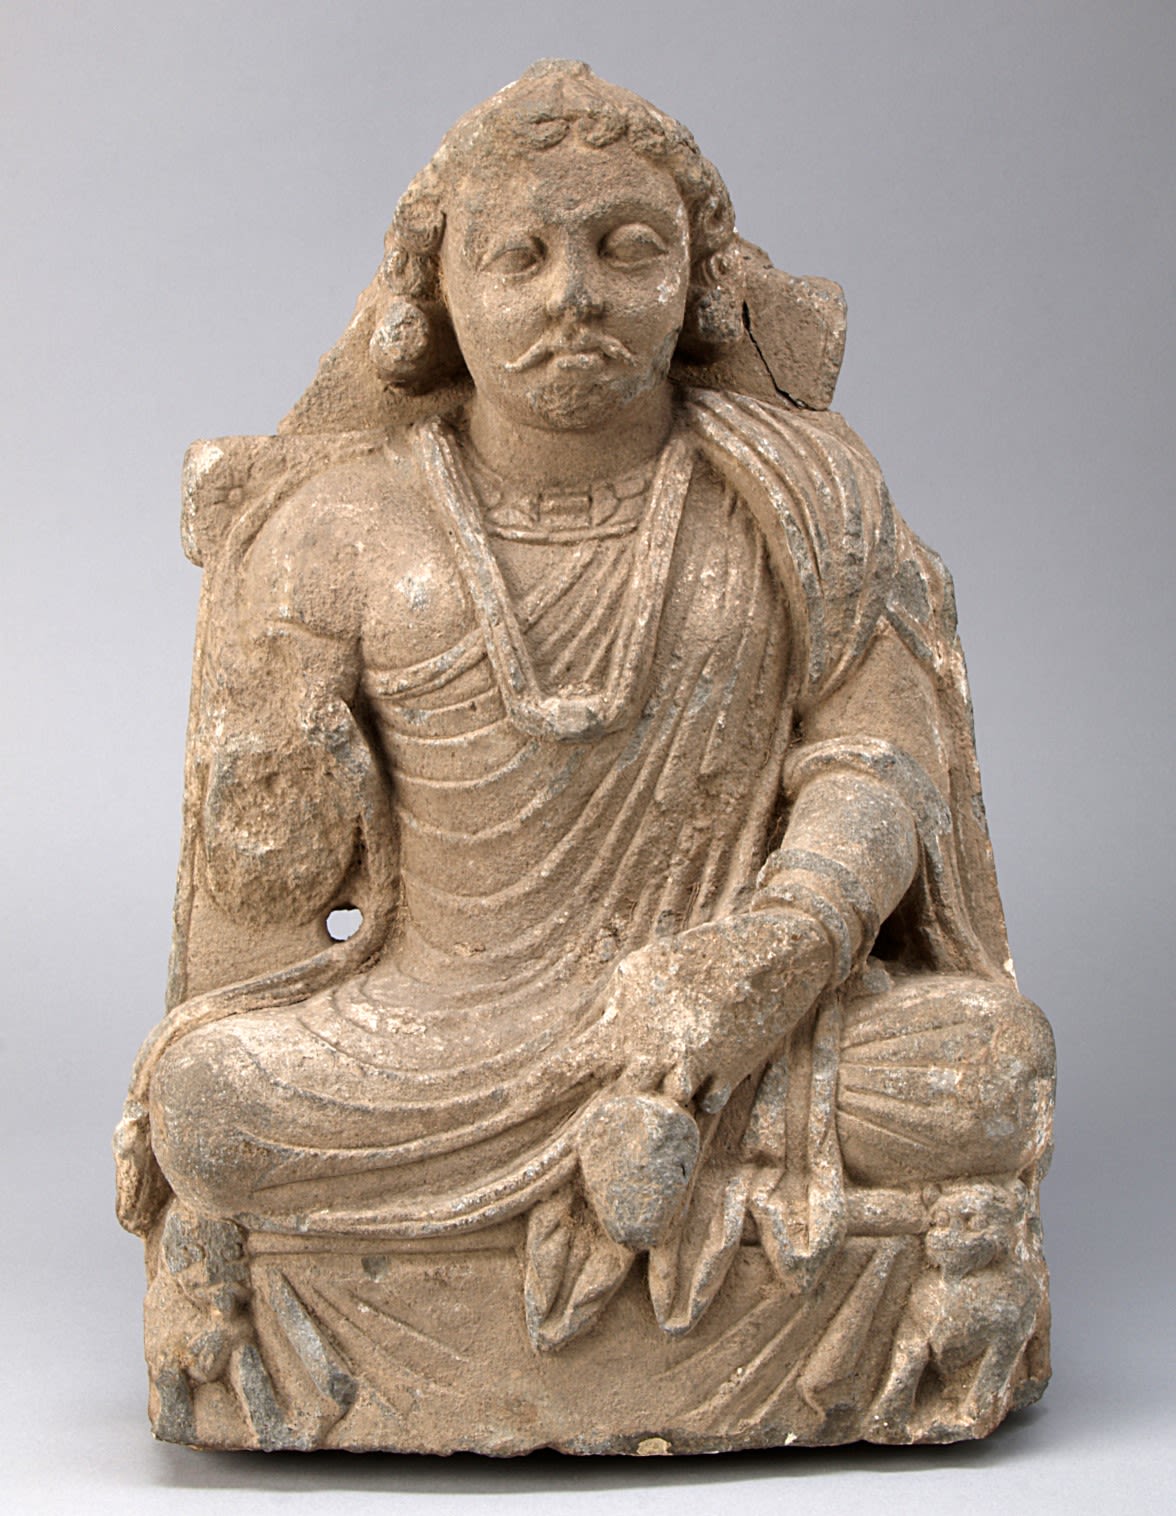
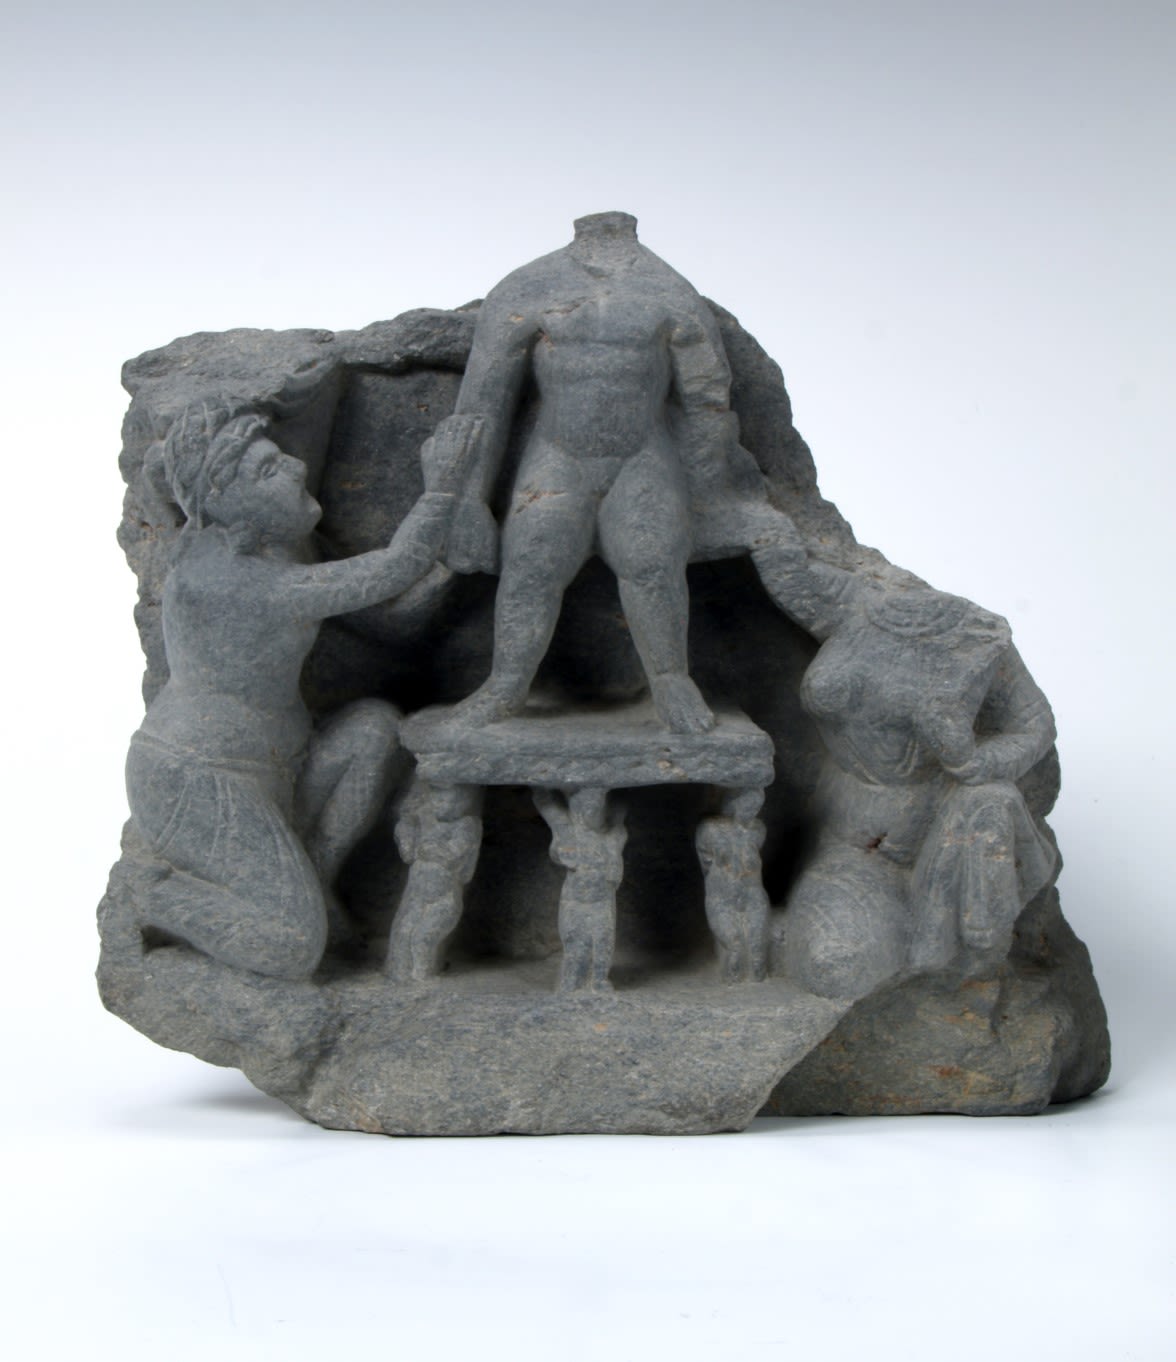
Frieze showing the interpretation of Queen Maya’s dream | This panel depicts the interpretation of Maya Devi’s dream foretelling the birth of the Buddha and is often associated with an attached relief depicting the birth. Queen Maya and King Suddhodana are shown facing forward seated on a high double throne. The figure to the right is facing the couple and is seated on a foot stool. While the head is damaged, it is possible to identify this figure as Asita, the hermit ascetic, who made the prediction about the two possible futures of the Queen’s son. Damage to the faces of all the figures on this relief may suggest deliberate defacement of the monument at a later date. 100=500 CE. Gandhara, Schist. DUROM.1952.1.6
Frieze showing the interpretation of Queen Maya’s dream | This panel depicts the interpretation of Maya Devi’s dream foretelling the birth of the Buddha and is often associated with an attached relief depicting the birth. Queen Maya and King Suddhodana are shown facing forward seated on a high double throne. The figure to the right is facing the couple and is seated on a foot stool. While the head is damaged, it is possible to identify this figure as Asita, the hermit ascetic, who made the prediction about the two possible futures of the Queen’s son. Damage to the faces of all the figures on this relief may suggest deliberate defacement of the monument at a later date. 100=500 CE. Gandhara, Schist. DUROM.1952.1.6

Frieze fragment showing the Birth of the Buddha | Queen Maya Devi is the central figure of this relief fragment. She is depicted holding onto the branch of a tree. Beside her can be seen the head of her sister, Mahaprajitpati. The haloed infant Siddhartha Gautama, the future Buddha, emerges from his mother’s side. He is received and bathed by the attending deities, Indra and Brahma. 100-500 CE. Gandhara, Schist. DUROM.1952.1.1, Burn Collection
Frieze fragment showing the Birth of the Buddha | Queen Maya Devi is the central figure of this relief fragment. She is depicted holding onto the branch of a tree. Beside her can be seen the head of her sister, Mahaprajitpati. The haloed infant Siddhartha Gautama, the future Buddha, emerges from his mother’s side. He is received and bathed by the attending deities, Indra and Brahma. 100-500 CE. Gandhara, Schist. DUROM.1952.1.1, Burn Collection

Frieze fragment showing the Bathing of the infant Buddha | The naked Siddhartha is depicted as a muscular infant with a broad chest. He is standing on a stool with legs carved to look like humans and is flanked by two attendants who are bathing him. 100-500 CE. Gandhara, Schist. DUROM.1952.1.9, Burn Collection
Frieze fragment showing the Bathing of the infant Buddha | The naked Siddhartha is depicted as a muscular infant with a broad chest. He is standing on a stool with legs carved to look like humans and is flanked by two attendants who are bathing him. 100-500 CE. Gandhara, Schist. DUROM.1952.1.9, Burn Collection
Pilgrimage
Pilgrimage is an activity shared across differing belief systems, traditions and parts of the world. Often spiritual, educational and religious in motivation, the trade and exchange routes of the Silk Roads encouraged and provided the infrastructure for pilgrim journeys.
Several pilgrims wrote accounts of their journeys through Taxila, including the Chinese Buddhist monks Faxian (337-422 CE) and Xuanzang (602-664 CE). Both recorded its significance as the location where, in a previous life, the Buddha gave away his own head as a donation.
Xuanzang also added that there was a stupa built by the Mauryan Emperor Asoka. Traditionally recognised as one of the monuments in which cremated remains of the Gautama Buddha were later interred by Asoka, these beliefs contributed to Taxila becoming an important destination for Buddhist pilgrims as well as a seat of learning.
Scenes depicted on Gandharan sculptural pieces give indications of how monuments at Taxila may have been venerated by pilgrims and devotees. These depict the placing of garlands and the circumambulation (ritual walking around) of monuments.
Relief panels, many illustrating stories from the life of the Buddha, were also placed around monuments so that they could be ‘read’ and engaged with by devotees during such veneration and circumambulation.
The Buddhist monuments of Taxila, and the wider region, continue to attract pilgrims from across the world. The early 21st century has seen many governments and regional development banks investing in programmes to promote Buddhist pilgrimage across South Asia.
Whilst it remains vital to protect the heritage from harmful development, increased tourism and pilgrimage to Taxila and Gandhara also creates opportunities for local communities to gain significant social and economic benefits. Pilgrims and tourists also create opportunities to develop and promote the intangible culture and traditions of local communities, such as Taxila’s renowned stone-carvers.
Pilgrimage and Diaspora
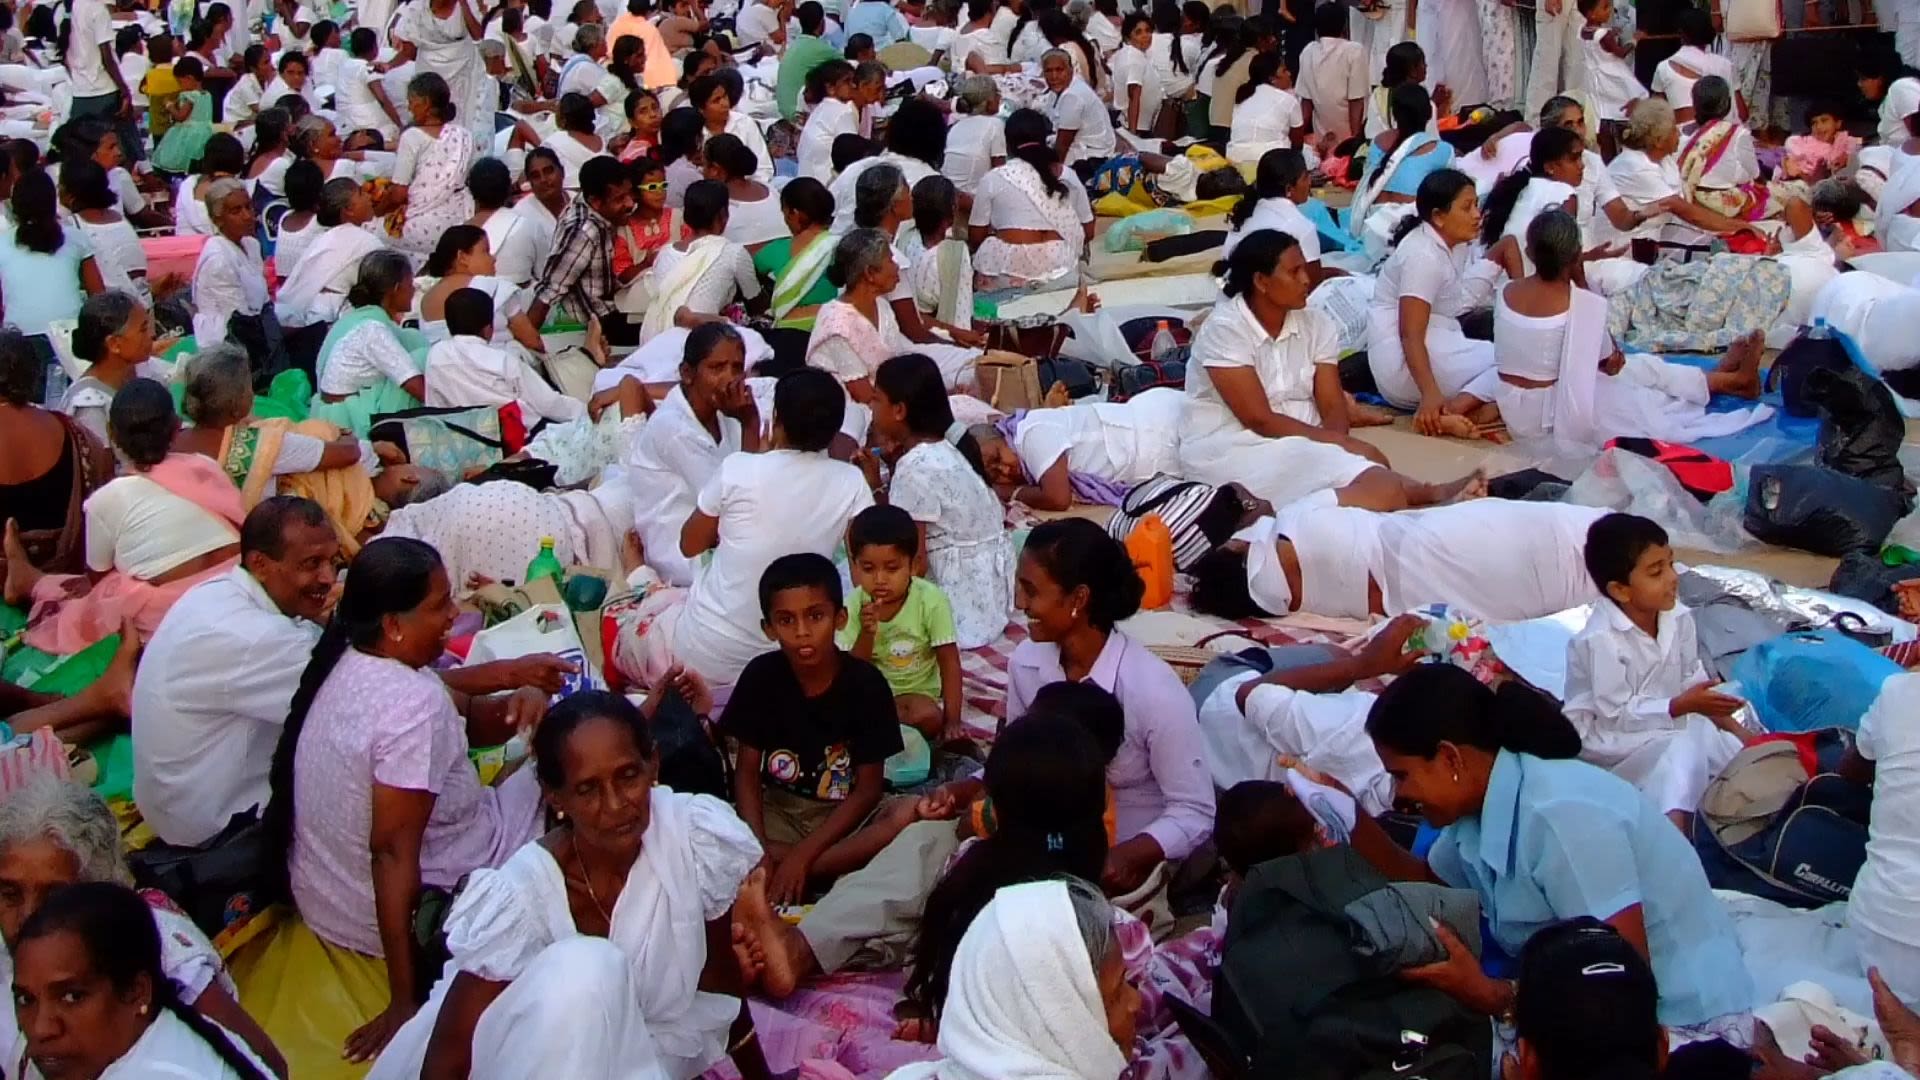
Before the COVID-19 pandemic, it was estimated that 600 million journeys annually undertaken across the world could be classified as pilgrimage. With a global population of 490 million Buddhists, 98% of whom are resident within the Asia Pacific region, there are significant financial incentives to encourage pilgrimage as a driver for poverty alleviation.
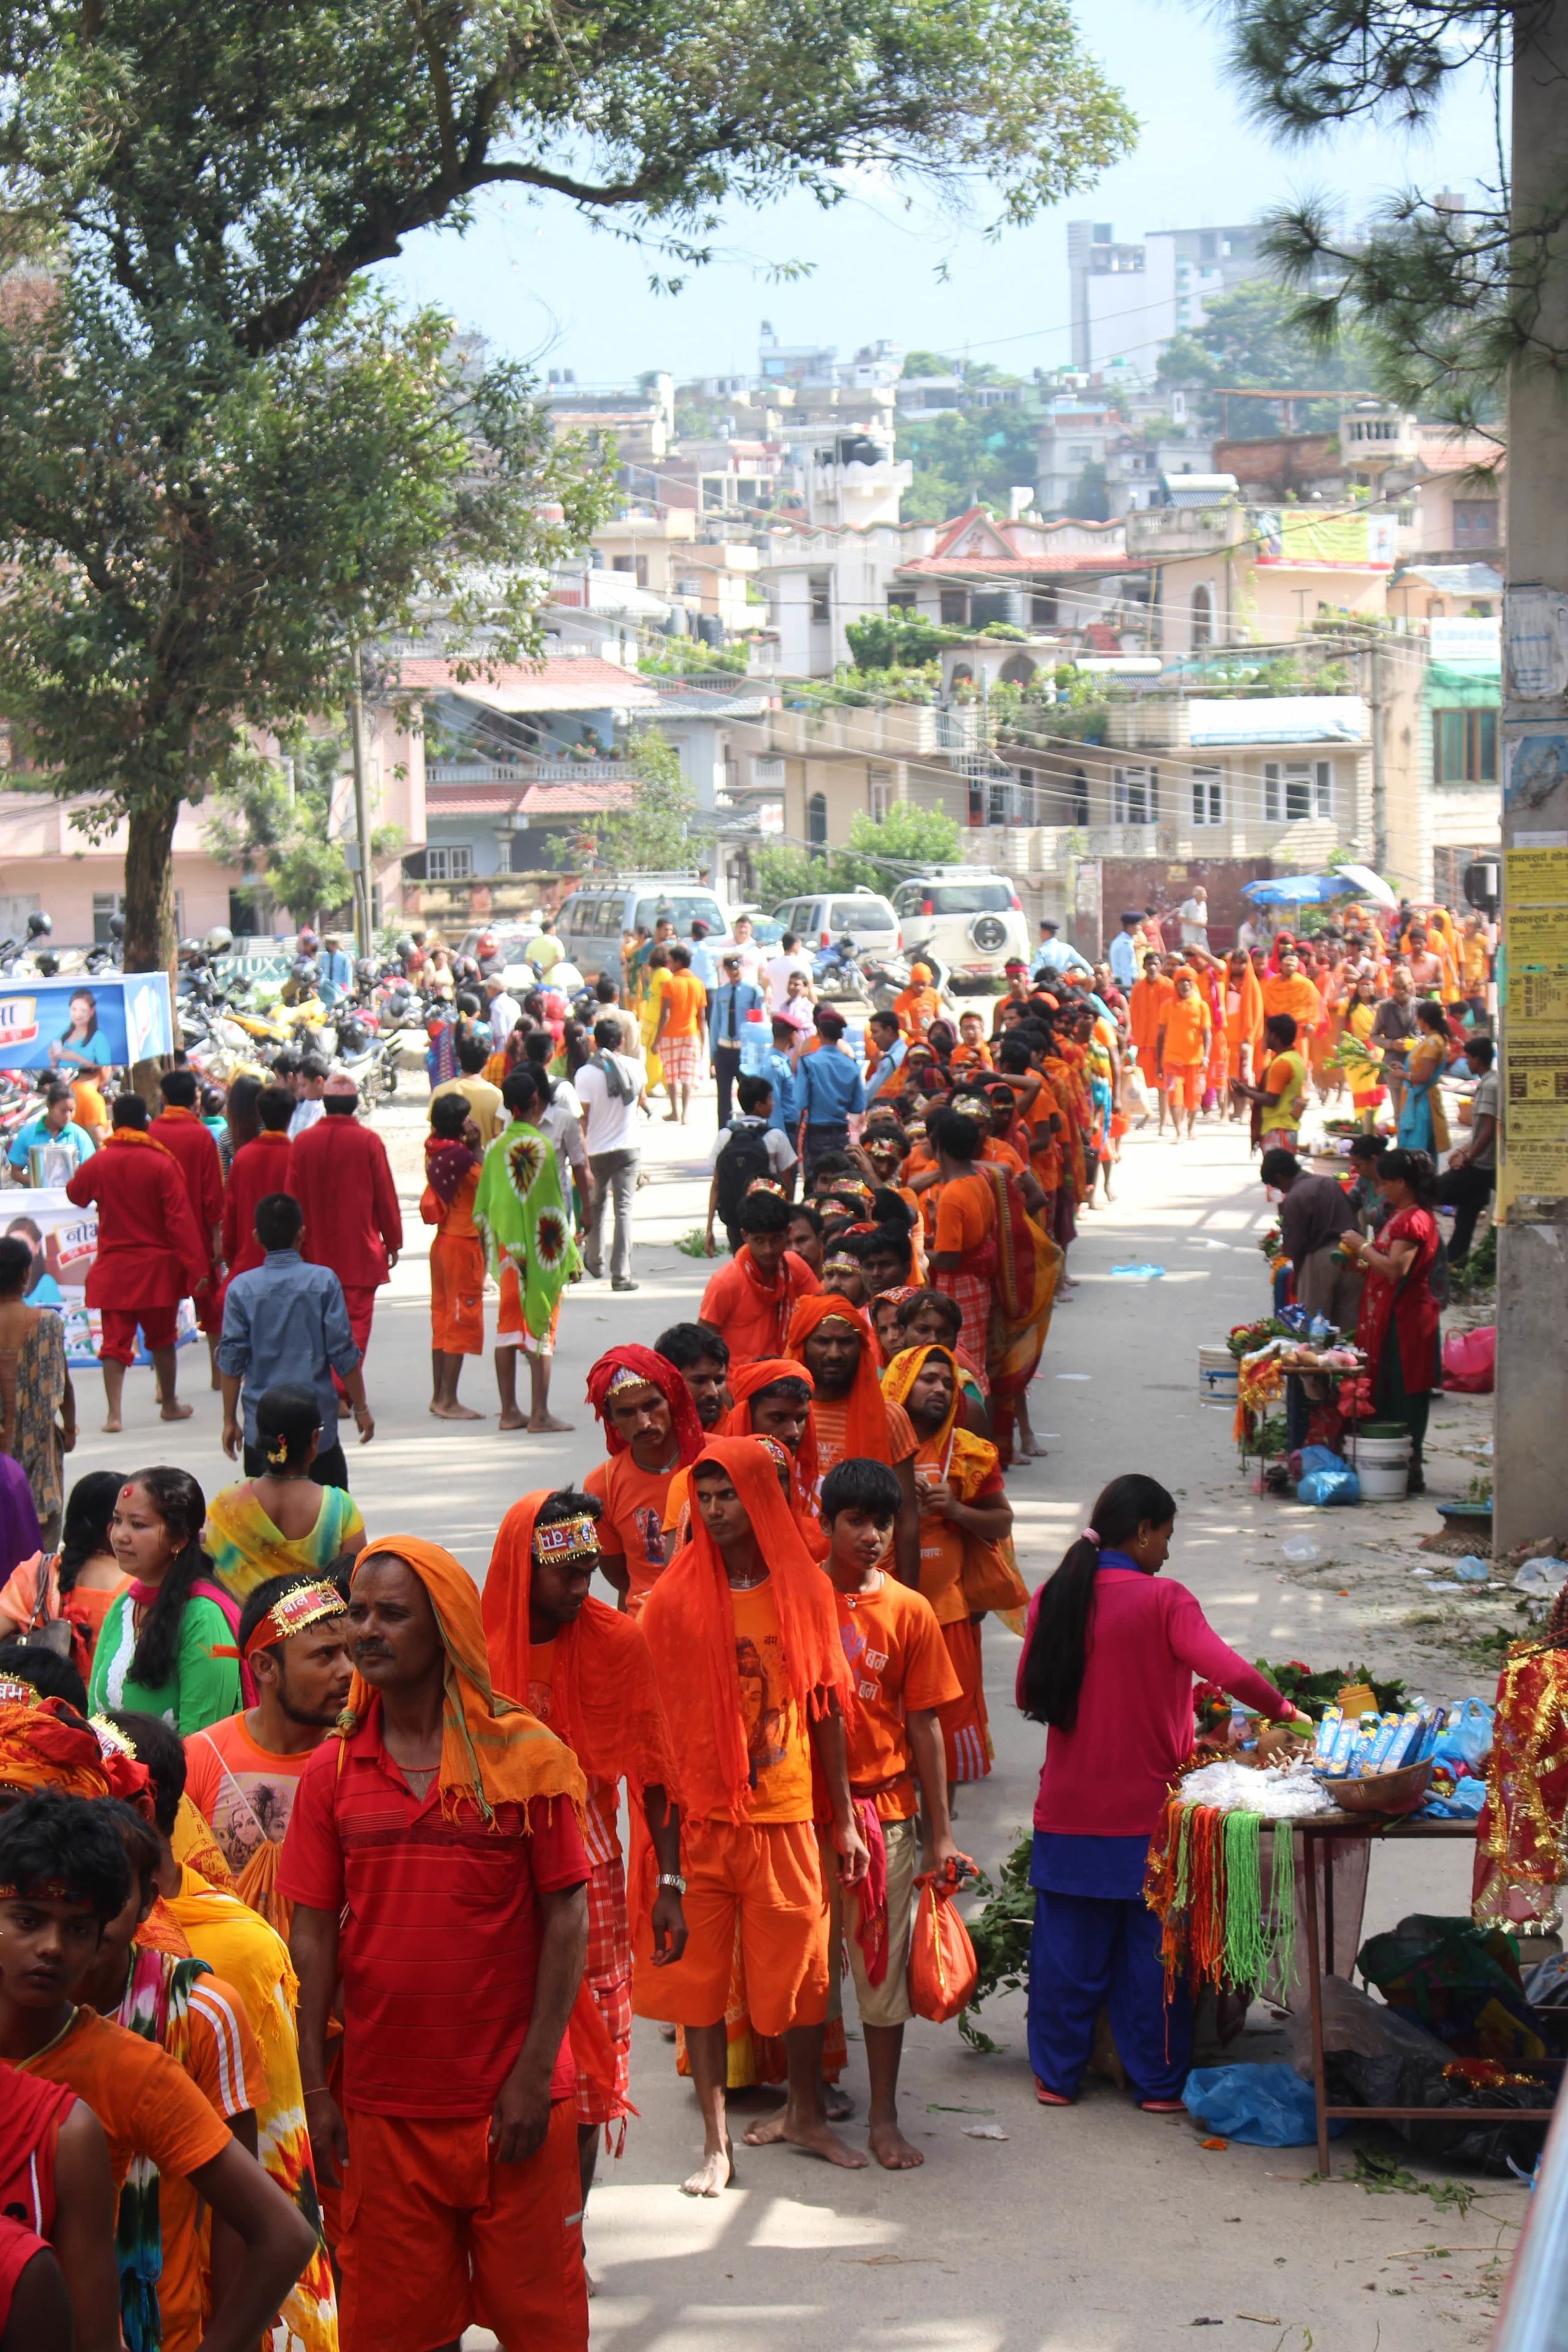
Nepal, Lumbini Province, Lumbini, 2012. Courtesy of Ira Block
According to the Asia Development Bank, US $252.9 billion was contributed directly and indirectly to the economies of South Asia through tourism in 2016; with tourism predicted to account for 9.5% of South Asia’s Gross Domestic Product by 2027.
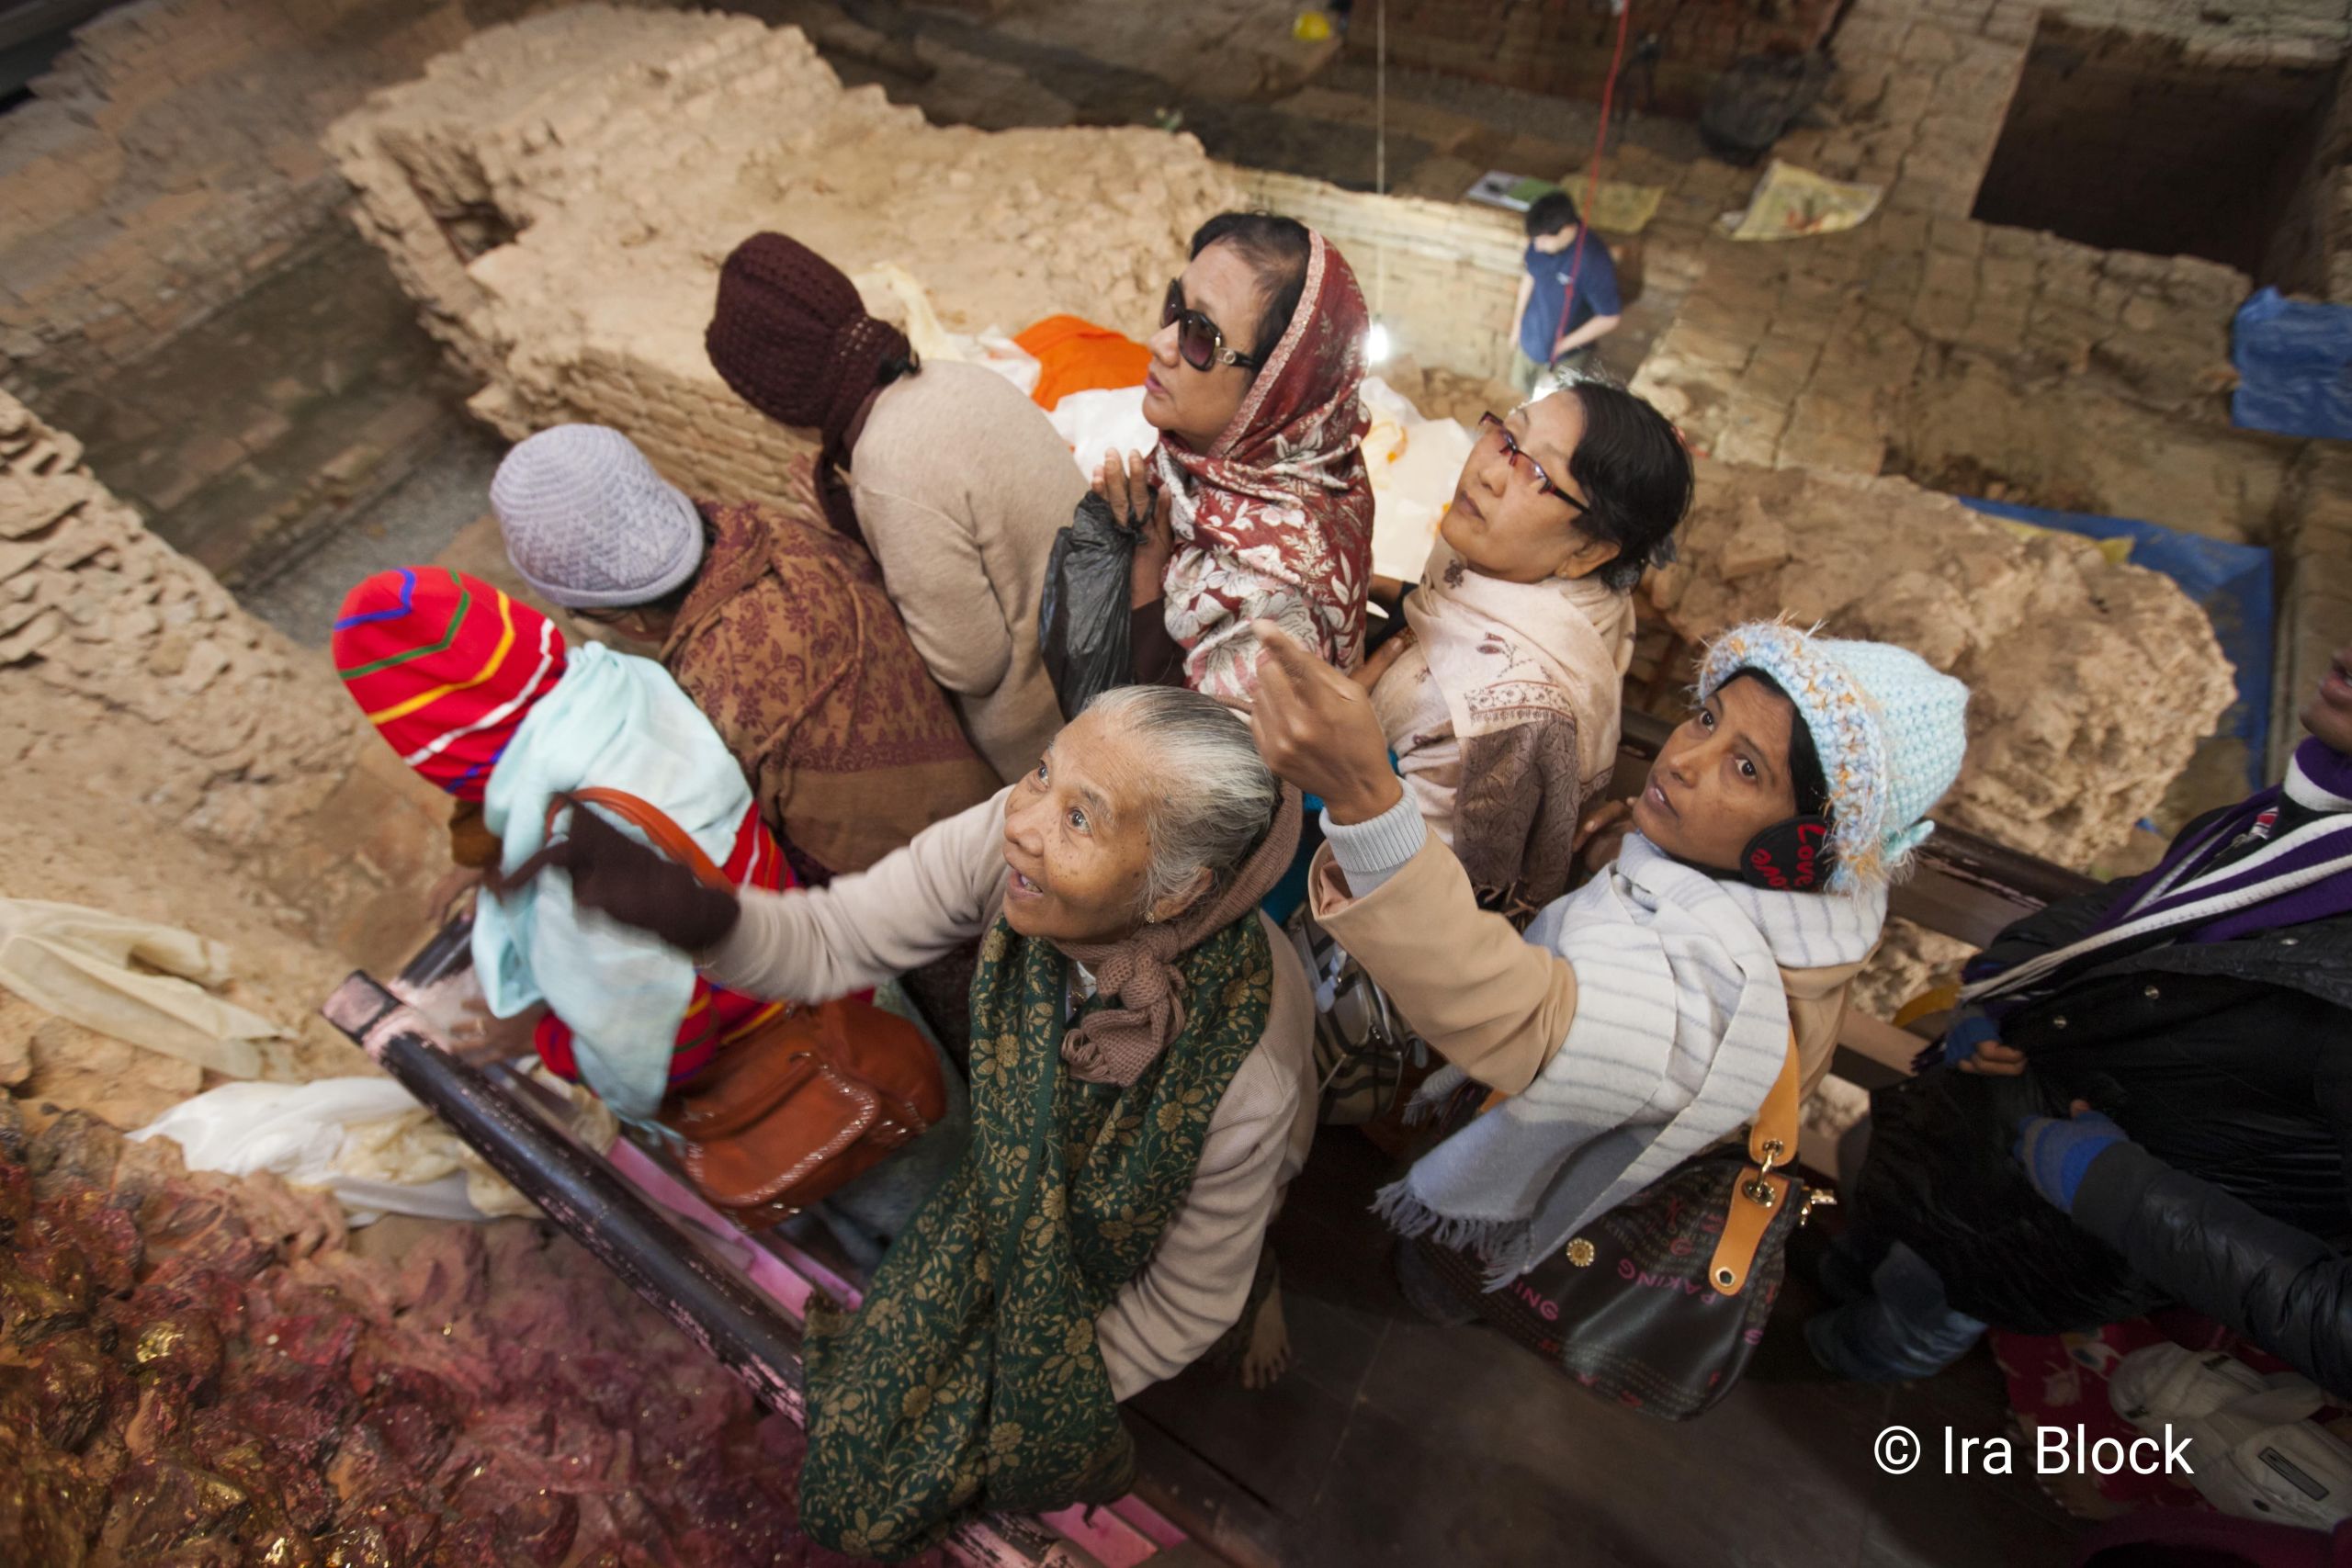
Surveys of pilgrims conducted by Durham University and partners at archaeological sites in Nepal, Sri Lanka and India have begun to map pilgrim numbers, experiences and interactions with heritage. Through this, the social and economic impact of pilgrimage on these sites and local communities is being explored.
Nepal, Bagmati Province, Kathmandu, 2014. Courtesy of Durham UNESCO Chair
Another group identified as a potential market for heritage-driven tourist developments are diaspora communities. A diaspora can be classified as a community that originate in a different geographic area from the one in which they now live.
Despite the UN’s recognition that diaspora communities can contribute to inclusive and sustainable development in both their countries of residence and origin, there has been little mapping or promotion of the potential benefits from diaspora-focused tourism.
In response, Durham University is working with colleagues from across South Asia, including the Maharaja Sayajirao University of Baroda and the Archaeological Survey of India and Union Christian College, Kerala, to identify the potential contribution of diaspora tourism and pilgrimage to positive social and economic developments whilst maintaining appropriate heritage protection.
Click the icons on the map to see images from these sites of pilgrimage.
Pilgrims will often buy a memento to remember and reflect on their journey and visit to a site.
Recent surveys by Durham’s UNESCO Chair at Tilaurakot, Nepal, have identified that pilgrims are keen to buy locally produced handicrafts. However, lack of knowledge and information frequently leads them to buy mass-produced imported goods with no connection to the site or region beyond religious iconography.
Co-designed by Durham University, and colleagues across South Asia, Tilaurakot’s new museum contains a gallery which celebrates local handicrafts and their artists. This raises visitor awareness of their products. The crafts can then be sold by local co-operatives and collectives for the economic benefit of resident communities.
Nepal, Lumbini Province, Lumbini, 2012. Courtesy of Ira Block
Nepal, Lumbini Province, Lumbini, 2012. Courtesy of Ira Block
Nepal, Bagmati Province, Kathmandu, 2014. Courtesy of Durham UNESCO Chair
Nepal, Bagmati Province, Kathmandu, 2014. Courtesy of Durham UNESCO Chair

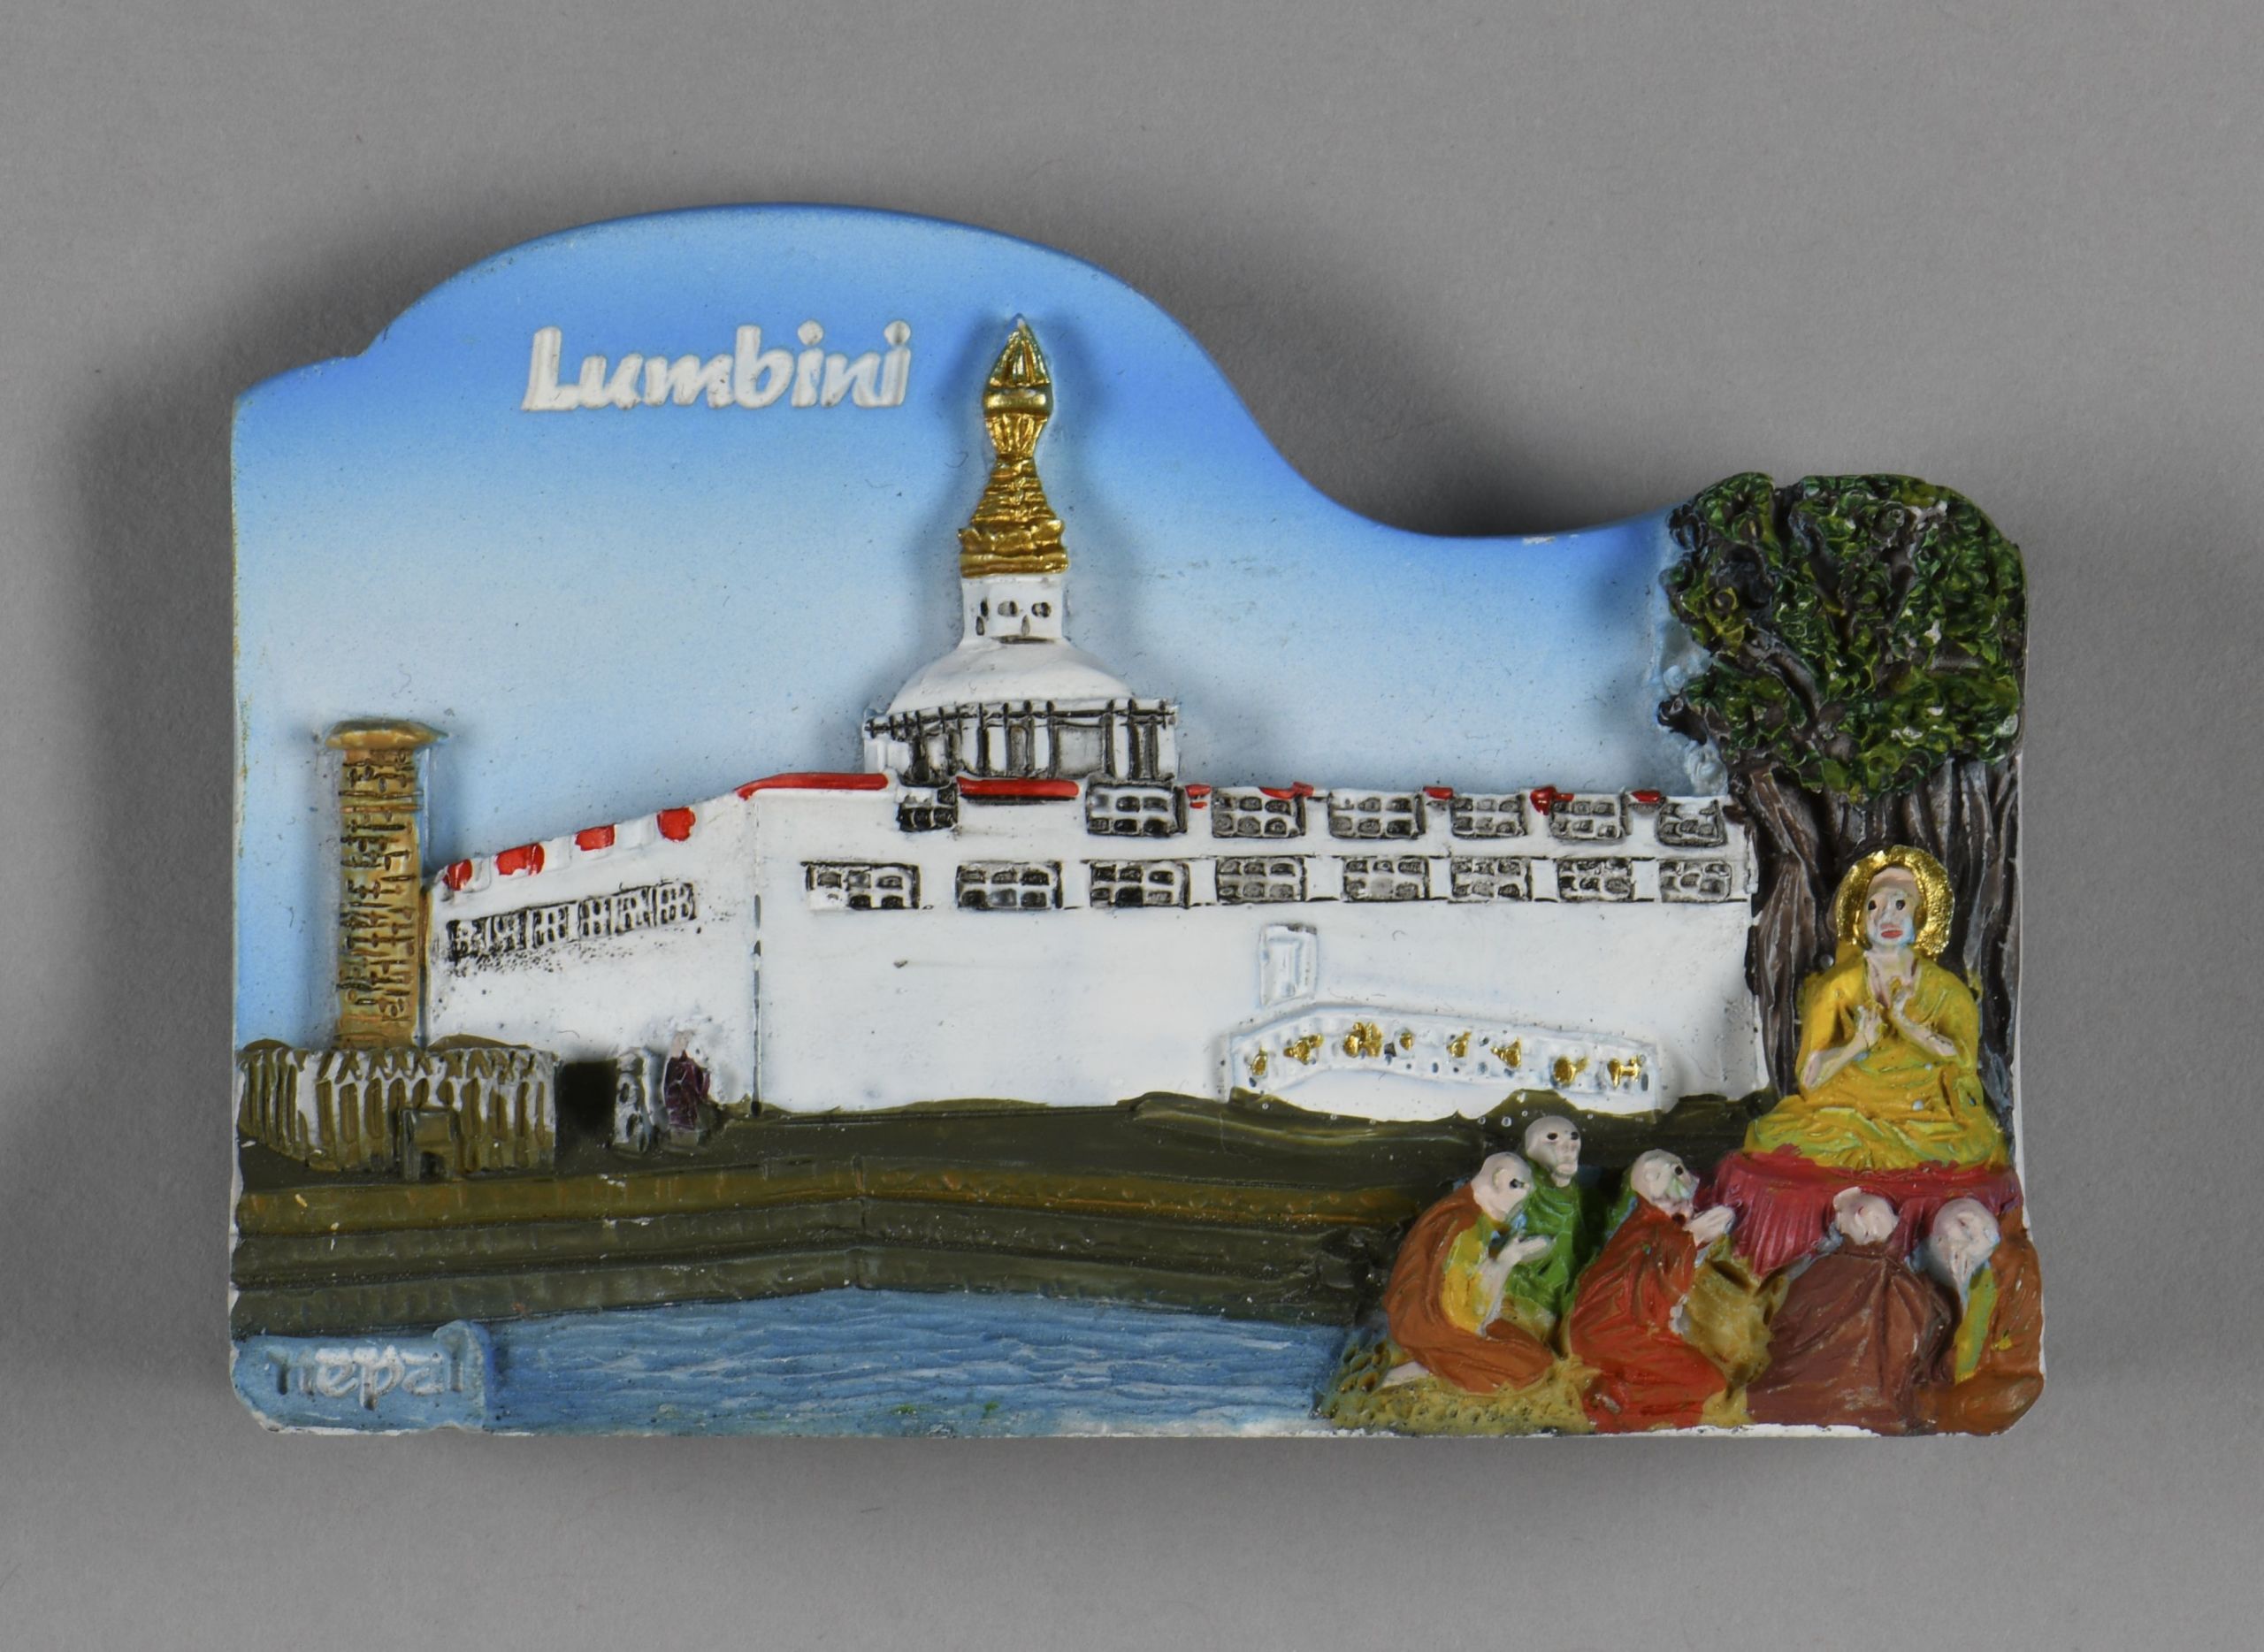


Modern mass produced souvenirs on sale at the Buddha’s birthplace in Lumbini, Nepal: a ceramic fridge magnet depicting the Maya Devi Temple and Ashokan Pillar at the site. DUROM.2015.114
Modern mass produced souvenirs on sale at the Buddha’s birthplace in Lumbini, Nepal: a ceramic fridge magnet depicting the Maya Devi Temple and Ashokan Pillar at the site. DUROM.2015.114

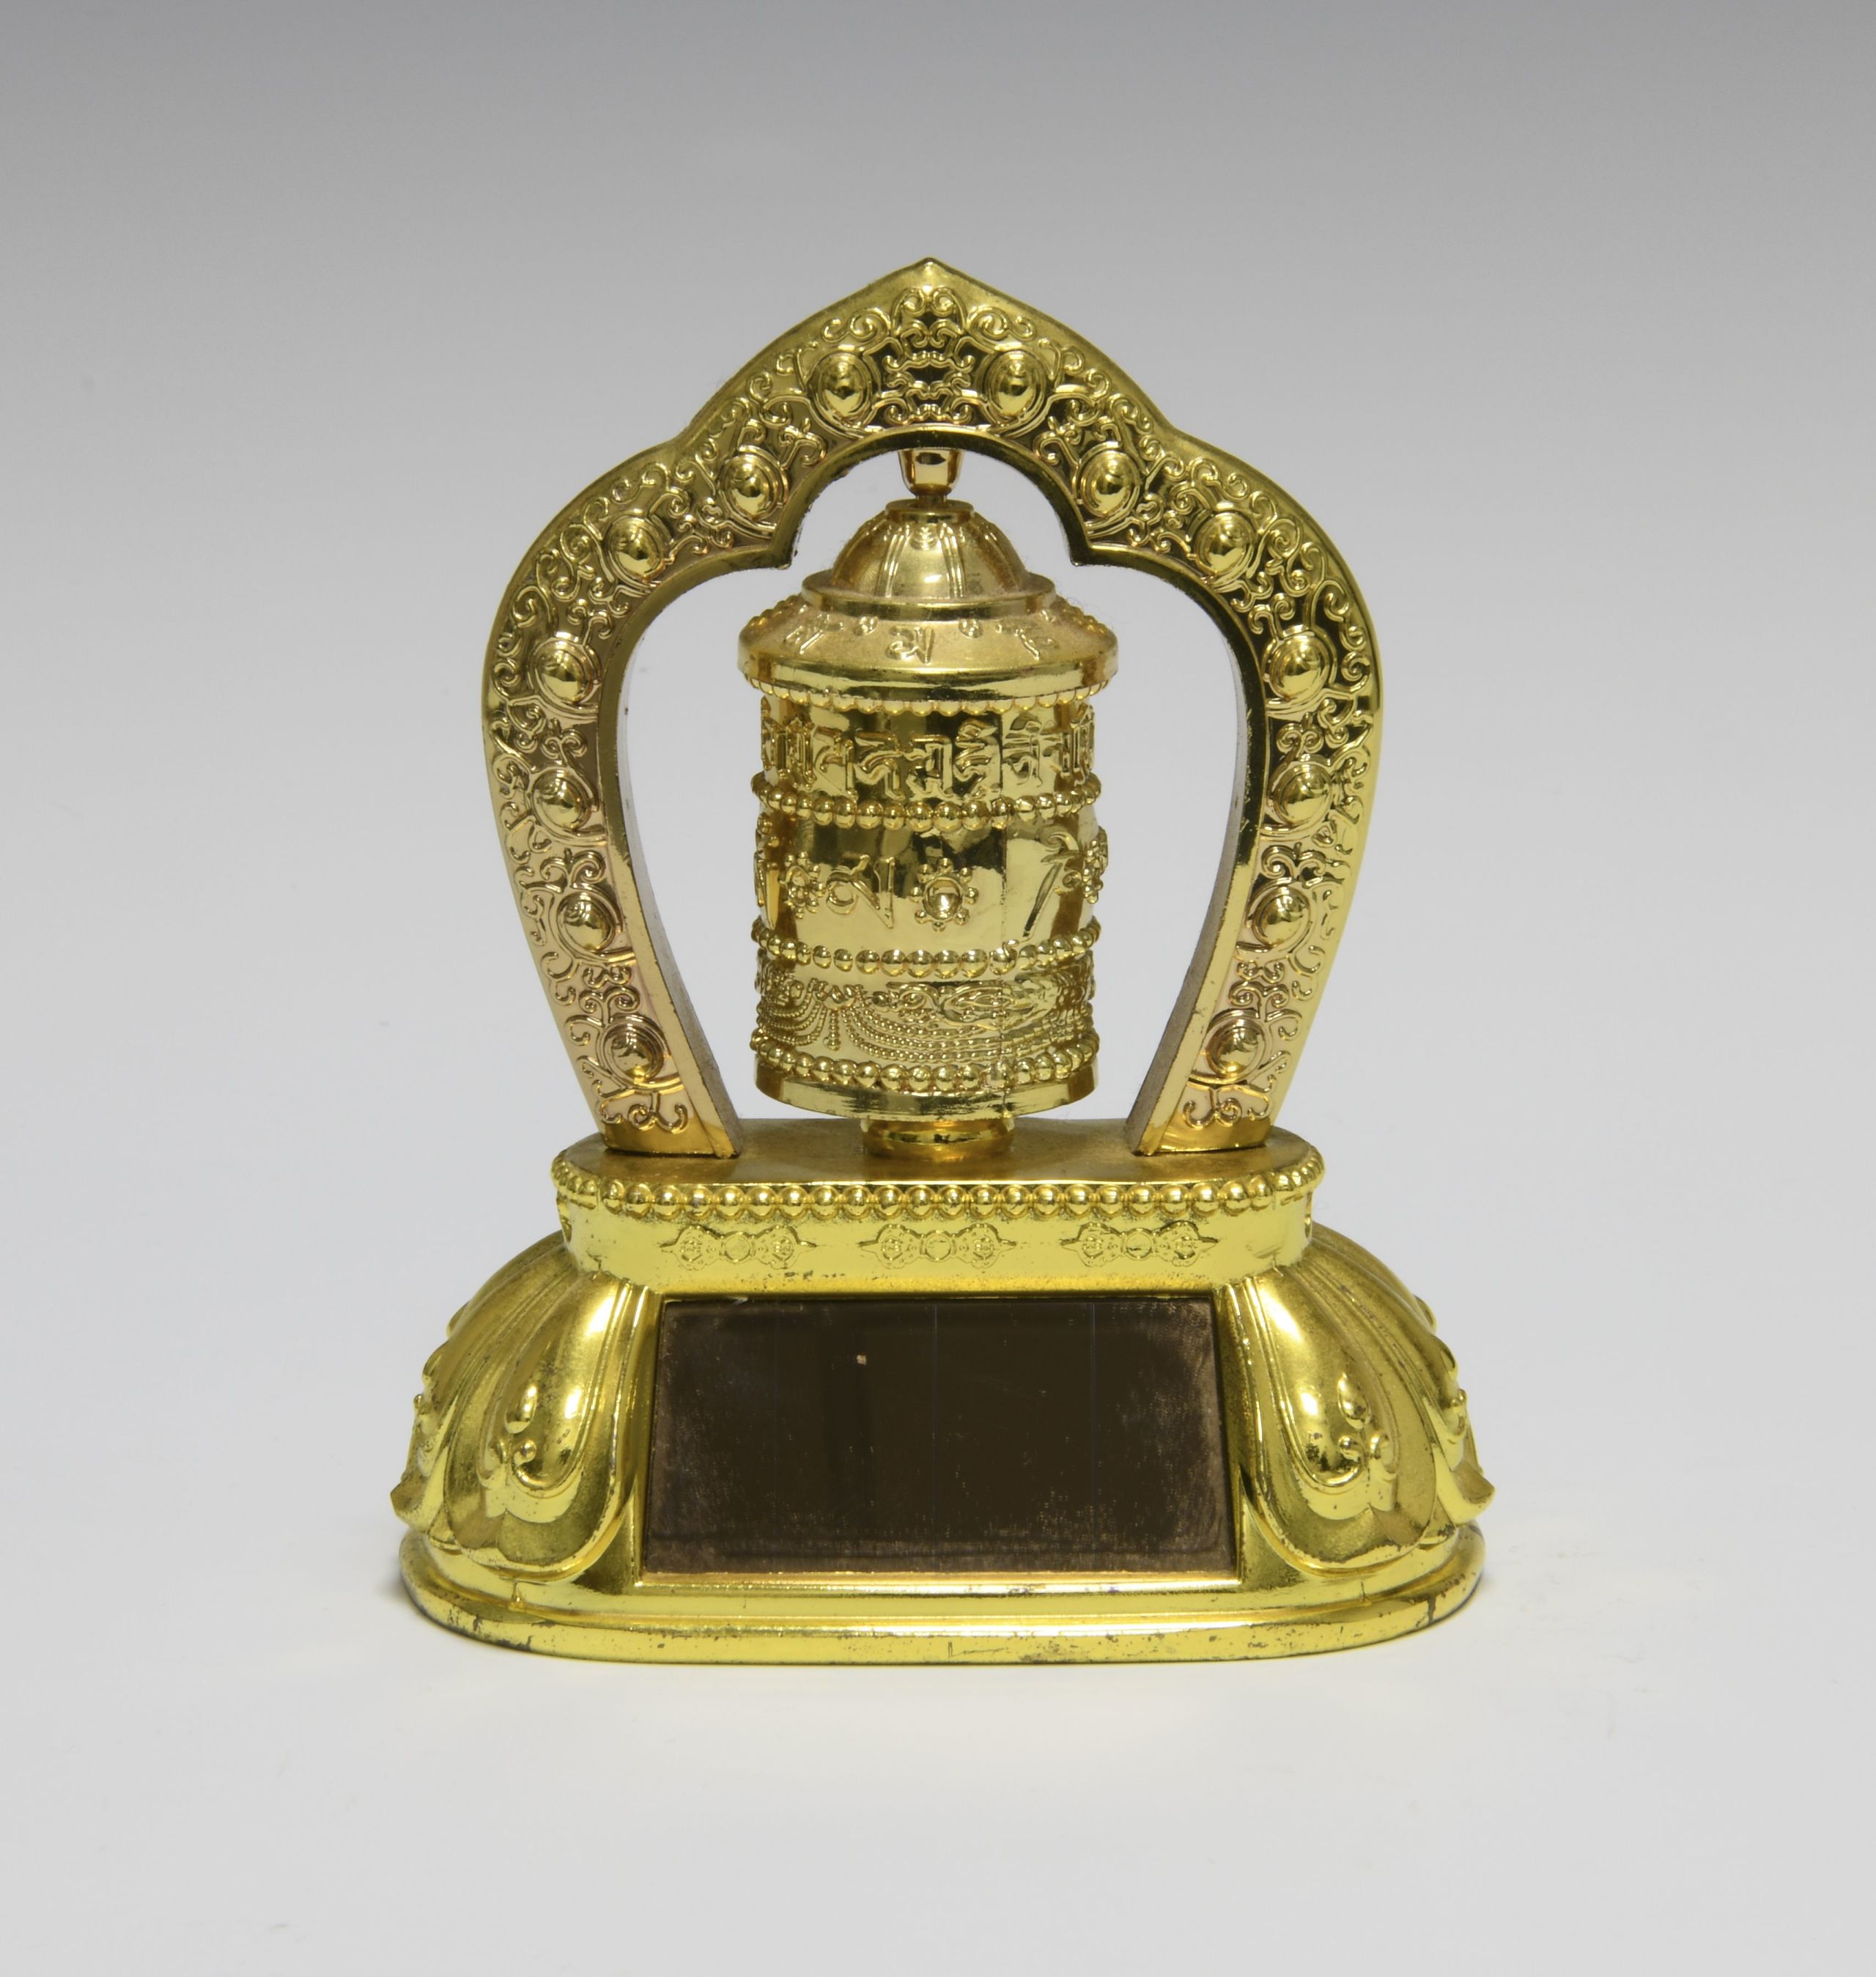
Solar powered prayer wheel. Durham UNESCO Chair
Solar powered prayer wheel. Durham UNESCO Chair

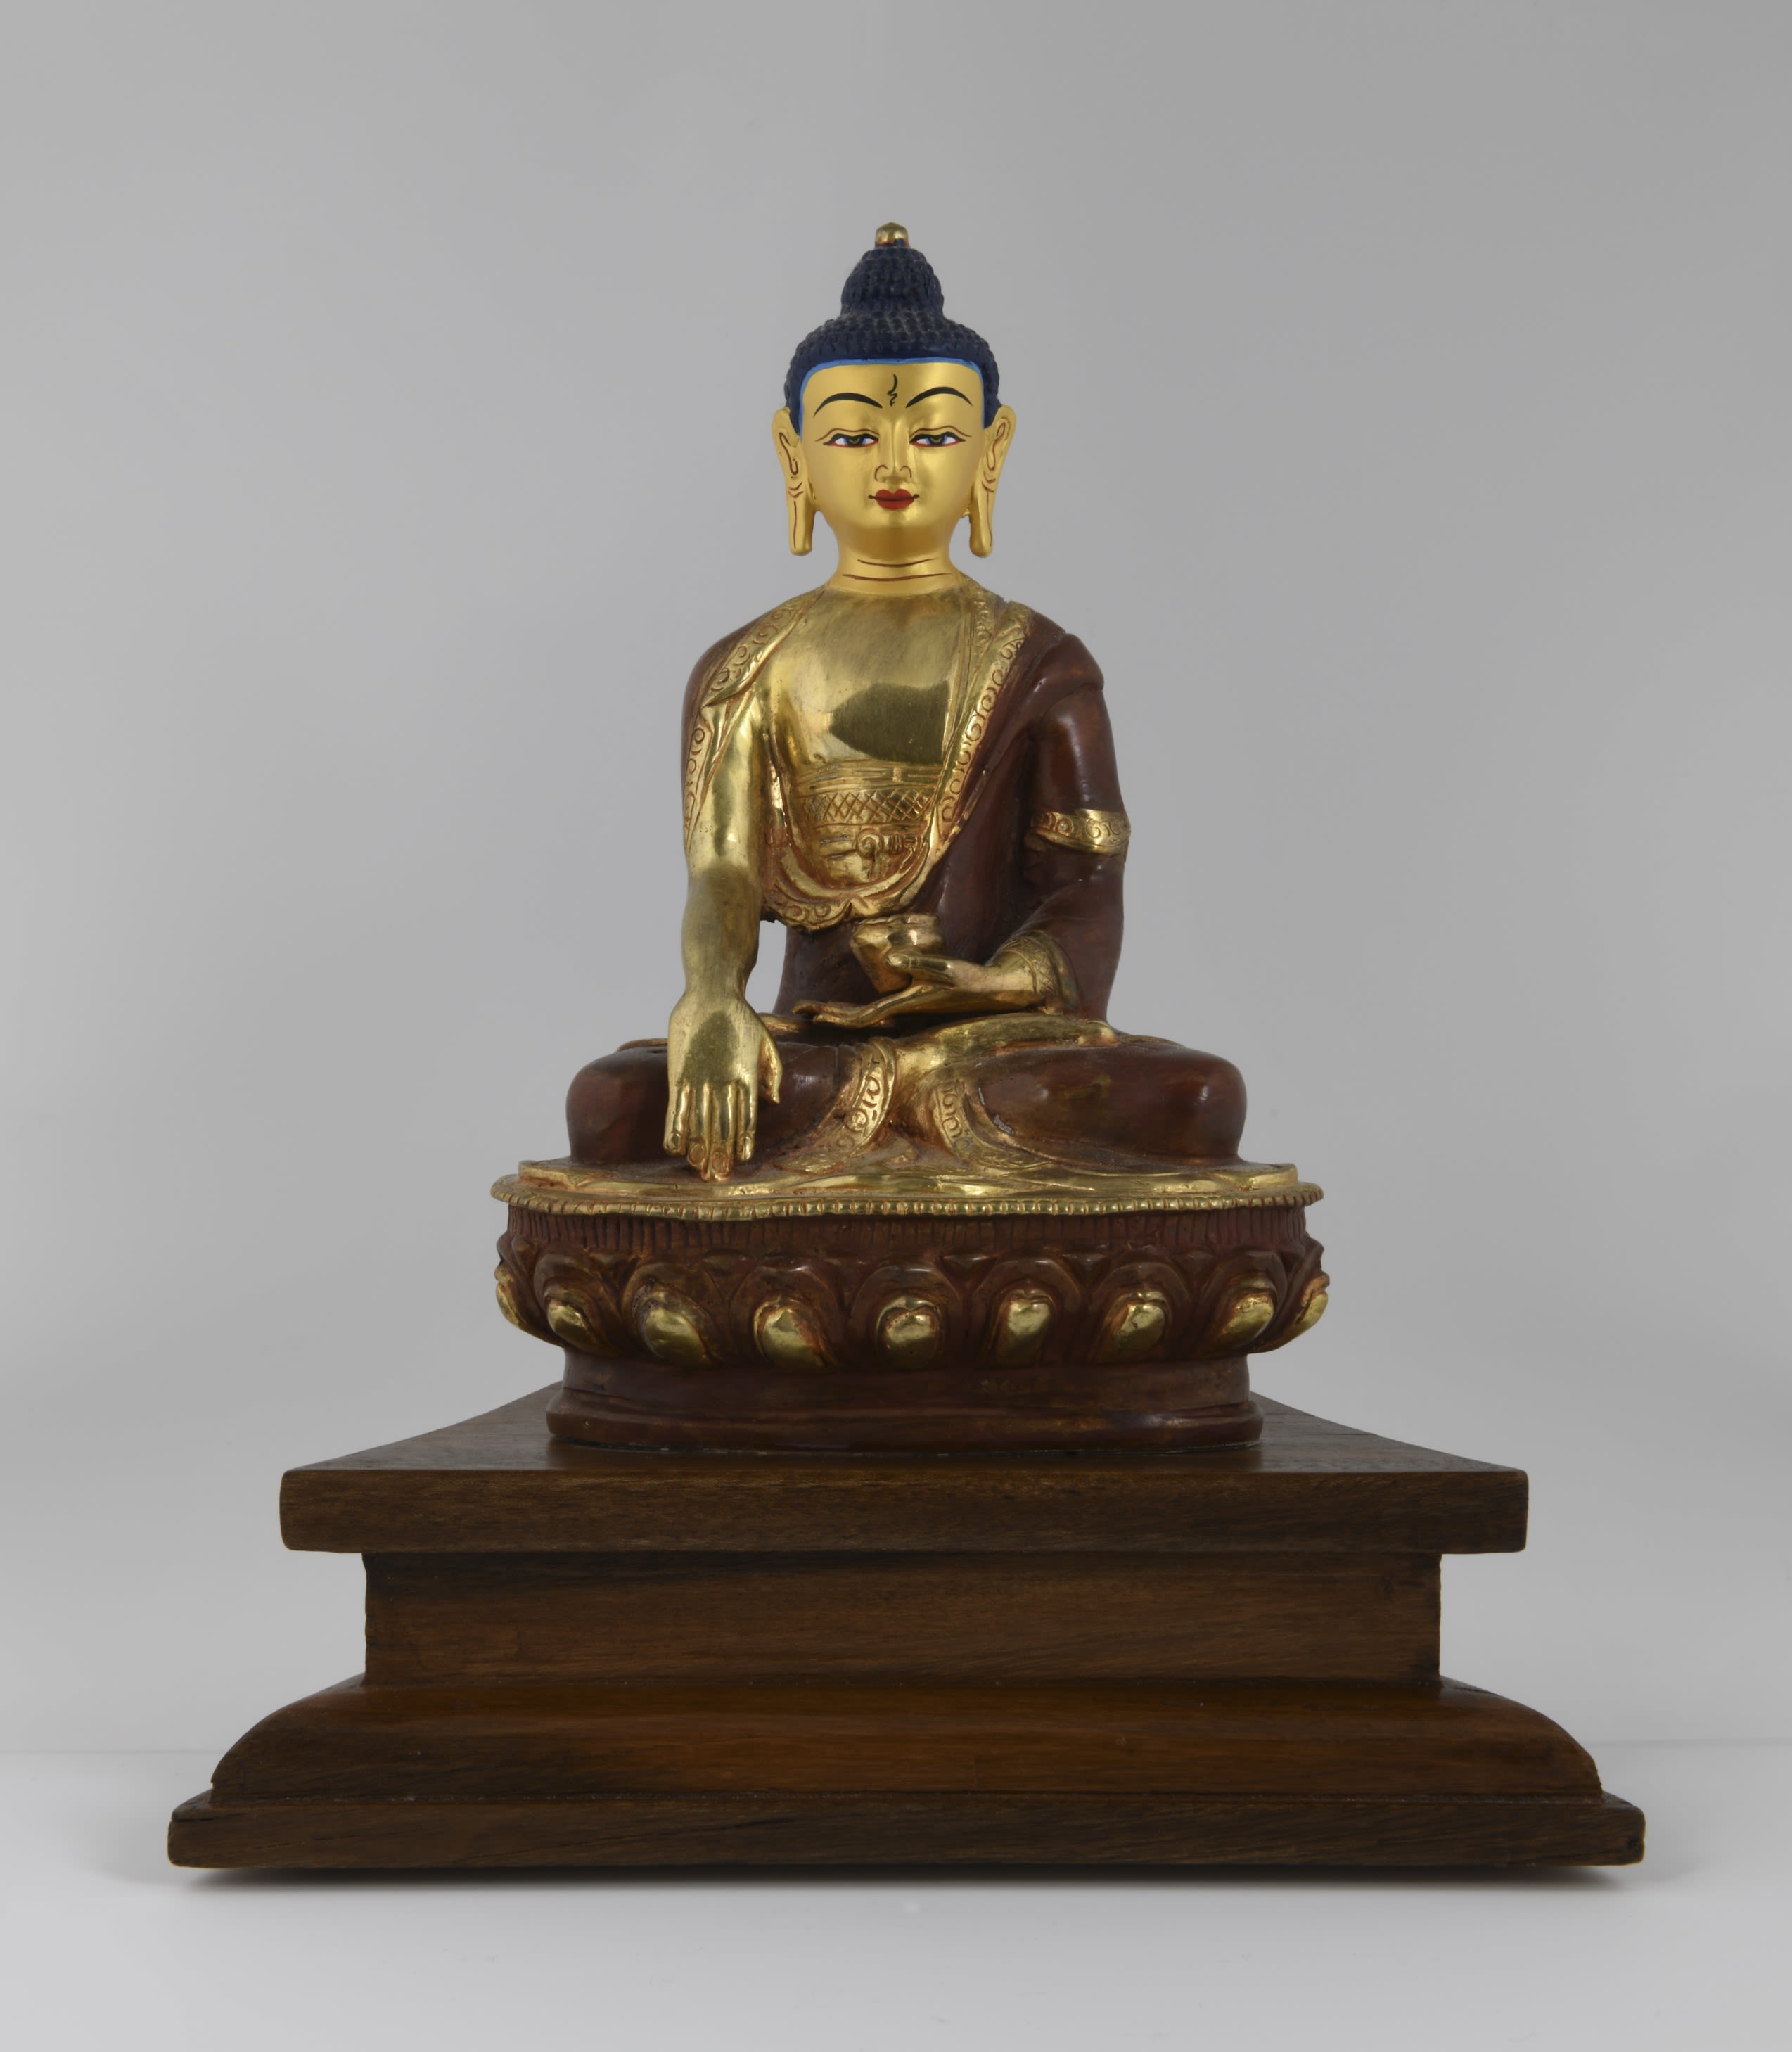
Modern mass-produced and imported statue of Buddha, available for purchase at Lumbini and Tilaurakot, Nepal as a tourist and pilgrim souvenir. Loan, Durham UNESCO Chair
Modern mass-produced and imported statue of Buddha, available for purchase at Lumbini and Tilaurakot, Nepal as a tourist and pilgrim souvenir. Loan, Durham UNESCO Chair

Replica of the Nativity Sculpture at Lumbini. Durham UNESCO Chair
Replica of the Nativity Sculpture at Lumbini. Durham UNESCO Chair

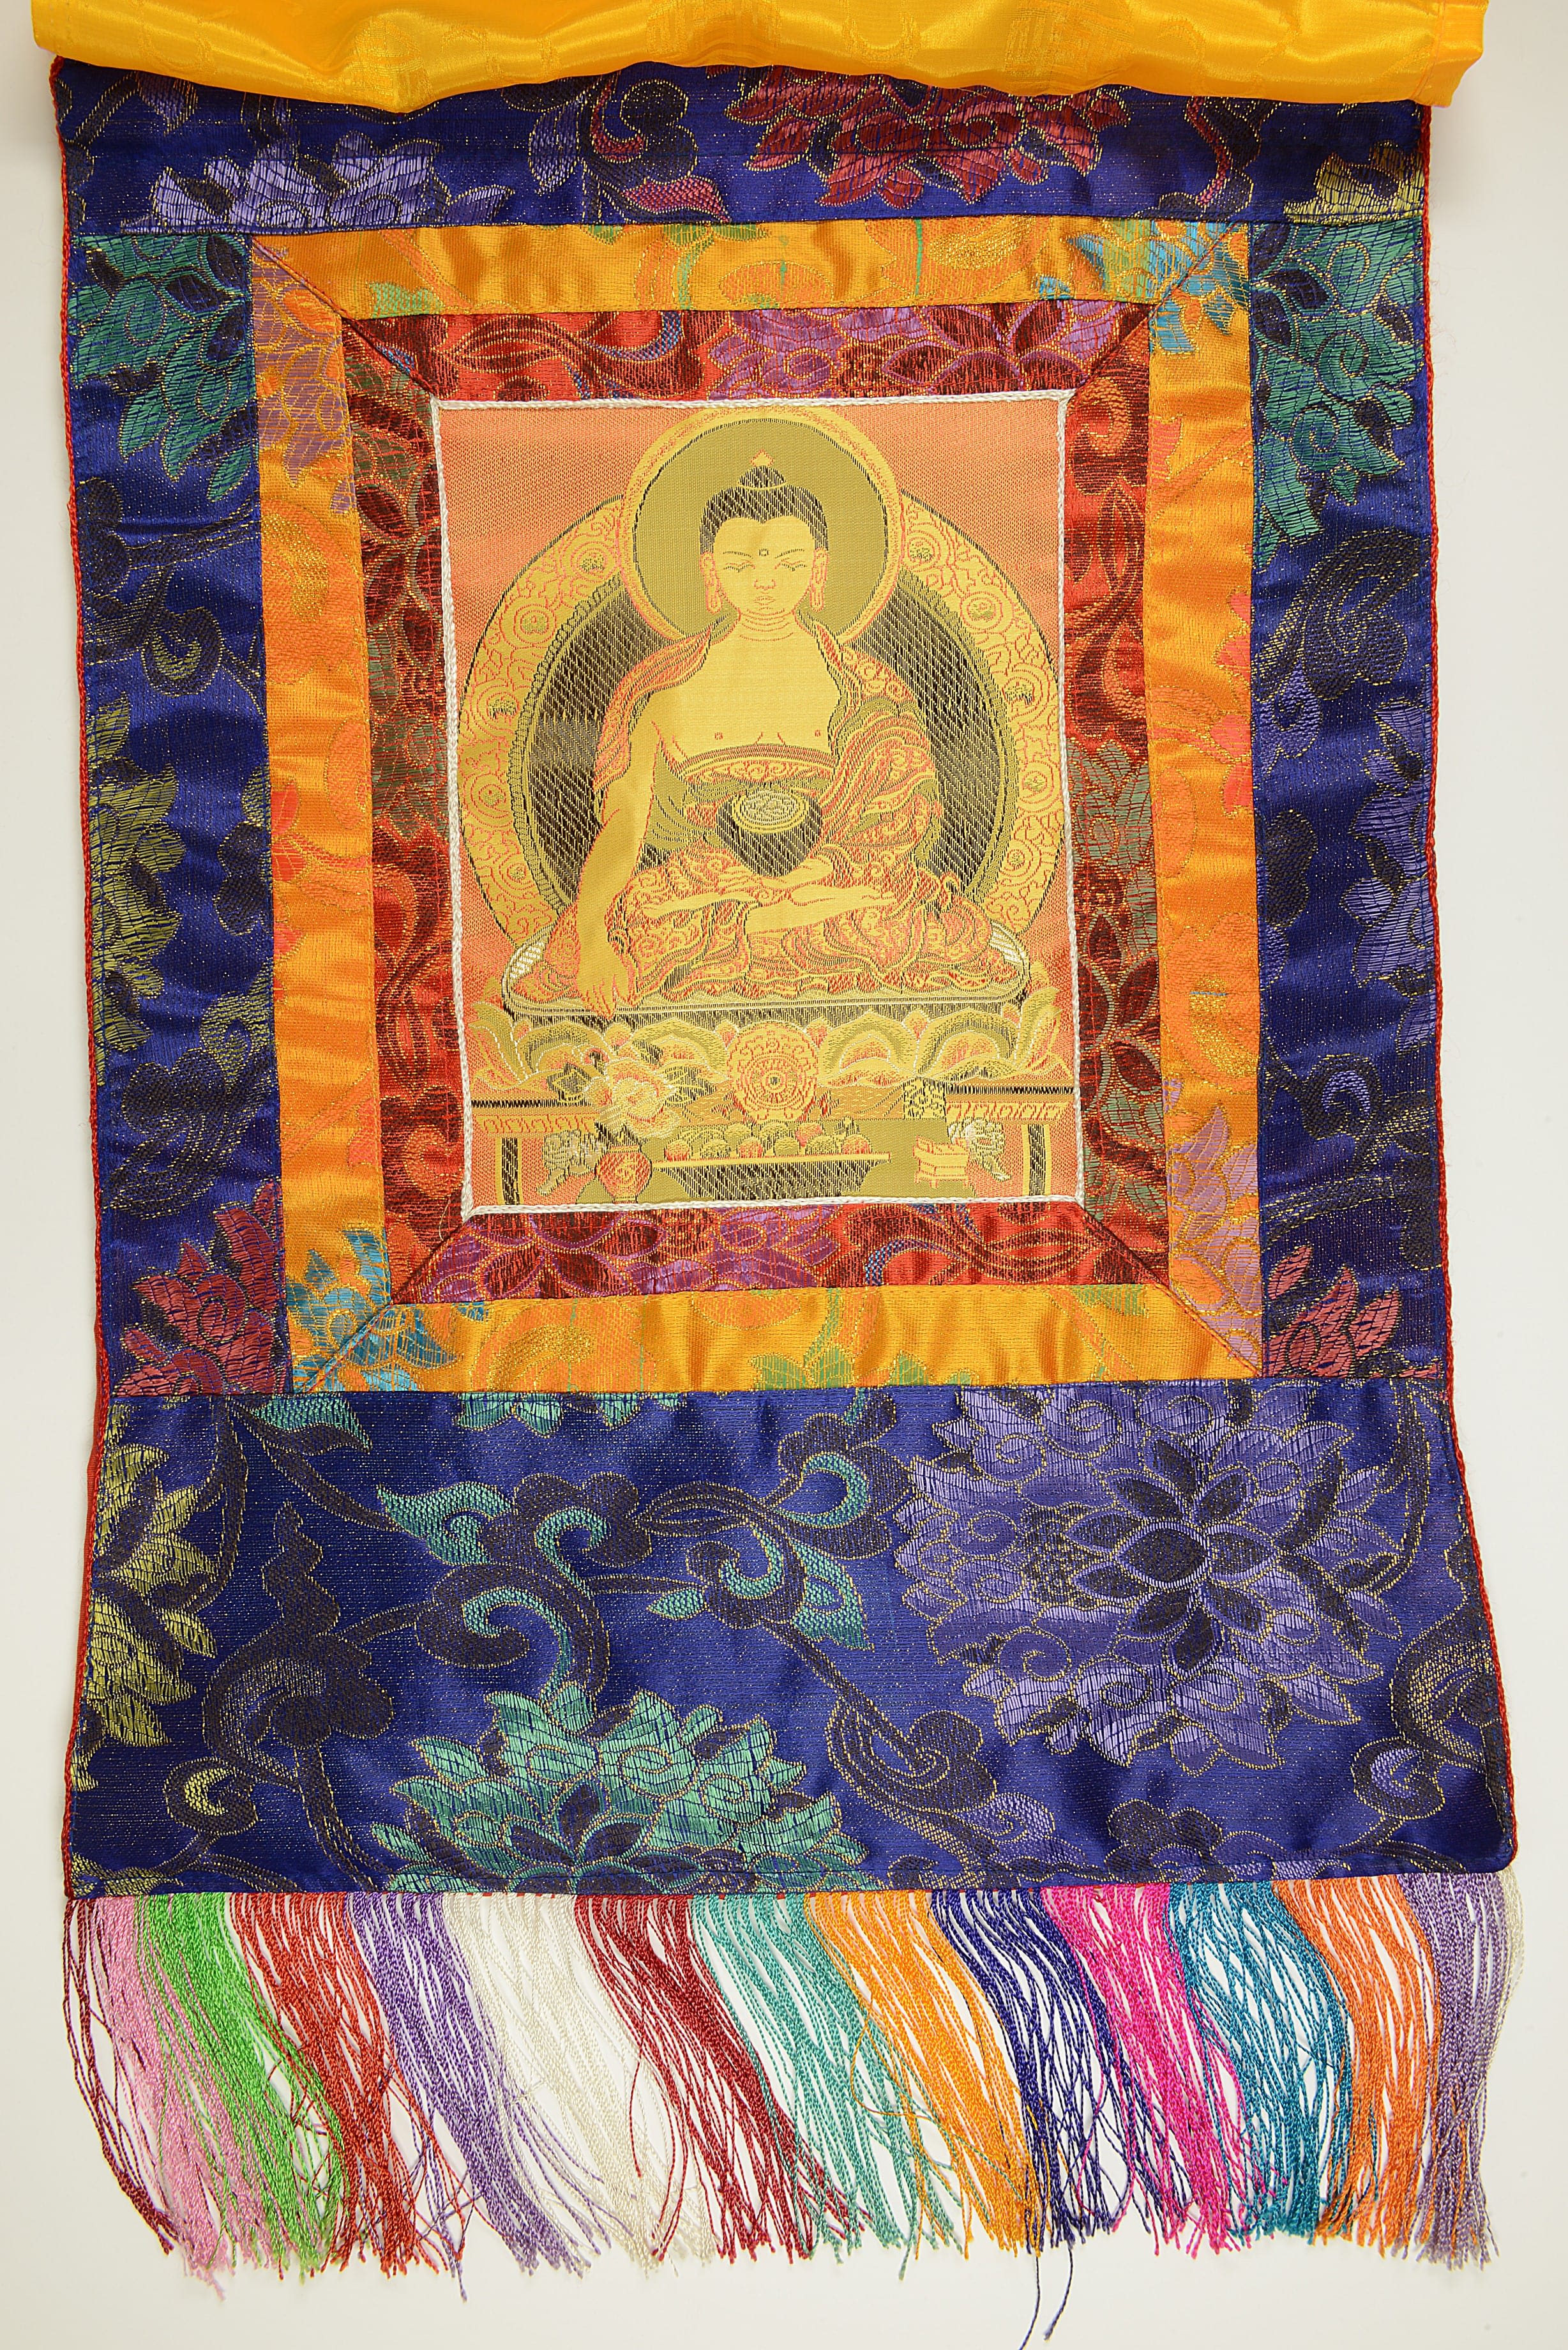
Modern machine-made devotional thangka created using synthetic materials. The small size and light weight makes this an ideal choice for travellers as a souvenir in contrast with a traditional thangka which were usually much larger in size and made using more expensive and fragile materials such as silk and paper. DUROM.2015.257
Modern machine-made devotional thangka created using synthetic materials. The small size and light weight makes this an ideal choice for travellers as a souvenir in contrast with a traditional thangka which were usually much larger in size and made using more expensive and fragile materials such as silk and paper. DUROM.2015.257
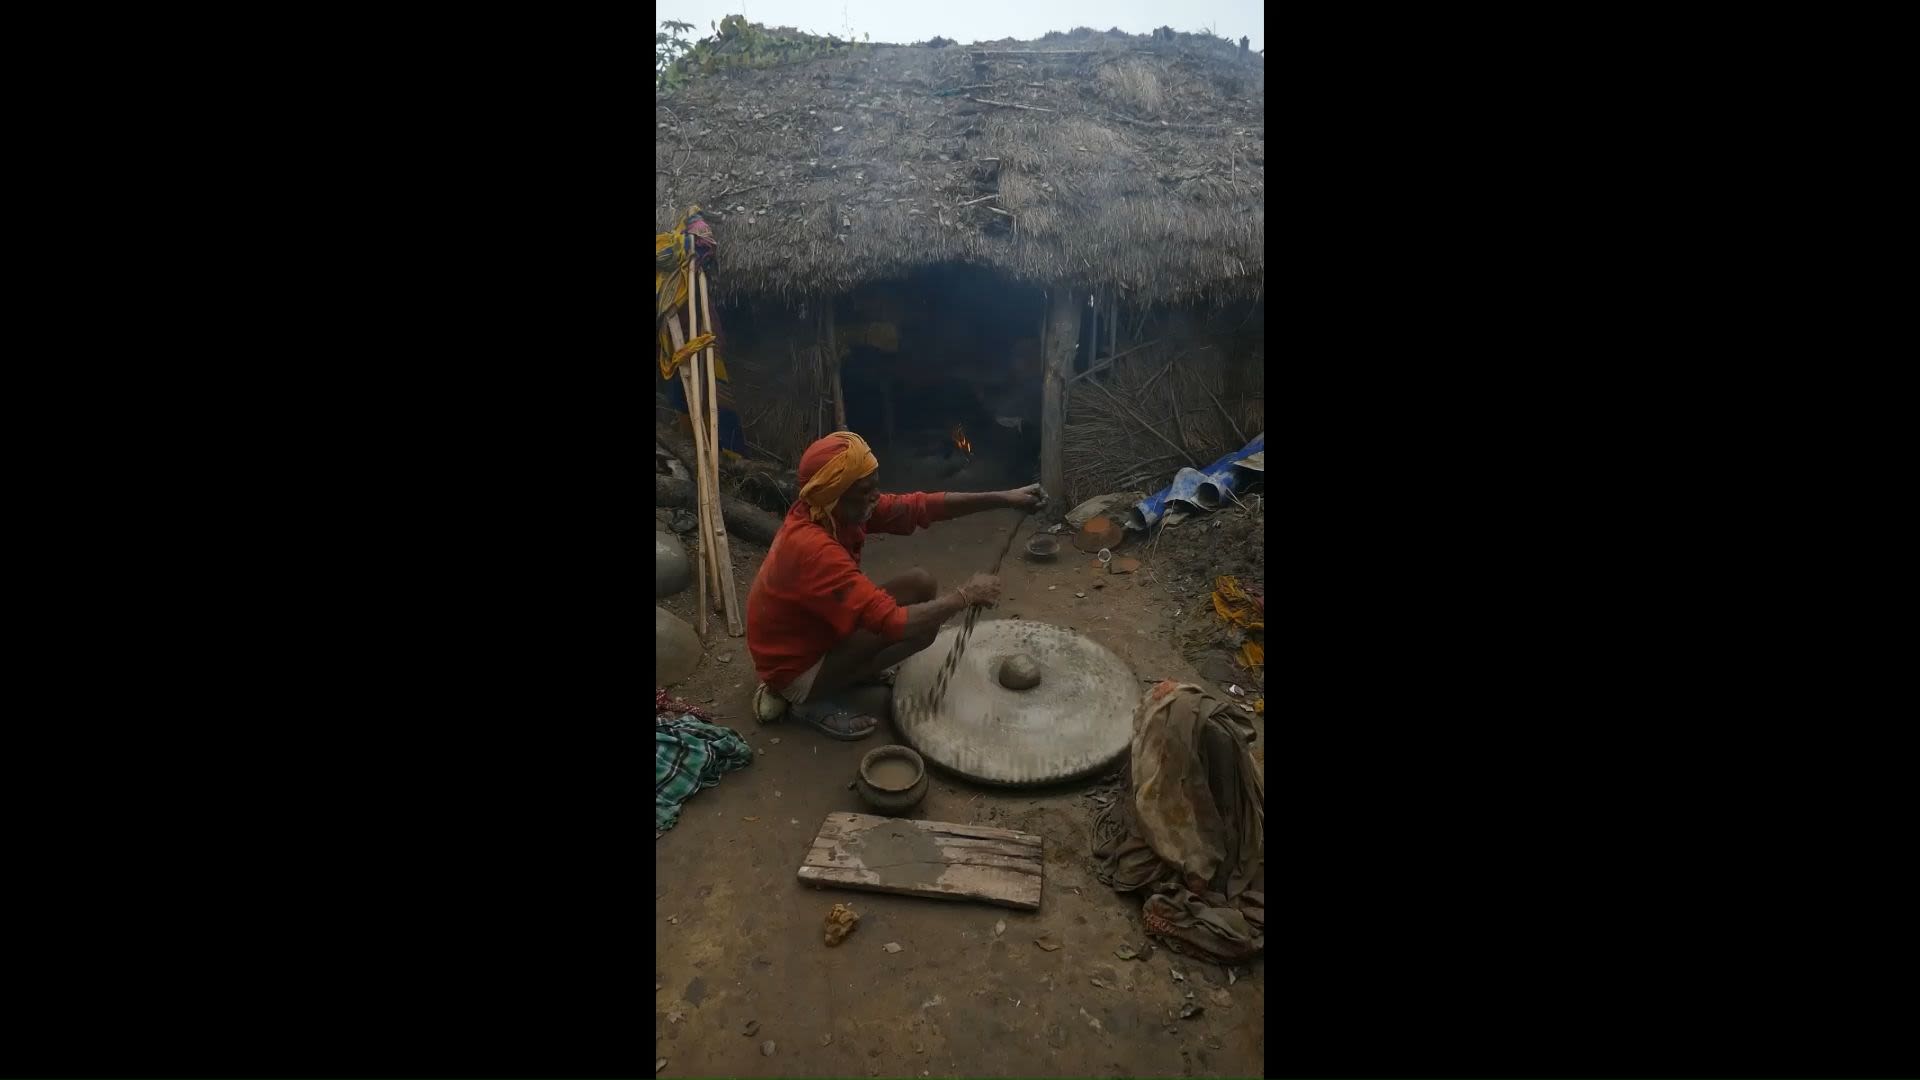
Rangi Lal Parjapati producing ceramic pots in 2020. Durham UNESCO Chair
Rangi Lal Parjapati producing ceramic pots in 2020. Durham UNESCO Chair
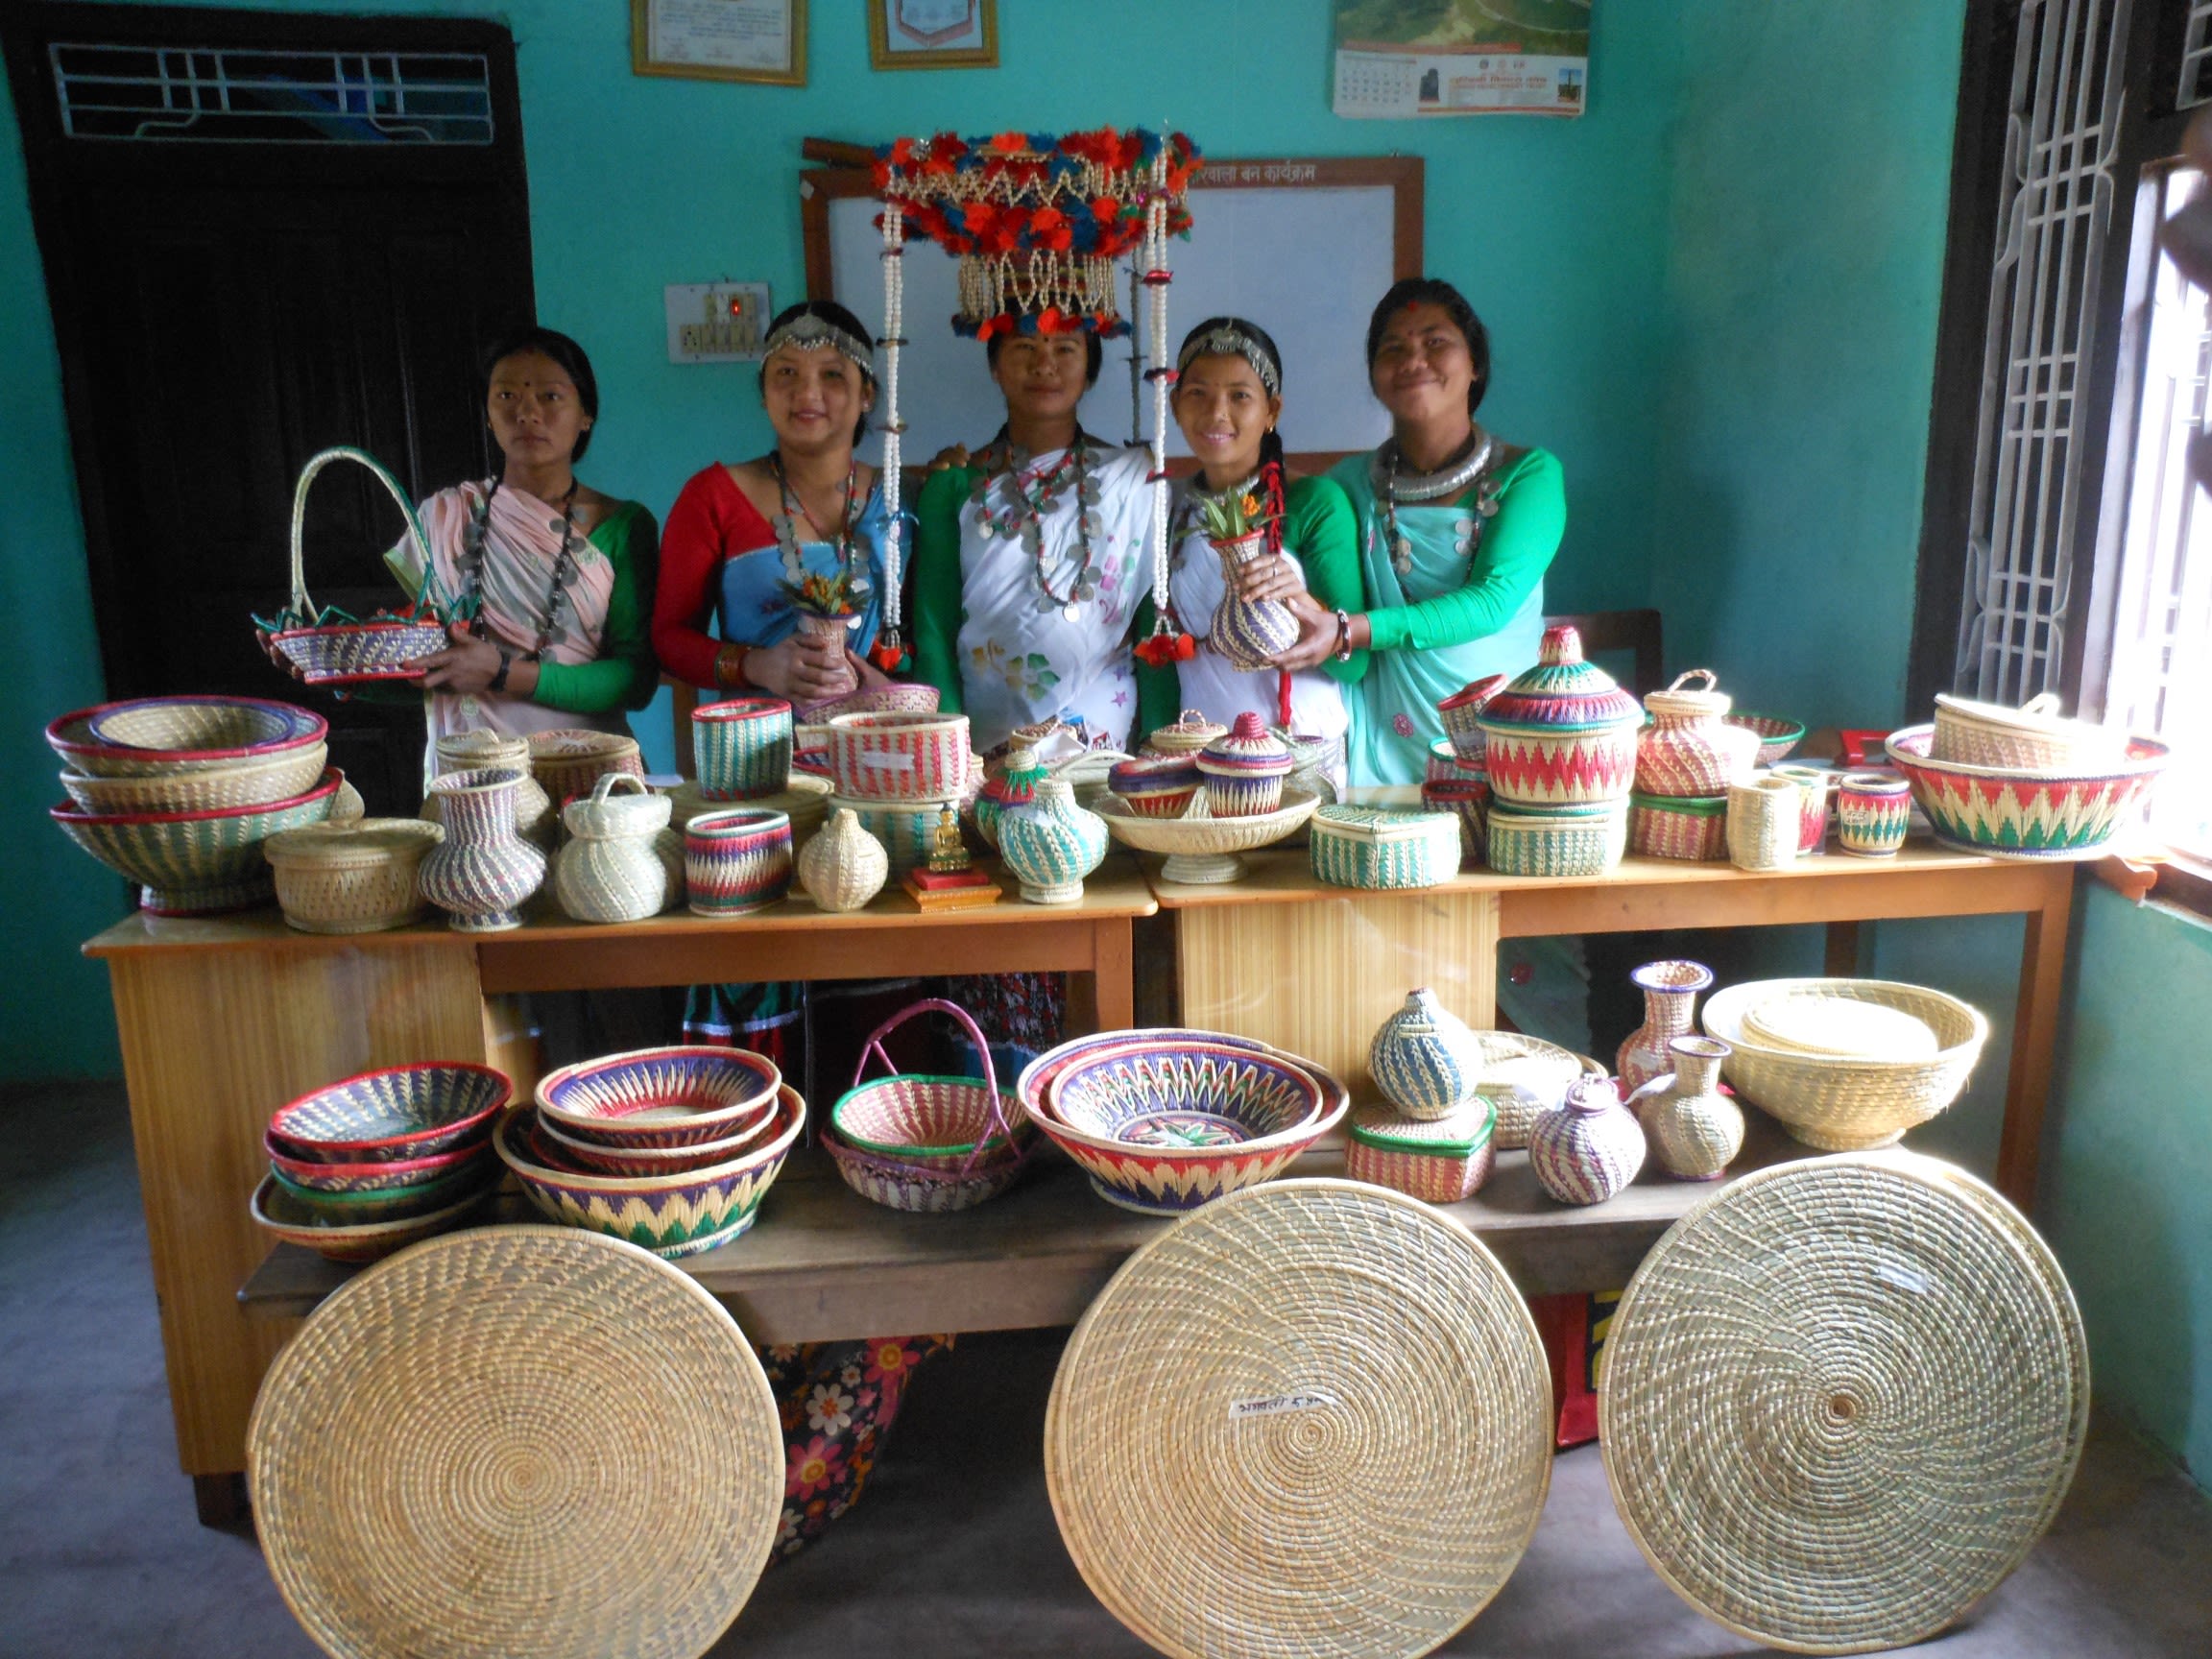
Members of the Hariyali Hastakala Women’s Co-operative with handicrafts they have produced in 2017. Durham UNESCO Chair
Members of the Hariyali Hastakala Women’s Co-operative with handicrafts they have produced in 2017. Durham UNESCO Chair

Modern terracotta elephant modelled and fired by Rangi Lal Parjapati in 2018. Loan, Durham UNESCO Chair
Modern terracotta elephant modelled and fired by Rangi Lal Parjapati in 2018. Loan, Durham UNESCO Chair

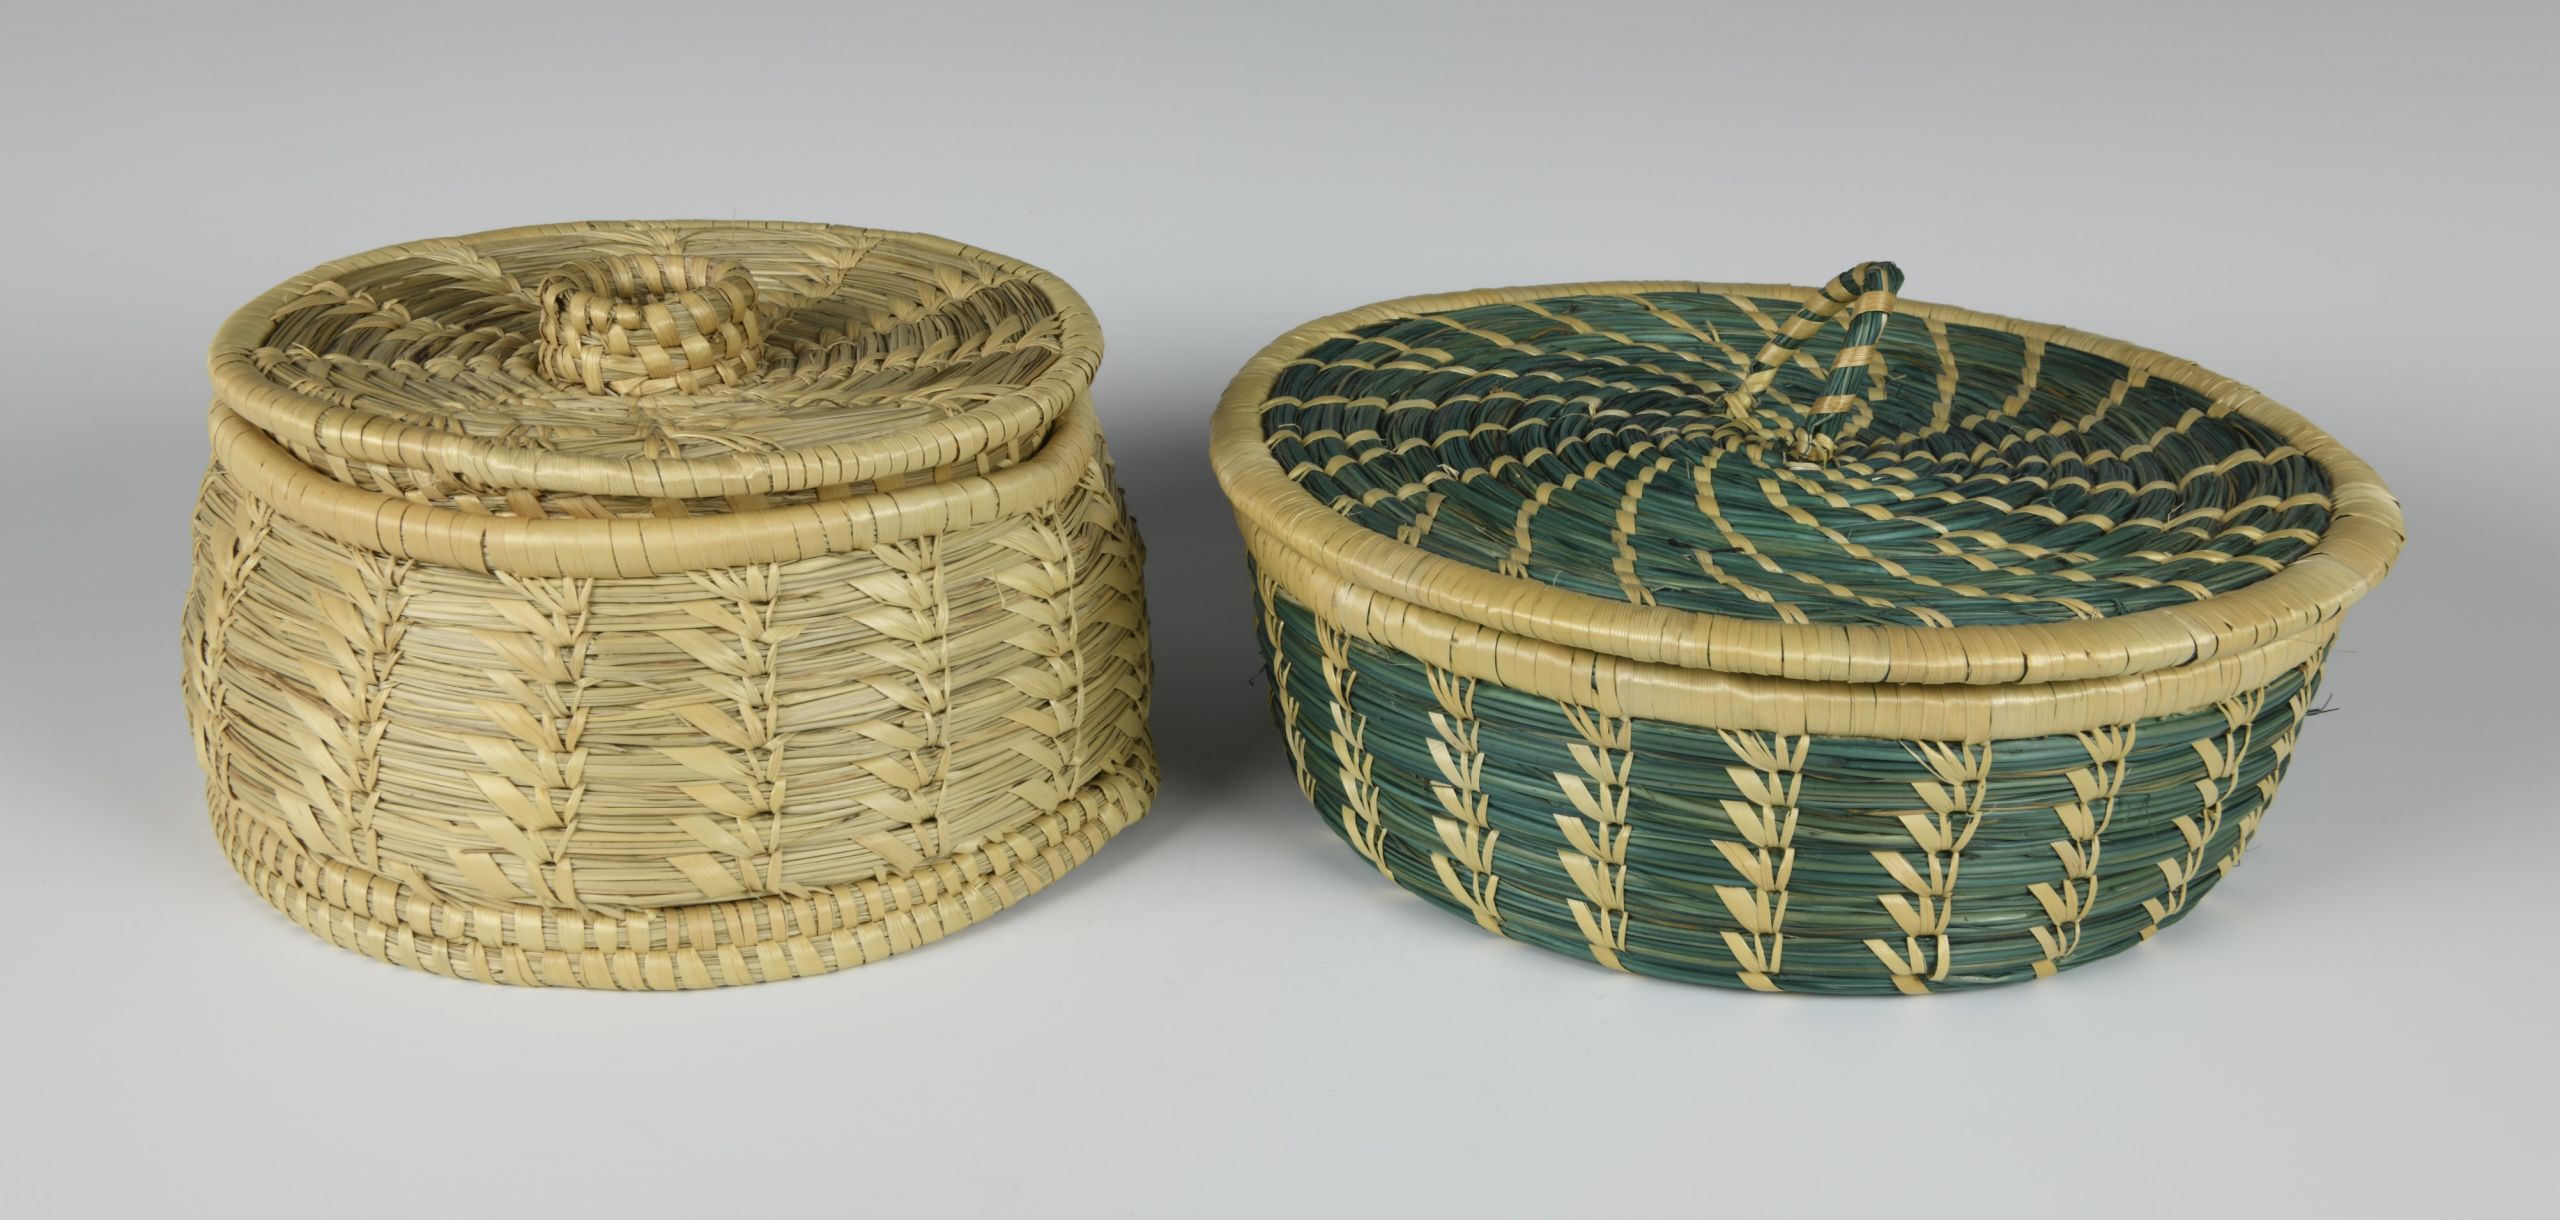
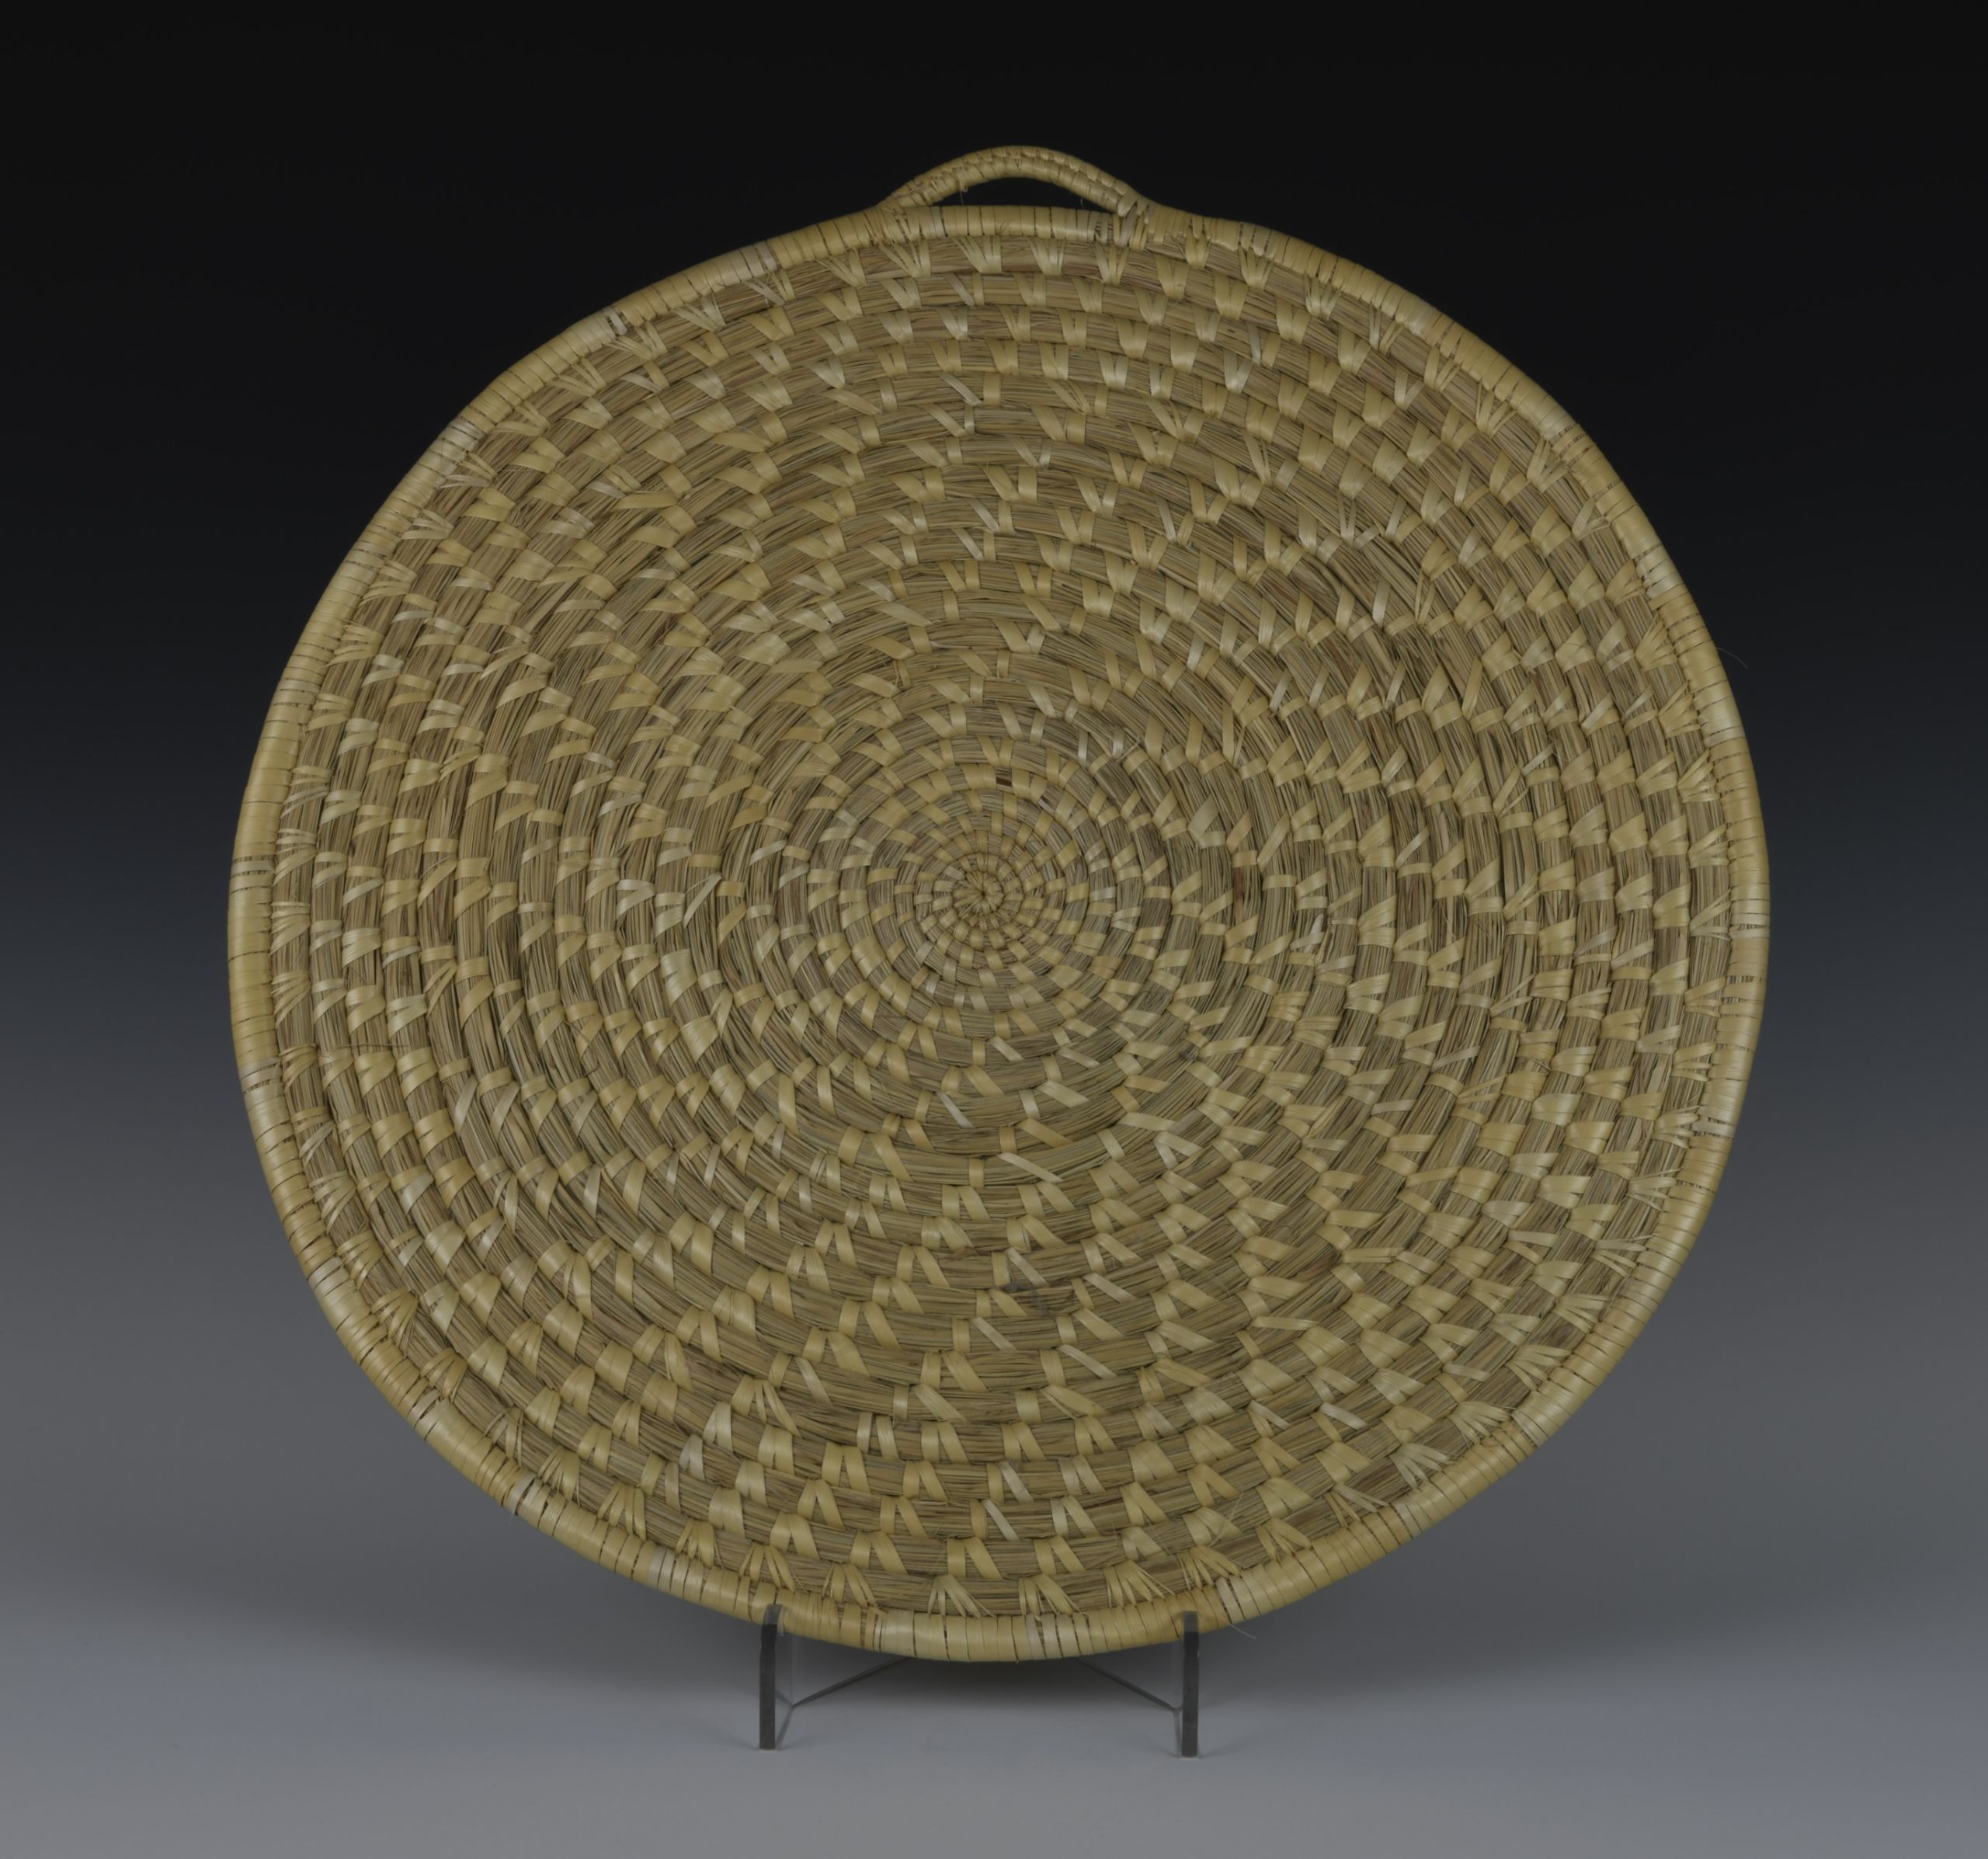
Grass baskets woven by the Hariyali Hastakala Women’s Co-operative in 2020, traditional artisans living close to the archaeological site of Tilaurakot, Nepal. Loan, Durham UNESCO Chair
Grass baskets woven by the Hariyali Hastakala Women’s Co-operative in 2020, traditional artisans living close to the archaeological site of Tilaurakot, Nepal. Loan, Durham UNESCO Chair

Grass mat woven by the Hariyali Hastakala Women’s Co-operative in 2020, traditional artisans living close to the archaeological site of Tilaurakot, Nepal. Loan, Durham UNESCO Chair
Grass mat woven by the Hariyali Hastakala Women’s Co-operative in 2020, traditional artisans living close to the archaeological site of Tilaurakot, Nepal. Loan, Durham UNESCO Chair

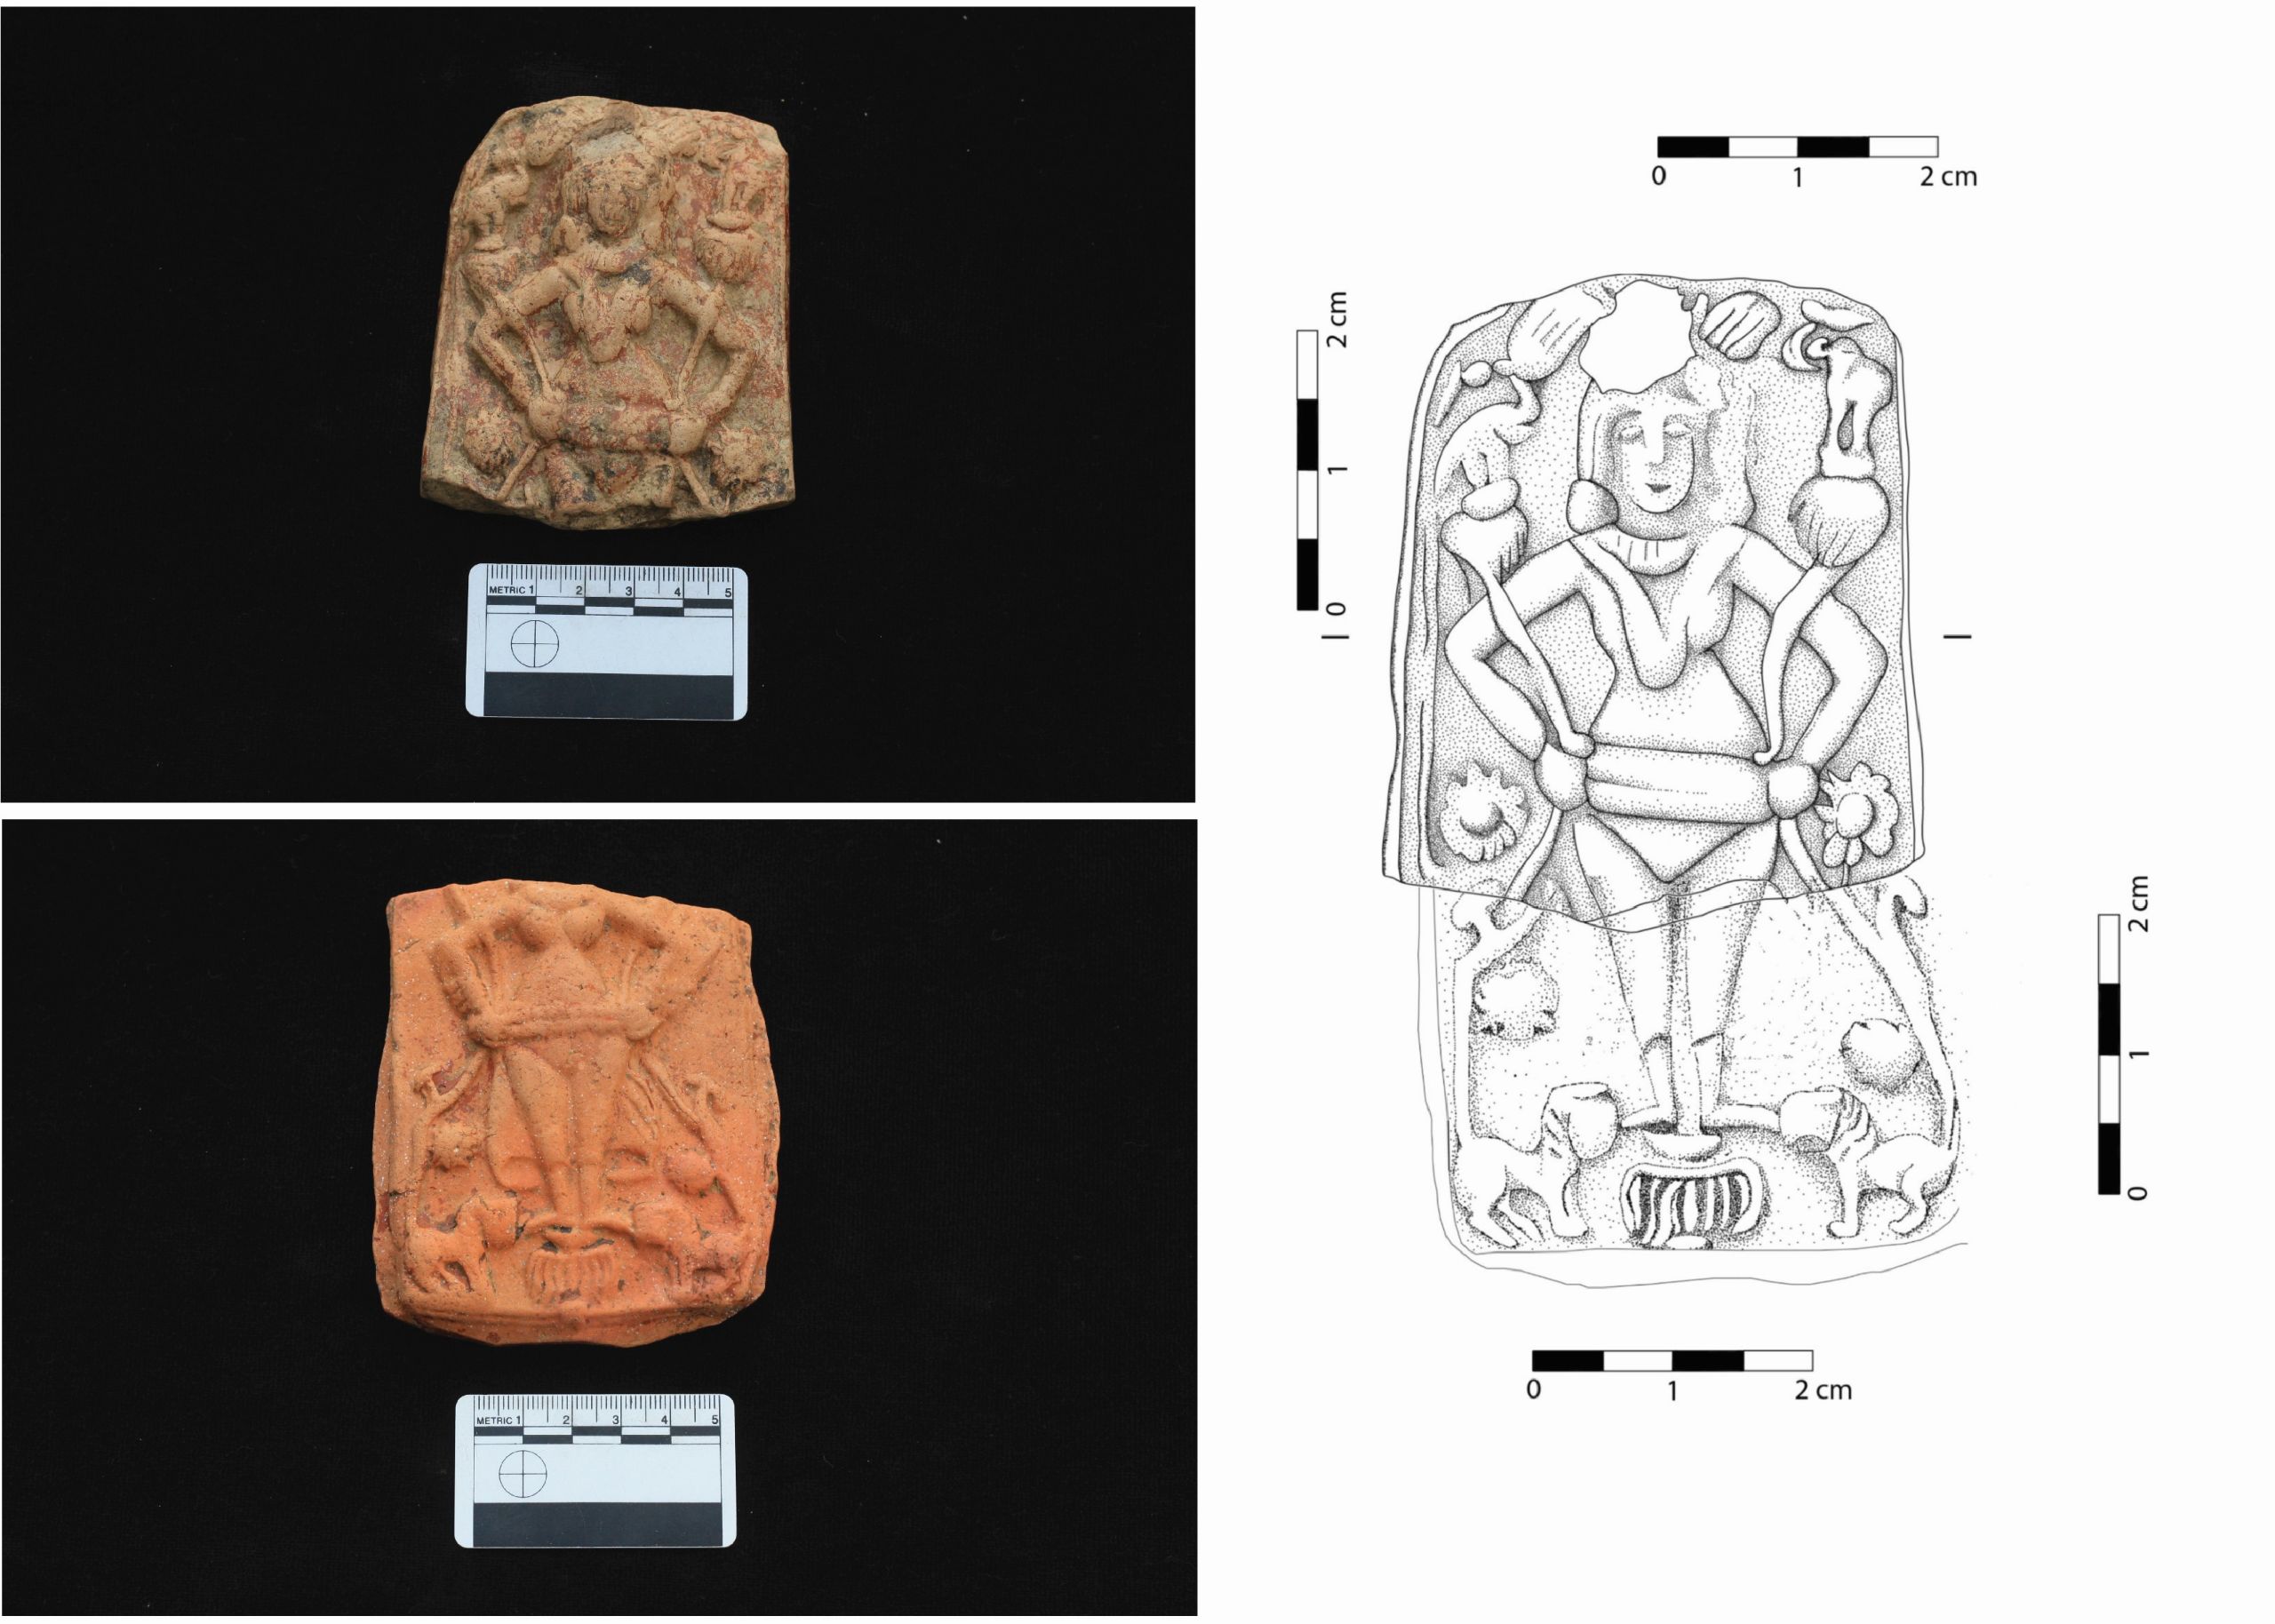
These terracotta plaques of Gaja Lakshmi, the goddess of wealth and fortune, date from the first or second century BCE. They were recently excavated during UNESCO-sponsored excavations at the ancient city of Tilaurakot, Nepal, led by the Department of Archaeology (Government of Nepal), Lumbini Development Trust, Tribhuvan University and Durham University. A composite drawing developed from the two objects (right) inspired local artisans to create moulds for new plaques for sale to pilgrims and visitors. The original artefacts are on display in the Kapilavastu Museum at Tilaurakot, Nepal. Excavation numbers: SF383 top left, SF240 bottom left. Durham UNESCO Chair
These terracotta plaques of Gaja Lakshmi, the goddess of wealth and fortune, date from the first or second century BCE. They were recently excavated during UNESCO-sponsored excavations at the ancient city of Tilaurakot, Nepal, led by the Department of Archaeology (Government of Nepal), Lumbini Development Trust, Tribhuvan University and Durham University. A composite drawing developed from the two objects (right) inspired local artisans to create moulds for new plaques for sale to pilgrims and visitors. The original artefacts are on display in the Kapilavastu Museum at Tilaurakot, Nepal. Excavation numbers: SF383 top left, SF240 bottom left. Durham UNESCO Chair

Modern painted Gaja Lakshmi plaque cast in gypsum in 2020 by Sunil Kumar Tiwari, one of Taulihawa’s traditional artisans. Durham UNESCO Chair
Modern painted Gaja Lakshmi plaque cast in gypsum in 2020 by Sunil Kumar Tiwari, one of Taulihawa’s traditional artisans. Durham UNESCO Chair
Modern stone carver in Taxila, courtesy of Dr Abdul Azeem
Modern stone carver in Taxila, courtesy of Dr Abdul Azeem
Acknowledgements
This exhibition was co-designed by Dr Abdul Azeem, Director-General of the Department of Archaeology and Museums, Government of Pakistan; UNESCO Prof Robin Coningham and Dr Christopher Davis, Department of Archaeology, Durham University; Ms Rachel Barclay, Curator of the Oriental Museum, Durham University; and Dr Craig Barclay, Head of Museums, Galleries and Exhibitions, Durham University. The online version was designed by Mr David Wright of Durham University Library and Collections.
We are very grateful to Arts Council England, Durham University and the Arts and Humanities Research Council for their financial sponsorship and to Durham University for support from the Oriental Museum, Department of Archaeology, International Office, Institute of Medieval and Early Modern Studies (IMEMS), Archives and Special Collections, and Residential Research Library.
The exhibition, and the research documented by it, would not have been possible without the support of the following institutions: the Department of Archaeology and Museums, Federal Government of Pakistan; University of Peshawar; Taxila Institute of Asian Civilizations, Quaid-i-Azam University; Arts and Humanities Research Council, UK and the Indian Council for Historical Research; Maharaja Sayajirao University of Baroda; Archaeological Survey of India; Union Christian College, Kerala; Department of Archaeology, Government of Nepal; Lumbini Development Trust, Government of Nepal; Liberal Arts University of Bangladesh; and UNESCO.
We are equally grateful to the following individuals for their assistance: Mr Shafqat Mehmood, Minister for Education, National History and Culture Division, Government of Pakistan; Mr Asif Hyder Shah, Secretary, National History and Culture Division, Government of Pakistan; Prof Muhammad Ashraf Khan; Dr Kamal Badreshany; Prof K. Krishnan; Dr Sanjay Kumar Manjul; Dr Jenee Peter; Mr Kosh Prasad Acharya; Prof Prishanta Gunawardhana; Prof Shahnaj Jahan; Dr Jennifer Tremblay-Fitton; Dr Tom Fitton; Dr Mark Manuel; Ms Sofia Turk; Dr Majid Sheikh; Mr Arslan Butt; Dr Anouk Lafortune-Bernard; Ms Brijeshwari Kumari Gohil; Ms Sophie Pinto; Ms Iris Mo; and Mr Madhav Acharya.
Dr Abdul Azeem, Dr Zahra Hussain, Mr Ira Block, Mr Kai Weise and Durham’s UNESCO Chair in Archaeological Ethics and Practice in Cultural Heritage kindly agreed for their images to be displayed. In addition, we are grateful to artisans Mr Rang Lal Prajapati, Mr Sunil Kumar Tiwari and the members of the Hariyali Hastkala Women’s Co-operative.
The Urdu translation was kindly prepared by Eldon Bureau Translation and Interpreting.